This article is translated from the Japanese article below.
https://qiita.com/tomotagwork/items/aac10ad84fe83d88bb5f
(google translate was used.)
Introduction
COBOL, PL/I, and Asembler are often used as application development languages for CICS Transaction Server for z/OS, but Java has also been supported for a long time. This means that you can write CICS applications in Java. A Java class library (JCICS) equivalent to the EXEC CICS command is provided, so you can use Java methods to perform operations such as EXEC CICS LINK or EXEC CICS START.
Here, we will try to actually run the sample CICS-Java application(OSGi compliant).
Related articles
Running CICS-Java application - (1) Simple application
Running CICS-Java application - (2) Build management with Maven
Running CICS-Java application - (3) Build management with Gradle
Running CICS-Java application - (4) Spring Boot Application
Running CICS-Java application - (5) Using JCICSX
Environment
Development Environment (PC)
Windows10
CICS Explorer V5.6(Beta)
Runtime Environment (CICS)
z/OS V2.4
CICS Transaction Server for z/OS V5.6(Beta)
About Java support for CICS
Here's a summary of CICS's Java support.
CICS supports OSGi-compliant Java applications.
To run a CICS application implemented in Java, the following procedure is required.
Runtime preparation
To execute a Java application, create a resource definition called JVMSERVER in the target CICS region and prepare a Java execution environment.
Application Development
You can use the free Eclipse-based tool "CICS Explorer" for CICS-Java application development.
You can create a Java app that imports the JCICS library and package it in the form of an OSGi bundle (like an extension of a jar). At this time, the first logic that you want to be recognized as a CICS program needs to be implemented in the main function.
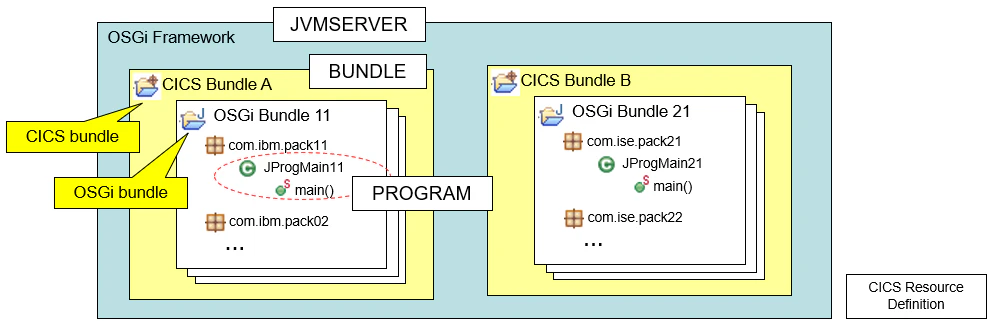
Package some OSGi Bundles in units called "CICS bundles".
- Liberty can also be run on CICS, and Java EE apps can also be run on Liberty on CICS. In that case, Java EE apps are packaged in units of WAR and EAR, but the idea of packaging them in units called "CICS bundles" is the same.
Deploy
Transfer the CICS bundle onto USS on z/OS in the runtime environment.
Create a BUNDLE definition in the resource definition of the CICS region to recognize the CICS bundle (Java app) transferred on the USS.
Create a PROGRAM definition in the resource definition of the CICS region and register the Java classes included in BUNDLE as a CICS program.
The relationship between each CICS resource definition and the entity is as follows.
Preparation
Development environment
Download and set up an Eclipse-based tool called CICS Explorer, referring to the following areas.
Reference: Downloading and starting CICS Explorer
- This tool is free of charge for CICS users.
As a host connection definition, configure an FTP connection for the z/OS running the target CICS.

Runtime environment
Prepare a CICS region to run the sample. For now, we'll use a region named CT56B4A1. Add a resource called JVMServer to run Java applications.
JVM Profile
Prepare the JVM profile on USS. (Properties for the JVMServer are effectively specified in a file on this USS. The JVMSERVER resource definition points to the filename of this JVM profile.) A sample is provided, so copy it and use it.
Create a directory /var/cicsts/cicsts56/CT56B4A1/JVMProfiles and copy /usr/lpp/cicsts/cicsts56/JVMProfiles/DFHOSGI.jvmprofile(sample definition for OSGi located under the CICS installation directory) to it. Customize as appropriate for your environment.
JAVA_HOME=/usr/lpp/java/J8.0_64/
WORK_DIR=/var/cicsts/cicsts56/CT56B4A1/work
-Xms32M
-Xmx256M
-Xmso1M
-Xgcpolicy:gencon
-Xscmx256M
-Xshareclasses:name=cicsts%g,groupAccess,nonfatal
-Xtune:virtualized
-Dcom.ibm.tools.attach.enable=no
_BPXK_DISABLE_SHLIB=YES
SIT
Specify the directory where the above properties file is located in the SIT parameter "JVMPROFILEDIR".
JVMPROFILEDIR=/var/cicsts/cicsts56/CT56B4A1/JVMProfiles
Restart the region for the changes to be enabled.
JVMSERVER definition
Prepare the JVMSERVER resource definition.
Copy the JVMSERVER definition "DFHJVMS" in the product-provided group called DFH$OSGI to an appropriate group and install it.
OBJECT CHARACTERISTICS                                    CICS RELEASE = 0730
 CEDA  View JVmserver( DFHJVMS  )
  JVmserver      : DFHJVMS
  Group          : TAG$OSGI
  DEScription    : CICS JVM server to run OSGi samples
  Status         : Enabled            Enabled | Disabled
  Jvmprofile     : DFHOSGI                                        (Mixed Case)
  Lerunopts      : DFHAXRO
  Threadlimit    : 015                1-256
 DEFINITION SIGNATURE
  DEFinetime     : 06/02/20 17:28:17
  CHANGETime     : 06/02/20 17:28:17
  CHANGEUsrid    : CICSUSER
  CHANGEAGEnt    : CSDApi             CSDApi | CSDBatch
  CHANGEAGRel    : 0730
*Jvmprofile: DFHOSGI means that the file DFHOSGI.jvmprofile under the directory specified in JVMPROFILEDIR of SIT is used as the JVM property file.
It is OK if it is enabled by checking with CEMT I JVMSERVER.
I JVMS
STATUS:  RESULTS - OVERTYPE TO MODIFY
 Jvm(DFHJVMS ) Ena     Prf(DFHOSGI ) Ler(DFHAXRO )
    Threadc(000) Threadl( 015 ) Cur(9965280)
Directory for bundle file placement
Create a directory on USS to place the bundle file.
Here, we will create a directory called /var/cicsts/cicsts56/CT56B4A1/bundles/.
Running sample application
Reference: [Java samples: JCICS examples] (https://www.ibm.com/docs/en/cics-ts/5.6?topic=samples-java-jcics-examples)
Creating a sample project
Select "Window" - "Preferences" from the CICS Explorer menu to open the Preferences window.
Select "Plug-in Development" - "Target Platform" and click Add button.

Select the target CICS version in the template. Here, select CICS TS V5.6.
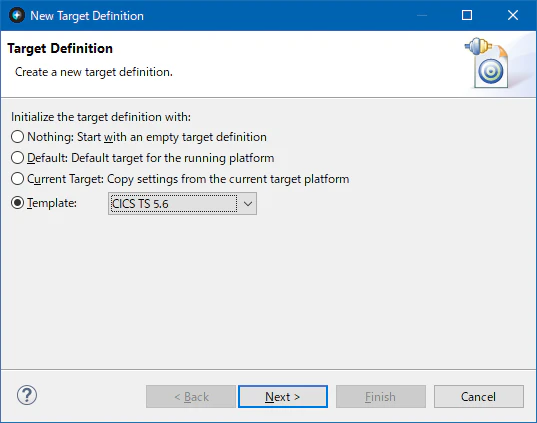
Check the added CICS TS 5.6 and apply .

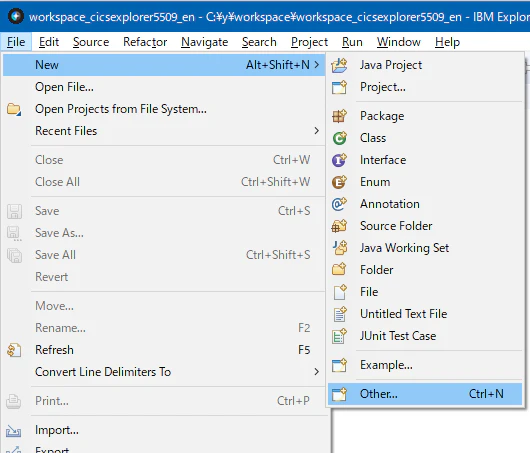
In the Java perspective, select "File"-"New"-"Other" from the menu.
Select "CICS Bundle OSGi Example"
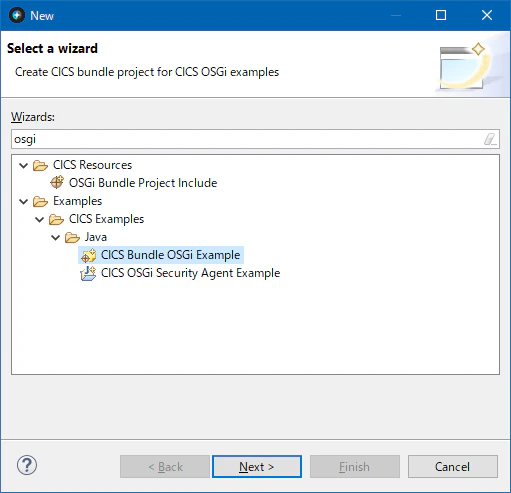
"Next"

"Finish"
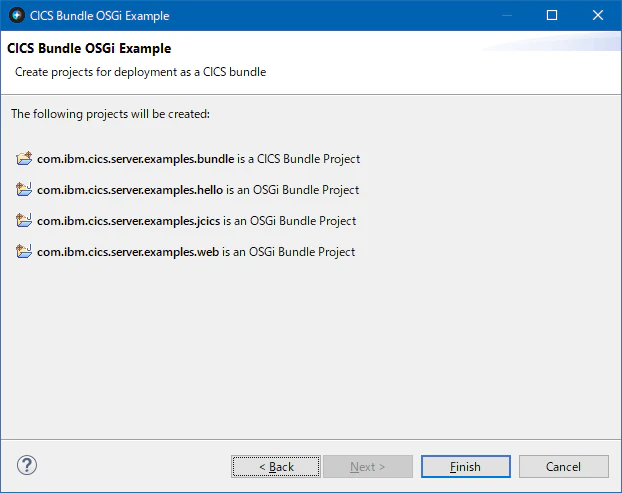
Sample projects are created.

Check the contents of the sample
This project provides some sample apps, so let's take a look at the simplest Hello World source examples.hello.HelloCICSWorld.java included in the com.ibm.cics.server.examples.hello project (OSGi bundle).
package examples.hello;

import com.ibm.cics.server.CommAreaHolder;
import com.ibm.cics.server.Task;

public class HelloCICSWorld
{
    public static void main(CommAreaHolder CAH)
    {
        Task t = Task.getTask();
        if ( t == null )
            System.err.println("HelloCICSWorld example: Can't get Task");
        else
            t.out.println("Hello from a Java CICS application");
    }
}
JCICS API com.ibm.cics.server.Task is used. Task.out means PrintWriter for terminal output, so it is the logic to send a simple character string to the terminal.
Reference: [Javadoc - Task] (https://www.ibm.com/docs/en/cics-ts/5.6?topic=SSGMCP_5.6.0/reference-javadocs/jcics-javadoc/com/ibm/cics/server/Task.html#%20out)
Let's check META-INF/MANIFEST.MF of the same project.
Manifest-Version: 1.0
Bundle-ManifestVersion: 2
Bundle-Name: Hello Plug-in
Bundle-SymbolicName: com.ibm.cics.server.examples.hello
Bundle-Version: 1.0.0
Bundle-RequiredExecutionEnvironment: J2SE-1.4,
 J2SE-1.5,
 JavaSE-1.6
Import-Package: com.ibm.cics.server;version="[1.0.0,2.0.0)"
CICS-MainClass: examples.hello.HelloCICSWorld, examples.hello.HelloWorld
The CICS-MainClass specifies a class that has a main method. The main method of the class specified here can be recognized as a CICS program (it can be defined as a program definition).
Check the CICS bundle project com.ibm.cics.server.examples.bundle.
When you open META-INF/cics.xml in the CICS Bundle Manifest Editor, you can see that it contains the OSGi bundle above.

Open com.ibm.cics.server.examples.hello.osgibundle.
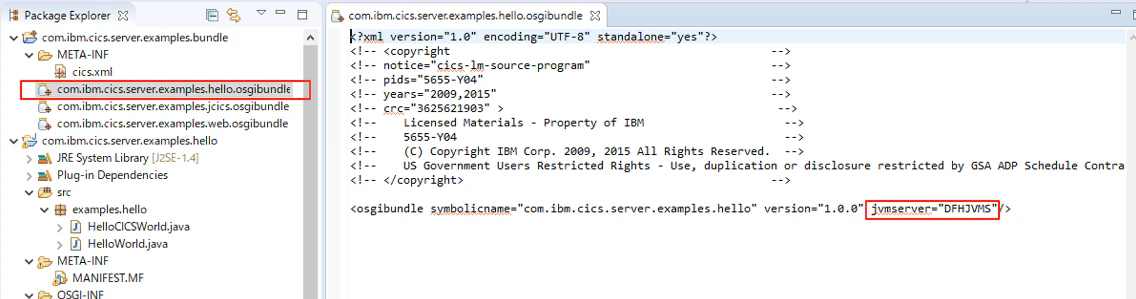
Check the value of jvmserver specified here. You must specify the name of the JVMSERVER definition you want to run here. Modify it according to the name of the JVMSERVER definition created in the preparation. If you copy the sample definition with the same name, it will be DFHJVMS, so you do not need to change it.
Deploy application to CICS
Deploy to CICS in units of "CICS bundles".
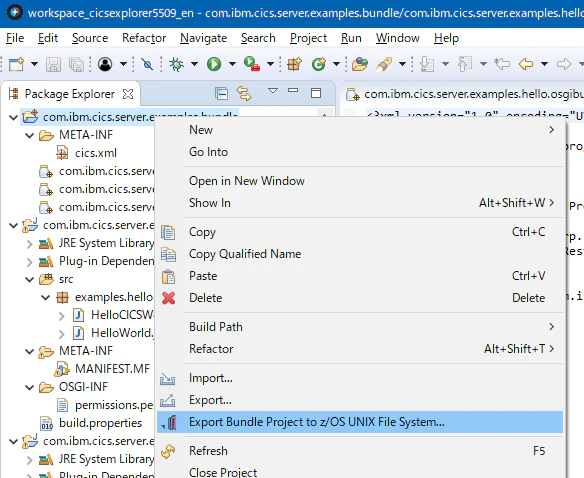
Right-click the com.ibm.cics.server.examples.bundle project and click "Export Bundle Project to z/OS UNIX File System".
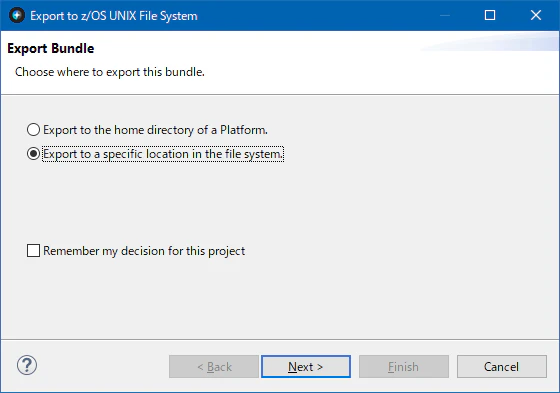
Select "Export to a specific location in the file system" and click "Next".
Specify the directory for bundle file placement created earlier and click "Finish".

Check the messages.

The bundle file has been placed on USS.
Copy each resource in the CICS-supplied DFH$OSGI group to the appropriate group.
Customize the BUNDLE definition "DFH$OSGB" and set the BUNDLEDIR value to the directory where you placed the bundle files above (Replace with /var/cicsts/cicsts56/CT56B4A1/bundles/com.ibm.cics.server.examples.bundle_1.0.0).
OVERTYPE TO MODIFY                                        CICS RELEASE = 0730
 CEDA  ALter Bundle( DFH$OSGB )
  Bundle         : DFH$OSGB
  Group          : TAG$OSGI
  DEScription  ==> CICS bundle containing OSGi sample bundles
  Status       ==> Enabled            Enabled | Disabled
  BUndledir    ==> /var/cicsts/cicsts56/CT56B4A1/bundles/com.ibm.cics.server.
  (Mixed Case) ==> examples.bundle_1.0.0
               ==>
               ==>
               ==>
  BAsescope    ==>
  (Mixed Case) ==>
               ==>
               ==>
               ==>
 DEFINITION SIGNATURE
  DEFinetime     : 06/02/20 18:27:37
  CHANGETime     : 06/02/20 18:27:37
Install it and make sure it is enabled.
I BUNDLE
STATUS:  RESULTS - OVERTYPE TO MODIFY
 Bun(DFH$OSGB) Ena         Par(00003) Tar(00003)
    Enabledc(00003) Bundlei(com.ibm.cics.server.exampl)
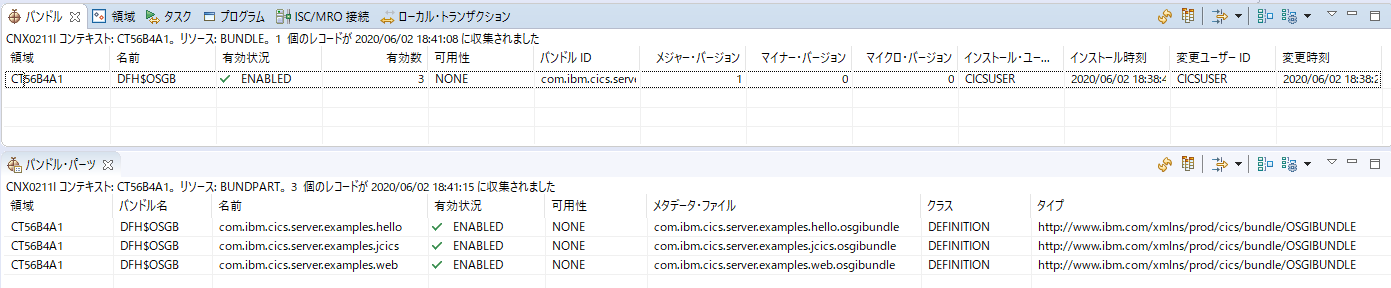
By the way, if you check the resource definition with CICS Explorer, you can check not only the BUNDLE definition but also the BUNDLE PARTS included in BUNDLE.
Running the example
Reference: Running the Hello World example
This time we will run the Hello World sample, so we will install additional resource definitions related to this sample. That is program definition "DFJ$JHE2" and the transaction definition "JHE2". The actual Java program is already installed as BUNDLE.
Both are provided in DFH$OSGI, so copy them and install them as they are.
By the way, if you take a look at the definition of DFH$JHE2,...
OBJECT CHARACTERISTICS                                    CICS RELEASE = 0730
 CEDA  View PROGram( DFJ$JHE2 )
  PROGram        : DFJ$JHE2
  Group          : TAG$OSGI
  DEScription    : OSGi Hello CICS world sample program
  Language       :                    CObol | Assembler | Le370 | C | Pli
  RELoad         : No                 No | Yes
  RESident       : No                 No | Yes
  USAge          : Normal             Normal | Transient
  USElpacopy     : No                 No | Yes
  Status         : Enabled            Enabled | Disabled
  RSl            : 00                 0-24 | Public
  CEdf           : Yes                Yes | No
  DAtalocation   : Any                Below | Any
  EXECKey        : Cics               User | Cics
  COncurrency    : Required           Quasirent | Threadsafe | Required
  Api            : Cicsapi            Cicsapi | Openapi
 REMOTE ATTRIBUTES
  DYnamic        : No                 No | Yes
  REMOTESystem   :
  REMOTEName     :
  Transid        :
  EXECUtionset   : Fullapi            Fullapi | Dplsubset
 JVM ATTRIBUTES
  JVM            : Yes                No | Yes
  JVMClass       : examples.hello.HelloCICSWorld
  (Mixed Case)   :
                 :
                 :
                 :
  JVMServer      : DFHJVMS
  JVMProfile     :                                                (Mixed Case)
 JAVA PROGRAM OBJECT ATTRIBUTES
  Hotpool        : No                 No | Yes
...
Like this, JVM: Yes, JVMClass: examples.hello.HelloCICSWorld, JVMServer: DFHJVMS are specified (classes installed by BUNDLEPARTS). * If the JVMServer name created in advance is different, please correct it accordingly.
Now that the resources have been placed, let's run them. Run "JHE2" transaction from a CICS terminal.
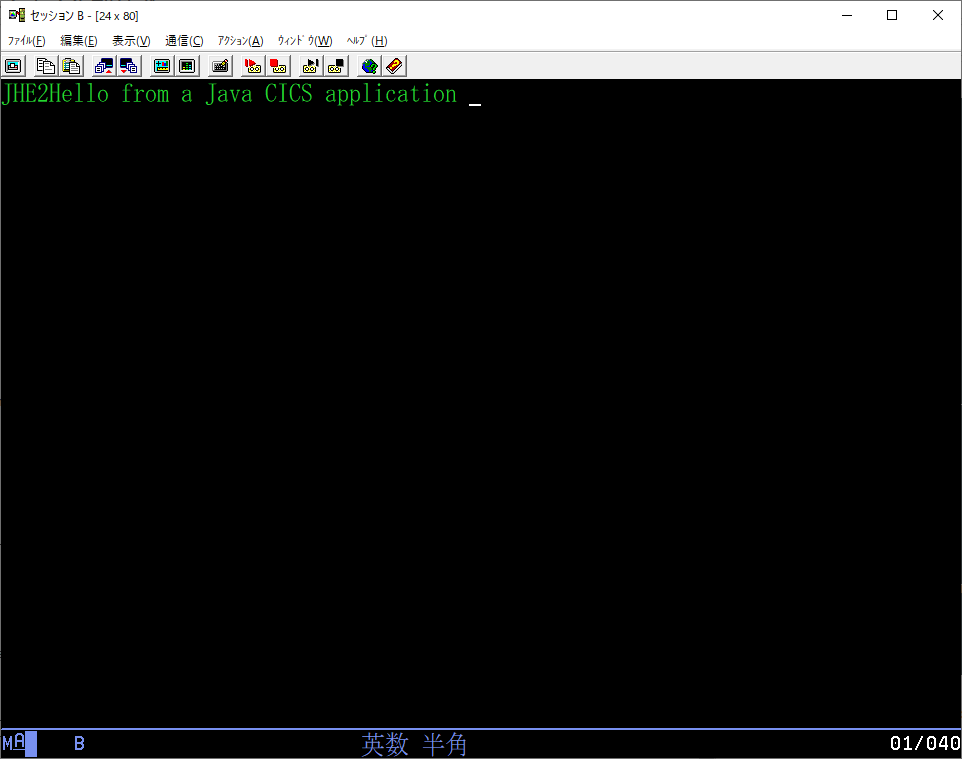
The string output from the Java program "Hello from a Java CICS application" is displayed!
This confirms that Java worked as a CICS program.