前回内容
STEP1 ネットワーク環境設定
[STEP2 EC2の設定]
(https://qiita.com/tksh8/items/9a8e88a777a3a4ee7a09#step2-ec2%E3%81%AE%E8%A8%AD%E5%AE%9A)
今回内容
[STEP3 EC2インスタンスの環境構築]
(https://qiita.com/tksh8/items/3d2f2eeaf0e8de291b6d#step3-ec2%E3%82%A4%E3%83%B3%E3%82%B9%E3%82%BF%E3%83%B3%E3%82%B9%E3%81%AE%E7%92%B0%E5%A2%83%E6%A7%8B%E7%AF%89)
[STEP4 gitとの連携、アプリのクローン]
(https://qiita.com/tksh8/items/3d2f2eeaf0e8de291b6d#step4-git%E3%81%A8%E3%81%AE%E9%80%A3%E6%90%BA%E3%82%A2%E3%83%97%E3%83%AA%E3%81%AE%E3%82%AF%E3%83%AD%E3%83%BC%E3%83%B3)
[STEP5 アプリのsecret_key_baseの設定]
(https://qiita.com/tksh8/items/3d2f2eeaf0e8de291b6d#step5-%E3%82%A2%E3%83%97%E3%83%AA%E3%81%AEsecret_key_base%E3%81%AE%E8%A8%AD%E5%AE%9A)
[STEP6 Unicornの設定]
(https://qiita.com/tksh8/items/3d2f2eeaf0e8de291b6d#step6-unicorn%E3%81%AE%E8%A8%AD%E5%AE%9A)
[STEP7 Nginxの設定]
(https://qiita.com/tksh8/items/3d2f2eeaf0e8de291b6d#step7-nginx%E3%81%AE%E8%A8%AD%E5%AE%9A)
[STEP8 マイグレーション]
(https://qiita.com/tksh8/items/3d2f2eeaf0e8de291b6d#step8-%E3%83%9E%E3%82%A4%E3%82%B0%E3%83%AC%E3%83%BC%E3%82%B7%E3%83%A7%E3%83%B3)
[STEP9 起動確認]
(https://qiita.com/tksh8/items/3d2f2eeaf0e8de291b6d#step9-%E8%B5%B7%E5%8B%95%E7%A2%BA%E8%AA%8D)
注意:
(最近の新しいmacはデフォルトがzshなので
.bash_profileのところを
.zshrcにかえてください)
STEP3 EC2インスタンスの環境構築
作成したEC2インスタンス内でrubyやその他の環境が動くよう設定していきます。
AWSにログイン
[~]$ ssh test_key_rsa

以下を入力します
[testuser@ ~]$ sudo yum install git make gcc-c++ patch openssl-devel libyaml-devel libffi-devel libicu-devel libxml2 libxslt libxml2-devel libxslt-devel zlib-devel readline-devel ImageMagick ImageMagick-devel epel-release

パスワードを聞かれるので入力します
Is this ok [y/d/N]: y

にあるので

yでEnter
MySQL 5.7 をインストール
[testuser@ ~]$ sudo rpm -ivh http://dev.mysql.com/get/mysql57-community-release-el7-11.noarch.rpm
[testuser@ ~]$ sudo yum install mysql-devel mysql57 mysql57-server
Node.jsのインストール
[testuser@ ~]$ curl -sL https://rpm.nodesource.com/setup_6.x | sudo bash -
[testuser@ ~]$ sudo yum -y install nodejs

これも確認が出てくるので、「y」→Enterをしてください。
rbenvのインストール
[testuser@ ~]$ git clone git://github.com/sstephenson/rbenv.git ~/.rbenv
[testuser@ ~]$ echo 'export PATH="$HOME/.rbenv/bin:$PATH"' >> ~/.bash_profile
[testuser@ ~]$ echo 'eval "$(rbenv init -)"' >> ~/.bash_profile
[testuser@ ~]$ source .bash_profile

- インストールしたrbenvバージョン確認
[testuser@ ~]$ rbenv --version
rbenv 1.1.2-4-g577f046
ruby-buildのインストール
(#.bash_profileの読み込み)
[testuser@ ~]$ git clone https://github.com/sstephenson/ruby-build.git ~/.rbenv/plugins/ruby-build
(#ruby-buildのインストール)
[testuser@ ~]$ rbenv rehash
rubyのインストール
- インストール可能なバージョンを確認
[testuser@ ~]$ rbenv install -l

[testuser@ ~]$ rbenv install 2.5.1
[testuser@ ~]$ rbenv global 2.5.1
[testuser@ ~]$ rbenv rehash


- インストールしたRubyのバージョン確認
- rubyのバージョンが表示されれば成功です
[testuser@ ~]$ ruby -v
ruby 2.5.1p57 (2018-03-29 revision 63029) [x86_64-linux]
STEP4 gitとの連携、アプリのクローン
アプリのクローン
作成されたアプリをgitからクローンし、EC2インスタンス内に配置していきます
vi コマンドで.gitconfigというgitに関する設定ファイルを生成します
[testuser@ ~]$ vi .gitconfig
「i」を押して編集モードにし、以下を追加します
name,emailは自分のものを入力してください
[user]
  name = your_name (#gitに登録した自分の名前)
  email = hoge@hoge.com (#git登録時の自分のメアド)

[alias] (#これはお好きに)
  a = add
  b = branch
  ch = checkout
  st = status

[color] (#色付け)
  ui = true

[url "github:"]
    InsteadOf = https://github.com/
    InsteadOf = git@github.com:
「esc」を押して終了し、
「:wq」で保存します
完了したらファイルを保存し、
アプリを配置するディレクトリを作成していきます
[testuser@ ~]$ cd /
[testuser@ ~]$ sudo chown testuser var (#varフォルダの所有者をtestuserにする)
[testuser@ ~]$ cd var
[testuser@ var]$ sudo mkdir www
[testuser@ var]$ sudo chown testuser www
[testuser@ var]$ cd www
(#wwwと同じ処理)
[testuser@ www]$ sudo mkdir rails
[testuser@ www]$ sudo chown testuser rails
gitとの接続
まずは、下記コマンドを打ち込んでください
鍵を作成、鍵名は「aws_git_rsa」、パスワードは空欄
[testuser@ www]$ cd ~
[testuser@ ~]$ chmod 700 .ssh
[testuser@ ~]$ cd .ssh
[testuser@ .ssh]$ ssh-keygen -t rsa
-----------------------------
Enter file in which to save the key ():

aws_git_rsa

(#ここでファイルの名前を記述して、エンター)

Enter passphrase (empty for no passphrase):
(#何もせずそのままエンター)

Enter same passphrase again:
(#何もせずそのままエンター)
[testuser@ .ssh]$ ls
(#「aws_git_rsa」と「aws_git_rsa.pub」が生成されたことを確認)

[testuser@.ssh]$ vi config
「i」を押して編集モードにし、以下を追加します
Host github
  Hostname github.com
  User git
  IdentityFile ~/.ssh/aws_git_rsa
「esc」を押して終了し、
「:wq」で保存します
鍵の内容を確認。どこかにコピーしておく
[testuser@.ssh]$ cat aws_git_rsa.pub
GitHubへブラウザからアクセス、「Settings」の「SSH and GPG keys」を選択

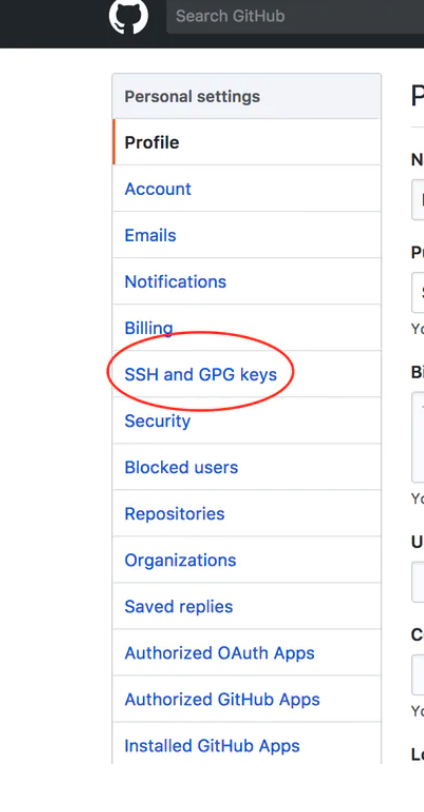
「New SSH key」をクリック、Titleに「アプリ名 - EC2」、Keyに「先ほど作成した鍵の内容」を入力し「Add SSH key」で登録


ターミナルへ戻り設定ファイルの権限を変更
[testuser@.ssh]$ chmod 600 config
GitHubへの接続確認。途中の質問にはYesで。Githubのユーザー名が出てくれば成功
[testuser@.ssh]$ ssh -T github

# Hi Githubのユーザー名! You've successfully authenticated, but GitHub does not provide shell access.

このようなメッセージが返って来れば接続成功です。
登録が済んだら、いよいよクローン作業です
[testuser@ .ssh]$ cd /var/www/rails
git cloneの後に続くURLは、
自分が作成したアプリのgithubのURLです(sshのものです)
[testuser@ .rails]$ git clone git@github.com:~~~~~~~~~~~~
確認のために、下記コマンドを実行してみてください
[testuser@ .rails]$ ls
ご自身のアプリ名が記載されたフォルダが存在すれば、見事クローン成功です。
STEP5 アプリのsecret_key_baseの設定
クローンが成功したら、railsファイルのconfig/secrets.ymlに記述されている、secrets_key_baseを変更していきます
bundlerのインストール
[testuser@ .rails]$ cd ~
[testuser@ ~]$ rbenv exec gem install bundler

[testuser@ ~]$ rbenv rehash


[testuser@ ~]$ which bundler
 # /usr/local/rbenv/shims/bundlerが出力されれば成功
[testuser@ .rails] cd /var/www/rails/アプリ名

[testuser@ アプリ名]$ gem install rubygems-update -v '<3' && update_rubygems
[testuser@ アプリ名]$ bundle config --local build.mysql2 "--with-cppflags=-I/usr/local/opt/openssl/include"
[testuser@ アプリ名]$ bundle config --local build.mysql2 "--with-ldflags=-L/usr/local/opt/openssl/lib"
[testuser@ アプリ名]$ bundle install --path vendor/bundle

[testuser@ アプリ名]$ bundle exec rake secret

表示されるkeyをコピーする
[testuser@ アプリ名]$ vi config/secrets.yml
「i」を押して編集モードにし、以下を追加します
  production:
    secret_key_base: (先ほどコピーしたものを貼り付けます)
「esc」を押して終了し、
「:wq」で保存します
STEP6 Unicornの設定
(UNIX環境でRuby Webアプリケーションを提供するRack HTTPサーバ(アプリサーバーでRailsアプリを実行できる)です)
[testuser@ アプリ名]$ gem install unicorn
Gemfileに以下を追加します
[testuser@ アプリ名]$ vi Gemfile
group :production, :staging do
  gem 'unicorn', '5.4.1'
end
「esc」を押して終了し、
「:wq」で保存します
[testuser@ アプリ名]$ bundle install

[testuser@ アプリ名]$ vi config/unicorn.conf.rb
config/unicorn.rbを作成し、内容を以下のように編集します
# サーバ上でのアプリケーションコードが設置されているディレクトリを変数に入れておく
app_path = File.expand_path('../../', __FILE__)

# アプリケーションサーバの性能を決定する
worker_processes 1

# アプリケーションの設置されているディレクトリを指定
working_directory app_path

# Unicornの起動に必要なファイルの設置場所を指定
pid "#{app_path}/tmp/pids/unicorn.pid"

# ポート番号を指定
listen "#{app_path}/tmp/sockets/unicorn.sock"

# エラーのログを記録するファイルを指定
stderr_path "#{app_path}/log/unicorn.stderr.log"

# 通常のログを記録するファイルを指定
stdout_path "#{app_path}/log/unicorn.stdout.log"

# Railsアプリケーションの応答を待つ上限時間を設定
timeout 60

# 以下は応用的な設定なので説明は割愛

preload_app true
GC.respond_to?(:copy_on_write_friendly=) && GC.copy_on_write_friendly = true

check_client_connection false

run_once = true

before_fork do |server, worker|
  defined?(ActiveRecord::Base) &&
    ActiveRecord::Base.connection.disconnect!

  if run_once
    run_once = false # prevent from firing again
  end

  old_pid = "#{server.config[:pid]}.oldbin"
  if File.exist?(old_pid) && server.pid != old_pid
    begin
      sig = (worker.nr + 1) >= server.worker_processes ? :QUIT : :TTOU
      Process.kill(sig, File.read(old_pid).to_i)
    rescue Errno::ENOENT, Errno::ESRCH => e
      logger.error e
    end
  end
end

after_fork do |_server, _worker|
  defined?(ActiveRecord::Base) && ActiveRecord::Base.establish_connection
end
「i」を押して編集モードにし、以下を追加します
  # set lets
  $worker  = 2
  $timeout = 30
  $app_dir = "/var/www/rails/mumu" #自分のアプリケーション名
  $listen  = File.expand_path 'tmp/sockets/.unicorn.sock', $app_dir
  $pid     = File.expand_path 'tmp/pids/unicorn.pid', $app_dir
  $std_log = File.expand_path 'log/unicorn.log', $app_dir
  # set config
  worker_processes  $worker
  working_directory $app_dir
  stderr_path $std_log
  stdout_path $std_log
  timeout $timeout
  listen  $listen
  pid $pid
  # loading booster
  preload_app true
  # before starting processes
  before_fork do |server, worker|
    defined?(ActiveRecord::Base) and ActiveRecord::Base.connection.disconnect!
    old_pid = "#{server.config[:pid]}.oldbin"
    if old_pid != server.pid
      begin
        Process.kill "QUIT", File.read(old_pid).to_i
      rescue Errno::ENOENT, Errno::ESRCH
      end
    end
  end
  # after finishing processes
  after_fork do |server, worker|
    defined?(ActiveRecord::Base) and ActiveRecord::Base.establish_connection
  end
「esc」を押して終了し、
「:wq」で保存します
次に
以下をコメントアウトします
# config.assets.js_compressor = :uglifier
STEP7 Nginxの設定
(apacheなどと同じwebサーバの一つ。
ただ、NginxとRackは直接つなげることができないので、Unicornを挟む必要があります)
[testuser@ ~]$ cd ~
[testuser@ ~]$ sudo yum install nginx
[testuser@ ~]$ cd /etc/nginx/conf.d/
[testuser@ conf.d]$ sudo vi test.conf #自分のアプリケーション名でファイル名変更
「i」を押して編集モードにし、以下を追加します
upstream app_server {
  # Unicornと連携させるための設定。アプリケーション名を自身のアプリ名に書き換えることに注意。今回であればおそらくchat-space
  server unix:/var/www/<アプリケーション名>/tmp/sockets/unicorn.sock;
}

# {}で囲った部分をブロックと呼ぶ。サーバの設定ができる
server {
  # このプログラムが接続を受け付けるポート番号
  listen 80;
  # 接続を受け付けるリクエストURL ここに書いていないURLではアクセスできない
  server_name <Elastic IP>;

  # クライアントからアップロードされてくるファイルの容量の上限を2ギガに設定。デフォルトは1メガなので大きめにしておく
  client_max_body_size 2g;

# 接続が来た際のrootディレクトリ
  root /var/www/<アプリケーション名>/public;

# assetsファイル(CSSやJavaScriptのファイルなど)にアクセスが来た際に適用される設定
  location ^~ /assets/ {
    gzip_static on;
    expires max;
    add_header Cache-Control public;
  }

  try_files $uri/index.html $uri @unicorn;

  location @unicorn {
    proxy_set_header X-Forwarded-For $proxy_add_x_forwarded_for;
    proxy_set_header Host $http_host;
    proxy_redirect off;
    proxy_pass http://app_server;
  }

  error_page 500 502 503 504 /500.html;
}
以下の3点は書き換えが必須です。
3行目の<アプリケーション名> となっている箇所は、ご自身のものに変更してください。
11行目の<Elastic IP>となっている箇所も同様に、ご自身のものに変更してください。
14行目の<アプリケーション名> となっている箇所は、ご自身のものに変更してください。
「esc」を押して終了し、
「:wq」で保存します
下記を実行
[testuser@ conf.d]$ cd /var/lib
[testuser@ lib]$ sudo chmod -R 775 nginx
STEP8 マイグレーション
MySQLのインストール
[testuser@ ~]$ sudo yum install mysql-devel

- MySQL Serverをインストール
[testuser@ ~]$ sudo yum install mysql-server

- MySQLの起動設定
[testuser@ ~]$ sudo chkconfig mysqld on

- chkconfigコマンドで起動設定が成功しているかを確認することができる。
- 以下のように表示されれば設定が成功している。
[testuser@ ~]$ chkconfig
mysqld           0:off   1:off   2:on    3:on    4:on    5:on    6:off

- MySQLを起動する。
[testuser@ ~]$ sudo vi /etc/my.cnf
以下を追記
character-set-server=utf8


[testuser@ ~]$ sudo /etc/init.d/mysqld start

- もしくは以下でも同じ。
[testuser@ ~]$ sudo service mysqld start

- rootでログインし新規ユーザーを作成する。
[testuser@ ~]$ mysql -u root
mysql> GRANT ALL PRIVILEGES ON [データベース名].* TO [あなたのアプリ名]@localhost IDENTIFIED BY '[設定するパスワード]';
MySQLの文字コードがデフォルトでlatin1になっている場合があるので確認する。
mysql> SHOW VARIABLES LIKE 'character_set%';
+--------------------------+----------------------------+
| Variable_name | Value |
+--------------------------+----------------------------+
| character_set_client | utf8 |
| character_set_connection | utf8 |
| character_set_database | latin1 |
| character_set_filesystem | binary |
| character_set_results | utf8 |
| character_set_server | latin1 |
| character_set_system | utf8 |
| character_sets_dir | /usr/share/mysql/charsets/ |
+--------------------------+----------------------------+
8 rows in set (0.00 sec)

- character_set_filesystem と character_sets_dir 以外が utf8 になっていればok。
- なっていなければutf8に統一し、再起動しておく。

mysql> set character_set_database = utf8;
mysql> set character_set_server = utf8;

Query OK, 0 rows affected (0.00 sec)

mysql> exit
MySQLの設定
[testuser@ ~]$ cd /var/www/rails/アプリ名
[testuser@ アプリ名]$ vi config/database.yml
----------------------------
  production:
    <<: *default
    database: mumu_production
    username: root #ここをrootに変更する
   password:      #ここを空欄にする
    host: localhost
----------------------------


[testuser@ アプリ名]$ sudo service mysqld start #mysqldの起動
[testuser@ アプリ名]$ ln -s /var/lib/mysql/mysql.sock /tmp/mysql.sock
[testuser@ アプリ名]$ bundle exec rake db:create RAILS_ENV=production
[testuser@ アプリ名]$ bundle exec rake db:migrate RAILS_ENV=production
マイグレーションが実行されたら成功です
[STEP9 起動確認へ進んでください]
(https://qiita.com/tksh8/items/3d2f2eeaf0e8de291b6d#step9-%E8%B5%B7%E5%8B%95%E7%A2%BA%E8%AA%8D)
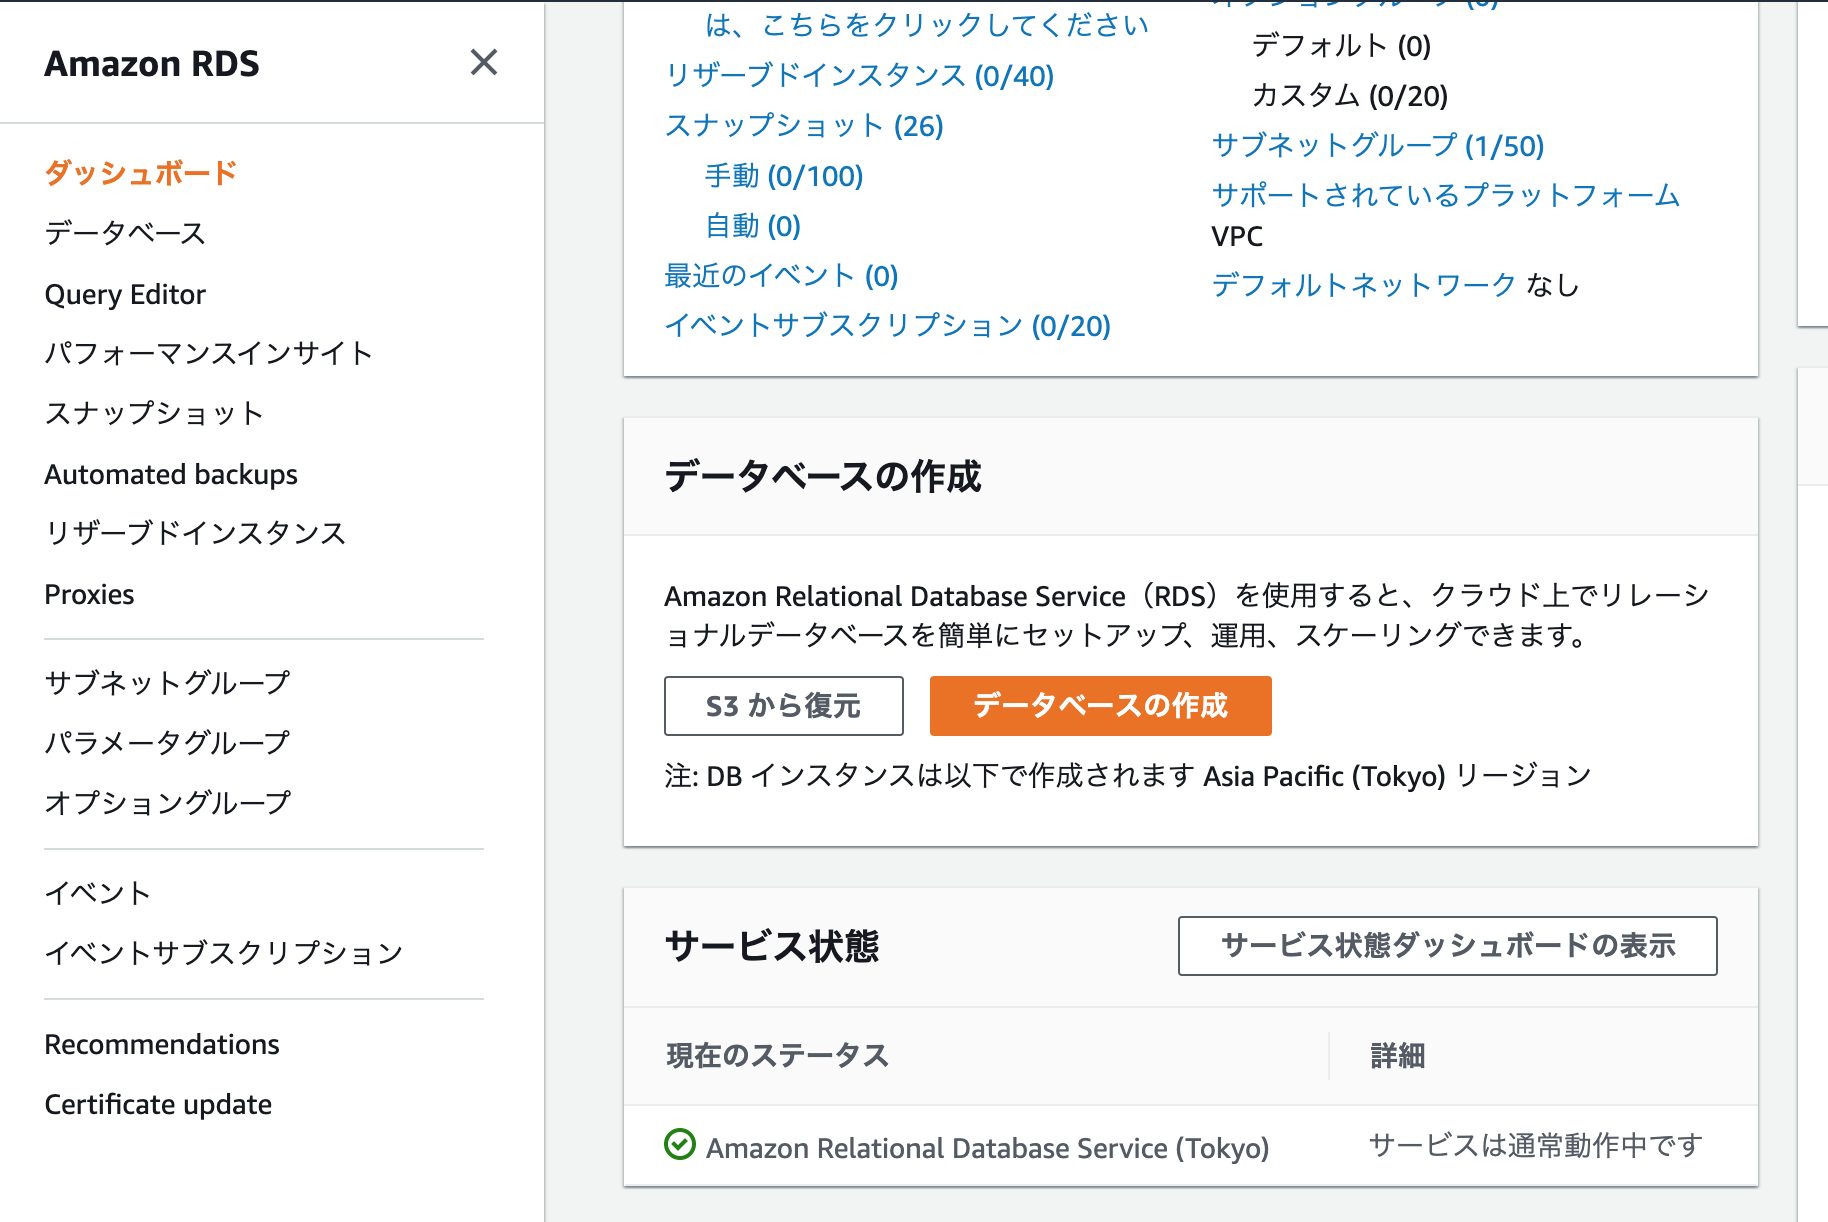
RDSの場合
サブネットを追加作成し、以下の二つにアベイラビリティーゾーンに属するサブネットを指定する
・ap-northeast-1a
・ap-northeast-1c
topで
"RDS"を検索
サブネットグループ > [DB サブネットグループの作成]を押下する

名前に「アプリ名_DB-Subnet-Group」
説明に「DB Subnet Group for アプリ名」
VPC IDに「VPCforアプリ名」
で
「この VPC に関連するすべてのサブネットを追加します」を押下し、
[作成]を押下する
ダッシュボードより
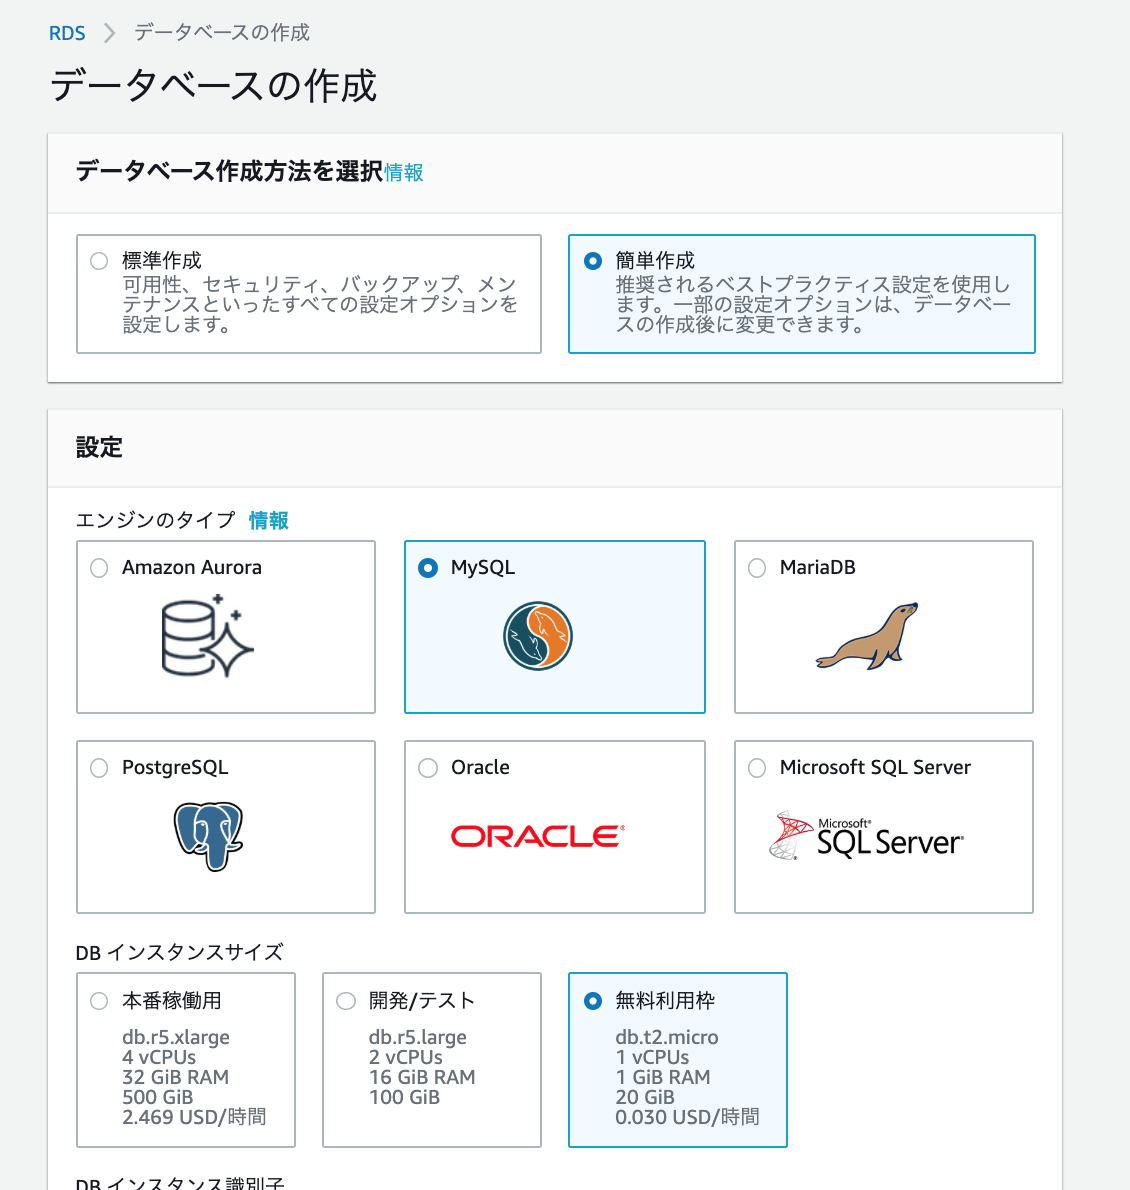
RDSの[データベースの作成]を押下する
-簡単作成
-MySQL
-無料利用枠
-DBインスタンス識別子に「アプリ名-mysql」
-マスターユーザ、マスターパスワードは任意の値
で「作成」
数分後にデータベースが作成されます
こちらを参考にしてください
Railsの環境変数としてproduction用のデータベース情報を追記して保存
下のようにdatabase.ymlを書き換えます
production:
  adapter: mysql2
  encoding: utf8
  reconnect: false
  pool: 5
  host: <%= ENV['DB_HOST'] %>
  username: <%= ENV['DB_USERNAME'] %>
  password: "<%= ENV['DB_PASSWORD'] %>"
  database: <%= ENV['DB_NAME'] %>
bash_profileを編集する
$ sudo vi ~/.bash_profile
Railsの環境変数としてproduction用のデータベース情報を追記して保存
export DB_HOST="RDSのエンドポイント"
export DB_USERNAME="RDSのユーザー名"
export DB_PASSWORD="RDSのパスワード"
export DB_NAME="アプリ名_production"
[testuser@ アプリ名]$ source ~/.bash_profile
正しく設定されているか確認
[testuser@ アプリ名]$ echo $DB_NAME
[testuser@ アプリ名]$ echo $DB_USERNAME
[testuser@ アプリ名]$ echo $DB_PASSWORD
[testuser@ アプリ名]$ echo $DB_HOSTNAME
[testuser@ アプリ名]$ echo $DB_PORT
mysqldを起動
[testuser@ アプリ名]$ sudo service mysqld start

マイグレーションを実行
[testuser@ アプリ名]$ rake db:create RAILS_ENV=production
[testuser@ アプリ名]$ bundle exec rake db:migrate RAILS_ENV=production
STEP9 起動確認
EC2へSSHでログインし、Railsアプリをプリコンパイルする
[testuser@ アプリ名]$ bundle exec rake assets:precompile RAILS_ENV=production


Nginxを再起動
[testuser@ アプリ名]$ sudo service nginx restart


Unicornを起動
[testuser@ アプリ名]bundle exec unicorn_rails -c config/unicorn.conf.rb -E production -D

または
$ bundle exec unicorn_rails -E production -c config/unicorn.rb -D

Uniconの起動を確認
[testuser@ アプリ名]$ ps -ef | grep unicorn | grep -v grep
# プロセスのリストが3行程表示されればOK


# unicornの起動

# 起動確認
$ ps aux | grep unicorn

# unicornが起動できない場合はログを確認
$ tailf log/unicorn.log

$ sudo tail -f /var/log/nginx/access.log
$ sudo tail -f /var/log/nginx/error.log
$ sudo tail -f /var/www/vue_sample/log/unicorn.log


# nginxの起動
$ sudo service nginx start
# 起動確認
$ ps aux | grep nginx
確認
ブラウザからIPを叩いてアクセス ※IPアドレスがわからない場合はEC2のインスタンスの説明から確認可能
52.64.~~~~~~~~~(ご自身のIPアドレス)にアクセス
すると
http://IPアドレス/
Railsアプリが無事動作すれば成功
うまくいくと表示されます!!
※私はうまく表示されなかったのですが
config.force_ssl = true

を
config.force_ssl = false
に変えたらいけました。。。参考に。。
独自ドメインにしたい場合はこちら