はじめに
本記事はAxonOnnxでVGG16を読み込んで
LiveViewで物体認識を行うアプリケーションを作成した際の忘備録になります
Axon
行列演算ライブラリNxを使用して作られたディープラーニングフレームワーク
AxonOnnx
AxonにONNXフォーマットの学習済みモデルを読み込むライブラリ
Project
いつもどおりプロジェクトの作成です
mix phx.new live_onnx --no-ecto
cd live_onnx
axon_onnxと画像の読み込み、リサイズを行うstb_imageを追加します
defmodule LiveOnnx.MixProject do
...
  defp deps do
    [
      ...
      # 以下追加
      {:axon_onnx, github: "elixir-nx/axon_onnx"},
      {:stb_image, "~> 0.4.0"}
    ]
  end
end
ONNXを読み込めない? 2022/06/03 現在
まだまだ開発中のため読み込めないモデルが多々あるようです
transformer系は注力していたようで幾つか成功しています
onnx model zooのclassification
https://github.com/onnx/models/tree/main/vision/classification
のモデルは現在 importで失敗します 多分dynamic inputになってるせいかと思います
dynamic inputはAxonOnnxでは現在サポートしていません
Pytorch onnx export
AxonOnnxのテストを見た感じPyTorchで学習済みモデル読み込んでonnx exportしているようなので、
それにならってVGG16をonnx exportしてみましょう
学習済みモデルはtorchvisionから読み込みます
pip install torch torchvision
# インポート
import torchvision
import torch

net = torchvision.models.vgg16(pretrained = True)
# モデル出力のための設定
model_onnx_path = "vgg16.onnx" # 出力するモデルのファイル名
input_names = [ "input" ] # データを入力する際の名称
output_names = [ "output" ] # 出力データを取り出す際の名称

# ダミーインプットの作成
input_shape = (3, 224, 224) # 入力データの形式
batch_size = 1 # 入力データのバッチサイズ
dummy_input = torch.randn(batch_size, *input_shape) # ダミーインプット生成

# 変換実行!!
output = torch.onnx.export(net, dummy_input, model_onnx_path, \
                   verbose=False, input_names=input_names, output_names=output_names)
モデル読み込み
{model, params} = AxonOnnx.import("vgg16.onnx")
detsに保存
vgg16は500MBあった読み込みに時間がかかるのでdets形式にして読み込みの高速化を図ります
:dets.open_file("vgg16", type: :bag, file: 'vgg16.dets')
:dets.insert("vgg16",{1,{model,params}})
:dets.sync("vgg16")
:dets.stop
推論アプリの作成
LiveViewを使ってアップロードした画像に対して物体認識を行う機能を実装していきます
mount
モデルと正解リストを読み込んでアサインします
推論する画像をアップロードするために live_file_inputをallow_uploadで使えるようにします
defmodule LiveOnnxWeb.PageLive do
  use LiveOnnxWeb, :live_view

  @impl true
  def mount(_params, _session, socket) do
    {:ok, params} = :dets.open_file('vgg16.dets')
    [{1, {model, params}}] = :dets.lookup(params, 1)
    list = File.read!("model/classlist.json") |> Jason.decode!()

    {
      :ok,
      socket
      |> assign(:model, model)
      |> assign(:params, params)
      |> assign(:list, list)
      |> allow_upload(
        :image,
        accept: :any
      )
    }
  end

  @impl true
  def handle_event("validate", _params, socket) do
    {:noreply, socket}
  end
end
classlistはこちらをvscodeで加工してjsonに形式に変換しました
UI
tailwindで1からデザインが面倒なのでcdnでblumaをimport
@import "https://cdn.jsdelivr.net/npm/bulma@0.9.3/css/bulma.min.css";
<div class="columns">
  <aside class="column is-2 menu">
    <p class="menu-label">Actions</p>
    <dl class="menu-list">
      <dt><button class="button is-fullwidth">Detect</button></dt>
    </dl>
  </aside>

  <div class="column is-10" >
    <div class="columns is-centered">
      <form phx-change="validate" >
          <div class="file is-boxed" phx-drop-target={ @uploads.image.ref }>
            <label class="file-label">
              <%= live_file_input @uploads.image, class: "file-input" %>
              <input class="file-input" type="file" name="resume">
              <span class="file-cta">
                <span class="file-label p-6">
                  Choose a file…
                </span>
              </span>
            </label>
          </div>
      </form>
    </div>
  </div>
</div>
router
ルーターに追加
defmodule LiveOnnxWeb.Router do
  use LiveOnnxWeb, :router

  scope "/", LiveOnnxWeb do
    pipe_through :browser

    live "/", PageLive # 追加
  end
アップロードした画像をbinaryデータとNx tensorに変換する
defmodule LiveOnnxWeb.PageLive do
  use LiveOnnxWeb, :live_view

  @impl true
  def mount(_params, _session, socket) do
    {:ok, params} = :dets.open_file('vgg16.dets')
    [{1, {model, params}}] = :dets.lookup(params, 1)
    list = File.read!("model/classlist.json") |> Jason.decode!()

    {
      :ok,
      socket
      |> assign(:model, model)
      |> assign(:params, params)
      |> assign(:list, list)
      |> assign(:upload_file, nil) # 追加
      |> assign(:tensor, nil) # 追加
      |> allow_upload(
        :image,
        accept: :any,
        chunk_size: 6400_000, # 追加
        progress: &handle_progress/3, # 追加
        auto_upload: true # 追加
      )
    }
  end

  # 以下追加
  def handle_progress(:image, _entry, socket) do
    # バイナリデータへ変換
    upload_file =
      consume_uploaded_entries(socket, :image, fn %{path: path}, _entry ->
        File.read(path)
      end)
      |> List.first()

    # 読み込み
    {:ok, image} = StbImage.from_binary(upload_file)
    # 224x224へリサイズ
    {:ok, image} = StbImage.resize(image, 224, 224)

    tensor =
      # Nx.Tensorへ変換
      StbImage.to_nx(image)
      # 値が0~1の範囲になるように変換
      |> Nx.divide(255)
      # 正規化 by torchvisonのドキュメント
      |> Nx.subtract(Nx.tensor([0.485, 0.456, 0.406]))
      |> Nx.divide(Nx.tensor([0.229, 0.224, 0.225]))
      # 224x224x3を3x224x224に変換
      |> Nx.transpose()
            # 1x3x224x224になるように軸を追加
      |> Nx.new_axis(0)

    {
      :noreply,
      socket
      |> assign(:upload_file, upload_file)
      |> assign(:tensor, tensor)
    }
  end
  ...
end
正規化ですが精度を上げるように 全体からmeanの値を引いてstbの値で除算を行います
https://pytorch.org/vision/stable/models.html#models-and-pre-trained-weights
The images have to be loaded in to a range of [0, 1] and then normalized using mean = [0.485, 0.456, 0.406] and std = [0.229, 0.224, 0.225]. You can use the following transform to normalize:
アップロードした画像を表示
binaryなのでbase64エンコードしてオブジェクトURLで表示させます
<div class="columns">
  <aside class="column is-2 menu">
    <p class="menu-label">Actions</p>
    <dl class="menu-list">
      <dt><button class="button is-fullwidth">Detect</button></dt>
    </dl>
  </aside>

  <div class="column is-10" >
    <div class="columns is-centered">
      <div style={ if @upload_file != nil, do: "display:none" }> <!--- 追加 --->
      <form phx-change="validate" >
          <div class="file is-boxed" phx-drop-target={ @uploads.image.ref }>
            <label class="file-label">
              <%= live_file_input @uploads.image, class: "file-input" %>
              <input class="file-input" type="file" name="resume">
              <span class="file-cta">
                <span class="file-label p-6">
                  Choose a file…
                </span>
              </span>
            </label>
          </div>
      </form>
      </div> <!--- 追加 --->
      <!--- 以下追加 --->
      <%= if @upload_file do %>
        <div><img alt="" class="w-full" src={"data:image/png;base64,#{Base.encode64(@upload_file)}"}/></div>
      <% end %>
    </div>
  </div>
</div>
detectの実装
axonをCPU高速化モードで起動するようにして
推論後データをランキングになるように変換します
defmodule LiveOnnxWeb.PageLive do
  use LiveOnnxWeb, :live_view
  require Axon # 追加
  EXLA.set_as_nx_default([:tpu, :cuda, :rocm, :host]) # 追加

  @impl true
  def mount(_params, _session, socket) do
    {:ok, params} = :dets.open_file('vgg16.dets')
    [{1, {model, params}}] = :dets.lookup(params, 1)
    list = File.read!("model/classlist.json") |> Jason.decode!()

    {
      :ok,
      socket
      |> assign(:model, model)
      |> assign(:params, params)
      |> assign(:list, list)
      |> assign(:upload_file, nil)
      |> assign(:ans, []) # 追加
      |> allow_upload(
        :image,
        accept: :any,
        chunk_size: 6400_000,
        progress: &handle_progress/3,
        auto_upload: true
      )
    }
  end

  ...

  @impl true
  def handle_event(
        "detect",
        _params,
        %{assigns: %{tensor: tensor, model: model, params: params}} = socket
      ) do
    ans =
      # 推論実行
      Axon.predict(model, params, tensor)
      # 結果の1x1000を1000に変換
      |> Nx.flatten()
      # 値が小さい順にindexを並べる
      |> Nx.argsort()
      # 大きい順に並べる
      |> Nx.reverse()
      # 上位5つのみ取得
      |> Nx.slice([0], [5])
      # Listに変換
      |> Nx.to_flat_list()

    {:noreply, assign(socket, :ans, ans)}
  end
end
detectイベントの追加+答えの表示
最後にボタンにdetectイベントを追加して完了です
<div class="columns">
  <aside class="column is-2 menu">
    <p class="menu-label">Actions</p>
    <dl class="menu-list">
      <!--- phx-clickを追加 --->
      <dt><button class="button is-fullwidth" phx-click="detect">Detect</button></dt>
    </dl>
    <!--- 以下追加 --->
    <%= for {ans, index} <- Enum.with_index(@ans) do %>
      <h5><%= "#{index + 1}: " <> Map.get(@list, to_string(ans)) %></h5>
    <% end %>
  </aside>

  <div class="column is-10">
  ...
  </div>
</div>
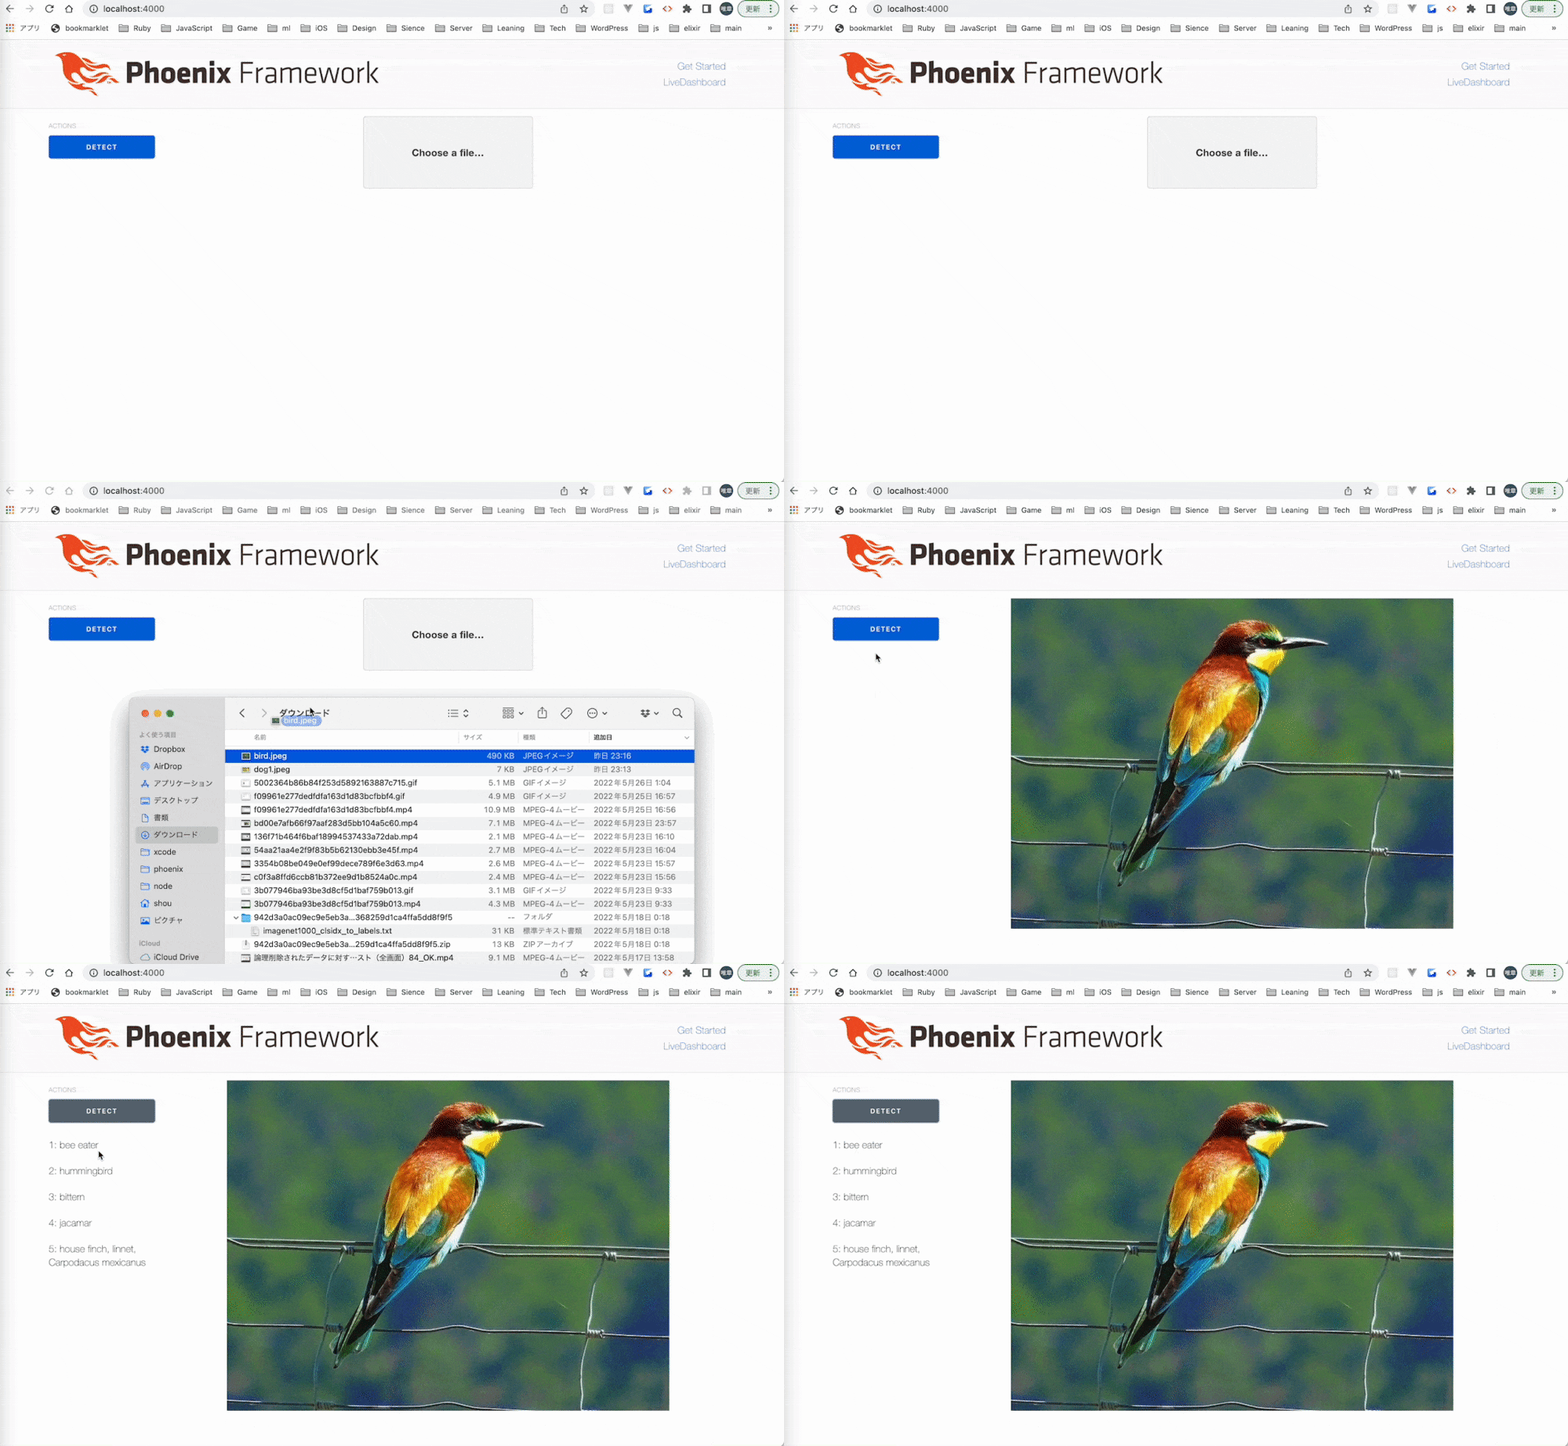
デモ
これで物体認識アプリができました!
他のモデルも使いたい
こちらに利用可能モデルがあるので、vgg16と同様にexportすれば使えるかと思います
convnextは検証済みです
AxonOnnxでmix testを実行する
おまけでAxonOnnxのmix testを行う際の環境構築手順を書いておきます
pip install onnx transformer sentencepiece
ubuntu
pip install onnxruntime
Mac
pip install -i https://test.pypi.org/simple/ onnxruntime==1.8.2.dev20210816004
curl --proto '=https' --tlsv1.2 -sSf https://sh.rustup.rs | sh
学習済みネットワークはGBクラスもあるので15GBはダウンロードされる覚悟をもって実行してください
mix text
最後に
AxonOnnxがまだまだ開発中なので読み込めないモデルがありますが、
モデルを読み込んで簡単にアプリケーションに組み込むことができました!
Elixirのみでディープラーニングアプリケーションが作れるので
Elixir DesktopやNervesなどマルチプラットフォームへの対応の夢が広がります
本記事は以上になりますありがとうございました
コード
参考
https://www.granvalley.co.jp/blog/convert_from_pytorch-model_to_openvino
https://gist.githubusercontent.com/yrevar/942d3a0ac09ec9e5eb3a/raw/238f720ff059c1f82f368259d1ca4ffa5dd8f9f5/imagenet1000_clsidx_to_labels.txt
https://pytorch.org/vision/stable/models.html#models-and-pre-trained-weights
https://qiita.com/MuAuan/items/c350f64b7abb396973ed#transforms%E3%81%AE%E6%95%B4%E7%90%86
