はじめに
IOS XE 16.12からDockerアプリケーションホスティングがサポートされました。
ちょっと紛らわしいですが、IR829/IR809等でサポートされるCisco IOxのDockerスタイルアプリとは異なります。こちらはDocker形式のイメージをLXCで動作させるという黒魔術的な実装になってます。
[Qiita] Cisco IOxのDockerタイプアプリを試してみる
https://qiita.com/tetsusat/items/8576eb0f80e50746cf7d
前提
この記事では、以下の環境を用いています。
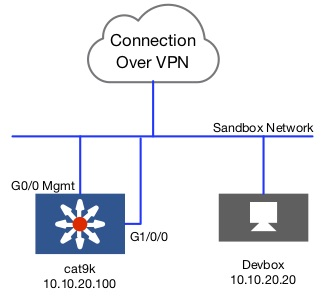
Dockerアプリケーションをデプロイする環境には、以下のDevNet Sandbox IOS XE on Catalyst 9000 16.12 EFT Codeを用いました。
Dockerアプリケーションをビルドする環境には、以下のものを用いました。
- Ubuntu 18.04.1 LTS
- Docker Engine Community 19.03.1
Dockerアプリケーションのビルド
Dockerアプリケーションをビルドには別環境を用意します。
適当な作業ディレクトリにHello World!と返すだけのサンプルアプリケーションを作成します。
package main

import (
    "fmt"
    "log"
    "net/http"
)

func main() {

    http.HandleFunc("/", func(w http.ResponseWriter, r *http.Request) {
        fmt.Fprintf(w, "Hello World!")
    })

    if err := http.ListenAndServe(":8080", nil); err != nil {
        log.Fatal("ListenAndServe failed.", err)
    }
}
みんな大好きMulti Stage BuildでDockerイメージを極力小さくします。
必須ではないですが、DevNet Sandboxのリモート環境にあるCatalystにDockerイメージをコピーするのに時間がかかるためです。
FROM golang:latest as builder

ENV CGO_ENABLED=0
ENV GOOS=linux
ENV GOARCH=amd64
COPY hello.go /go/src/hello.go
WORKDIR /go/src
RUN go build -o app

FROM alpine
RUN apk add --no-cache ca-certificates
COPY --from=builder /go/src/app /app
EXPOSE 8080
ENTRYPOINT ["/app"]
まずは、ローカル環境でアプリケーションが適切に動作するか試します。
Dockerイメージをビルドして。
$ docker build -t hello .
Dockerコンテナを起動します。
$ docker run -d -p 8080:8080 hello
アクセスすると、Hello Wold!と返してくれるでしょう。
$ curl localhost:8080
次に、DockerイメージをTar形式で出力します。
$ docker save hello -o hello.tar
Catalyst9300のアプリケーションホスティングの設定
ここから先の作業は、DevNet Sandboxの環境にVPN接続して実施します。
Catalyst側でSCPを有効にします。ユーザークレデンシャル情報はSSHのために用意されているdeveloper/C1sco12345をそのまま使います。
cat9k(config)#ip scp server enable
VPN接続したPCからTar形式DockerイメージをSCPでコピーします。
$ scp hello.tar developer@10.10.20.100:flash:/hello.tar
Catalystでアプリケーションホスティングのための設定をします。
Dockerコンテナの実行環境には管理インターフェイスと同じサブネット(10.10.20.0/24)の範囲内のアドレスを割り振ります。
今回の環境ではコンテナの実行環境にゲートウェイは必要ないのですが、通常は必要なので念のために割り当てておきます。
Dockerコンテナに割り当てるリソースやDockerコンテナを起動するためのオプションやリソースもここで設定します。
app-hosting appid HELLO
 app-vnic management guest-interface 0
  guest-ipaddress 10.10.20.101 netmask 255.255.255.0
 app-default-gateway 10.10.20.254 guest-interface 0
 app-resource docker
  run-opts "-p 8080:8080"
 app-resource profile custom
  cpu 7400
  memory 1024
Dockerアプリケーションをインストールします。
cat9k#app-hosting install appid HELLO package flash:hello.tar
Installing package 'flash:hello.tar' for 'HELLO'. Use 'show app-hosting list' for progress.
このときの状態を確認すると、DEPLOYEDになります。
cat9k#show app-hosting list
App id                                   State
---------------------------------------------------------
HELLO                                    DEPLOYED
Dockerアプリケーションを有効化します。
cat9k#app-hosting activate appid HELLO
HELLO activated successfully
Current state is: ACTIVATED
このときの状態を確認すると、ACTIVATEDになります。
cat9k#show app-hosting list
App id                                   State
---------------------------------------------------------
HELLO                                    ACTIVATED
Dockerアプリケーションをスタートします。
cat9k#app-hosting start appid HELLO
HELLO started successfully
Current state is: RUNNING
このときの状態を確認すると、RUNNINGになります。
cat9k#show app-hosting list
App id                                   State
---------------------------------------------------------
HELLO                                    RUNNING
Dockerアプリケーションの詳細を確認します。
cat9k#show app-hosting detail
App id                 : HELLO
Owner                  : iox
State                  : RUNNING
Application
  Type                 : docker
  Name                 : hello
  Version              : latest
  Description          :
  Path                 : flash:hello.tar
Activated profile name : custom

Resource reservation
  Memory               : 1024 MB
  Disk                 : 10 MB
  CPU                  : 7400 units
  VCPU                 : 1 units

Attached devices
  Type              Name               Alias
  ---------------------------------------------
  serial/shell     iox_console_shell   serial0
  serial/aux       iox_console_aux     serial1
  serial/syslog    iox_syslog          serial2
  serial/trace     iox_trace           serial3

Network interfaces
   ---------------------------------------
eth0:
   MAC address         : 52:54:dd:6a:96:c5
   IPv4 address        : 10.10.20.101
   Network name        : mgmt-bridge100


Docker
------
Run-time information
  Command              :
  Entry-point          : /app
  Run options in use   : -p 8080:8080
Application health information
  Status               : 0
  Last probe error     :
  Last probe output    :
動作確認
最後にアプリケーションが適切に動作しているのか、試してみます。このテストはDevBox VMから行ってください。DevNet Sandboxの仕様上、VPN接続したPCから行っても失敗します。
Devbox VMにSSH接続してからcurlでアクセスします。
[developer@devbox ~]$ curl 10.10.20.101:8080
Hello World!
Hello Wold!と返ってきたら成功です。
工夫次第でいろいろと便利な仕組みを作れそうです.。゚+.(・∀・)゚+.゚
おしまい
