この記事でやること
この記事ではcolab上で生成したweightsを用いて、Jetsonで走らせるところまでやります。
YOLOのオリジナルモデルの作成方法については過去の記事を参考にしてください。
https://qiita.com/tayutayufk/items/4e5e35822edc5fda60ca
https://qiita.com/tayutayufk/items/4dba4087e6f06fec338b
Jetson Nanoの用意
前提としてJetsonにはJetCardをインストールしておいてください。
最初にOpenCVのダウンロードから行っていきます。
https://qiita.com/usk81/items/98e54e2463e9d8a11415
このサイトを参考に導入してください。
自分は/home/"ユーザーネーム"/Lib/以下にクローン&ビルドしました。
次にdarknetを導入します。
darknetを入れたいディレクトリに移動して
git clone https://github.com/AlexeyAB/darknet
ダウンロードが終わったらbuildする前にcolab同様Makefileの変更を行います。
GPU=1
CUDNN=1
CUDNN_HALF=0
OPENCV=1
AVX=0
OPENMP=0
LIBSO=1
ZED_CAMERA=0 # ZED SDK 3.0 and above
ZED_CAMERA_v2_8=0 # ZED SDK 2.X

# set GPU=1 and CUDNN=1 to speedup on GPU
# set CUDNN_HALF=1 to further speedup 3 x times (Mixed-precision on Tensor Cores) GPU: Volta, Xavier, Turing and higher
# set AVX=1 and OPENMP=1 to speedup on CPU (if error occurs then set AVX=0)

USE_CPP=0
DEBUG=0

ARCH= -gencode arch=compute_30,code=sm_30 \
      -gencode arch=compute_35,code=sm_35 \
      -gencode arch=compute_50,code=[sm_50,compute_50] \
      -gencode arch=compute_52,code=[sm_52,compute_52] \
#           -gencode arch=compute_61,code=[sm_61,compute_61]

OS := $(shell uname)

# Tesla V100
# ARCH= -gencode arch=compute_70,code=[sm_70,compute_70]

# GeForce RTX 2080 Ti, RTX 2080, RTX 2070, Quadro RTX 8000, Quadro RTX 6000, Quadro RTX 5000, Tesla T4, XNOR Tensor Cores
# ARCH= -gencode arch=compute_75,code=[sm_75,compute_75]

# Jetson XAVIER
# ARCH= -gencode arch=compute_72,code=[sm_72,compute_72]

# GTX 1080, GTX 1070, GTX 1060, GTX 1050, GTX 1030, Titan Xp, Tesla P40, Tesla P4
# ARCH= -gencode arch=compute_61,code=sm_61 -gencode arch=compute_61,code=compute_61

# GP100/Tesla P100 - DGX-1
# ARCH= -gencode arch=compute_60,code=sm_60

# For Jetson TX1, Tegra X1, DRIVE CX, DRIVE PX - uncomment:
ARCH= -gencode arch=compute_53,code=[sm_53,compute_53]

# For Jetson Tx2 or Drive-PX2 uncomment:
# ARCH= -gencode arch=compute_62,code=[sm_62,compute_62]


VPATH=./src/
EXEC=darknet
OBJDIR=./obj/

ifeq ($(LIBSO), 1)
LIBNAMESO=libdarknet.so
APPNAMESO=uselib
endif

ifeq ($(USE_CPP), 1)
CC=g++
else
CC=gcc
endif

CPP=g++ -std=c++11
NVCC=/usr/local/cuda/bin/nvcc
OPTS=-Ofast
LDFLAGS= -lm -pthread
COMMON= -Iinclude/ -I3rdparty/stb/include
CFLAGS=-Wall -Wfatal-errors -Wno-unused-result -Wno-unknown-pragmas -fPIC

ifeq ($(DEBUG), 1)
# OPTS= -O0 -g
# OPTS= -Og -g
COMMON+= -DDEBUG
CFLAGS+= -DDEBUG
else                                                                                                                 ifeq ($(AVX), 1)                                                                                                     CFLAGS+= -ffp-contract=fast -mavx -mavx2 -msse3 -msse4.1 -msse4.2 -msse4a                                            endif                                                                                                                endif
といったぐらいに変更します。
具体的には一番上の
GPU=0
CUDNN=0
CUDNN_HALF=0
OPENCV=0
AVX=0
OPENMP=0
LIBSO=0
を以下のように変更
GPU=1
CUDNN=1
CUDNN_HALF=0
OPENCV=1
AVX=0
OPENMP=0
LIBSO=1
次に
ARCH= -gencode arch=compute_30,code=sm_30 \
      -gencode arch=compute_35,code=sm_35 \
      -gencode arch=compute_50,code=[sm_50,compute_50] \
      -gencode arch=compute_52,code=[sm_52,compute_52] \
      -gencode arch=compute_61,code=[sm_61,compute_61]

        .......................

# For Jetson TX1, Tegra X1, DRIVE CX, DRIVE PX - uncomment:
# ARCH= -gencode arch=compute_53,code=[sm_53,compute_53]
とあるので-gencodeの最後の行をコメアウトして、JetsonNanoはJetsonX1チップを使っているので# For Jetson TX1, Tegra X1, DRIVE CX, DRIVE PX - uncomment:の下をアンコメントしてください。
最後にjetsonのnvccの場所を指定したいのでNVCCの所を
NVCC=/usr/local/cuda/bin/nvcc
に変更
あとはmakeすればコンパイルが始まります。
Pythonでdarknetを読み込む
えーーー
./darknet/にdarknet_video.pyがあるので思いっきり拝借します。
from ctypes import *
import math
import random
import os
import cv2
import numpy as np
import time
import darknet

def convertBack(x, y, w, h):
    xmin = int(round(x - (w / 2)))
    xmax = int(round(x + (w / 2)))
    ymin = int(round(y - (h / 2)))
    ymax = int(round(y + (h / 2)))
    return xmin, ymin, xmax, ymax


def cvDrawBoxes(detections, img):
    for detection in detections:
        x, y, w, h = detection[2][0],\
            detection[2][1],\
            detection[2][2],\
            detection[2][3]
        xmin, ymin, xmax, ymax = convertBack(
            float(x), float(y), float(w), float(h))
        pt1 = (xmin, ymin)
        pt2 = (xmax, ymax)
        cv2.rectangle(img, pt1, pt2, (0, 255, 0), 1)
        cv2.putText(img,
                    detection[0].decode() +
                    " [" + str(round(detection[1] * 100, 2)) + "]",
                    (pt1[0], pt1[1] - 5), cv2.FONT_HERSHEY_SIMPLEX, 0.5,
                    [0, 255, 0], 2)
    return img


netMain = None
metaMain = None
altNames = None


def YOLO():

    global metaMain, netMain, altNames
    configPath = "./cfg/yolov3-tiny.cfg"#ここにモデルのcfgファイルの場所を指定
    weightPath = "./yolov3-tiny_final.weights"#weightsファイルの場所
    metaPath = "./cfg/obj.data"#dataファイルの場所
    if not os.path.exists(configPath):
        raise ValueError("Invalid config path `" +
                         os.path.abspath(configPath)+"`")
    if not os.path.exists(weightPath):
        raise ValueError("Invalid weight path `" +
                        os.path.abspath(weightPath)+"`")
    if not os.path.exists(metaPath):
        raise ValueError("Invalid data file path `" +
                         os.path.abspath(metaPath)+"`")
    if netMain is None:
        netMain = darknet.load_net_custom(configPath.encode(
            "ascii"), weightPath.encode("ascii"), 0, 1)  # batch size = 1
    if metaMain is None:
        metaMain = darknet.load_meta(metaPath.encode("ascii"))
    if altNames is None:
       try:
            with open(metaPath) as metaFH:
                metaContents = metaFH.read()
                import re
                match = re.search("names *= *(.*)$", metaContents,
                                  re.IGNORECASE | re.MULTILINE)
                if match:
                    result = match.group(1)
                else:
                    result = None
                try:
                    if os.path.exists(result):
                        with open(result) as namesFH:
                            namesList = namesFH.read().strip().split("\n")
                            altNames = [x.strip() for x in namesList]
                except TypeError:
                    pass
        except Exception:
            pass
    cap = cv2.VideoCapture(0)#webカムから映像を取り込みたいときはここをアンコメント&下をコメアウト
    #cap = cv2.VideoCapture("test.mp4")
    cap.set(3, 1280)
    cap.set(4, 720)
    out = cv2.VideoWriter(
        "output.avi", cv2.VideoWriter_fourcc(*"MJPG"), 10.0,
        (darknet.network_width(netMain), darknet.network_height(netMain)))
    print("Starting the YOLO loop...")

    darknet_image = darknet.make_image(darknet.network_width(netMain),
                                    darknet.network_height(netMain),3)

    while True:
        prev_time = time.time()
        ret, frame_read = cap.read()
        frame_rgb = cv2.cvtColor(frame_read, cv2.COLOR_BGR2RGB)
        frame_resized = cv2.resize(frame_rgb,
                                   (darknet.network_width(netMain),
                                    darknet.network_height(netMain)),
                                   interpolation=cv2.INTER_LINEAR)

        darknet.copy_image_from_bytes(darknet_image,frame_resized.tobytes())

        detections = darknet.detect_image(netMain, metaMain, darknet_image, thresh=0.25)
        #image = frame_resized
        image = cvDrawBoxes(detections, frame_resized)
        image = cv2.cvtColor(image, cv2.COLOR_BGR2RGB)
        print(1/(time.time()-prev_time))
        cv2.imshow('Demo', image)
        if cv2.waitKey(1) & 0xFF == ord('q'):
            break
    cap.release()
    out.release()

if __name__ == "__main__":
    YOLO()
普段からpythonでOpenCVを使われている方には説明するまでもないですね。
入力ファイルの所を変更して、webCamなのか動画ファイルなのかを選択すれば動きます。
なんてすばらしい。
自分は終了ボタンが欲しかったので最後の方に
if cv2.waitKey(1)
を
 if cv2.waitKey(1) & 0xFF == ord('q'):
            break
に変更しました
実行

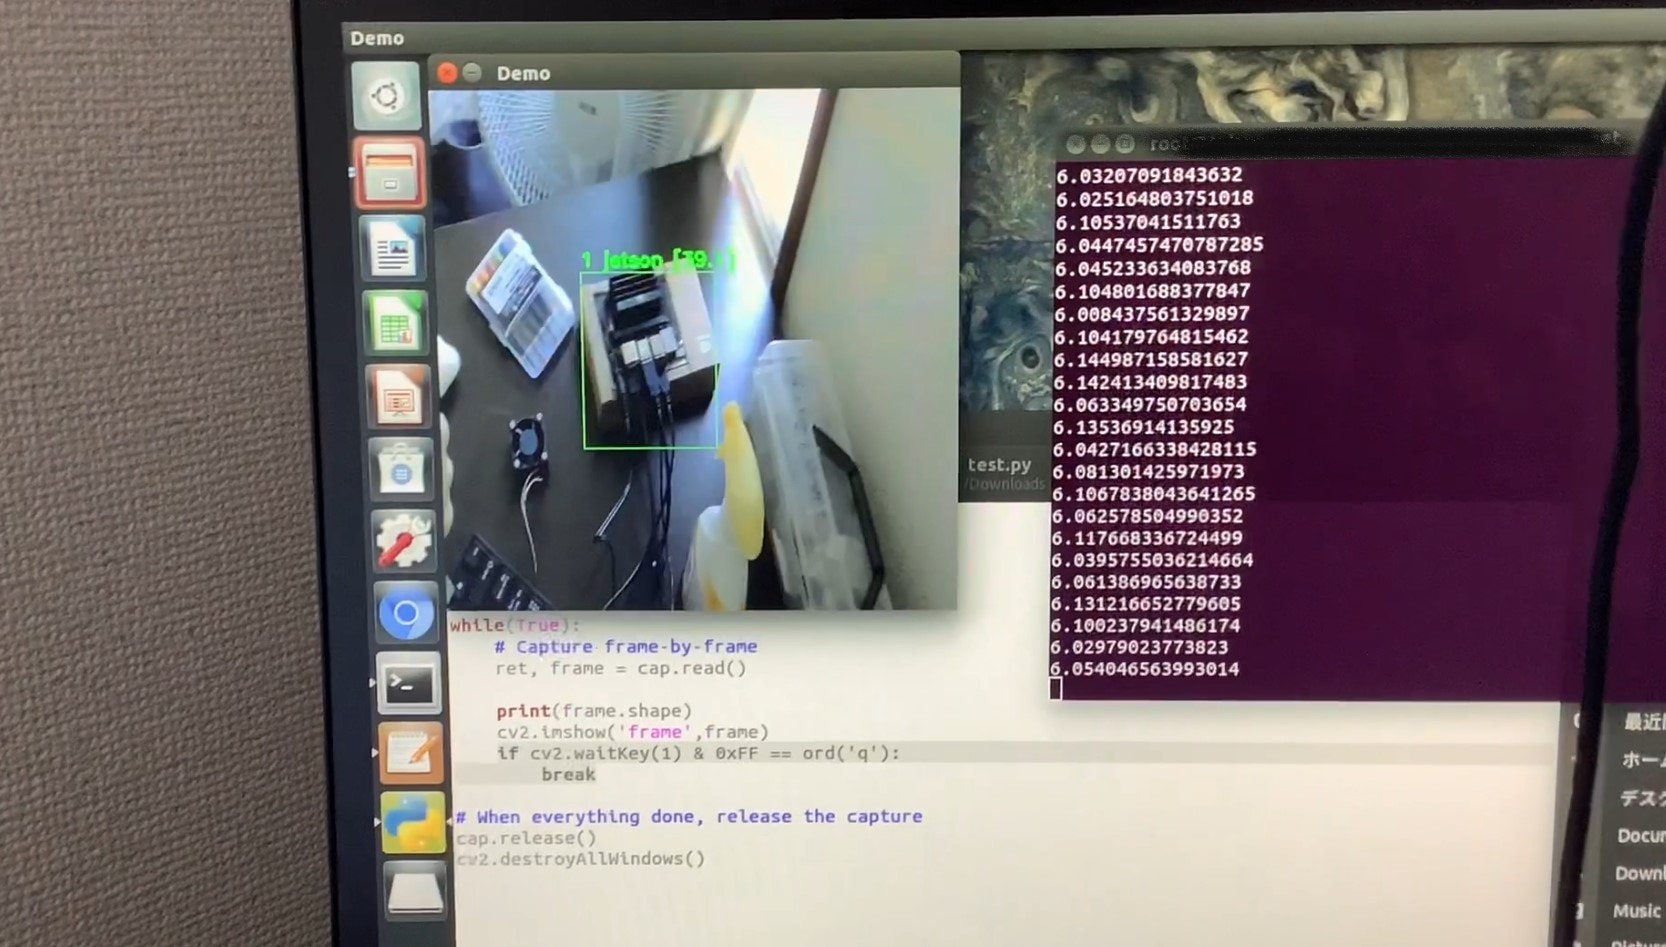
JetsonがJetsonを認識している。これはJetsonちゃんが自己意識に目覚め、霊長類並みの知能を有していることを示している。(大嘘)
まぁまだキーボードを自分だと認識してるあたり、サンプル数足りてない感じしますね。
FPSは6~7fpsほど出ていました。も少し高速化してほしい。そこらへんがpythonの限界なのかな?
C++でコーディングは.....考えとく
最後に
ロボットとかでちょっと画像認識したい人、YOLOは良いぞ