はじめに
少し前に、チームで頻繁に使うコードを共通ライブラリとしてまとめ、それをドキュメント化する業務に取り組んだ。
調べたところ、Sphinxというライブラリでドキュメントが作成できることを知った。
GitHubActions等を使用し「ソースコードを更新したら、ドキュメントも自動で更新する」ようなパイプラインを作れば、効率的に運用できると考え、実行してみたのでその時の記録を残したいと思う。
使用技術
- Python: 3.8
- Poetry: 1.0.10
- Sphinx: 5.0.1
- AWS CloudFormation
- AWS CloudFront
- AWS S3
- GitHub Actions
省略すること
- テストコードの記述と自動テスト
- tagでのバージョン管理
- 認証
方法
1. Poetryの導入
poetryを導入する際のコマンドは大きく二つある。
-
$ poery new:ディレクトリやREADMEファイルなど、プロジェクトを作成する上で必要なことを基本的に全てやってくれる -
$ poetry init:パッケージ一覧を管理するpyproject.tomlを生成する
ディレクトリの構成などは自分で行いたいので今回は$ poetry initでpyproject.tomlだけ作成する。
対話的にいろいろ質問されますが、後で編集できるのでとりあえずは全てエンターキーを押して進む。
$ poetry init
[tool.poetry]
name = "generate-python-document"
version = "0.1.0"
description = ""
authors = ["taki-21 <XXXXX@XXX.com>"]

[tool.poetry.dependencies]
python = "^3.9"

[tool.poetry.dev-dependencies]

[build-system]
requires = ["poetry-core>=1.0.0"]
build-backend = "poetry.core.masonry.api"
2. Dockerfile, docker-compose.ymlの作成
開発環境を構築するためDockerを作成する。
RUN poetry installで先ほど作成したpyproject.tomlに記載されているライブラリがインストールされる。
FROM python:3.8

WORKDIR /code

RUN apt-get update && \
    apt-get upgrade -y && \
    pip install poetry

COPY . .

RUN poetry install

EXPOSE 8080
続いて、docker-compose.ymlを作成する。
今回は頻繁に用いるpythonの関数をまとめたパッケージを想定しているので、サービス名はpython-wrapperとしている。
version: '3.8'

services:
  python-wrapper:
    container_name: python_wrapper
    build:
      context: ./
      dockerfile: ./Dockerfile
    ports:
      - "8080:8080"
    tty: true
    volumes:
      - .:/code/
      - ${PIP_CACHE_DIR:-cache-python-wrapper}:/root/.cache

volumes:
  cache-python-wrapper:
3. Sphinxの設定 から HTMLファイルの作成 まで
今回ドキュメント化するために使うライブラリ「Sphinx」をインストールする。
1. コンテナを立ち上げる
$ docker-compose up -d --build
2. コンテナに入る
$ docker-compose exec python_wrapper bash
3. コンテナ環境でSphinxとsphinx_rtd_themeをインストールする
# poetry add sphinx
# poetry add sphinx_rtd_theme
pyproject.tomlに追記され、同時に、poetry.lockファイルが生成される。
4. sphinx-apidocコマンドでドキュメント作成に必要なファイルを作成する
# poetry run sphinx-apidoc -F -H python-wrapper -o docs pythonwrapper
- 指定したディレクトリ配下(今回は
docs)にファイルが生成される。
5. 作成されたconf.pyの編集
-
conf.pyでは大きく分けて、以下4つの設定が可能。- Path setup(パスの設定)
- Project information(プロジェクト情報の設定)
- General configuration(一般的な設定)
- Options for HTML output(HTML出力に関するオプション)
- 今回は以下の3つを変更する
- パスの指定
- 拡張モジュールの追加
sphinx.ext.autodocsphinx.ext.viewcodesphinx.ext.todosphinx.ext.napoleonsphinx_rtd_theme
- デザインの設定(
sphinx_rtd_theme)
# Configuration file for the Sphinx documentation builder.
#
# This file only contains a selection of the most common options. For a full
# list see the documentation:
# https://www.sphinx-doc.org/en/master/usage/configuration.html

# -- Path setup --------------------------------------------------------------

# If extensions (or modules to document with autodoc) are in another directory,
# add these directories to sys.path here. If the directory is relative to the
# documentation root, use os.path.abspath to make it absolute, like shown here.
#

import sphinx_rtd_theme # sphinx_rtd_themeのインポート

import os # コメントアウトを外す
import sys # コメントアウトを外す

sys.path.insert(0, os.path.abspath('../')) # パスの指定(conf.pyから見てルートディレクトリを指定する)

# -- Project information -----------------------------------------------------

project = 'python-wrapper'
copyright = '2022, taki-21'
author = 'taki-21'


# -- General configuration ---------------------------------------------------

# Add any Sphinx extension module names here, as strings. They can be
# extensions coming with Sphinx (named 'sphinx.ext.*') or your custom
# ones.
extensions = [
    'sphinx.ext.autodoc', # 追加
    'sphinx.ext.viewcode', # 追加
    'sphinx.ext.todo', # 追加
    'sphinx.ext.napoleon', # 追加
    'sphinx_rtd_theme' # 追加
]

# Add any paths that contain templates here, relative to this directory.
templates_path = ['_templates']

# List of patterns, relative to source directory, that match files and
# directories to ignore when looking for source files.
# This pattern also affects html_static_path and html_extra_path.
exclude_patterns = ['_build', 'Thumbs.db', '.DS_Store']


# -- Options for HTML output -------------------------------------------------

# The theme to use for HTML and HTML Help pages.  See the documentation for
# a list of builtin themes.
#
html_theme = 'sphinx_rtd_theme' # 編集
html_theme_path = ["_themes", sphinx_rtd_theme.get_html_theme_path()] # 追加

# Add any paths that contain custom static files (such as style sheets) here,
# relative to this directory. They are copied after the builtin static files,
# so a file named "default.css" will overwrite the builtin "default.css".
html_static_path = ['_static']
6. HTMLファイルをビルドする
以下コマンドでHTMLファイルをビルドする。
# poetry run sphinx-build docs docs/_build
7. 動作確認
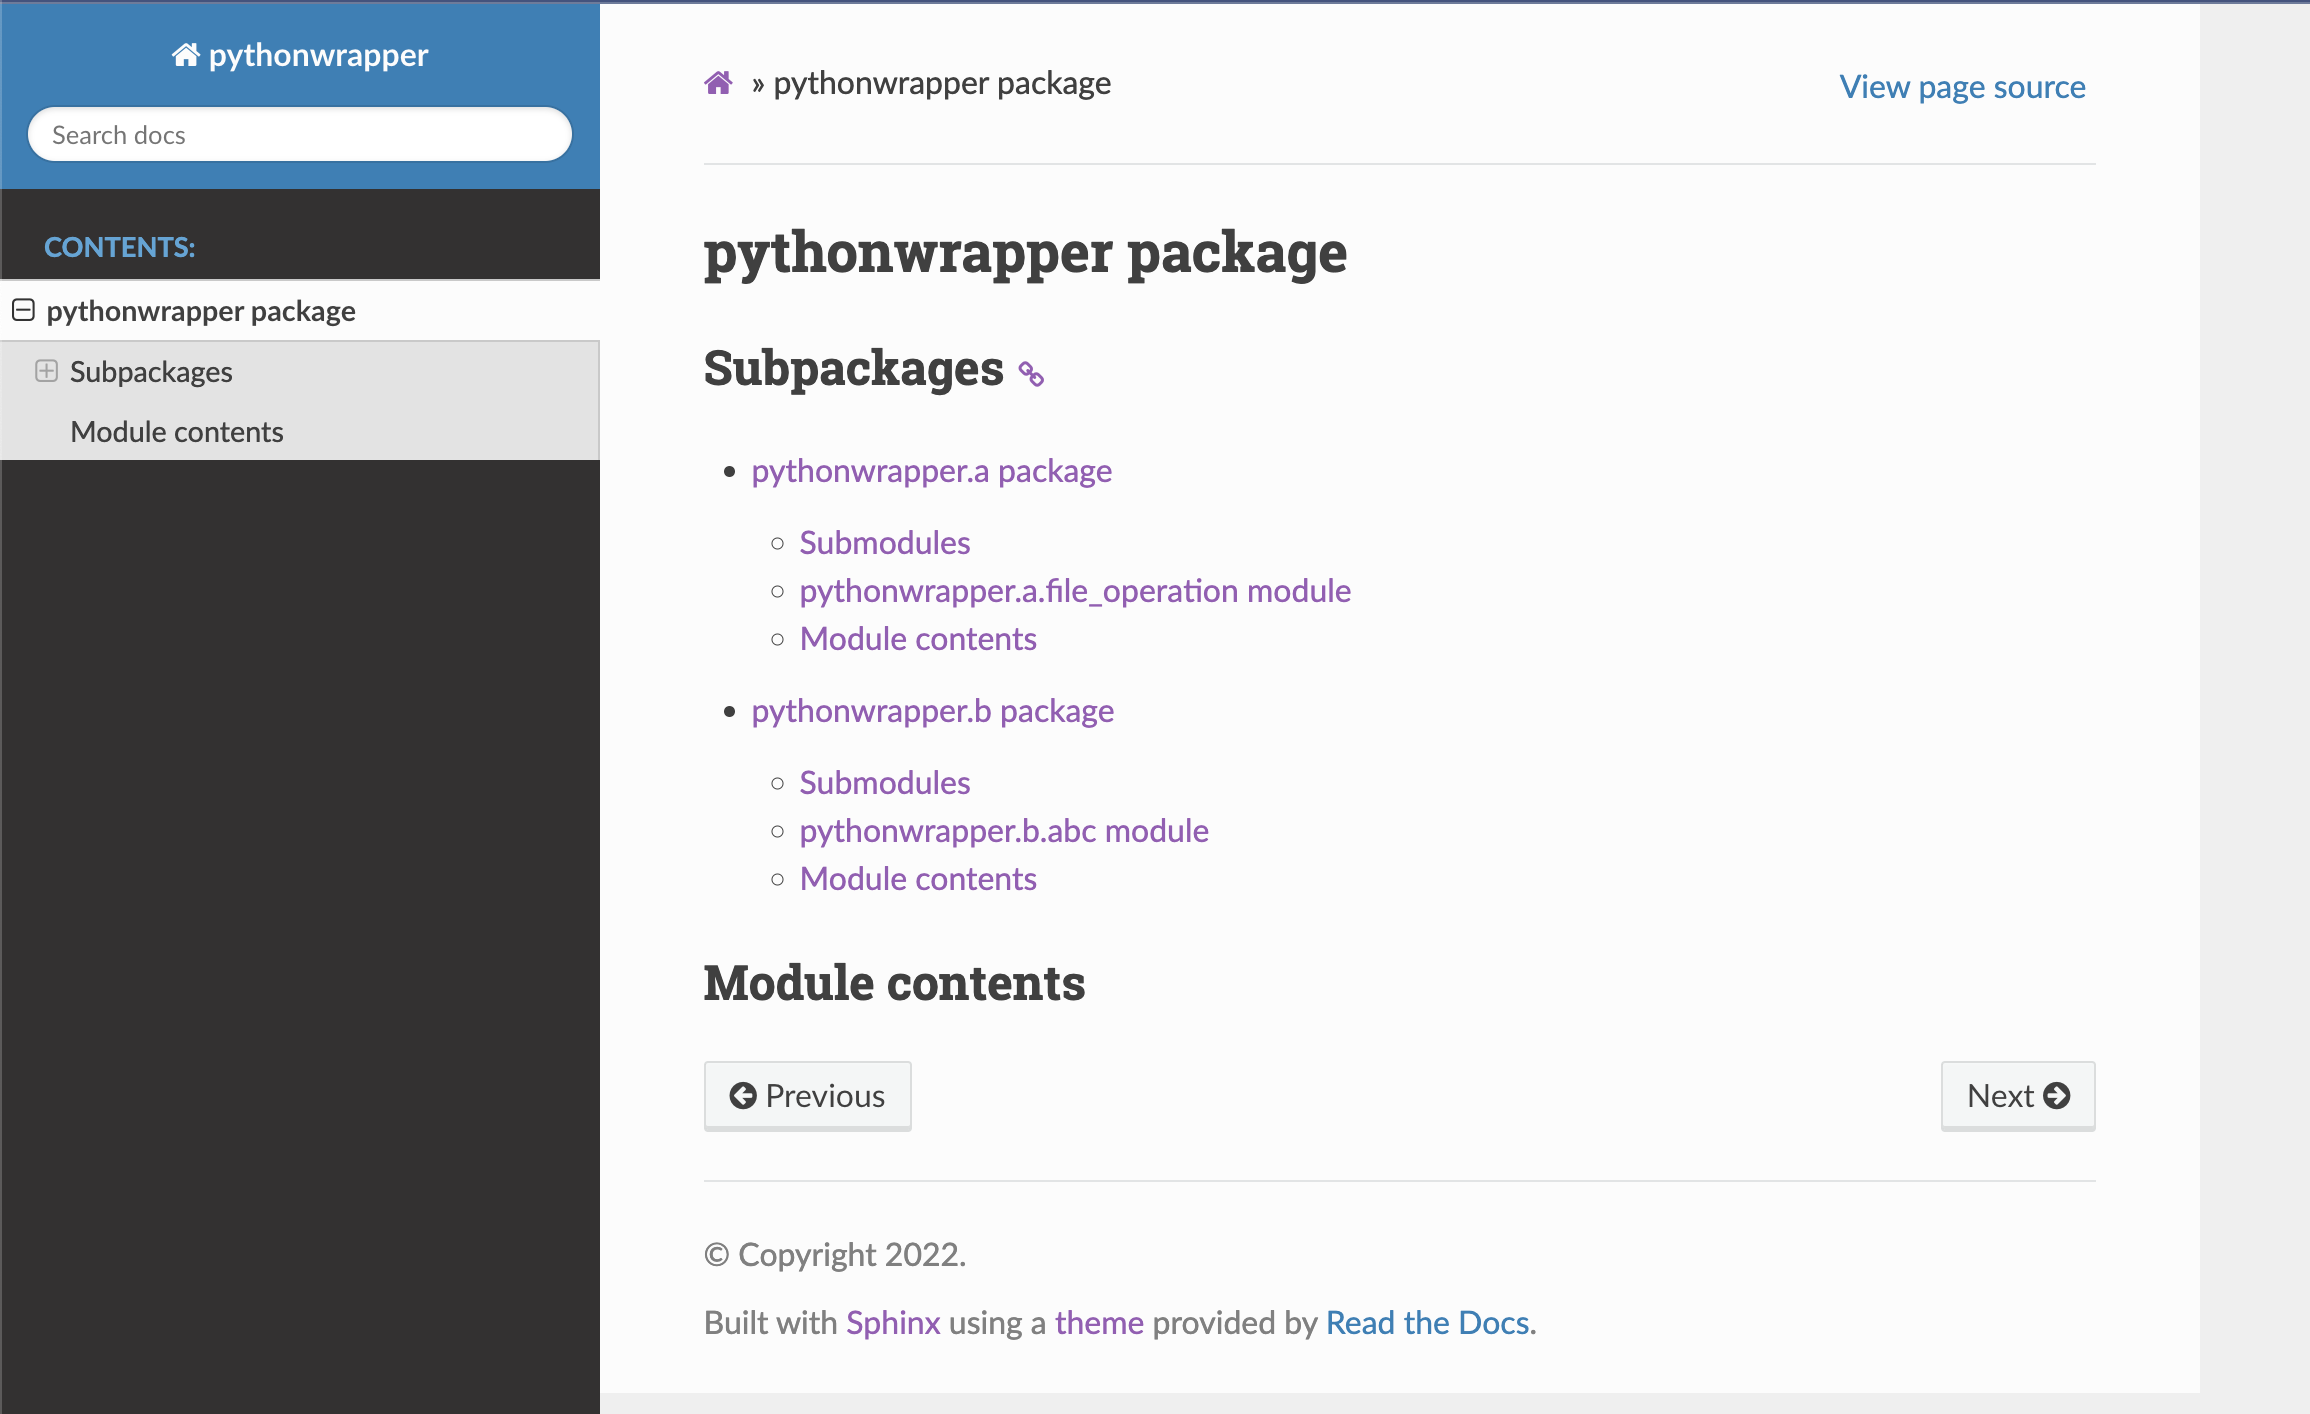
docs/_buildディレクトリに作成されたindex.htmlを確認すると、以下のようなページが出来上がっているのことが確認できる。
4. インフラの構築
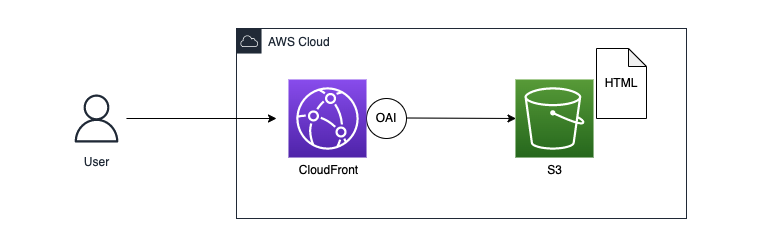
インフラ構成
レスポンス速度の向上のため、S3だけではなく、CloudFrontを間に設置し、エッジロケーション経由でコンテンツを配信する。
- CloudFrontのディストリビューションでS3バケットをオリジンに設定し、S3バケットに保存したHTMLファイルをCloudFrontを通して配信する。
- ディストリビューションにOAI(Origin Access Identity)を設定して、S3エンドポイントに直接アクセスできないようにする。
- このときS3のバケットポリシーでOAIのみアクセスを許可するよう設定する
- 参考: オリジンアクセスアイデンティティ (OAI) を使用して Amazon S3 コンテンツへのアクセスを制限する
方法
以下テンプレートをCloudFormationにアップロードし、各種リソースの作成を行う。
AWSTemplateFormatVersion: 2010-09-09
Description: Static contents distribution using S3 and CloudFront.

Resources:
  # S3 バケット
  MyBucket:
    Type: AWS::S3::Bucket
    Properties:
      BucketName: "python-wrapper-bucket"
      Tags:
        - Key: Name
          Value: python-wrapper
        - Key: CmBillingGroup
          Value: python-wrapper

  # S3 バケットポリシー
  MyBucketPolicy:
    Type: AWS::S3::BucketPolicy
    Properties:
      Bucket: !Ref MyBucket
      PolicyDocument:
        Statement:
          - Action: s3:GetObject
            Effect: Allow
            Resource: !Sub arn:aws:s3:::${MyBucket}/*
            Principal:
              AWS: !Sub arn:aws:iam::cloudfront:user/CloudFront Origin Access Identity ${CloudFrontOriginAccessIdentity}

  # CloudFront ディストリビューション
  CloudfrontDistribution:
    Type: AWS::CloudFront::Distribution
    Properties:
      DistributionConfig:
        Origins:
          - Id: S3Origin
            DomainName: !GetAtt MyBucket.RegionalDomainName
            S3OriginConfig:
              OriginAccessIdentity: !Sub origin-access-identity/cloudfront/${CloudFrontOriginAccessIdentity}
        Enabled: true
        DefaultRootObject: index.html
        Comment: !Sub ${AWS::StackName} distribution
        DefaultCacheBehavior:
          TargetOriginId: S3Origin
          ForwardedValues:
            QueryString: false
          ViewerProtocolPolicy: redirect-to-https
      Tags:
        - Key: Name
          Value: python-wrapper

  # CloudFront OAI
  CloudFrontOriginAccessIdentity:
    Type: AWS::CloudFront::CloudFrontOriginAccessIdentity
    Properties:
      CloudFrontOriginAccessIdentityConfig:
        Comment: !Ref AWS::StackName
5. GitHub Actionsによるデプロイパイプラインの構築
docsディレクトリはローカルには不要となるのでconf.pyをdocs.conf.devとしてルートディレクトリに外だししてdocsディレクトリは削除しておきます。
```yml:.github/workflows/deploy.yml
name: python-wrapper

on: [push]

env:
  PIP_CACHE_DIR: /tmp/cache/pip_python_wrapper
  AWS_REGION: ap-northeast-1
  AWS_ACCESS_KEY_ID: ${{ secrets.AWS_ACCESS_KEY_ID }}
  AWS_SECRET_ACCESS_KEY: ${{ secrets.AWS_SECRET_ACCESS_KEY }}
  ACCOUNT_ID: ${{ secrets.ACCOUNT_ID }}
  AWS_ROLE_ARN: arn:aws:iam::${{ secrets.ACCOUNT_ID }}:role/SwitchRoleForTest01

  BUCKET_NAME: python-wrapper-bucket

jobs:
  deploy:
    name: Deploy
    runs-on: ubuntu-latest
    steps:
      - name: Checkout
        uses: actions/checkout@v3

      - name: Configure AWS credentials
        uses: aws-actions/configure-aws-credentials@v1
        with:
          aws-access-key-id: ${{ env.AWS_ACCESS_KEY_ID }}
          aws-secret-access-key: ${{ env.AWS_SECRET_ACCESS_KEY }}
          aws-region: ${{ env.AWS_REGION }}

      - name: Cache pip
        uses: actions/cache@v2
        with:
          path: ${{ env.PIP_CACHE_DIR }}
          key: ${{ runner.os }}-python-cache-${{ hashFiles('./pyproject.toml') }}
          restore-keys: |
            ${{ runner.os }}-python-cache-


      - name: Build the docker-compose
        run: docker-compose up -d python-wrapper

      - name: python-wrapper install modules
        run: |
          docker exec python_wrapper /bin/bash -c "poetry install"
          docker exec python_wrapper /bin/bash -c "chmod -R 755 /root/.cache/"

      - name: Make base files
        run: docker exec python_wrapper poetry run sphinx-apidoc -F -H python-wrapper -o docs pythonwrapper

      - name: Copy conf file
        run: docker exec python_wrapper /bin/bash -c "cp docs.conf.dev docs/conf.py"

      - name: Build docs
        run: docker exec python_wrapper poetry run sphinx-build docs docs/_build

      - name: Upload HTML to S3
        run: aws s3 cp ./docs/_build/ s3://${{ env.BUCKET_NAME }} --recursive
- 注意点
aws s3 cp ./docs/_build/ s3://<bucket_name> --recursive
最後に --recursive オプションをつけないとディレクトリ配下のファイルがS3バケットにコピーされないので注意する。
動作確認
CLoudFrontのディストリビューションからドメイン名をクリックしてページを開きます。
この時、CloudFrontのドメイン名の後に/index.htmlをつけることを忘れないでください。
S3のエンドポイントからは直接ページを表示することができませんが、CloudFrontのドメイン名にアクセスすると、ページが表示することが可能となりました。
最後に
このようなチームで使用する共通ライブラリはプロダクトの開発が進むにつれて要望があがり、頻繁にアップデートすることがあるので、自動的にドキュメントの更新もできるようパイプラインを作っておくと、より効率的に開発ができると感じました。