この記事について
機械学習、Deep Learningの専門家ではない人が、Deep Learningを応用したアプリケーションを作れるようになるのが目的です。MNIST数字識別する簡単なアプリケーションを、色々な方法で作ってみます。特に、組み込み向けアプリケーション(Edge AI)を意識しています。
モデルそのものには言及しません。数学的な話も出てきません。Deep Learningモデルをどうやって使うか(エッジ推論)、ということに重点を置いています。
- Kerasで簡単にMNIST数字識別モデルを作り、Pythonで確認
- TensorFlowモデルに変換してPythonで使用してみる (Windows, Linux)
- TensorFlowモデルに変換してCで使用してみる (Windows, Linux)
- TensorFlow Liteモデルに変換してPythonで使用してみる (Windows, Linux)
- TensorFlow Liteモデルに変換してCで使用してみる (Linux)
- TensorFlow Liteモデルに変換してC++で使用してみる (Raspberry Pi)
- TensorFlow LiteモデルをEdge TPU上で動かしてみる (Raspberry Pi)
- TensorFlow.jsモデルに変換してブラウザ上で動かしてみる <--- 今回の内容
今回の内容
Qiita用に再撮影 pic.twitter.com/sdFtIESQum
— iwatake@禁酒0日目 (@iwatake2222) January 25, 2020
- Kerasモデル(h5)を、TensorFlow.jsモデルに変換する
- TensorFlow.jsモデルを使ってみる
- カメラ入力から数字識別するWebアプリを作ってみる
ソースコード: https://github.com/iwatake2222/tfjs_study/tree/master/mnist
環境
- Google colaboratory
- Tensorflow 1.15
- VisualStudio Code
- ブラウザ(Chrome)
TensorFlow.jsとは
機械学習用 JavaScript ライブラリです。
TensorFlow.jsを使ってモデルを作り、推論するところまで出来ます。
本記事では以前Pythonで作成したモデルを変換して推論してみます。
TensorFlow.jsもチュートリアルやデモが充実しているのですが、推論に特化したシンプルなコードがなかったり、分かりやすい前処理コードが見つからなかったので、そこらへんを補完する意味で本記事を書いてみました。
- 参考文献
Kerasモデル(h5)を、TensorFlow.jsモデルに変換する
Kerasモデルを作る
元になるモデルはKerasで簡単にMNIST数字識別モデルを作り、Pythonで確認で作成したconv_mnist.h5を使います。
これは、28x28グレースケール画像を入力して、数字の0~9を識別する簡単なMNIST用モデルです。
モデル作成コードは、https://github.com/iwatake2222/tfjs_study/blob/master/mnist/CreateMnistModel_tfjs.ipynb の通りです。
TensorFlow.jsモデルに変換する
変換のために、tensorflowjs パッケージが必要になるのでインストールします。その後、tensorflowjs_converter で変換します。
(https://www.tensorflow.org/js/tutorials/conversion/import_keras )
Google Colaboratoryだと、以下のようになります。
TensorFlow.jsモデルをconv_mnist_tfjs.tar.gzとしてローカルPCにダウンロードして保存しておきます。
!pip install tensorflowjs

!mkdir conv_mnist_tfjs
!tensorflowjs_converter --input_format keras \
                       conv_mnist.h5 \
                       ./conv_mnist_tfjs
!tar zcvf conv_mnist_tfjs.tar.gz conv_mnist_tfjs

# Download to local
from google.colab import files
files.download("./conv_mnist_tfjs.tar.gz")
files.download( "./conv_mnist.h5")
モデルの中身は、以下のようになっています。モデルサイズが小さいのでbinは1つだけですが、大きいモデルになると数が増えていくと思います。
model.jsonにモデル情報が格納されています。
model.json
group1-shard1of1.bin
TensorFlow.jsモデルを使ってみる
(おまけ)JavaScript開発環境
開発環境の準備
VisualStudio Codeに以下のExtensionをインストールしました。
- 必須
- Debugger for Chrome
- Live Server
- 必要に応じて
- ESLint
- HTMLHint
- IntelliSense for CSS class name in HTML
デバッグ方法
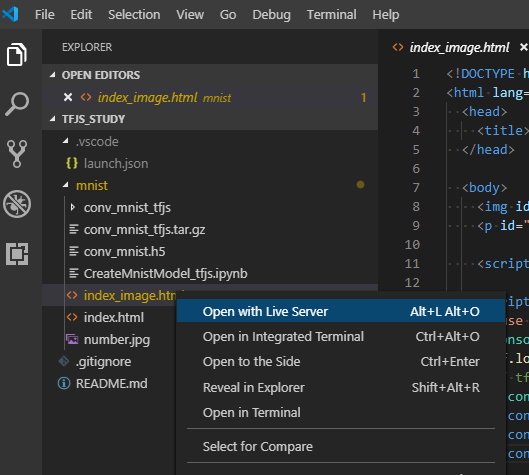
適当なhtmlファイルを右クリックして、「Open with Live Server」をクリックします。
すると、ローカルサーバが起動してブラウザ上で選択したhtmlが開かれます。
次に、これをデバッグできるようにします。
「F5」キーを押して、「Select Environment」から「Chrome」を選びます。その後、launch.json が開かれるので、url の項目を先ほど起動したローカルサーバ上のアドレスに変更します。
{
	// Use IntelliSense to learn about possible attributes.
	// Hover to view descriptions of existing attributes.
	// For more information, visit: https://go.microsoft.com/fwlink/?linkid=830387
	"version": "0.2.0",
	"configurations": [
		{
			"type": "chrome",
			"request": "launch",
			"name": "Launch Chrome against localhost",
			"url": "http://127.0.0.1:5500/mnist/index_image.html",
			"webRoot": "${workspaceFolder}"
		}
	]
}
簡単なテストアプリでMNIST数字識別する
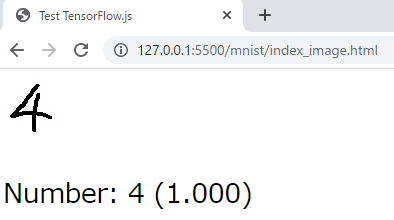
コードと実行結果
HTML5のimgタグの内容を読み込んで、数字識別してみます。
<!DOCTYPE html>
<html lang="en">
  <head>
    <title>Test TensorFlow.js</title>
  </head>

  <body>
    <img id="img" src="number.jpg"></img>
    <p id="result" style="font-size: 20pt;"></p>

    <script src="https://cdn.jsdelivr.net/npm/@tensorflow/tfjs/dist/tf.min.js"></script>

    <script>
      "use strict";
      console.log(tf.version)
      tf.loadLayersModel("./conv_mnist_tfjs/model.json").then(model => {
      // tf.loadLayersModel("https://iwatake2222.github.io/tfjs_study/mnist/conv_mnist_tfjs/model.json").then(model => {
        console.log(model.input.shape);
        const MODEL_HEIGHT  = model.input.shape[1];
        const MODEL_WIDTH   = model.input.shape[2];
        const MODEL_CHANNEL = model.input.shape[3];

        /* Read image and convert into tensor */
        const img_org = document.getElementById('img');
        let inputTensor = tf.browser.fromPixels(img_org, 3);  // get rgb (without alpha)

        /* Resize to model input size (28x28) */
        inputTensor = inputTensor.resizeBilinear([MODEL_HEIGHT, MODEL_WIDTH])

        /* Convert to grayscale (keep dimension(HWC))*/
        inputTensor = inputTensor.mean(2, true);

        /* Reverse black and white */
        inputTensor = tf.sub(255, inputTensor);

        /* 0.0 - 1.0 */
        inputTensor = inputTensor.cast("float32").div(tf.scalar(255));

        /* expand dimension (HWC ->  NHWC) */
        inputTensor = inputTensor.expandDims();

        /* Inference */
        // scores = model.execute(inputTensor, "output_scores");
        const scores = model.predict(inputTensor).dataSync();

        /* Post process */
        const maxScoreIndex = tf.argMax(scores).arraySync();

        /* Display result */
        console.log(scores);
        document.getElementById("result").innerHTML = "Number: " + maxScoreIndex + " (" + scores[maxScoreIndex].toFixed(3) + ")";

      });
    </script>
  </body>
</html>
コードの説明
TensorFlow.jsを使う準備
<script src="https://cdn.jsdelivr.net/npm/@tensorflow/tfjs/dist/tf.min.js"></script> によって、TensorFlow.jsを読み込んでいます。
Node.jsで実行する場合には、代わりにimport * as tf from '@tensorflow/tfjs'; するみたいです。
モデルのロード
tf.loadLayersModel("./conv_mnist_tfjs/model.json") によって、先ほど変換したTensorFlow.jsモデルを読み込みます。この関数はPromiseを返す非同期関数なので、モデル読み込み後の処理はthen の中に記載します。モデル読み込み後、まずはモデルのサイズ情報をログに出力してみました。
画像読み込み
tf.browser.fromPixels によって、imgタグの内容をTensorに変換しています。
imgタグは、RGBAの4チャネルの画像情報を持ちます。Tensorに変換する際にはアルファチャネルを除いた3チャネルだけを取得します。そのため、3(default)を指定しています。これで、R0,G0,B0,A0,R1,G1,B1,A1,R2,G2,B2,A0というピクセル画像データをR0,G0,B0,R1,G1,B1,R2,G2,B2というTensorにします。
https://js.tensorflow.org/api/latest/#browser.fromPixels
前処理(リサイズ)
tf.image.resizeBilinear によって、モデルの入力サイズ(28x28)にリサイズしています。
https://js.tensorflow.org/api/latest/#image.resizeBilinear
前処理(グレースケール化)
tf.mean によって、RGB3チャネルTensorをグレースケールの1チャネルTensorに変換します。axis = 2を指定することで、[R,G,B] の平均を取ります。また、keepDims=trueを指定することで、平均を取った後も、shapeの形を維持します(28x28ではなく、28x28x1のままにする)。
https://js.tensorflow.org/api/latest/#mean
[[R,G,B],[R,G,B],[R,G,B],],
[[R,G,B],[R,G,B],[R,G,B],],
[[R,G,B],[R,G,B],[R,G,B],],
⇒
[[Y],[Y],[Y],],
[[Y],[Y],[Y],],
[[Y],[Y],[Y],],
前処理(白黒反転)
MNISTモデルの学習に使用したデータは黒字に白のため、白黒反転させます。
そのために、255とtf.sub で引き算しています。
前処理(値の正規化)
MNISTモデルの学習時に、ピクセル値0~255を、0.0~1.0に正規化しました。
これに揃えるために、tf.cast でfloat32にし、tf.div で255で割っています。
前処理(次元の拡張)
TensorFlowの入力TensorはNHWCを期待しています。
ここまで、通常の画像だったのでTensorの形はHWCの3次元でした。推論なので、N(バッチ数)が1になるようtf.expandDims で拡張します。
https://js.tensorflow.org/api/latest/#expandDims
推論
tf.LayersModel.predict によって、推論処理を実行します。この関数自体は、tf.Tensor を返却します。
https://js.tensorflow.org/api/latest/#tf.LayersModel.predict
tf.Tensor から結果のデータを取り出す必要があります。
そのために、tf.Tensor.data や tf.Tensor.dataSync を使います。tf.Tensor.data だと非同期処理になります。サンプルコードだと大体こちらが使われているのですが、ここでは簡単にするためtf.Tensor.dataSync を使いました。
これによって、scoresという変数に結果が格納されます。
https://js.tensorflow.org/api/latest/#class:Tensor
後処理
画数時のスコアが格納されたscoresから、最もスコアの高いものを探します。
そのために、tf.argMax を使いました。この関数もtf.Tensor を返却すうるので、そこからデータを配列として取り出すために、今回はarraySync を使いました。
最後に結果を表示して完了です。
カメラ入力から数字識別するWebアプリを作ってみる
コードと実行結果
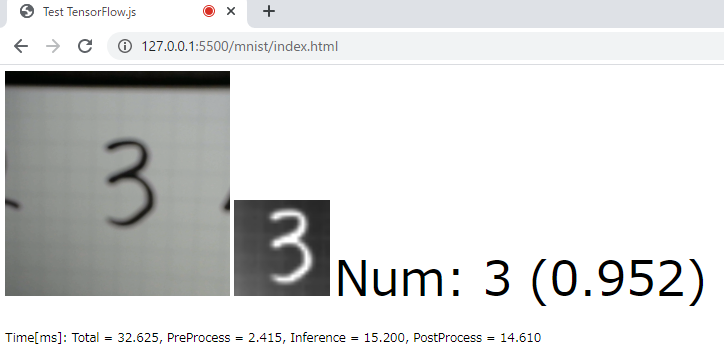
次に、ウェブカメラで撮影した画像から数字識別をするという、少し実用的なアプリケーションを作ってみます。
カメラから画像を読み込み、中央付近をクロップ/リサイズしてMNISTモデルに食わせています。
その際、簡易的な2値化処理もしています。
<!DOCTYPE html>
<html lang="en">
  <head>
    <title>Test TensorFlow.js</title>
  </head>

  <body>
    <video id="video"></video>
    <canvas id="canvas"></canvas>
    <span id="result" style="font-size: 48pt;"></span>
    <p id="time"></p>

    <script src="https://cdn.jsdelivr.net/npm/@tensorflow/tfjs/dist/tf.min.js"></script>

    <script>
      "use strict";
      console.log(tf.version)

      // Parameters
      const CANVAS_SIZE = [300, 300];
      const TARGET_AREA = [0.25, 0.25, 0.75, 0.75]; // y1, x1, y2, x2
      const WEBCAM_CONFIG = {facingMode: "environment"};
      let   MODEL_SIZE = [-1, -1, -1, -1]; // NHWC. get from model

      async function initCam() {
        // const videoElement = document.createElement("video");
        try {
          const videoElement = document.getElementById("video")
          videoElement.width = CANVAS_SIZE[0];
          videoElement.height = CANVAS_SIZE[1];
          const cam = await tf.data.webcam(videoElement, WEBCAM_CONFIG);
          return cam;
        } catch (e) {
          alert("[initCam] failed");
          alert(e.message);
          return null;
        }
      }

      async function initModel() {
        try {
          let model = await tf.loadLayersModel("./conv_mnist_tfjs/model.json");
          MODEL_SIZE = model.input.shape;
          return model;
        } catch (e) {
          try {
            alert("[initModel] failed to open local model. try to load from server");
            let model = await tf.loadLayersModel("https://iwatake2222.github.io/tfjs_study/mnist/conv_mnist_tfjs/model.json");
            MODEL_SIZE = model.input.shape;
            return model;
          } catch (e) {
            alert("[initModel] failed");
            alert(e.message);
            return null;
          }
        }
      }

      async function getImage(cam) {
        const imgCam = await cam.capture(); /* [300x300x3] tensor */

        const processedImg = tf.tidy(() => {
          /* Crop center and Resize to model input size (28x28) */
          /* need expandDims and squeeze to ficropAndResize */
          let img = tf.image.cropAndResize(imgCam.expandDims(), [TARGET_AREA], [0], [MODEL_SIZE[1], MODEL_SIZE[2]]).squeeze()

          /* Convert to grayscale (keep dimension(HWC))*/
          img = img.mean(2, true);

          /* Reverse black and white */
          img = tf.sub(tf.scalar(255), img);

          // /* 0.0 - 1.0 */
          // img = img.cast("float32").div(tf.scalar(255));
          /* Rough binarization */
          img = img.cast("float32").div(tf.scalar(128));  /* 0.0 - 2.0 */
          img = img.clipByValue(0.5, 1.5).sub(0.5); /* 0.5 - 1.5 -> 0.0 - 1.0 */

          return img;
        });
        imgCam.dispose();

        tf.browser.toPixels(processedImg.resizeBilinear([128, 128]), document.getElementById("canvas"));

        /* expand dimension (HWC ->  NHWC) */
        return processedImg.expandDims();
      }

      (async function() {
        const cam = await initCam();
        const model = await initModel();
        if (cam == null || model == null) {
          document.getElementById("result").innerHTML = "init failed"
          return;
        }

        while(1) {
          /* Get image and pre process */
          const t0 = performance.now();
          const inputTensor = await getImage(cam);

          /* Inference */
          const t1 = performance.now();
          const scores = await model.predict(inputTensor).data();
          inputTensor.dispose();

          /* Post process */
          const t2 = performance.now();
          const maxScoreIndex = await tf.argMax(scores).array();

          /* Display result */
          const t3 = performance.now();
          console.log(scores);
          document.getElementById("result").innerHTML = "Num: " + maxScoreIndex + " (" + scores[maxScoreIndex].toFixed(3) + ")";

          const t4 = performance.now();
          document.getElementById("time").innerHTML = `Time[ms]: Total = ${(t4 - t0).toFixed(3)},
          PreProcess = ${(t1 - t0).toFixed(3)},
          Inference = ${(t2 - t1).toFixed(3)},
          PostProcess = ${(t3 - t2).toFixed(3)}`;
        }
      }());

    </script>
  </body>
</html>
コードの説明
先ほどのシンプルなコードを少し整理しました。
各処理を関数化しました。
上述した通り、モデルのロードやtf.Tensorからデータを取り出したりする処理は非同期となります。
今回は、await によって処理の完了を待っています。デモコードでもほとんどはこの方法が使われていました。
注意点として、await は async 関数の中でしか使うことはできません。トップレベルではworkaroundとして無名async関数の中で処理しています。
カメラ初期化
webカメラから画像を読み込むために、tf.data.webcam を使用しています。webcamVideoElement にHTML5のvideoエレメントを指定することで、自動的に取り込んだ画像を表示してくれます。また、スマホで使用することを考慮して、webcamConfig のfacingMode にはenvironment (背面カメラ)を指定しました。
モデルのロード
やっていることは先ほどと同じですが、少し処理を変えています。
TensorFlow.jsではモデルロードのためにFetch APIを使用しているらしく、ファイルはサーバ上にあるものしかロードできません。
今回デバッグ時はローカルサーバを立てているので問題はないのですが、スマホなどにファイル一式をコピーして実行すると以下のようなエラーが出てしまいます。
platform_browser.ts:28 Fetch API cannot load file:///C:/Users/tak/Desktop/tfjs_study/mnist/conv_mnist_tfjs/model.json. URL scheme must be "http" or "https"
そのため、ローカルにあるモデルのロードに失敗したら、サーバ(GitHub) にあるモデルをロードするようにしました。
画像読み込み
cam.capture() によって画像(300x300のTensor)を取得します。
前処理
基本的にやっていることは先ほどのコードと同じです。
TensorFlow.jsでは、処理の最中に使われたTensorのメモリは自動的に開放されないようです。
そのため、処理全体をtf.tidyで囲って解放するようにします。
また、tf.tidy で囲った関数の戻り値は解放されないため、tf.dispose によって自分で解放しています。
上手くできていないと、GPUメモリ使用量がどんどん増加していくのですぐに気づくと思います(毎フレーム処理する場合)。
https://js.tensorflow.org/api/latest/#tidy
https://js.tensorflow.org/api/latest/#dispose
前処理(CropAndResize)
先ほどは画像全体を28x28にリサイズしたのですが、今回はカメラ入力なので、画面中央付近だけをクロップして使用するようにしました。
そのためにtf.image.cropAndResize を使用しました。
tf.image.cropAndResize は入力としてNHWCのTensorを期待しているので、わざわざexpandDims で次元拡張しています。
その他パラメータによって、クロップしたい領域([Y1,X1,Y2,X2] を画像サイズに対する比率で指定)、リサイズサイズを指定します。結果もNHWCで出力されるので、squeeze によってHWCに戻しています。
前処理(2値化)
先ほどは、入力画像を単にグレースケール化して、0.0~1.0に正規化しました。
実際のカメラ画像だとノイズなどの影響で、白くても値が200くらいだったり、黒くても値が50くらいだったりします。本来はモデル学習時のAugmentation等でも工夫をすべきですが、ここでは推論時の入力画像を2値化することで対応します。
2値化用の関数は用意されていなかったので、自分で簡単に作ってみました。
まず、グレースケール化した画像を128で割って、0.0~2.0に正規化します。その後、tf.clipByValue によって0.5~1.5の範囲にクリップします。その後、0.5を引いて0.0~1.0の範囲に戻します。これによって0~64は0(0.0)に、192~255は255(1.0)になります。中途半端な明るさのものは2値化されずに戻ります。
モデルへの入力画像を表示する
tf.browser.toPixels によって、TensorをHTML5のcanvasエレメントに出力しています。
これによって、実際にどのような画像がモデルへ入力されたかを確認できます。
おわりに
いつも前処理や画像入力はOpenCVでやっていたため、JavaScriptではどうするのかなと思っていました。
一度Tensorに変換してしまえばTensorFlowによって提供される関数で大抵のことはできるようです。また、おそらくWebGLによってGPUなども使われるため、自分で下手に頑張るよりも速いはずです。
なお、本コードは分かりやすさとデバッグ性重視のため全部同期実行になっています。
非同期処理をうまく活用すればもう少し高速化するはずです。


