この記事について
機械学習、Deep Learningの専門家ではない人が、Deep Learningを応用したアプリケーションを作れるようになるのが目的です。MNIST数字識別する簡単なアプリケーションを、色々な方法で作ってみます。特に、組み込み向けアプリケーション(Edge AI)を意識しています。
モデルそのものには言及しません。数学的な話も出てきません。Deep Learningモデルをどうやって使うか(エッジ推論)、ということに重点を置いています。
- Kerasで簡単にMNIST数字識別モデルを作り、Pythonで確認
- TensorFlowモデルに変換してPythonで使用してみる (Windows, Linux)
- TensorFlowモデルに変換してCで使用してみる (Windows, Linux)
- TensorFlow Liteモデルに変換してPythonで使用してみる (Windows, Linux)
- TensorFlow Liteモデルに変換してCで使用してみる (Linux)
- TensorFlow Liteモデルに変換してC++で使用してみる (Raspberry Pi)
- TensorFlow LiteモデルをEdge TPU上で動かしてみる (Raspberry Pi) <--- 今回の内容
今回の内容
- Kerasモデル(h5)を、Edge TPU用に変換する
- Raspberry Pi上でのEdge TPU環境を用意する
- Raspberry Piに接続されたEdge TPU上でモデルを動作させてMNIST数字識別をする
TensorFLow Lite用モデルはKerasで簡単にMNIST数字識別モデルを作り、Pythonで確認で作成したconv_mnist.h5を使います
ソースコード: https://github.com/iwatake2222/colaboratory_study/blob/master/DL_tutorial/DL_tutorial_07.ipynb
環境
- Google colaboratory
- Tensorflow 1.15
Keras用モデルをEdge TPU用モデルに変換する
量子化モデルの作り方
Edge TPU上で動作可能なモデルは、いくつかの制約を満たしたTensorFlow Liteモデル(tflite)になります。(https://coral.ai/docs/edgetpu/models-intro/)
一番の重要点は、「8-bit量子化モデル」であることです。モデルを量子化するためには2つの方法があります。
- Quantization-aware training
- 学習時に量子化する
- 必要なこと: 学習コードの変更
- Good: 対応するオペレーションが多い
- Bad: 現在、Tensorflow2.0では非サポート。Kerasでは非サポート
- Post-training quantization
- 学習後に量子化する
- 必要なこと: tflite変換時にデータセットが必要(大した手間ではない)
- Good: 学習済みのモデル、学習コードをそのまま使える
- Bad: 対応するオペレーションが少ない
今回は、2のPost-training quantizationを試します。
tfliteへの変換は、変換コマンド(tflite_convert)でもできるのですが、今回はPython APIを使います。
https://www.tensorflow.org/lite/convert
量子化したTensorFlow Liteモデルに変換する
Kerasで簡単にMNIST数字識別モデルを作り、Pythonで確認 で作成したKerasモデル(conv_mnist.h5)を変換します。下記スクリプトではダウンロードしていますが、前記事から継続して実施している場合には不要です。
%tensorflow_version 1.x
from __future__ import absolute_import, division, print_function, unicode_literals
import tensorflow as tf
import numpy as np

print(tf.__version__)

# Download Keraas model
!wget -O conv_mnist.h5 "https://drive.google.com/uc?export=download&id=1OLR1n5Pq0CGPz7Bw5pad-fvYsgCnKvHh"

## Prepara dataset generator for calibration
(x_train, _), (_, _) = tf.keras.datasets.mnist.load_data()
x_train = x_train.reshape(x_train.shape[0], x_train.shape[1], x_train.shape[2], 1)
x_train = x_train / 255.0
x_train = x_train.astype(np.float32)
num_calibration_images = 100
calibration_indexes   = np.random.choice(x_train.shape[0], num_calibration_images, replace=False)
def representative_dataset_gen():
  for i in range(num_calibration_images):
    yield [x_train[calibration_indexes[i: i + 1]]]


# Convert
# loaded_model = tf.keras.models.load_model("conv_mnist.h5")
# converter = tf.lite.TFLiteConverter.from_keras_model(loaded_model)
converter = tf.lite.TFLiteConverter.from_keras_model_file("conv_mnist.h5")

converter.optimizations = [tf.lite.Optimize.DEFAULT]
converter.representative_dataset = representative_dataset_gen

# For full integer quantization
converter.target_spec.supported_ops = [tf.lite.OpsSet.TFLITE_BUILTINS_INT8]
converter.inference_input_type = tf.uint8
converter.inference_output_type = tf.uint8
converter.experimental_new_converter = True   # will be no need in the future

tflite_model = converter.convert()
open("conv_mnist_quant.tflite", "wb").write(tflite_model)
上述したように、学習時に使用したものと同じデータが必要です。このデータの形式(値範囲など)は学習時と全く同じである必要があります。今回はMNISTなので、再度ダウンロードして100個ランダムに選ぶようにしました。representative_dataset_gen で1つずつリスト形式で返却するようにします。(https://www.tensorflow.org/lite/performance/post_training_integer_quant )
これによって、conv_mnist_quant.tfliteというファイルが出来上がります。
saved modelから変換する場合は、以下を使います。
converter = tf.lite.TFLiteConverter.from_saved_model(saved_model_dir)
Edge TPU用モデルに変換する
次に、作成したTensorFlow Liteモデルを、Edge TPU用に変換します。これには、Googleが提供しているコンパイラを使用しますので、インストールが必要です。
下記コマンドを実行すると、「conv_mnist_quant_edgetpu.tflite 」が生成されます。
# Install EdgeTPU
!curl https://packages.cloud.google.com/apt/doc/apt-key.gpg | sudo apt-key add -
!echo "deb https://packages.cloud.google.com/apt coral-edgetpu-stable main" | sudo tee /etc/apt/sources.list.d/coral-edgetpu.list
!sudo apt -y update
!sudo apt -y install edgetpu

# Convert into edgetpu model
!edgetpu_compiler conv_mnist_quant.tflite
(おまけ)Full integer quantizationとInteger quantization
Post-training量子化によって、重みと活性化関数の値が8bit整数になります。
単に変換するだけだと、万が一量子化できない演算があったら、その演算はfloat32のままになります。これを防ぐために上記のコードでは、tf.lite.OpsSet.TFLITE_BUILTINS_INT8 を指定しています。この場合、量子化できない演算があると変換に失敗します。
また、入出力はfloat32のままになります。これをint8にするために、上記コードではconverter.inference_input_type = tf.uint8 を指定しています。
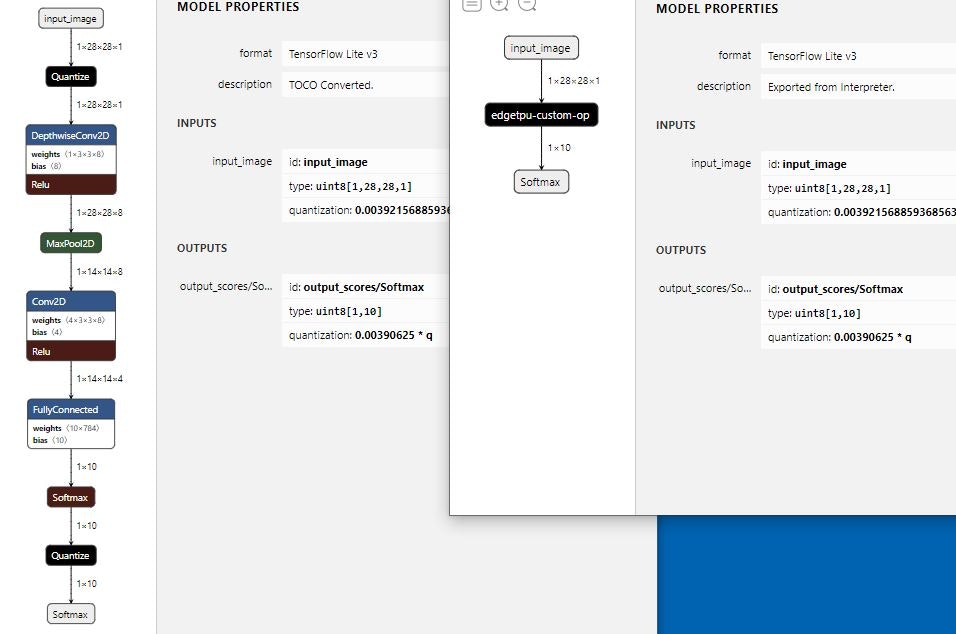
Full integer quantization
上述のオプション指定を行うFull integer quantizationだと、tfliteモデルとしての入出力はint8になります。そのため、edgetpu用モデルに変換後、全ての演算がEdgeTPU実行になります (edgetpu-custom-op にまとめられます)。
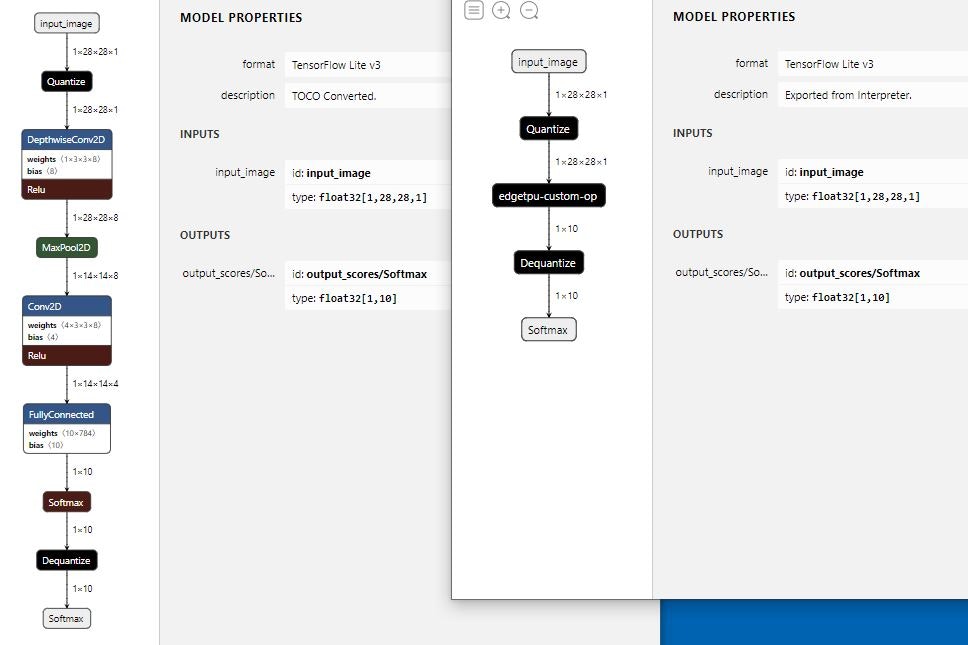
Integer quantization
上述のオプション指定を行わないInteger quantizationだと、tfliteモデルとしての入出力はfloat32のままになります。そのため、edgetpu用モデルに変換後、量子化用の演算がCPU実行になります。
量子化を含む演算は全部で7個あるのですが、そのうちの2個(Quantize)がCPU実行になったと、edgetpuコンパイル時に警告が出ます。
それでも、EdgeTPUでの実行も可能でした。注意点として、Edge TPU PythonライブラリのAPIを使うと、ライブラリ部がuint8型を期待しているらしく動かすことはできませんでした。(エラー内容: TypeError: Cannot cast array data from dtype('float32') to dtype('uint8') according to the rule 'safe' )。Tensorflow Lite delegateだとInteger quantizationモデルでも動かすことが出来ました。
Edge TPU Compiler version 2.0.267685300

Model compiled successfully in 22 ms.

Input model: conv_mnist_quant.tflite
Input size: 10.82KiB
Output model: conv_mnist_quant_edgetpu.tflite
Output size: 68.88KiB
On-chip memory available for caching model parameters: 7.95MiB
On-chip memory used for caching model parameters: 52.75KiB
Off-chip memory used for streaming uncached model parameters: 0.00B
Number of Edge TPU subgraphs: 1
Total number of operations: 7
Operation log: conv_mnist_quant_edgetpu.log

Model successfully compiled but not all operations are supported by the Edge TPU. A percentage of the model will instead run on the CPU, which is slower. If possible, consider updating your model to use only operations supported by the Edge TPU. For details, visit g.co/coral/model-reqs.
Number of operations that will run on Edge TPU: 5
Number of operations that will run on CPU: 2
See the operation log file for individual operation details.
参考:
https://www.tensorflow.org/lite/performance/post_training_quantization
https://www.tensorflow.org/lite/performance/post_training_integer_quant
https://nextremer-nbo.blogspot.com/2019/10/tf20keraspost-training-quantization.html
(おまけ)Tensorflow2.xでPost-training量子化してみる
Note: To use post-training quantization, you must use TensorFlow 1.15 and set both the input and output type to uint8. (Currently, TensorFlow 2.0 does not support uint8 input/output with post-training quantization.)
https://coral.ai/docs/edgetpu/models-intro/ に上記のように書かれているため、ここまで、Tensorflow1.15を使用してきました。
しかし、実はTensorflow2.xでも変換まではできました(2020年1月現在)。
2.xを使うメリットとして、Tensorflow2.xで作成、保存したsaved modelはTensorflow1.15では変換できませんでした。が、Tensorflow2.2だと変換できました。
以下の点に注意が必要です。
- バージョンは標準で入っている2.1ではなく、2.2(tf-nightly)を使う
-
ValueError: Failed to parse the model: /tensorflow-2.1.0/python3.6/tensorflow_core/lite/python/optimize/_tensorflow_lite_wrap_calibration_wrapper.so: undefined symbol: _ZTIN10tensorflow6DeviceE.さもないと、というエラーが発生。
-
- Full integer quantizationには対応していないので、Integer quantizationになる。
%tensorflow_version 2.x
!pip3 uninstall -y tensorflow
!pip3 install tf-nightly
Raspberry Pi上でのEdge TPU環境を用意する
基本的には、https://coral.withgoogle.com/docs/accelerator/get-started/ の通りに進めれば大丈夫です。
ラズパイ上の端末で以下コマンドでインストールします。
echo "deb https://packages.cloud.google.com/apt coral-edgetpu-stable main" | sudo tee /etc/apt/sources.list.d/coral-edgetpu.list
curl https://packages.cloud.google.com/apt/doc/apt-key.gpg | sudo apt-key add -
sudo apt-get update
sudo apt-get install python3-edgetpu libedgetpu1-max
Edge TPU上でモデルを動作させてMNIST数字識別をする
Edge TPU Python APIを使用する
まず、Edge TPU Python API (https://coral.ai/docs/edgetpu/api-intro/ ) を使用してMNIST数字識別するアプリケーションを作ります。PythonでEdge TPUを使用する場合には、大抵はこの方法になると思います。識別、検知処理を簡単にするためのクラスが提供されています。
注意点があります。識別用にはClassificationEngine クラスが提供されています。このエンジンのclassify_with_image 関数を使うことで、前処理、後処理を含めて簡単に識別処理を行うことが出来ます。
が、この関数は入力として3chを期待しており、1ch入力だとエラーを返します。そのため、基本的な関数であるrun_inference を使って前処理、後処理を自分で実装しました。
import time
from PIL import Image, ImageOps
import numpy as np
from edgetpu.classification.engine import ClassificationEngine
from edgetpu.utils import dataset_utils
import time

MODEL_FILENAME = "conv_mnist_quant_edgetpu.tflite"
# MODEL_FILENAME = "conv_mnist_quant.tflite"

# Initialize engine.
engine = ClassificationEngine(MODEL_FILENAME)
_, height, width, _ = engine.get_input_tensor_shape()

# Read input image
img = Image.open("4.jpg")

# Pre process
img = img.convert("L")
img = ImageOps.invert(img)
img = img.resize((width, height), Image.NEAREST)

# Conver to tensor
input_tensor = np.asarray(img).flatten()
input_tensor = input_tensor.astype(np.uint8)

# Run inference
# results = engine.classify_with_image(img, threshold=0.5, top_k=1)
start = time.time()
for i in range(1000):
	inference_time, scores = engine.run_inference(input_tensor)
elapsed_time = time.time() - start

# Retrieve result
result = np.argmax(scores)
print("predicted number is {} [{:.2f}]".format(result, scores[result]))
# print("inference time is " + str(inference_time) + "[msec]")
print("inference time is {:.2f} [msec]".format(elapsed_time * 1000 / 1000.))
predicted number is 4 [1.00]
inference time is 0.39 [msec]
TensorFlow Lite delegateを使用する(Full integer quantization)
次に、TensorFlow Lite delegate を使ってみます。(https://coral.ai/docs/edgetpu/tflite-python/ )
この場合は、Tensorflow Lite用のコードとほぼ同じになります。
ただし、TensorflowLiteランタイムのインストールが必要になります。https://www.tensorflow.org/lite/guide/python
wget https://dl.google.com/coral/python/tflite_runtime-1.14.0-cp37-cp37m-linux_armv7l.whl
sudo pip3 install tflite_runtime-1.14.0-cp37-cp37m-linux_armv7l.whl
import time
from PIL import Image, ImageOps
import numpy as np
import tflite_runtime.interpreter as tflite
import time

MODEL_FILENAME = "conv_mnist_quant_edgetpu.tflite"
# MODEL_FILENAME = "conv_mnist_quant.tflite"

# Load model
# interpreter = tf.lite.Interpreter(model_path=MODEL_FILENAME)
interpreter = tflite.Interpreter(model_path=MODEL_FILENAME, experimental_delegates=[tflite.load_delegate("libedgetpu.so.1")])

interpreter.allocate_tensors()
input_details = interpreter.get_input_details()[0]
output_details = interpreter.get_output_details()[0]
_, height, width, _ = input_details["shape"]

# Read input image
img = Image.open("4.jpg")

# Pre process
img = img.convert("L")
img = ImageOps.invert(img)
img = img.resize((width, height), Image.NEAREST)

# Conver to tensor (1, 28, 28, 1)
if output_details["dtype"] == np.uint8:
	print("Full Integer quantization")
	input_tensor = np.asarray(img).astype(np.uint8)
else:
	print("Integer quantization")
	input_tensor = np.asarray(img).astype(np.float32)
	input_tensor /= 255.
input_tensor = input_tensor.reshape(1, input_tensor.shape[0], input_tensor.shape[1], 1)

# set input tensor
interpreter.set_tensor(input_details["index"], input_tensor)

# Inference
start = time.time()
for i in range(1000):
	interpreter.invoke()
elapsed_time = time.time() - start

# Retrieve result
scores = interpreter.get_tensor(output_details["index"])
# If the model is quantized (uint8 data), then dequantize the results
if output_details["dtype"] == np.uint8:
	scale, zero_point = output_details["quantization"]
	scores = scale * (scores - zero_point)

result = np.argmax(scores[0])
print("predicted number is {} [{:.2f}]".format(result, scores[0][result]))
print("inference time is {:.2f} [msec]".format(elapsed_time * 1000 / 1000.))
INFO: Initialized TensorFlow Lite runtime.
Full Integer quantization
predicted number is 4 [1.00]
inference time is 0.40 [msec]
(おまけ)TensorFlow Lite delegateを使用する(Integer quantization)
最後に、試しにInteger quantizationしたモデルを使ってみます。
Edge TPU APIだと上述のエラーによって実行できませんでしたが、TensorFlow Lite delegateだと実行可能でした。
Integer quantizationの場合には、inpute_tensor をnp.uint8からnp.float32に変更して、0.0-1.0に正規化しています。この切り替え処理は上記コード内で既に実装済みなので、モデルを切り替えるだけで試すことが出来ます。
結果、処理時間、精度はFull Integer quantizationとほぼ同じでした。
INFO: Initialized TensorFlow Lite runtime.
Integer quantization
predicted number is 4 [1.00]
inference time is 0.40 [msec]