Javalinというフレームワークを試してみたので投稿します。
このフレームワークは、参考書や日本語のサイトなどの情報が少ないですが、DocsとTutorialがとてもわかりやすく、特にTutorialには、それぞれサンプルプログラムがGitHUBに投稿されているので、Intellijにそのままインポートしてカスタマイズできたりしますので、WEBアプリを作成するのにあまり困らないでしょう。
環境
| カテゴリ | 値 |
|---|---|
| os | windows 10 home 64bit |
| Java | 1.8 |
| framework | Javalin 3.6 |
| 開発環境 | IntelliJ IDEA 2019.2 |
1. Hello World
Gradleプロジェクトを新規作成して、以下を実装するだけです。JavaがインストールされていればWeb Serverも立ち上がります。Tomcatも必要ありません。
import io.javalin.Javalin;

public class HelloWorld {
    public static void main(String[] args) {
        Javalin app = Javalin.create().start(7000);
        app.get("/", ctx -> ctx.result("Hello World"));
    }
}
2. Tutorial(Basic website structure)
実践では、Tutorialのサンプルプログラムをダウンロードし、カスタマイズするようなアプローチがいいでしょう。
「Basic website structure」tipsy/javalin-website-exampleをダウンロードして、Intellijで開いてみます。
└─src
    └─main
        ├─java
        │  └─app
        │      │  Main.java
        │      ├─book
        │      │      Book.java
        │      │      BookController.java
        │      │      BookDao.java
        │      ├─index
        │      │      IndexController.java
        │      ├─login
        │      │      LoginController.java
        │      ├─user
        │      │      User.java
        │      │      UserController.java
        │      │      UserDao.java
        │      └─util
        │              Filters.java
        │              HerokuUtil.java
        │              MessageBundle.java
        │              Path.java
        │              RequestUtil.java
        │              ViewUtil.java
        └─resources
            ├─localization
            │      messages_de.properties
            │      messages_en.properties
            ├─public
            │  │  main.css
            │  └─img
            │          english.png
            │          favicon.png
            │          german.png
            │          logo.png
            ├─velocity
            │  │  layout.vm
            │  │  notFound.vm
            │  ├─book
            │  │      all.vm
            │  │      one.vm
            │  ├─index
            │  │      index.vm
            │  └─login
            │          login.vm
            └─velocityconfig
                    velocity_implicit.vm
Mainを実行するとそのまま動きます。あとはDAOなどのクラスをデータベースに変換するだけで、プロジェクトテンプレートを作成することができます。
3. Thymeleaf
さきほどインポートしたプロジェクトのテンプレートエンジンは「velocity」になっています。Thymeleafを使いたい場合は変更が必要です。「javalin」は、thymeleafもデフォルトでサポートしているようですが、dialectに対応していないようなので、カスタマイズしましょう。
htmlのルートは、「/public/templates」とします。以下の構成でファイルを作成していきます。
layout.htmlで、layout-dialectを使ってhtmlのレイアウトを共通化します。
└─src
    ├─main
    │  ├─java
    │  │  └─app
    │  │          AppThymeleafRenderer.java
    │  │          Main.java
    │  └─resources
    │      ├─public
    │      │  └─css
    │      │         main.css
    │      └─templates
    │          │  layout.html
    │          └─example
    │                  index.html
(1) gradle.gradleに以下を追加します。
※Projectは、gradleで焼き直ししています
    compile group: 'org.thymeleaf', name: 'thymeleaf', version: '3.0.11.RELEASE'
    compile group: 'nz.net.ultraq.thymeleaf', name: 'thymeleaf-layout-dialect', version: '2.4.1'
    compile "org.webjars:jquery:3.4.1"
(2) ThymeleafRenderer
Thymeleafは、「layout-dialect」を使う場合などカスタマイズする場合独自のrendererを作成する必要があります。
import io.javalin.http.Context;
import io.javalin.plugin.rendering.FileRenderer;
import nz.net.ultraq.thymeleaf.LayoutDialect;
import org.jetbrains.annotations.NotNull;
import org.thymeleaf.TemplateEngine;
import org.thymeleaf.context.WebContext;
import org.thymeleaf.templateresolver.ClassLoaderTemplateResolver;
import org.thymeleaf.templateresolver.ITemplateResolver;

import java.util.Map;

public class AppThymeleafRenderer implements FileRenderer {

    private final TemplateEngine templateEngine;

    public AppThymeleafRenderer() {
        templateEngine = templateEngine();
    }

    @Override
    public String render(@NotNull String filePath, @NotNull Map<String, Object> model, @NotNull Context ctx) {
        WebContext context =
                new WebContext(ctx.req, ctx.res, ctx.req.getServletContext(), ctx.req.getLocale());
        context.setVariables(model);
        return templateEngine.process(filePath, context);
    }

    private TemplateEngine templateEngine() {
        TemplateEngine templateEngine = new TemplateEngine();
        templateEngine.setTemplateResolver(templateResolver());
        // LayoutDialectを追加する。
        templateEngine.addDialect(new LayoutDialect());
        return templateEngine;
    }

    private ITemplateResolver templateResolver() {
        ClassLoaderTemplateResolver templateResolver = new ClassLoaderTemplateResolver();
        // /templatesフォルダをルートにする。
        templateResolver.setPrefix("/templates/");
        return templateResolver;
    }

}
(3) Main.javaに追加
Mainメソッドで、「JavalinRenderer」に、先に作成した「AppThymeleafRenderer」クラスを追加します。
また、Routerでhtmlを返す場合は、「ctx.render」とします。
public class Main {
    public static void main(String[] args) {

//add
        JavalinRenderer.register(new AppThymeleafRenderer(), ".html");
//add end
        Javalin app = Javalin.create(config->{
            config.enableWebjars();
            config.addStaticFiles("/public");
        }).start(7000);
//add
        app.get("/template", ctx -> {
            Map<String, Object> model = new HashMap<>();
            model.put("hello", "hello world");
            ctx.render("/example/index.html", model);
        });
//add end
(4) layout.html
<!DOCTYPE html>
<html lang="ja" xmlns="http://www.w3.org/1999/xhtml"
      xmlns:th="http://www.thymeleaf.org"
      xmlns:layout="http://www.ultraq.net.nz/thymeleaf/layout">
<head>
    <meta charset="UTF-8">
    <title>Spring Boot Sample Site</title>
    <meta name="description" content="common-meta">
    <script th:src="@{/webjars/jquery/3.4.1/jquery.min.js}"></script>
    <link rel="stylesheet" href="css/main.css">
</head>
<body>
<div class="container">
    <div class="inner">
        <div class="body header">
            <div class="apptitle">Example</div>
        </div>
        <div class="body main">
            <div layout:fragment="contents"></div>
        </div>
        <div class="body footer">
            <footer style="text-align:center;">共通フッタ</footer>
        </div>
    </div>
</div>
</body>
</html>
<!DOCTYPE html>
<html
        xmlns:th="http://www.thymeleaf.org"
        xmlns:layout="http://www.ultraq.net.nz/thymeleaf/layout"
        layout:decorate="~{/layout.html}">
<head></head>
<body>
<div layout:fragment="contents">
    <div th:text="${hello}">hello</div>
</div>
</body>
</html>
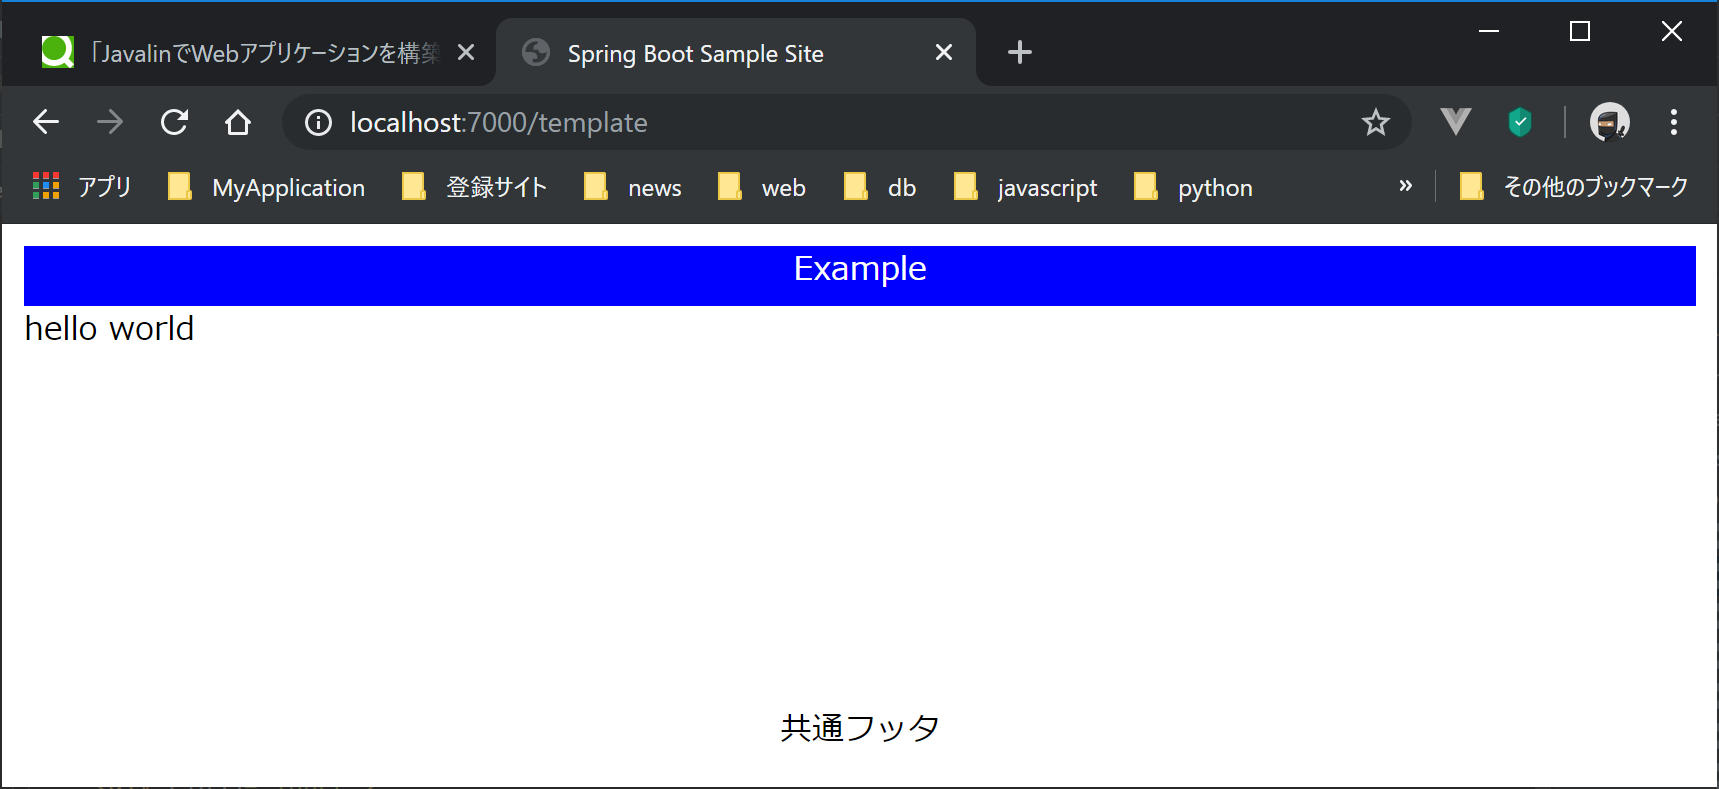
http://localhost:7000/templateにアクセスすると、layoutも正しく出力されてます。
4. Database
いろいろ悩んだ末、「Apache commons-dbutils」を使うことにしました。理由は単純にわかりやすいので。Connection Poolは、「HikariCP」、Databaseには「postgresql」を使用します。
    compile "com.zaxxer:HikariCP:2.7.3"
    compile "org.postgresql:postgresql:42.2.8"
    compile "commons-dbutils:commons-dbutils:1.7"
import com.zaxxer.hikari.HikariConfig;
import com.zaxxer.hikari.HikariDataSource;
import javax.sql.DataSource;

public class PGDataSource {
    private static HikariDataSource ds = null;
    public PGDataSource(){
        HikariConfig hikariconfig = new HikariConfig();
        hikariconfig.setUsername("testuser");
        hikariconfig.setPassword("************************");
        hikariconfig.setJdbcUrl("jdbc:postgresql://localhost:5432/javalindb");
        hikariconfig.setMaximumPoolSize(2);
        ds=new HikariDataSource(hikariconfig);
    }
    public DataSource getDataSource(){
        return ds;
    }
    public void close(){
        if (!ds.isClosed()) ds.close();
    }

}
import lombok.Data;

@Data
public class User {
    private String username;
    private String password;
    public User(){};
    public User(String username, String password){
        this.username=username;
        this.password=password;
    };
}
public class Main {

//add
    private static PGDataSource ds;
    public static Connection getConnection() throws SQLException {
        Connection connection = ds.getDataSource().getConnection();
        return connection;
    }
//add end
    public static void main(String[] args) {
        JavalinRenderer.register(new AppThymeleafRenderer(), ".html");
//add
        ds = new PGDataSource();
//add end
//・・・・・・・
//add
        app.get("/user", ctx -> {
            QueryRunner runner = new QueryRunner();
            ResultSetHandler rsh = new BeanListHandler(User.class);
            List<User> users = (List<User>) runner.query(getConnection(),
                    "select username from public.users",rsh);
            ctx.json(users);
        });
//add end
これだけわかれば、あとはDocsとTutorialを見ていけばWEBアプリを作成できます。

