![]() PHPExcelの後継PhpSpreadsheetを使おう
PHPExcelの後継PhpSpreadsheetを使おう ![]()
PHPExcelは非推奨となったため、これからExcel出力を始める場合はPHPExcelの後継であるPHPOffice/PhpSpreadsheetを導入することを推奨する。
PHPExcelでエクセルを出力する方法を紹介していきます。なお、ここで紹介するPHPコードはGitHubのsuin/phpexcel-playground: PHPExcelの遊び場で公開しています。
PHPExcelとは?
PHPExcelとは、Excel95、Excel2007等のエクセルファイルを読み書きすることができるピュアPHPのライブラリです。WindowsやExcelが必要ないため、Linux環境だけで完結するのが特徴です。
PHPExcelのインストール
Composerでインストールする
composer require phpoffice/phpexcel
空っぽのExcelを出力する
プロパティだけを持った空っぽのエクセルを出力してみます。
date_default_timezone_set('Asia/Tokyo');
require __DIR__ . '/vendor/autoload.php';

$book = new PHPExcel();
$book->getProperties()
    ->setCreator("田中 太郎")
    ->setLastModifiedBy("山田 花子")
    ->setCompany('株式会社○○')
    ->setCreated(strtotime('2016-01-02 03:04:05'))
    ->setModified(strtotime('2016-02-03 04:05:06'))
    ->setManager('佐藤 次郎')
    ->setTitle("タイトル")
    ->setSubject("サブジェクト")
    ->setDescription("説明文")
    ->setKeywords("エクセル PHP 出力")
    ->setCategory("PHPすごい");

$writer = PHPExcel_IOFactory::createWriter($book, 'Excel2007');
$writer->save('output/01-からっぽのエクセル.xlsx');
出力結果

セルに値を入れる
$book = new PHPExcel();
$sheet = $book->getActiveSheet();

// セル番地で書いてみる
$sheet->setCellValue('A1', 10000);
$sheet->setCellValue('A2', true);
$sheet->setCellValue('A3', 'テスト');

// 行列番号で書いてみる
$column = 1;
$sheet->setCellValueByColumnAndRow($column, 1, 'B1');
$sheet->setCellValueByColumnAndRow($column, 2, 'B2');
$sheet->setCellValueByColumnAndRow($column, 3, 'B3');

$writer = PHPExcel_IOFactory::createWriter($book, 'Excel2007');
$writer->save('output/05-セルに書いてみる.xlsx');
出力結果

数式をセルに書く
数式も値と同様に、setCellValueに文字列として渡すことで書き込むことができます。
$book = new PHPExcel();
$sheet = $book->getActiveSheet();
$sheet->setCellValue('A1', 64);
$sheet->setCellValue('B1', 4);
$sheet->setCellValue('C1', '=A1 * B1');

$writer = PHPExcel_IOFactory::createWriter($book, 'Excel2007');
$writer->save('output/12-計算式を書き込む.xlsx');
出力結果

シートに名前をつける
$book = new PHPExcel();
$book->getActiveSheet()->setTitle("シート1です");
$book->createSheet()->setTitle("二枚目!");
$book->createSheet()->setTitle("さんまいめだよ");

$writer = PHPExcel_IOFactory::createWriter($book, 'Excel2007');
$writer->save('output/02-シートに名前をつける.xlsx');
出力結果

xlsとxlsxを出力する
Excel 97〜Excel 2003のxls形式と、Excel 2007以降のxlsx形式を出力する方法です。
$book = new PHPExcel();
$sheet = $book->getActiveSheet();
$sheet->setCellValue('A1', 'テスト');

// xls: Excel97~2003
$writer2003 = PHPExcel_IOFactory::createWriter($book, 'Excel5');
$writer2003->save('output/08-excel2003.xls');

// xlsx: Excel2007~
$writer2007 = PHPExcel_IOFactory::createWriter($book, 'Excel2007');
$writer2007->save('output/08-excel2007.xlsx');
Excelをダウンロードできるようにする
出力したExcelをダウンロードできようにするには、HTTPヘッダにContent-Type: application/vnd.ms-excelとContent-Dispositionを設定して、出力先をphp://outputにします。
$book = new PHPExcel();
$book->getActiveSheet()->setTitle('テスト');

header('Content-Type: application/vnd.ms-excel');
header('Content-Disposition: attachment;filename="output.xlsx"');
header('Cache-Control: max-age=0');

$writer = PHPExcel_IOFactory::createWriter($book, 'Excel2007');
$writer->save('php://output');
なお、日本語ファイル名でダウンロードさせる際は、User-Agent分岐無しに日本語ファイル名でファイルをダウンロードさせる (理論編)をご参考に。
範囲を指定して罫線を引く
$book = new PHPExcel();
$sheet = $book->getActiveSheet();
$sheet
    ->getStyle('A1:C3')
    ->getBorders()
    ->getAllBorders()
    ->setBorderStyle(PHPExcel_Style_Border::BORDER_THIN);

// 色を指定する場合
$sheet
    ->getStyle('A5:C8')
    ->applyFromArray([
        'borders' => [
            'allborders' => [
                'style' => PHPExcel_Style_Border::BORDER_THIN,
                'color' => ['rgb' => 'FF0000'],
            ],
        ],
    ]);

$writer = PHPExcel_IOFactory::createWriter($book, 'Excel2007');
$writer->save('output/10-罫線で表を描く.xlsx');
出力結果

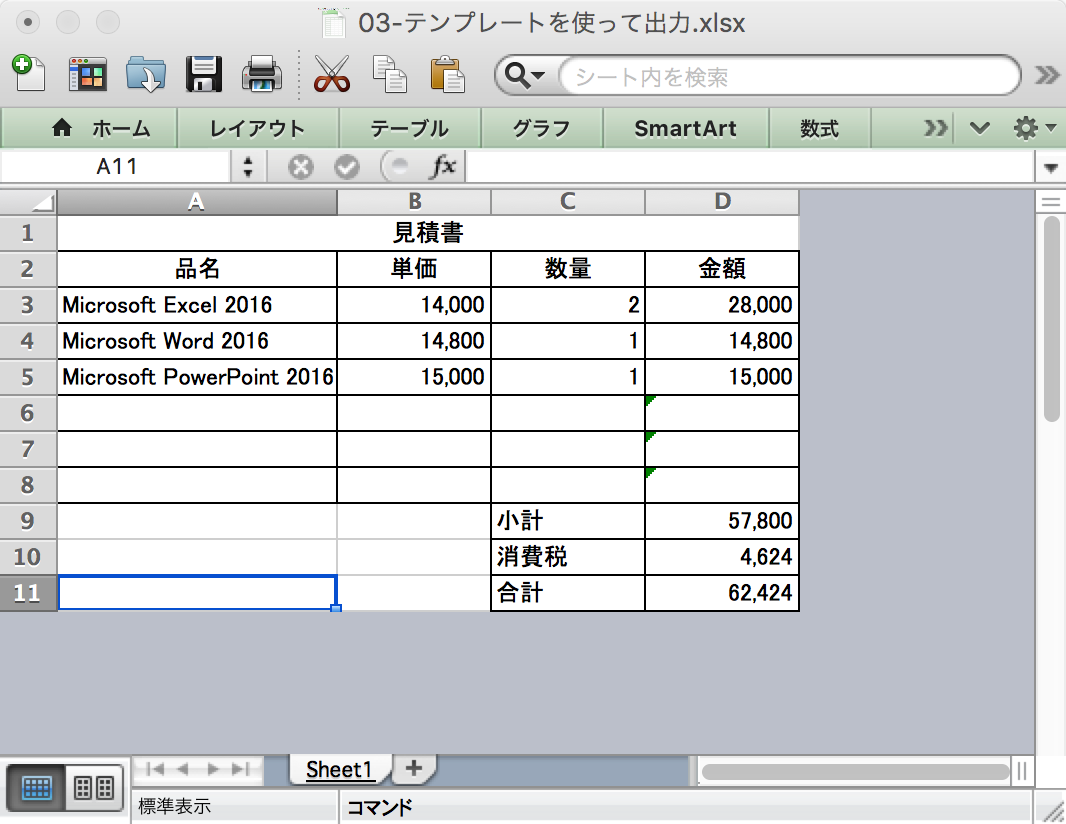
テンプレートから出力する
SUMなどの数式や罫線などをあらかじめ仕込んだ「03-見積書テンプレート.xltx」というテンプレートを作って、テンプレートのセルに値を入れていく例です。

$products = [
    ['Microsoft Excel 2016',      14000, 2],
    ['Microsoft Word 2016',       14800, 1],
    ['Microsoft PowerPoint 2016', 15000, 1],
];

$book = PHPExcel_IOFactory::load('templates/03-見積書テンプレート.xltx');
$sheet = $book->getActiveSheet();

$rowOffset = 3;
foreach ($products as $row => $product) {
    foreach ($product as $col => $value) {
        $sheet->setCellValueByColumnAndRow($col, $row + $rowOffset, $value);
    }
}

$writer = PHPExcel_IOFactory::createWriter($book, 'Excel2007');
$writer->save('output/03-テンプレートを使って出力.xlsx');
出力結果
大量の行を書いてみる
PHPExcelがどの程度メモリを使うのか調べてみます。エクセルは最大1,048,576行までも持てますが、今回は100,000行の範囲で、1行に「あ」を32文字ずつ書いてメモリ使用量を調査してみます。
ini_set('memory_limit', '1024M');

$book = new PHPExcel();
$sheet = $book->getActiveSheet();
$startedOn = time();

for ($row = 1; $row <= 100000; $row++) {
    $sheet->setCellValueByColumnAndRow(0, $row, str_repeat('あ', 32));
    if ($row % 10000 === 0) {
        $writer2007 = PHPExcel_IOFactory::createWriter($book, 'Excel2007');
        $writer2007->save('output/04-large-excel.xlsx');
        $writer5 = PHPExcel_IOFactory::createWriter($book, 'Excel5');
        $writer5->save('output/04-large-excel.xls');
        rap($row, $startedOn);
    }
}

function rap($row, $startedOn)
{
    printf(
        "% 4d sec| rows: % 6d xlsx: % 4uKB xls: % 4uKB mem: %.02fMB\n",
        time() - $startedOn,
        $row,
        filesize('output/04-large-excel.xlsx') / 1024,
        filesize('output/04-large-excel.xls') / 1024,
        memory_get_usage(true) / 1024 / 1024
    );
}
結果
   0 sec| rows:  10000 xlsx:   57KB xls:  338KB mem: 19.00MB
   2 sec| rows:  20000 xlsx:  107KB xls:  673KB mem: 33.00MB
   4 sec| rows:  30000 xlsx:  158KB xls: 1007KB mem: 42.25MB
   7 sec| rows:  40000 xlsx:  208KB xls: 1342KB mem: 57.00MB
  11 sec| rows:  50000 xlsx:  258KB xls: 1677KB mem: 66.75MB
  16 sec| rows:  60000 xlsx:  309KB xls: 2011KB mem: 76.25MB
  23 sec| rows:  70000 xlsx:  359KB xls: 2284KB mem: 95.00MB
  31 sec| rows:  80000 xlsx:  409KB xls: 2481KB mem: 104.25MB
  42 sec| rows:  90000 xlsx:  460KB xls: 2678KB mem: 114.50MB
  56 sec| rows: 100000 xlsx:  510KB xls: 2875KB mem: 122.25MB
1万行あたり、10~20メガバイトほど消費するようです。
範囲を選択してコピー&ペースト
罫線・セル結合・値などが入ったテンプレート「07-交通費精算書テンプレート.xlsx」の明細を増やしていって、複数の交通費精算が記載されたエクセルを出力するサンプルです。下図がそのテンプレートです。

PHPExcelには範囲を選択してコピペするAPIがないため、PHPExcelで行のコピー : 時々、失業SEの開発日誌で紹介されているコードを活用します。
<?php
/**
 * 行を完全コピーする
 *
 * http://blog.kotemaru.org/old/2012/04/06.html より
 * @param PHPExcel_Worksheet $sheet
 * @param int $srcRow
 * @param int $dstRow
 * @param int $height
 * @param int $width
 * @throws PHPExcel_Exception
 */
function copyRows(
    PHPExcel_Worksheet $sheet,
    $srcRow,
    $dstRow,
    $height,
    $width
) {
    for ($row = 0; $row < $height; $row++) {
        // セルの書式と値の複製
        for ($col = 0; $col < $width; $col++) {
            $cell = $sheet->getCellByColumnAndRow($col, $srcRow + $row);
            $style = $sheet->getStyleByColumnAndRow($col, $srcRow + $row);

            $dstCell = PHPExcel_Cell::stringFromColumnIndex($col) . (string)($dstRow + $row);
            $sheet->setCellValue($dstCell, $cell->getValue());
            $sheet->duplicateStyle($style, $dstCell);
        }

        // 行の高さ複製。
        $h = $sheet->getRowDimension($srcRow + $row)->getRowHeight();
        $sheet->getRowDimension($dstRow + $row)->setRowHeight($h);
    }

    // セル結合の複製
    // - $mergeCell="AB12:AC15" 複製範囲の物だけ行を加算して復元。
    // - $merge="AB16:AC19"
    foreach ($sheet->getMergeCells() as $mergeCell) {
        $mc = explode(":", $mergeCell);
        $col_s = preg_replace("/[0-9]*/", "", $mc[0]);
        $col_e = preg_replace("/[0-9]*/", "", $mc[1]);
        $row_s = ((int)preg_replace("/[A-Z]*/", "", $mc[0])) - $srcRow;
        $row_e = ((int)preg_replace("/[A-Z]*/", "", $mc[1])) - $srcRow;

        // 複製先の行範囲なら。
        if (0 <= $row_s && $row_s < $height) {
            $merge = $col_s . (string)($dstRow + $row_s) . ":" . $col_e . (string)($dstRow + $row_e);
            $sheet->mergeCells($merge);
        }
    }
}

$book = PHPExcel_IOFactory::load('templates/07-交通費精算書テンプレート.xlsx');
$sheet = $book->getActiveSheet();

copyRows($sheet, 2, 7, 5, 5);
copyRows($sheet, 2, 7 + 5, 5, 5);
copyRows($sheet, 2, 7 + 10, 5, 5);
copyRows($sheet, 2, 7 + 15, 5, 5);

$writer = PHPExcel_IOFactory::createWriter($book, 'Excel2007');
$writer->save('output/07-交通費精算書.xlsx');
出力結果

ブック全体のデフォルトフォントスタイルを設定する
$book = new PHPExcel();
$book
    ->getDefaultStyle()
    ->getFont()
    ->setName('メイリオ')
    ->setSize(16)
    ->setColor(new PHPExcel_Style_Color(PHPExcel_Style_Color::COLOR_GREEN));

$book->getActiveSheet()->setCellValue('A1', 'シート1');
$book->createSheet()->setCellValue('A1', 'シート2');

$writer = PHPExcel_IOFactory::createWriter($book, 'Excel2007');
$writer->save('output/11-デフォルトのスタイル.xlsx');
出力結果

セル背景色を塗る
$image = imagecreatefrompng('images/mc.png');
$width = imagesx($image);
$height = imagesy($image);

$book = new PHPExcel();
$sheet = $book->getActiveSheet();

for ($x = 0; $x < $width; $x ++) {
    $sheet->getColumnDimensionByColumn($x)->setWidth(1);
    for ($y = 0; $y < $height; $y ++) {
        $color = vsprintf('%02x%02x%02x', imagecolorsforindex($image, imagecolorat($image, $x, $y)));
        $sheet->getRowDimension($y + 1)->setRowHeight(6);
        $sheet
            ->getStyleByColumnAndRow($x, $y + 1)
            ->getFill()
            ->setFillType(PHPExcel_Style_Fill::FILL_SOLID)
            ->getStartColor()
            ->setRGB($color); // FFFFFFの16進数で色を指定する
    }
}

$writer = PHPExcel_IOFactory::createWriter($book, 'Excel2007');
$writer->save('output/06-セルの背景色.xlsx');
出力結果: ちゃんと塗れます。

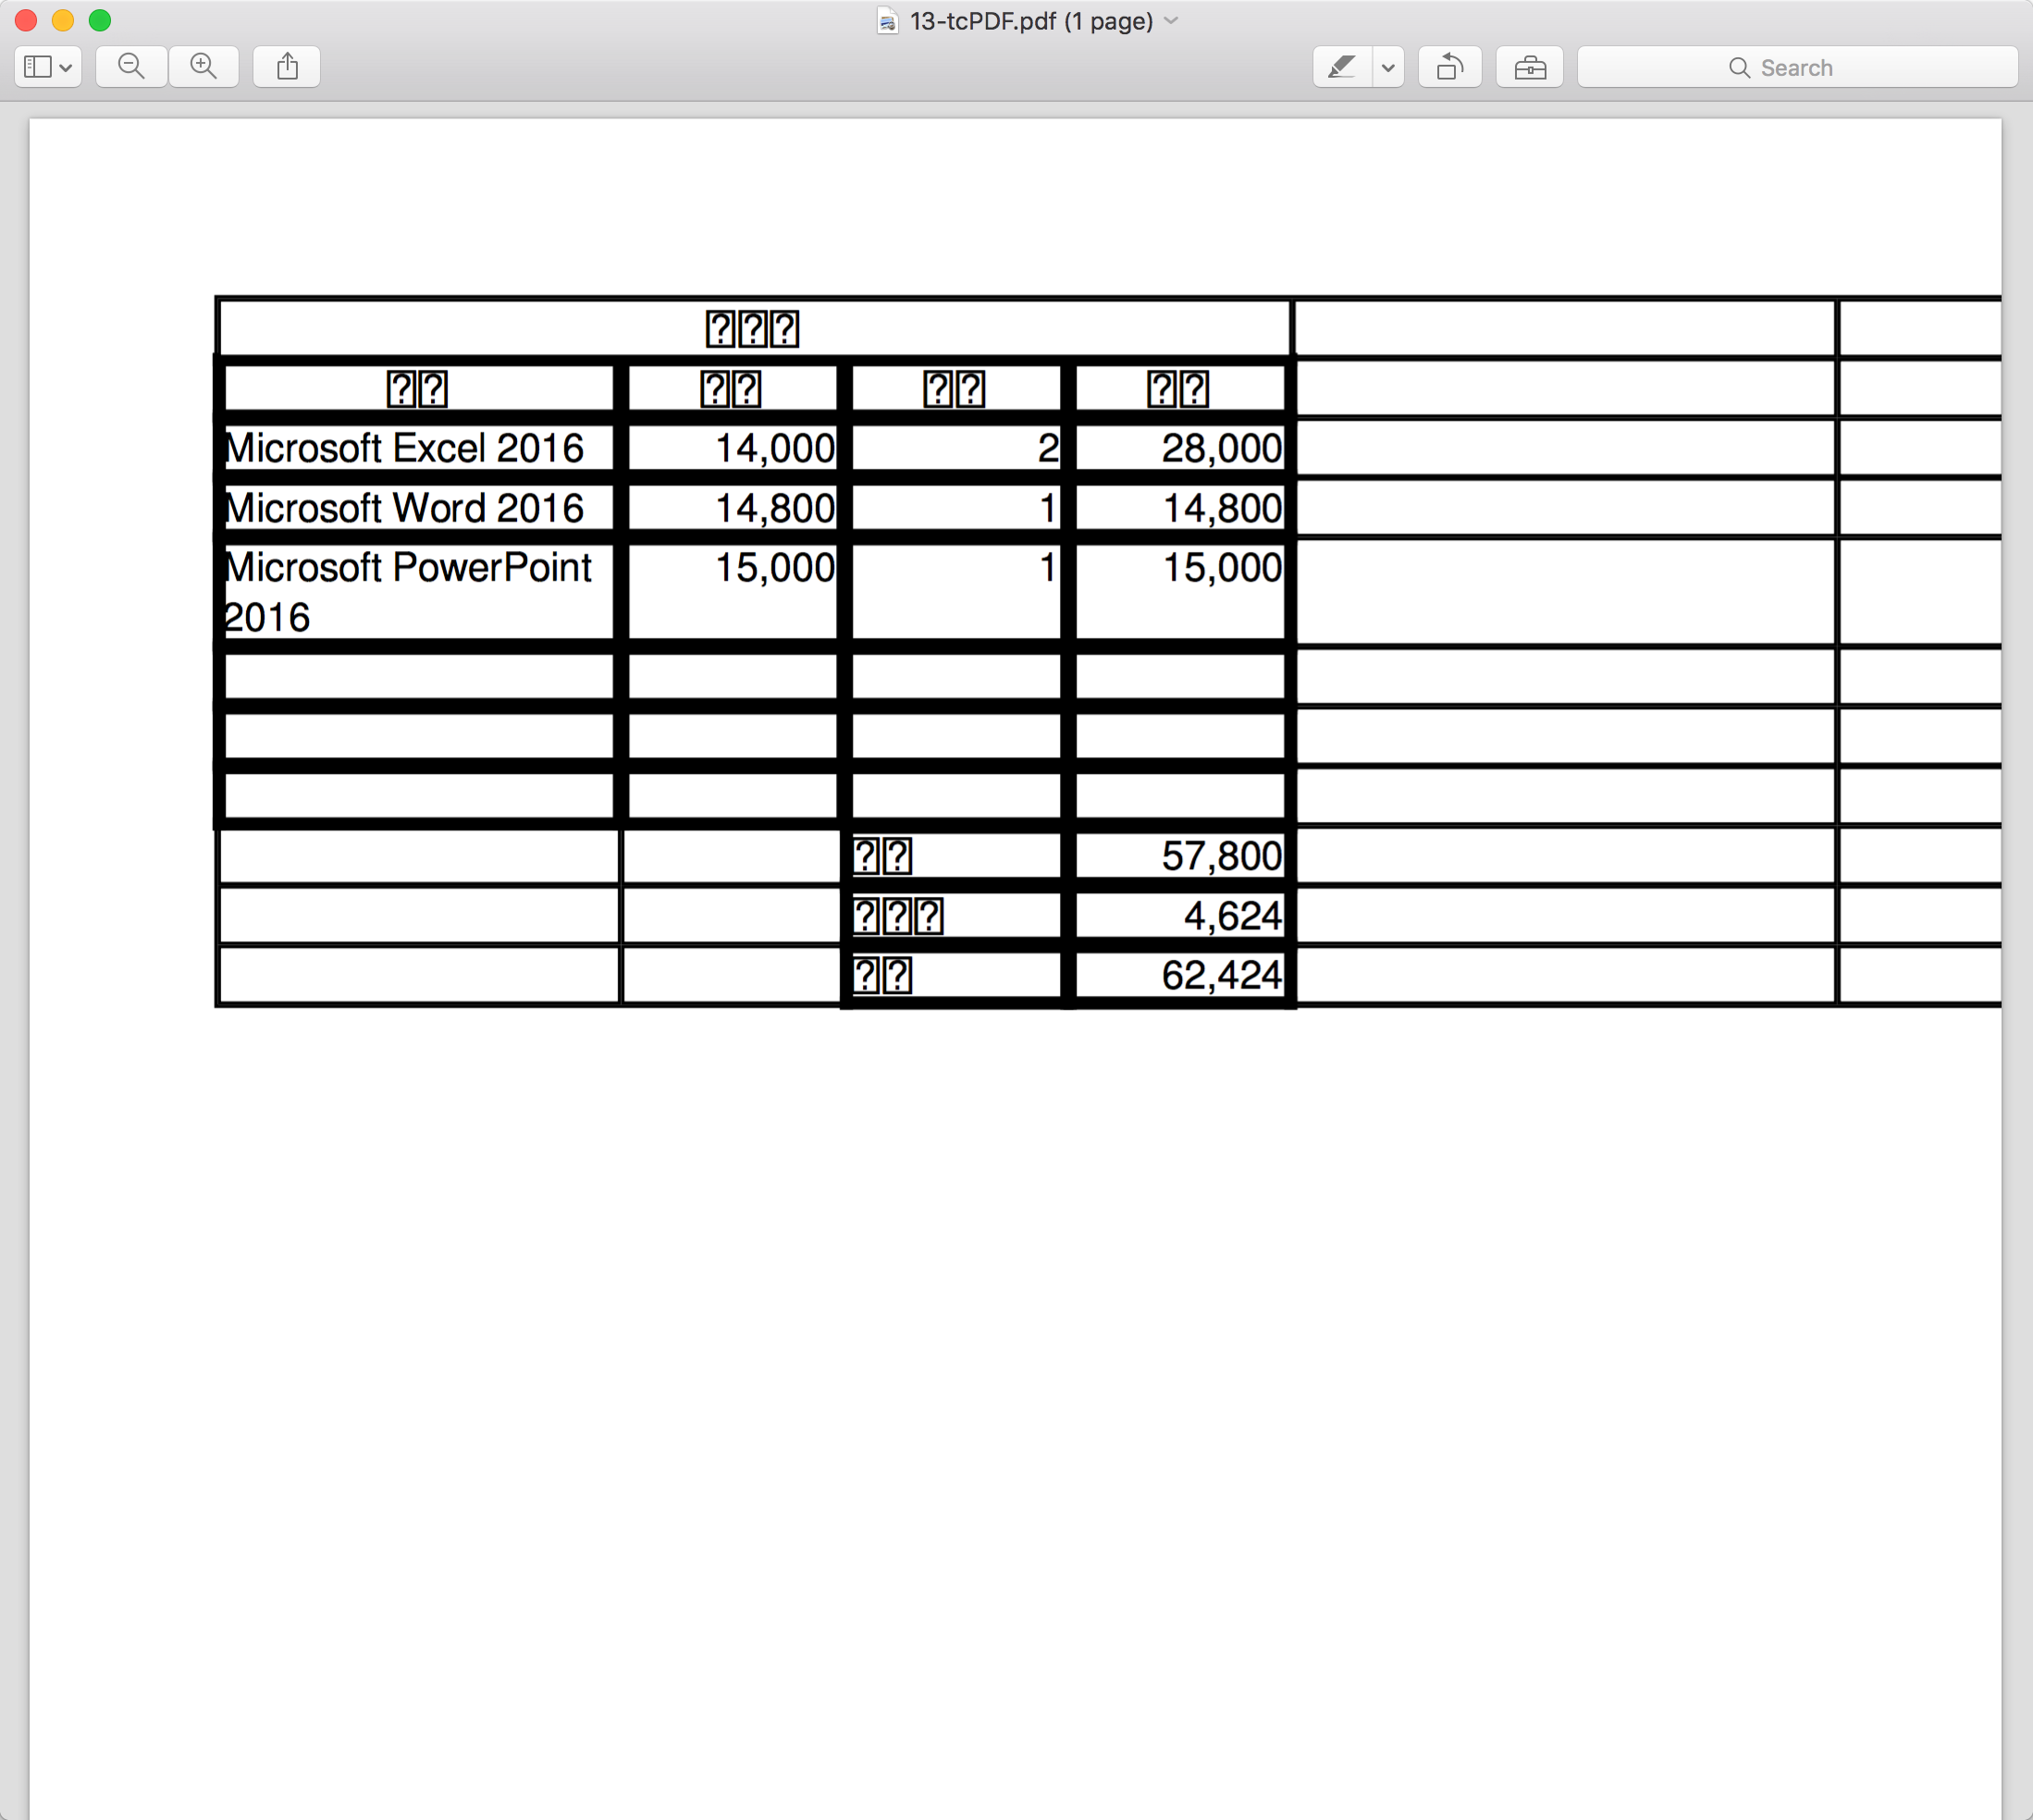
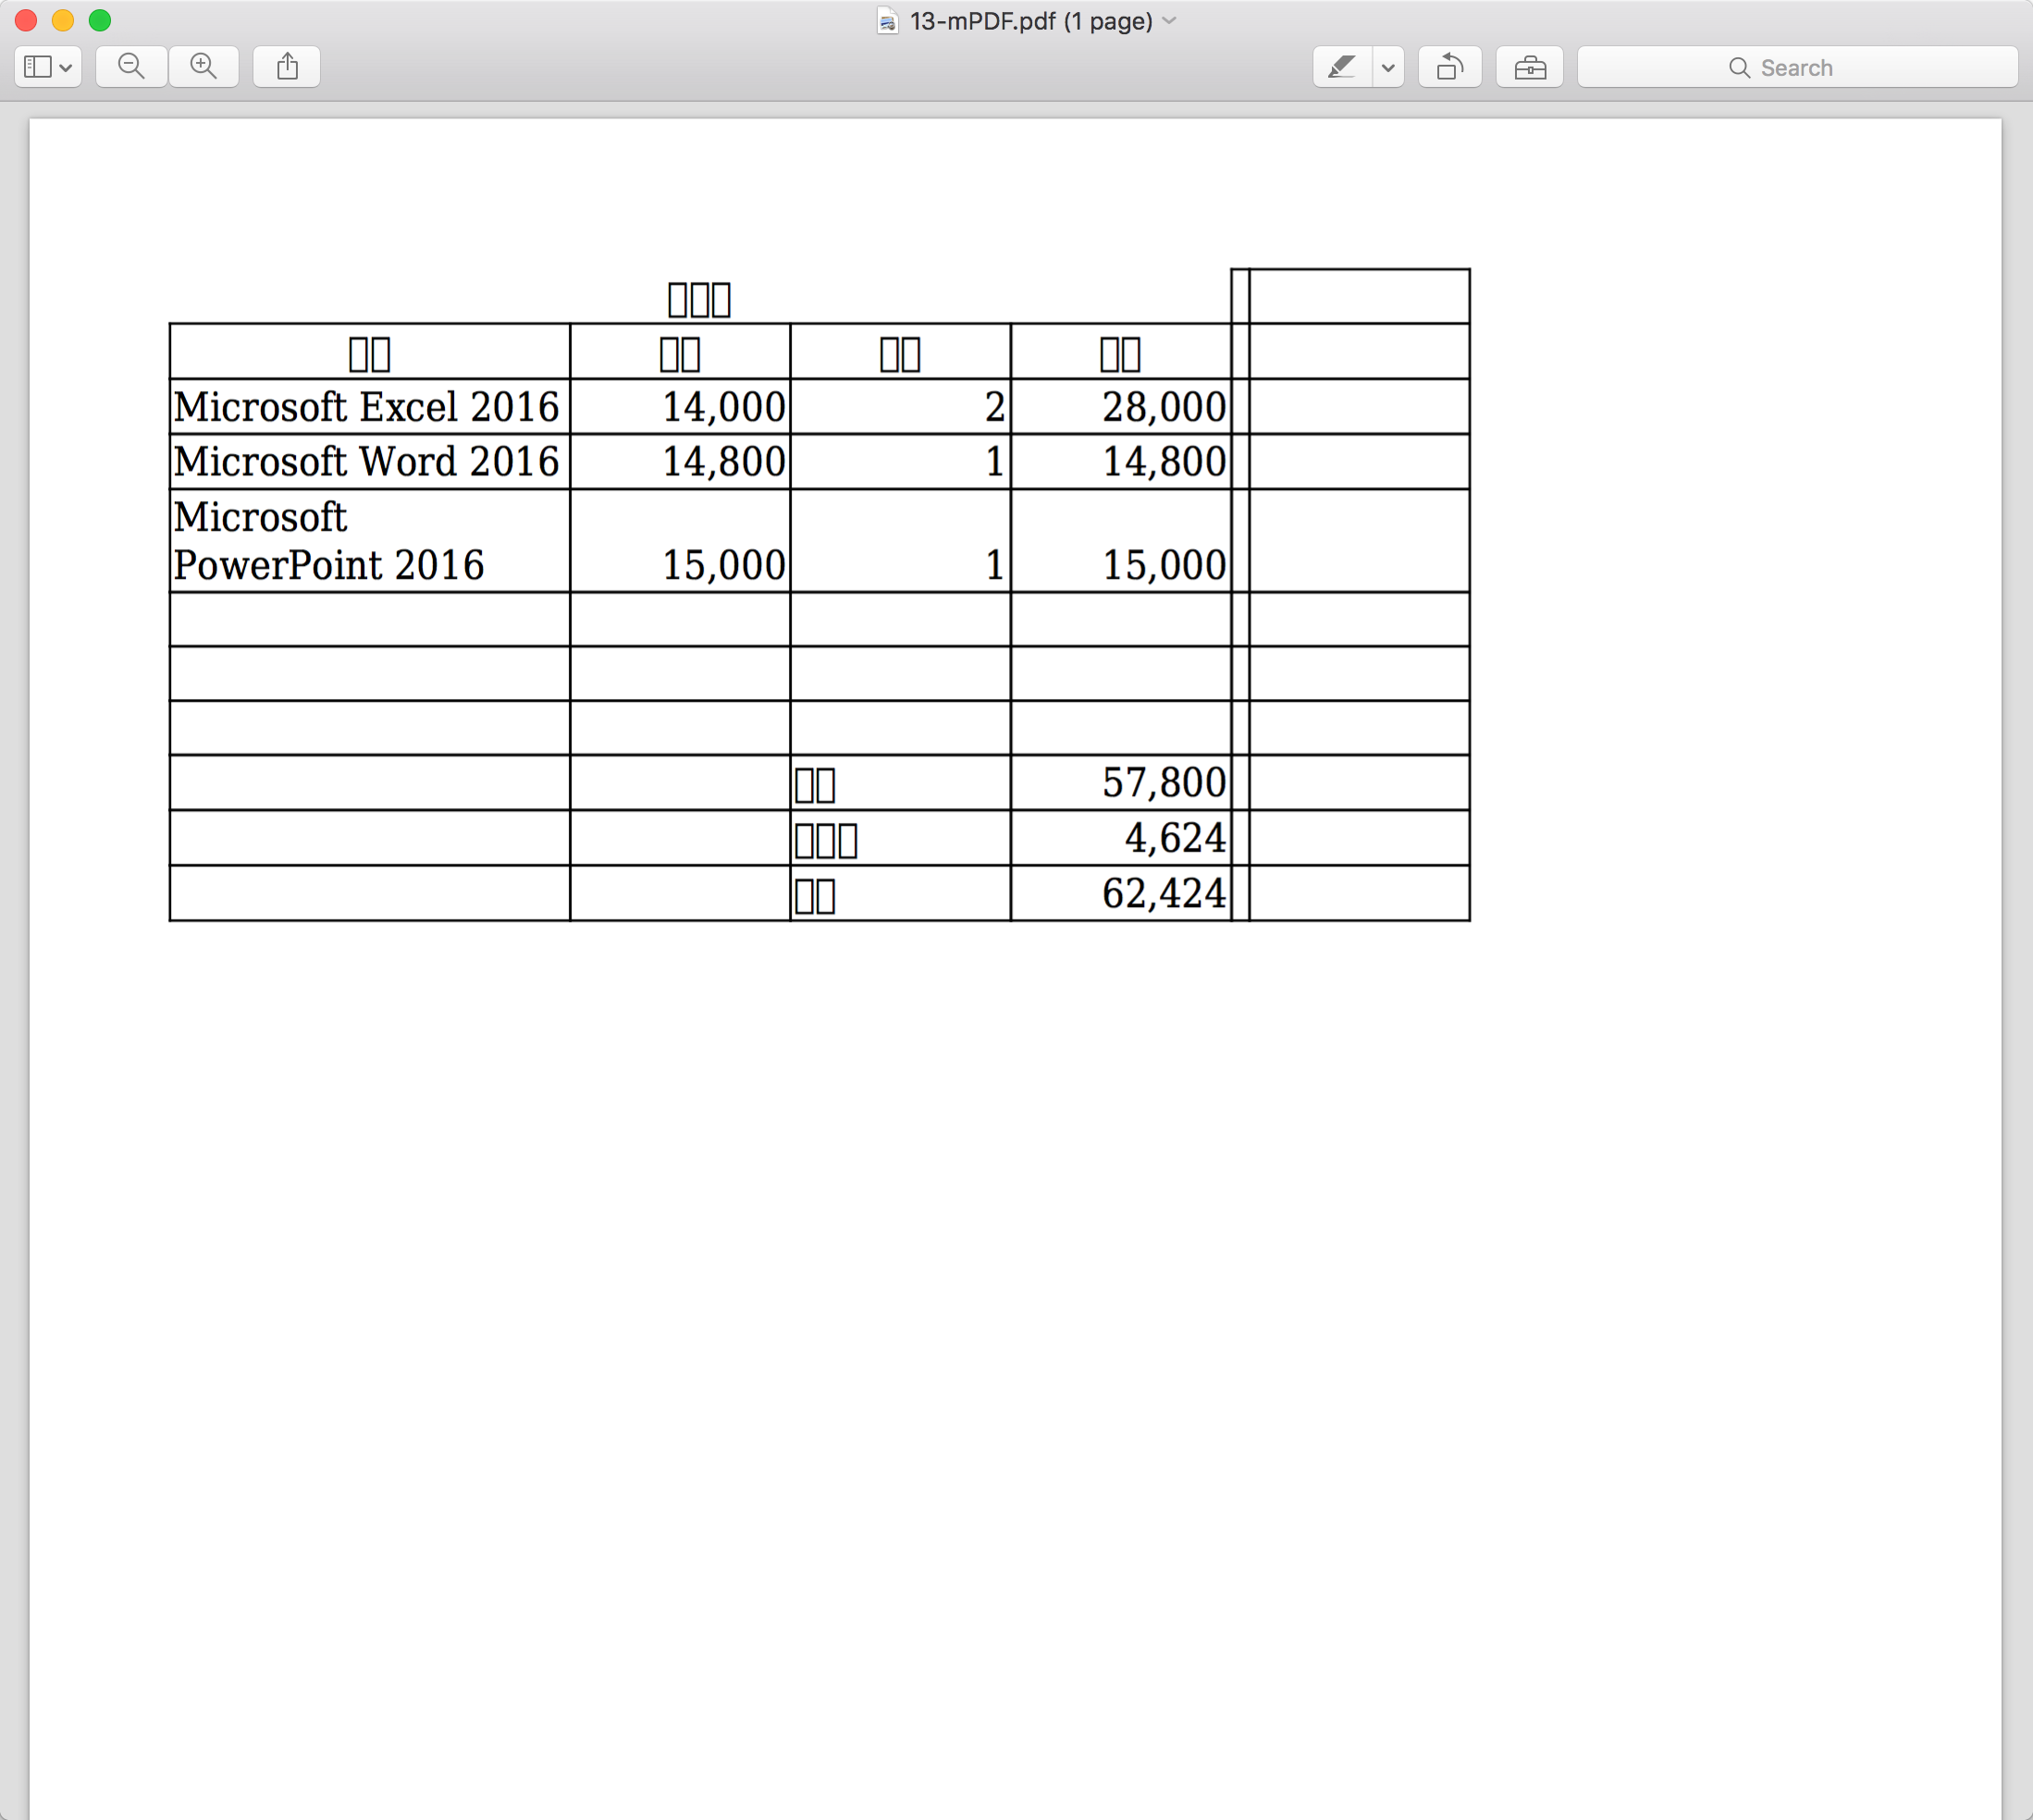
生成したExcelをPDFに出力する
PHPExcel自体にはPDF生成ライブラリがないので、composerで次の3つのライブラリのうち、どれかをインストールしておく。
composer require tecnickcom/tcpdf
composer require dompdf/dompdf
composer require mpdf/mpdf
次のサンプルは、これら3種類のPDF出力ライブラリと、LibreOfficeのCUIを使ってPDFを生成するものです。
$products = [
    ['Microsoft Excel 2016',      14000, 2],
    ['Microsoft Word 2016',       14800, 1],
    ['Microsoft PowerPoint 2016', 15000, 1],
];

$book = PHPExcel_IOFactory::load('templates/13-見積書テンプレート.xlsx');
$sheet = $book->getActiveSheet();

$rowOffset = 3;
foreach ($products as $row => $product) {
    foreach ($product as $col => $value) {
        $sheet->setCellValueByColumnAndRow($col, $row + $rowOffset, $value);
    }
}

$excelWriter = PHPExcel_IOFactory::createWriter($book, 'Excel2007');
$excelWriter->save('output/13-excel.xlsx');

// tcPDF
PHPExcel_Settings::setPdfRenderer(
    PHPExcel_Settings::PDF_RENDERER_TCPDF,
    __DIR__ .'/vendor/tecnickcom/tcpdf'
);
$pdfWriter = PHPExcel_IOFactory::createWriter($book, 'PDF');
$pdfWriter->save('output/13-tcPDF.pdf');

// DomPDF
PHPExcel_Settings::setPdfRenderer(
    PHPExcel_Settings::PDF_RENDERER_DOMPDF,
    __DIR__ .'/vendor/dompdf/dompdf'
);
$pdfWriter = PHPExcel_IOFactory::createWriter($book, 'PDF');
$pdfWriter->save('output/13-Dompdf.pdf');

// mPDF
PHPExcel_Settings::setPdfRenderer(
    PHPExcel_Settings::PDF_RENDERER_MPDF,
    __DIR__ .'/vendor/mpdf/mpdf'
);
$pdfWriter = PHPExcel_IOFactory::createWriter($book, 'PDF');
$pdfWriter->save('output/13-mPDF.pdf');

// LibreOfficeでPDF化する
$soffice = '/Applications/LibreOffice.app/Contents/MacOS/soffice';
$outdir = __DIR__ . '/output';
$command = "$soffice --headless --convert-to pdf --outdir $outdir $outdir/13-excel.xlsx";
echo $command, PHP_EOL;
passthru($command);
出力結果
PDF変換前のExcelです:
tcPDF:
Dompdf:

mPDF:
LibreOfficeのCUI:

tcPDF, Dompdf, mPDFについては日本語フォントをちゃんと指定すれば、文字化けせずに出力出来そうですが、やり方がよくわかりませんでした。Excelのシートに限りなく見た目を同じにしたい場合は、LibreOfficeのCUIを使うのが良さそうですが、式の計算結果が印字されないバグ?があるようです。
おわり
他にも追記していこうと思います。
最後までお読みくださりありがとうございました。Twitterでは、Qiitaに書かない技術ネタなどもツイートしているので、よかったらフォローお願いします![]() →Twitter@suin
→Twitter@suin