はじめに
Oracle Cloud には、Oracle Cloud の仮想ネットワーク(VCN) と オンプレミスネットワークを相互に接続する方法があります。大きく分けて、下の3個の方法があります。
- Internet接続:Global IP を使用して接続
- IPsec VPN接続:Internet を経由して、仮想的なプライベート接続
- FastConnect接続:キャリアが提供するネットワーク(閉域網など)を使用して、プライベート接続。帯域やレイテンシーなど、性能が高いのが特徴
今回の記事は、手軽にプライベート接続を確認するために、IPsec VPN 接続を行う手順を記載します。
接続概要
オンプレミス環境を持っていないため、OCIのVCNを疑似オンプレミス環境として扱います。
純粋なVCN環境と、疑似オンプレミスとして扱うVCN環境の、2環境をIPsec VPNで相互接続を行います。
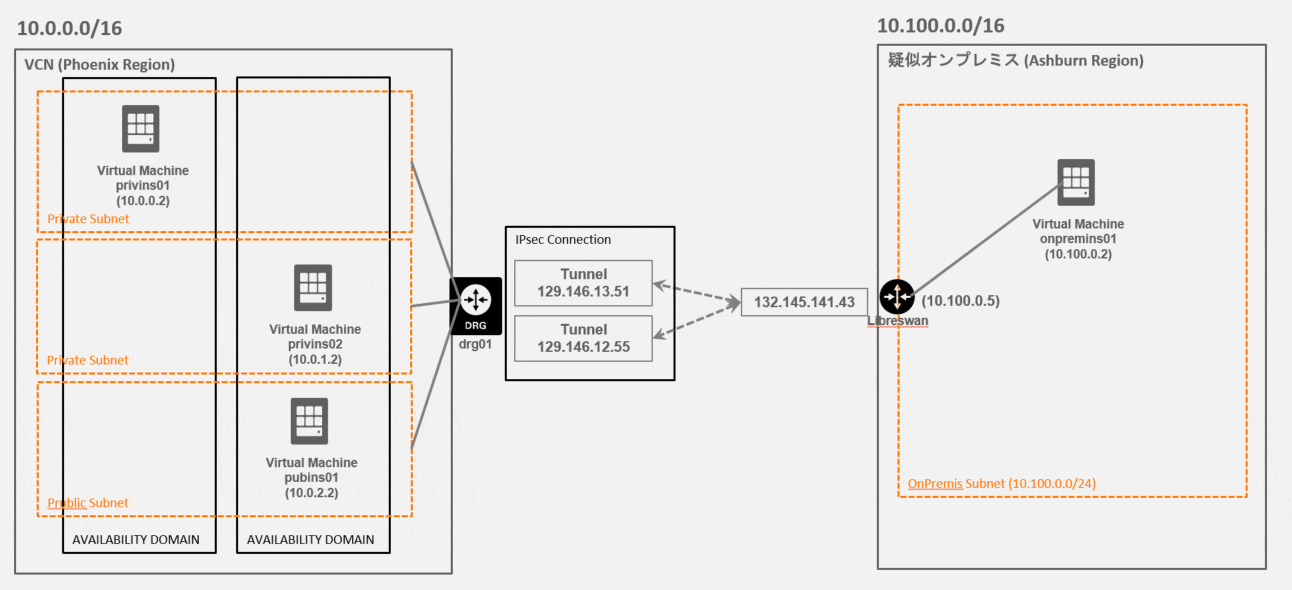
- VCN : Phoenix の VCN
- CIDR:10.0.0.0/16
- 疑似オンプレミス : Oracle Cloud の VCNを疑似オンプレミスとして使う
- CIDR:10.100.0.0/16
- LibreswanをIPsec VPNのルータとして使用
手順
oci cli を主に使用して設定を進めます。変数格納や json を加工するための jq コマンドを多用していますのでご注意ください。
VCN側 事前準備
VCNを作成
oci network vcn create --cidr-block 10.0.0.0/16 --display-name vpnnw --dns-label vpnnw
VCNのOCIR を変数に格納
set vcn_ocid (oci network vcn list | jq -r '.data | map(select(.["display-name"] == "vpnnw"))[].id')
Regional Private Subnet を2個、Regional Public Subnetを1個作成
Regional Public Subnet を作る理由は、手元のPCからVCN環境へ接続するためです。
oci network subnet create --cidr-block 10.0.0.0/24 --vcn-id $vcn_ocid --display-name private01 --dns-label private01 --prohibit-public-ip-on-vnic true
oci network subnet create --cidr-block 10.0.1.0/24 --vcn-id $vcn_ocid --display-name private02 --dns-label private02 --prohibit-public-ip-on-vnic true
oci network subnet create --cidr-block 10.0.2.0/24 --vcn-id $vcn_ocid --display-name public01 --dns-label public01 --prohibit-public-ip-on-vnic false
3個のsubnetのOCIDを変数に格納
set subnet_private01 (oci network subnet list --vcn-id $vcn_ocid --display-name private01 | jq -r ".data[0].id")
set subnet_private02 (oci network subnet list --vcn-id $vcn_ocid --display-name private02 | jq -r ".data[0].id")
set subnet_public01 (oci network subnet list --vcn-id $vcn_ocid --display-name public01 | jq -r ".data[0].id")
Ubuntu18.04のOCIDを変数に格納
set ubuntu1804_ocid (oci compute image list --operating-system "Canonical Ubuntu" --operating-system-version "18.04" --sort-by TIMECREATED --sort-order DESC | jq -r ".data[0].id")
Instance を作成
oci compute instance launch \
--availability-domain TGjA:PHX-AD-1 \
--fault-domain FAULT-DOMAIN-1 \
--shape VM.Standard2.2 \
--display-name privins01 \
--hostname-label privins01 \
--image-id $ubuntu1804_ocid \
--subnet-id $subnet_private01 \
--assign-public-ip false \
--ssh-authorized-keys-file ~/.ssh/id_rsa.pub

oci compute instance launch \
--availability-domain TGjA:PHX-AD-2 \
--fault-domain FAULT-DOMAIN-1 \
--shape VM.Standard2.2 \
--display-name privins02 \
--hostname-label privins02 \
--image-id $ubuntu1804_ocid \
--subnet-id $subnet_private02 \
--assign-public-ip false \
--ssh-authorized-keys-file ~/.ssh/id_rsa.pub

oci compute instance launch \
--availability-domain TGjA:PHX-AD-2 \
--fault-domain FAULT-DOMAIN-1 \
--shape VM.Standard2.2 \
--display-name pubins01 \
--hostname-label pubins01 \
--image-id $ubuntu1804_ocid \
--subnet-id $subnet_public01 \
--assign-public-ip true \
--ssh-authorized-keys-file ~/.ssh/id_rsa.pub
Public Instance に接続するため、Internet Gateway・Route Tableを作成して、Public Subnet に設定します
oci network internet-gateway create --is-enabled true --vcn-id $vcn_ocid --display-name intgw01
set ig_ocid (oci network internet-gateway list --vcn-id $vcn_ocid --display-name intgw01 | jq -r ".data[0].id")
oci network route-table create --vcn-id $vcn_ocid --display-name public-routetable \
  --route-rules "[{\"cidrBlock\":\"0.0.0.0/0\",\"networkEntityId\":\"$ig_ocid\"}]"
set routetable_ocid (oci network route-table list --vcn-id $vcn_ocid --display-name public-routetable | jq -r ".data[0].id")
oci network subnet update --subnet-id $subnet_public01 --route-table-id $routetable_ocid
疑似オンプレミス側 事前準備
VCNを作成
oci network vcn create --cidr-block 10.100.0.0/16 --display-name onpremnw --dns-label onpremnw --profile ashburn
VCNのOCIR を変数に格納
set onprem_vcn_ocid (oci network vcn list --profile ashburn | jq -r '.data | map(select(.["display-name"] == "onpremnw"))[].id')
regional public subnet を1個作成
oci network subnet create --cidr-block 10.100.0.0/24 --vcn-id $onprem_vcn_ocid --display-name onprem01 --dns-label onprem01 --prohibit-public-ip-on-vnic false --profile ashburn
subnetのOCIDを変数に格納
set subnet_onprem01 (oci network subnet list --vcn-id $onprem_vcn_ocid --display-name onprem01 --profile ashburn | jq -r ".data[0].id")
Ubuntu18.04 ImageのOCIDを変数に格納
set ubuntu1804_ocid (oci compute image list --operating-system "Canonical Ubuntu" --operating-system-version "18.04" --sort-by TIMECREATED --sort-order DESC --profile ashburn | jq -r ".data[0].id")
CentOS Image の OCID を変数に格納
set centos_ocid (oci compute image list --operating-system "CentOS" --operating-system-version "7" --sort-by TIMECREATED --sort-order DESC --profile ashburn | jq -r ".data[0].id")
Instance
oci compute instance launch \
--availability-domain TGjA:US-ASHBURN-AD-2 \
--fault-domain FAULT-DOMAIN-1 \
--shape VM.Standard2.2 \
--display-name onpremins01 \
--hostname-label onpremins01 \
--image-id $ubuntu1804_ocid \
--subnet-id $subnet_onprem01 \
--assign-public-ip true \
--ssh-authorized-keys-file ~/.ssh/id_rsa.pub \
--profile ashburn

oci compute instance launch \
--availability-domain TGjA:US-ASHBURN-AD-2 \
--fault-domain FAULT-DOMAIN-1 \
--shape VM.Standard2.2 \
--display-name libreswan-centos \
--hostname-label libreswan-centos \
--image-id $centos_ocid \
--subnet-id $subnet_onprem01 \
--assign-public-ip true \
--ssh-authorized-keys-file ~/.ssh/id_rsa.pub \
--profile ashburn
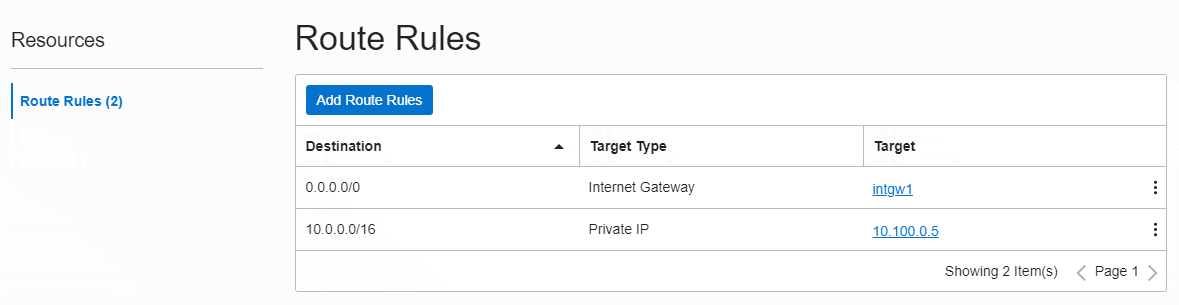
Instance に接続するため、Internet Gatewayを作成して、Default Route Table に、ルールを設定します
oci network internet-gateway create --is-enabled true --vcn-id $onprem_vcn_ocid --display-name intgw1 --profile ashburn
set onpewm_ig_ocid (oci network internet-gateway list --vcn-id $onprem_vcn_ocid --display-name intgw1 --profile ashburn | jq -r ".data[0].id")
set onpewm_routetable_ocid (oci network route-table list --vcn-id $onprem_vcn_ocid --display-name "Default Route Table for onpremnw" --profile ashburn | jq -r ".data[0].id")
oci network route-table update --rt-id $onpewm_routetable_ocid --route-rules "[{\"cidrBlock\":\"0.0.0.0/0\",\"networkEntityId\":\"$onpewm_ig_ocid\"}]" --profile ashburn
LibreswanのVNIC設定変更。VNIC上で、Source/Destination Check を実施しない(スキップ)するように変更します。
set libreswan_instance_ocid (oci compute instance list --display-name "libreswan-centos" --profile ashburn | jq -r ".data[0].id")
set libreswan_vnic_ocid (oci compute instance list-vnics --instance-id $libreswan_instance_ocid --profile ashburn | jq -r ".data[0].id")
oci network vnic update --vnic-id $libreswan_vnic_ocid --skip-source-dest-check true --profile ashburn
Security List を変更して、以下の要件に対応します
- ICMP (Ping)
- IPsecのためにポート開放 (4500, 500, ESP) ESPプロトコル(protocol50)を許可するのを、忘れないように注意
set onprem_vcn_seclist_ocid (oci network security-list list --vcn-id $onprem_vcn_ocid --display-name "Default Security List for onpremnw" --profile ashburn | jq -r ".data[0].id")
oci network security-list update --security-list-id $onprem_vcn_seclist_ocid --profile ashburn --force \
  --ingress-security-rules '[
                              {
                                "isStateless":false,
                                "source":  "0.0.0.0/0",
                                "protocol": "6",
                                "tcpOptions": {
                                  "sourcePortRange": null,
                                  "destinationPortRange": {"max":22, "min":22}
                                }
                              },
                              {
                                "isStateless":false,
                                "source":  "0.0.0.0/0",
                                "protocol": "1"
                              },
                              {
                                "isStateless":false,
                                "source":  "0.0.0.0/0",
                                "protocol": "6",
                                "tcpOptions": {
                                  "sourcePortRange": null,
                                  "destinationPortRange": {"max":500, "min":500}
                                }
                              },
                              {
                                "isStateless":false,
                                "source":  "0.0.0.0/0",
                                "protocol": "6",
                                "tcpOptions": {
                                  "sourcePortRange": null,
                                  "destinationPortRange": {"max":4500, "min":4500}
                                }
                              },
                              {
                                "isStateless":false,
                                "source":  "0.0.0.0/0",
                                "protocol": "17",
                                "udpOptions": {
                                  "sourcePortRange": null,
                                  "destinationPortRange": {"max":500, "min":500}
                                }
                              },
                              {
                                "isStateless":false,
                                "source":  "0.0.0.0/0",
                                "protocol": "17",
                                "udpOptions": {
                                  "sourcePortRange": null,
                                  "destinationPortRange": {"max":4500, "min":4500}
                                }
                              },
                              {
                                "isStateless":false,
                                "source":  "0.0.0.0/0",
                                "protocol": "50"
                               }
                            ]'
VCN側 IPsec設定
DRG作成
DRG作成
oci network drg create --display-name drg01
DRGのIDを変数に格納
set drg_ocid (oci network drg list | jq -r '.data | map(select(.["display-name"] == "drg01"))[].id')
VCNにDRGをアタッチ
oci network drg-attachment create --vcn-id $vcn_ocid --drg-id $drg_ocid
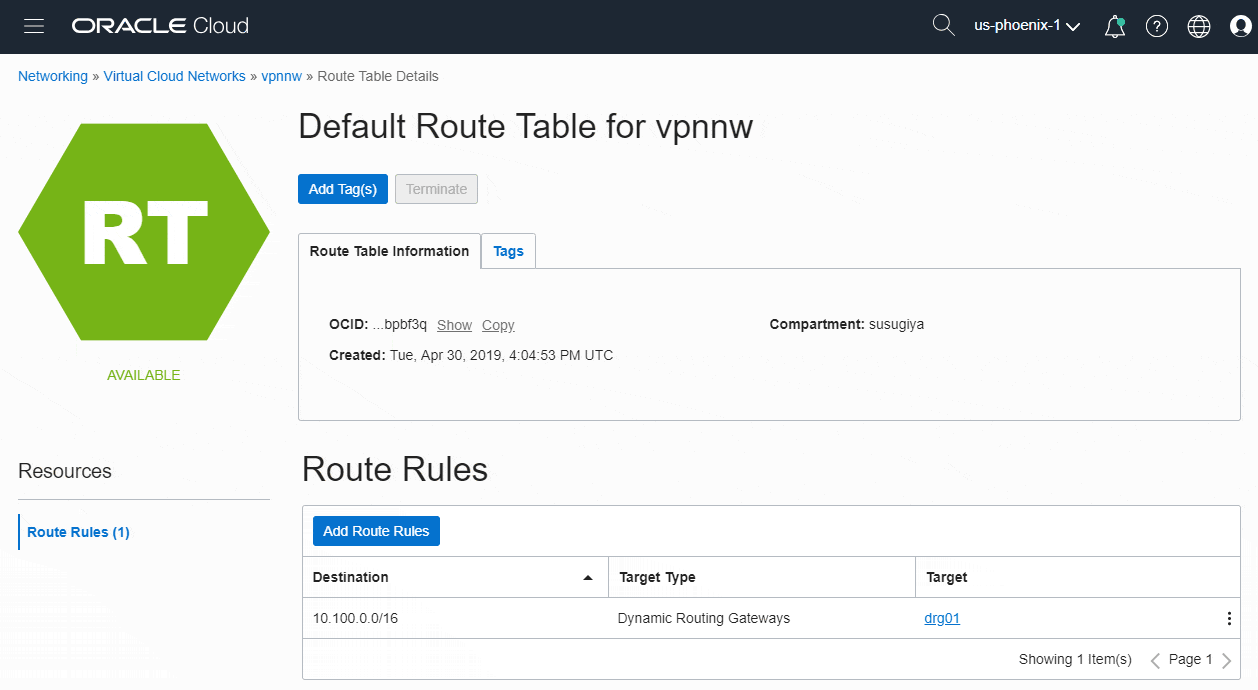
Route Tablesの編集
既存Subnetに紐づいている Default の Route Tables を編集して、Static Route を設定します。オンプレミスへの通信は、DRGを経由する設定を付与します
- Target Type : DRG
- Destination CIDR Block : 10.100.0.0/16 (オンプレミスのネットワークセグメント)
- Target DRG : drg01
set routetable_ocid (oci network route-table list --vcn-id $vcn_ocid --display-name "Default Route Table for vpnnw" | jq -r ".data[0].id")
oci network route-table update --rt-id $routetable_ocid --route-rules "[{\"cidrBlock\":\"10.100.0.0/16\",\"networkEntityId\":\"$drg_ocid\"}]"
コンソール上で表示結果
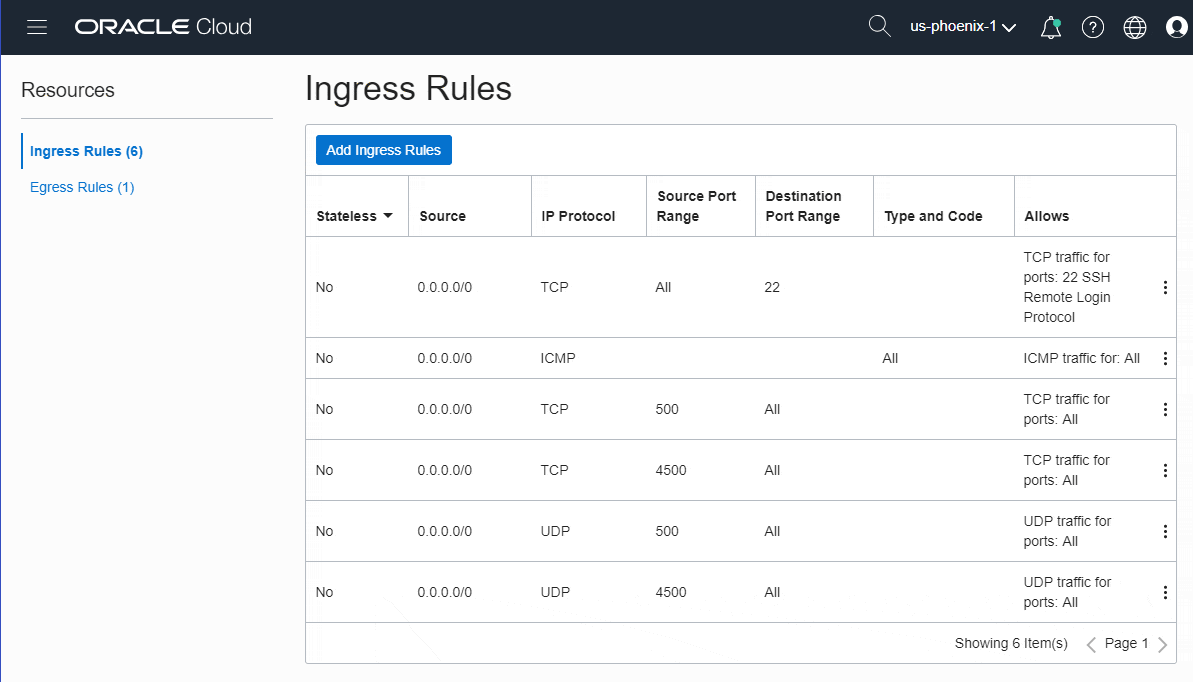
Security List の編集
- source port 500, 4500 を TCP UDP 共に設定
set vcn_seclist_ocid (oci network security-list list --vcn-id $vcn_ocid --display-name "Default Security List for vpnnw" | jq -r ".data[0].id")
oci network security-list update --security-list-id $vcn_seclist_ocid --force \
  --ingress-security-rules '[
                              {
                                "isStateless":false,
                                "source":  "0.0.0.0/0",
                                "protocol": "6",
                                "tcpOptions": {
                                  "sourcePortRange": null,
                                  "destinationPortRange": {"max":22, "min":22}
                                }
                              },
                              {
                                "isStateless":false,
                                "source":  "0.0.0.0/0",
                                "protocol": "1"
                              },
                              {
                                "isStateless":false,
                                "source":  "0.0.0.0/0",
                                "protocol": "6",
                                "tcpOptions": {
                                  "sourcePortRange": {"max":500, "min":500},
                                  "destinationPortRange": null
                                }
                              },
                              {
                                "isStateless":false,
                                "source":  "0.0.0.0/0",
                                "protocol": "6",
                                "tcpOptions": {
                                  "sourcePortRange": {"max":4500, "min":4500},
                                  "destinationPortRange": null
                                }
                              },
                              {
                                "isStateless":false,
                                "source":  "0.0.0.0/0",
                                "protocol": "17",
                                "udpOptions": {
                                  "sourcePortRange": {"max":500, "min":500},
                                  "destinationPortRange": null
                                }
                              },
                              {
                                "isStateless":false,
                                "source":  "0.0.0.0/0",
                                "protocol": "17",
                                "udpOptions": {
                                  "sourcePortRange": {"max":4500, "min":4500},
                                  "destinationPortRange": null
                                }
                              }
                            ]'
コンソール上での結果表示
CPE作成
CPE(Customer-Premises Equipment) を作成します。CPEはオンプレミスなどに存在している IPsec VPN のルータの Global IP を指定して、OCI上に作成を行います。
oci network cpe create --ip-address 132.145.141.43 --display-name omprem-libreswan-centos
CPE の OCID を変数に格納します
set cpe_ocid (oci network cpe list | jq -r '.data | map(select(.["display-name"] == "omprem-libreswan-centos"))[].id')
IPSec Connections作成
VCNとオンプレミス環境を接続するための、IPSec Connection を作成します。IPSec Connection を1個作成することで、コネクションを設定するためのVCN側のGlibal IP が2個生成されます。
冗長構成を考慮すると、Global IP 2個ともコネクションを設定するのが推奨です。
なお、オンプレミス側でも、IPSec のためのルータは複数用意することが推奨ですが、今回は簡単にするため1個のIPSec ルータで設定を進めています。
create する時のパラメータ static-routes は、オンプレミス環境のネットワークを指定します。
createした後、Availableになるまで、自分の環境では5分ほど待機する必要がありました
oci network ip-sec-connection create --cpe-id $cpe_ocid --drg-id $drg_ocid --static-routes '["10.100.0.0/16"]' --displayname ipsec-con-vyos
ID を変数に格納
set ipsec_con_ocid (oci network ip-sec-connection list --cpe-id $cpe_ocid --drg-id $drg_ocid | jq -r ".data[0].id")
IPSec connection に設定された Global IP2個と、コネクションを張るためのパスワード shared-secret の値を確認します。以下の例では実際の値を、 secret1, secret2 に変更しています。
> oci network ip-sec-connection get-config --ipsc-id $ipsec_con_ocid
{
  "data": {
    "compartment-id": "ocid1.compartment.oc1..aaaaaaaasaxgjviqpyubmkpj3pnh6khw412sc542quokfqgduq6h7wubsta",
    "id": "ocid1.ipsecconnection.oc1.phx.aaaaaaaayptkfy5i5v3fbx3zxftn7azlyrrxfssuultitzgjhqeepdrvq6nq",
    "time-created": "2019-05-04T12:42:05.232000+00:00",
    "tunnels": [
      {
        "ip-address": "129.146.13.51",
        "shared-secret": "secret1",
        "time-created": "2019-05-04T12:42:05.331000+00:00"
      },
      {
        "ip-address": "129.146.12.55",
        "shared-secret": "secret2",
        "time-created": "2019-05-04T12:42:05.319000+00:00"
      }
    ]
  }
}
疑似オンプレミス側 Libreswan IPSec VPN 設定
Route Table を更新 Libreswanに向け
疑似オンプレミス環境は、OCIを使っているため、Route Table を更新する必要があります。
疑似オンプレミスから、OCIのVCNへ通信するためのStatic Route を設定し、Libreswan(10.100.0.5)経由でのルーティングを有効にします。
実際のオンプレミス環境の場合は、ルータなどでルーティング情報を更新する必要があります。
Firewallを無効化
firewalld が Default で有効になっており、簡単のために無効化します。有効になっていると、IPパケットのFORWARDが遮断されてしまうためです。
sudo systemctl stop firewalld
sudo systemctl disable firewalld
Libreswanの設定
疑似オンプレミス側に作成した CentOS にSSHログインし、Libreswan を yumコマンドでインストールします
sudo yum install -y libreswan
インストール後、バージョンを確認します。自分の環境では、3.25 がインストールされました。
$ ipsec --version
Linux Libreswan 3.25 (netkey) on 3.10.0-957.10.1.el7.x86_64
Linux のカーネルパラメータを変更し、Libreswan がパケットをルーティングできるようにします。インターフェース名(ens3)は、適宜環境に合わせて変更してください
CentOSの場合の例
sudo vi /etc/sysctl.conf
net.ipv4.ip_forward=1
net.ipv4.conf.all.accept_redirects = 0
net.ipv4.conf.all.send_redirects = 0
net.ipv4.conf.default.send_redirects = 0
net.ipv4.conf.ens3.send_redirects = 0
net.ipv4.conf.default.accept_redirects = 0
net.ipv4.conf.ens3.accept_redirects = 0
net.ipv4.conf.all.rp_filter = 0
net.ipv4.conf.ens3.rp_filter = 0
net.ipv4.conf.default.rp_filter = 0
net.ipv4.conf.ip_vti0.rp_filter = 0
カーネルパラメータを有効にします
sudo sysctl -p
IPSec VPN のための config を変更します。
sudo vi /etc/ipsec.d/ipsec.conf
conn oracle-tunnel-1
     left=10.100.0.5
     leftid=132.145.141.43
     right=129.146.13.51
     authby=secret
     leftsubnet=0.0.0.0/0
     rightsubnet=0.0.0.0/0
     auto=start
     mark=10/0xffffffff
     vti-interface=vti01
     vti-routing=no
     encapsulation=no
conn oracle-tunnel-2
     left=10.100.0.5
     leftid=132.145.141.43
     right=129.146.12.55
     authby=secret
     leftsubnet=0.0.0.0/0
     rightsubnet=0.0.0.0/0
     auto=start
     mark=15/0xffffffff
     vti-interface=vti02
     vti-routing=no
     encapsulation=no
設定値の説明をします
conn oracle-tunnel-1
     left=10.100.0.5         <= LibreswanのローカルIPアドレス
     leftid=132.145.141.43   <= LibreswanのGlobal IPアドレス
     right=129.146.13.51     <= OCIのIPSec Connectionに付与された、GlobalIPの1個目
     authby=secret
     leftsubnet=0.0.0.0/0
     rightsubnet=0.0.0.0/0
     auto=start
     mark=10/0xffffffff
     vti-interface=vti01
     vti-routing=no
     encapsulation=no
conn oracle-tunnel-2
     left=10.100.0.5         <= LibreswanのローカルIPアドレス
     leftid=132.145.141.43   <= LibreswanのGlobal IPアドレス
     right=129.146.12.55     <= OCIのIPSec Connectionに付与された、GlobalIPの2個目
     authby=secret
     leftsubnet=0.0.0.0/0
     rightsubnet=0.0.0.0/0
     auto=start
     mark=15/0xffffffff
     vti-interface=vti02
     vti-routing=no
     encapsulation=no
IPSecの事前共有鍵(Pre Shared Key) を設定します。今回は、OCI側のIPSec Connection で自動生成されているため、OCI側の値を確認して、ここに同じ値を入力します。
IPアドレスは、LibreswanとIPSec ConnectionのGlobalIPを、それぞれに記載します。
sudo vi /etc/ipsec.d/oci.secrets
132.145.141.43 129.146.13.51: PSK "secret1"
132.145.141.43 129.146.12.55: PSK "secret2"
IPSec のサービスを再起動します
sudo systemctl restart ipsec
sudo systemctl status ipsec
sudo systemctl enable ipsec
以下のコマンドで、諸々のネットワークを確認します
sudo ipsec status | grep established
sudo ipsec verify
sudo ip -d a
sudo ip link show
sudo ip route
実行例
$ sudo ipsec status | grep established
000 #1: "oracle-tunnel-1":500 STATE_MAIN_I4 (ISAKMP SA established); EVENT_SA_REPLACE in 2329s; newest ISAKMP; lastdpd=8s(seq in:0 out:0); idle; import:admin initiate
000 #3: "oracle-tunnel-1":500 STATE_QUICK_I2 (sent QI2, IPsec SA established); EVENT_SA_REPLACE in 27770s; newest IPSEC; eroute owner; isakmp#1; idle; import:admin initiate
000 #2: "oracle-tunnel-2":500 STATE_MAIN_I4 (ISAKMP SA established); EVENT_SA_REPLACE in 2360s; newest ISAKMP; lastdpd=1s(seq in:0 out:0); idle; import:admin initiate
000 #4: "oracle-tunnel-2":500 STATE_QUICK_I2 (sent QI2, IPsec SA established); EVENT_SA_REPLACE in 27551s; newest IPSEC; eroute owner; isakmp#2; idle; import:admin initiate
実行例
$ sudo ipsec verify
Verifying installed system and configuration files

Version check and ipsec on-path                         [OK]
Libreswan 3.25 (netkey) on 3.10.0-957.10.1.el7.x86_64
Checking for IPsec support in kernel                    [OK]
 NETKEY: Testing XFRM related proc values
         ICMP default/send_redirects                    [OK]
         ICMP default/accept_redirects                  [OK]
         XFRM larval drop                               [OK]
Pluto ipsec.conf syntax                                 [OK]
Two or more interfaces found, checking IP forwarding    [OK]
Checking rp_filter                                      [OK]
Checking that pluto is running                          [OK]
 Pluto listening for IKE on udp 500                     [OK]
 Pluto listening for IKE/NAT-T on udp 4500              [OK]
 Pluto ipsec.secret syntax                              [OK]
Checking 'ip' command                                   [OK]
Checking 'iptables' command                             [OK]
Checking 'prelink' command does not interfere with FIPS [OK]
Checking for obsolete ipsec.conf options                [OK]
実行例
$ ip -d a
1: lo: <LOOPBACK,UP,LOWER_UP> mtu 65536 qdisc noqueue state UNKNOWN group default qlen 1000
    link/loopback 00:00:00:00:00:00 brd 00:00:00:00:00:00 promiscuity 0 numtxqueues 1 numrxqueues 1 gso_max_size 65536 gso_max_segs 65535
    inet 127.0.0.1/8 scope host lo
       valid_lft forever preferred_lft forever
    inet6 ::1/128 scope host
       valid_lft forever preferred_lft forever
2: ens3: <BROADCAST,MULTICAST,UP,LOWER_UP> mtu 9000 qdisc mq state UP group default qlen 1000
    link/ether 00:00:17:00:97:81 brd ff:ff:ff:ff:ff:ff promiscuity 0 numtxqueues 4 numrxqueues 4 gso_max_size 65536 gso_max_segs 65535
    inet 10.100.0.5/24 brd 10.100.0.255 scope global dynamic ens3
       valid_lft 82957sec preferred_lft 82957sec
    inet6 fe80::200:17ff:fe00:9781/64 scope link
       valid_lft forever preferred_lft forever
3: ip_vti0@NONE: <NOARP> mtu 1480 qdisc noop state DOWN group default qlen 1000
    link/ipip 0.0.0.0 brd 0.0.0.0 promiscuity 0
    vti remote any local any ikey 0.0.0.0 okey 0.0.0.0 numtxqueues 1 numrxqueues 1 gso_max_size 65536 gso_max_segs 65535
4: vti01@NONE: <POINTOPOINT,NOARP,UP,LOWER_UP> mtu 8980 qdisc noqueue state UNKNOWN group default qlen 1000
    link/ipip 10.100.0.5 peer 129.146.13.51 promiscuity 0
    vti remote 129.146.13.51 local 10.100.0.5 ikey 0.0.0.10 okey 0.0.0.10 numtxqueues 1 numrxqueues 1 gso_max_size 65536 gso_max_segs 65535
5: vti02@NONE: <POINTOPOINT,NOARP,UP,LOWER_UP> mtu 8980 qdisc noqueue state UNKNOWN group default qlen 1000
    link/ipip 10.100.0.5 peer 129.146.12.55 promiscuity 0
    vti remote 129.146.12.55 local 10.100.0.5 ikey 0.0.0.15 okey 0.0.0.15 numtxqueues 1 numrxqueues 1 gso_max_size 65536 gso_max_segs 65535
実行例
$ sudo ip link show
1: lo: <LOOPBACK,UP,LOWER_UP> mtu 65536 qdisc noqueue state UNKNOWN mode DEFAULT group default qlen 1000
    link/loopback 00:00:00:00:00:00 brd 00:00:00:00:00:00
2: ens3: <BROADCAST,MULTICAST,UP,LOWER_UP> mtu 9000 qdisc mq state UP mode DEFAULT group default qlen 1000
    link/ether 00:00:17:00:97:81 brd ff:ff:ff:ff:ff:ff
3: ip_vti0@NONE: <NOARP> mtu 1480 qdisc noop state DOWN mode DEFAULT group default qlen 1000
    link/ipip 0.0.0.0 brd 0.0.0.0
4: vti01@NONE: <POINTOPOINT,NOARP,UP,LOWER_UP> mtu 8980 qdisc noqueue state UNKNOWN mode DEFAULT group default qlen 1000
    link/ipip 10.100.0.5 peer 129.146.13.51
5: vti02@NONE: <POINTOPOINT,NOARP,UP,LOWER_UP> mtu 8980 qdisc noqueue state UNKNOWN mode DEFAULT group default qlen 1000
    link/ipip 10.100.0.5 peer 129.146.12.55
実行例
$ sudo ip route
default via 10.100.0.1 dev ens3
default via 10.100.0.1 dev ens3 proto dhcp metric 100
10.100.0.0/24 dev ens3 proto kernel scope link src 10.100.0.5
169.254.0.0/16 dev ens3 proto dhcp scope link metric 100
Libreswan上にStaticRouteを設定し、疑似オンプレミス環境へ接続できるようにします
sudo ip route add 10.0.0.0/16 nexthop dev vti01 nexthop dev vti02
確認
$ sudo ip route
default via 10.100.0.1 dev ens3
10.0.0.0/16
        nexthop dev vti01 weight 1
        nexthop dev vti02 weight 1
10.100.0.0/24 dev ens3 proto kernel scope link src 10.100.0.5
169.254.0.0/16 dev ens3 proto static scope link
169.254.0.0/16 dev ens3 scope link metric 1002
なお、上記のStaticRouteの設定は一時的なものとなっており、OSを再起動すると設定が消えます。永続的な設定については今回の記事では触れません。
shell script などを作成して、OS起動時にStaticRouteを設定するように、自動設定を行うと良いと思います。
注意点としては、vti01, vti02 はIPsecのサービスが起動したあとに有効になるインターフェースなので、自動設定のタイミングを考慮する必要があります。
(systemd で 独自のサービスを定義すると、正常に動作する気がしています)
通信確認
LibreswanからVCN
ping
[opc@libreswan-centos ~]$ ping 10.0.0.2
PING 10.0.0.2 (10.0.0.2) 56(84) bytes of data.
64 bytes from 10.0.0.2: icmp_seq=1 ttl=63 time=61.0 ms
64 bytes from 10.0.0.2: icmp_seq=2 ttl=63 time=61.0 ms
64 bytes from 10.0.0.2: icmp_seq=3 ttl=63 time=61.0 ms
64 bytes from 10.0.0.2: icmp_seq=4 ttl=63 time=60.0 ms
^C
--- 10.0.0.2 ping statistics ---
4 packets transmitted, 4 received, 0% packet loss, time 3003ms
rtt min/avg/max/mdev = 60.047/60.795/61.054/0.431 ms


[opc@libreswan-centos ~]$ ping 10.0.1.2
PING 10.0.1.2 (10.0.1.2) 56(84) bytes of data.
64 bytes from 10.0.1.2: icmp_seq=1 ttl=63 time=59.5 ms
64 bytes from 10.0.1.2: icmp_seq=2 ttl=63 time=59.5 ms
64 bytes from 10.0.1.2: icmp_seq=3 ttl=63 time=59.5 ms
64 bytes from 10.0.1.2: icmp_seq=4 ttl=63 time=59.4 ms
^C
--- 10.0.1.2 ping statistics ---
4 packets transmitted, 4 received, 0% packet loss, time 3005ms
rtt min/avg/max/mdev = 59.490/59.524/59.545/0.021 ms
ssh
[opc@libreswan-centos ~]$ ssh ubuntu@10.0.0.2

Welcome to Ubuntu 18.04.2 LTS (GNU/Linux 4.15.0-1010-oracle x86_64)

 * Documentation:  https://help.ubuntu.com
 * Management:     https://landscape.canonical.com
 * Support:        https://ubuntu.com/advantage

This system has been minimized by removing packages and content that are
not required on a system that users do not log into.

To restore this content, you can run the 'unminimize' command.

30 packages can be updated.
0 updates are security updates.

Failed to connect to https://changelogs.ubuntu.com/meta-release-lts. Check your Internet connection or proxy settings

Last login: Sun May  5 07:14:53 2019 from 10.0.2.2
ubuntu@privins01:~$
疑似オンプレミスインスタンスからVCN
ping
ubuntu@onpremins01:~$ ping 10.0.0.2
PING 10.0.0.2 (10.0.0.2) 56(84) bytes of data.
64 bytes from 10.0.0.2: icmp_seq=1 ttl=62 time=60.4 ms
64 bytes from 10.0.0.2: icmp_seq=2 ttl=62 time=60.2 ms
64 bytes from 10.0.0.2: icmp_seq=3 ttl=62 time=60.2 ms
64 bytes from 10.0.0.2: icmp_seq=4 ttl=62 time=60.2 ms
^C
--- 10.0.0.2 ping statistics ---
4 packets transmitted, 4 received, 0% packet loss, time 3004ms
rtt min/avg/max/mdev = 60.203/60.274/60.400/0.310 ms
ubuntu@onpremins01:~$ ping 10.0.1.2
PING 10.0.1.2 (10.0.1.2) 56(84) bytes of data.
64 bytes from 10.0.1.2: icmp_seq=1 ttl=62 time=60.8 ms
64 bytes from 10.0.1.2: icmp_seq=2 ttl=62 time=60.7 ms
64 bytes from 10.0.1.2: icmp_seq=3 ttl=62 time=60.7 ms
64 bytes from 10.0.1.2: icmp_seq=4 ttl=62 time=60.7 ms
^C
--- 10.0.1.2 ping statistics ---
4 packets transmitted, 4 received, 0% packet loss, time 3005ms
rtt min/avg/max/mdev = 60.724/60.778/60.888/0.254 ms
ssh
ubuntu@onpremins01:~$ ssh ubuntu@10.0.0.2
Welcome to Ubuntu 18.04.2 LTS (GNU/Linux 4.15.0-1010-oracle x86_64)

 * Documentation:  https://help.ubuntu.com
 * Management:     https://landscape.canonical.com
 * Support:        https://ubuntu.com/advantage

This system has been minimized by removing packages and content that are
not required on a system that users do not log into.

To restore this content, you can run the 'unminimize' command.

30 packages can be updated.
0 updates are security updates.

Failed to connect to https://changelogs.ubuntu.com/meta-release-lts. Check your Internet connection or proxy settings

Last login: Sun May  5 09:40:27 2019 from 10.100.0.2
ubuntu@privins01:~$
Tips : 通信できなかった事象
LibreswanでIPSecサービスを起動したときに、それなりの頻度で通信ができない事象が発生しました。この事象が発生したときに、10分くらい放置したあと、systemctl restart ipsec をすると通信できるようになりました。
通信できないときに、pingしてみると、Libreswan の ipsec のlogを開くと、以下のようなメッセージがパケットごとにながれていることが確認できました。
# sudo journalctl -u ipsec -f
May 04 15:38:04 ip-10-100-0-101.ap-northeast-1.compute.internal pluto[5895]: packet from 129.146.12.55:4500: Received packet with mangled
IKE header - dropped
May 04 15:38:05 ip-10-100-0-101.ap-northeast-1.compute.internal pluto[5895]: packet from 129.146.12.55:4500: exchange type of ISAKMP Message has an unknown value: 165 (0xa5)
May 04 15:38:05 ip-10-100-0-101.ap-northeast-1.compute.internal pluto[5895]: packet from 129.146.12.55:4500: Received packet with mangled
IKE header - dropped
May 04 15:38:06 ip-10-100-0-101.ap-northeast-1.compute.internal pluto[5895]: packet from 129.146.12.55:4500: exchange type of ISAKMP Message has an unknown value: 84 (0x54)
May 04 15:38:06 ip-10-100-0-101.ap-northeast-1.compute.internal pluto[5895]: packet from 129.146.12.55:4500: Received packet with mangled
IKE header - dropped
May 04 15:38:07 ip-10-100-0-101.ap-northeast-1.compute.internal pluto[5895]: packet from 129.146.12.55:4500: exchange type of ISAKMP Message has an unknown value: 208 (0xd0)
May 04 15:38:07 ip-10-100-0-101.ap-northeast-1.compute.internal pluto[5895]: packet from 129.146.12.55:4500: Received packet with mangled
IKE header - dropped
May 04 15:38:08 ip-10-100-0-101.ap-northeast-1.compute.internal pluto[5895]: packet from 129.146.12.55:4500: exchange type of ISAKMP Message has an unknown value: 165 (0xa5)
May 04 15:38:08 ip-10-100-0-101.ap-northeast-1.compute.internal pluto[5895]: packet from 129.146.12.55:4500: Received packet with mangled
IKE header - dropped
参考URL
CPE側での設定
https://docs.cloud.oracle.com/iaas/Content/Network/Reference/libreswanCPE.htm
https://qiita.com/shirok/items/a0848df3d3d67fccd4f9