アマゾン ウェブ サービス (AWS) と Oracle Cloud Infrastructure (OCI)を Libreswanで IPSec VPNで サイト間 VPN接続してみてみます。
サイト間 VPN は、 Oracle 環境と Amazon 環境の間に安全で暗号化されたサイト間 IPSec 接続を提供します。これにより、2 つのクラウド内のリソースが、あたかも同じネットワーク セグメント内にあるかのように、プライベート IP アドレスを使用して相互に通信できるようになります。
Libreswan は、 FreeS/WAN および Openswan に基づいたオープンソースの IPSec 実装で、オンプレミス ネットワークまたはクラウド プロバイダー ネットワークのホストにインストールできます。
ということで、顧客構内機器(CPE)として Libreswan VMを備えたサイト間 VPNを使用して、 Oracle Cloud Infrastructure仮想クラウド・ネットワーク(VCN)を別のクラウド・プロバイダに接続する方法を示します。
■ 接続イメージ
今回、Libreswan 3.25を使用してOracle CloudへIPSec VPN接続します。
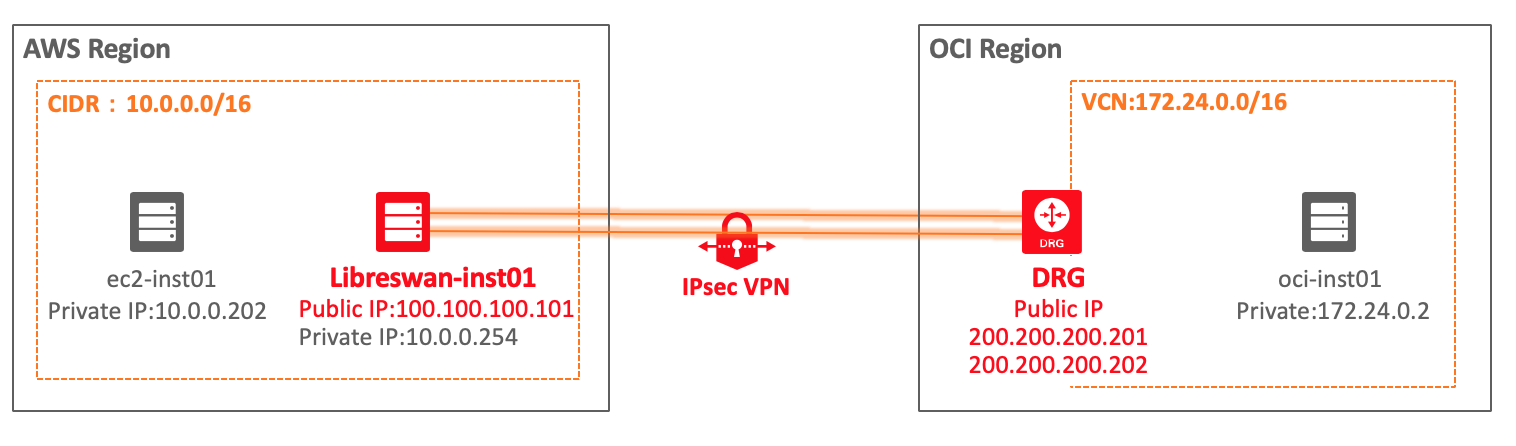
■ 各種情報
| Cloud | Section | Value |
|---|---|---|
| AWS | VPC CIDR block | 10.0.0.0/16 |
| AWS | Libreswan public interface | Public IP - 100.100.100.101 |
| Oracle | VCN CIDR block | 172.24.0.0/16 |
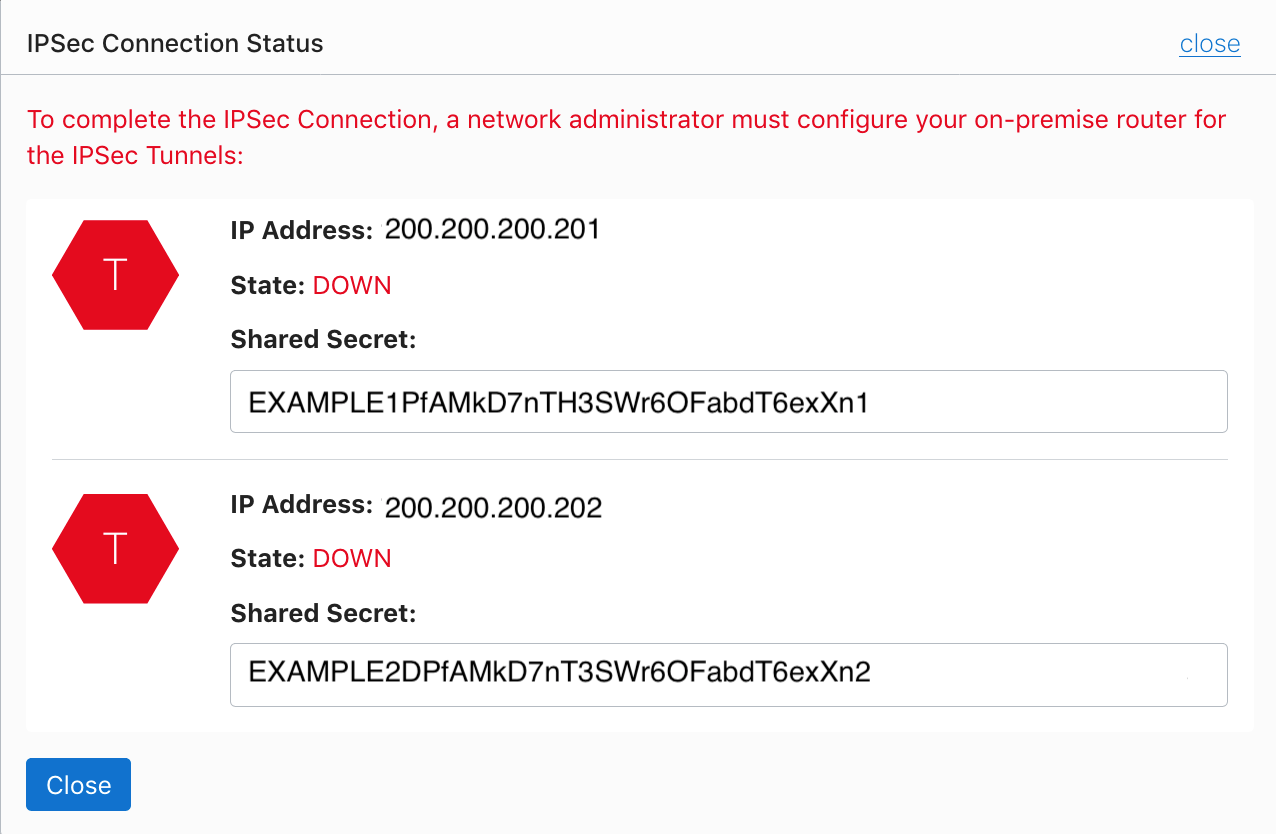
| Oracle | DRG VPN headend IPSec tunnel1 endpoint | Public IP - 200.200.200.201 |
| Oracle | DRG VPN tunnel1 shared secret | EXAMPLE1PfAMkD7nTH3SWr6OFabdT6exXn1 |
| Oracle | DRG VPN headend IPSec tunnel2 endpoint | Public IP - 200.200.200.202 |
| Oracle | DRG VPN tunnel2 shared secret | EXAMPLE2DPfAMkD7nT3SWr6OFabdT6exXn2 |
■ AWS側インスタンス設定
1) libreswanインストール
[ec2-user@libreswan-inst01 ~]$ sudo yum -y install libreswan
      Loaded plugins: amazon-id, rhui-lb, search-disabled-repos
      rhui-REGION-client-config-server-7                       | 2.9 kB     00:00
      rhui-REGION-rhel-server-releases                         | 3.5 kB     00:00

      ・・・

     Installed:
       libreswan.x86_64 0:3.25-4.1.0.1.el7_6

     Dependency Installed:
       ldns.x86_64 0:1.6.16-10.el7                                  unbound-libs.x86_64 0:1.6.6-1.el7

     Dependency Updated:
       nss.x86_64 0:3.36.0-7.1.el7_6            nss-sysinit.x86_64 0:3.36.0-7.1.el7_6       nss-tools.x86_64 0:3.36.0-7.1.el7_6
       nss-util.x86_64 0:3.36.0-1.1.el7_6

[ec2-user@libreswan-inst01 ~]$ sudo ipsec --version
	Linux Libreswan 3.25 (netkey) on 3.10.0-862.el7.x86_64Linux Libreswan 3.25 (netkey) on 3.10.0-862.el7.x86_64
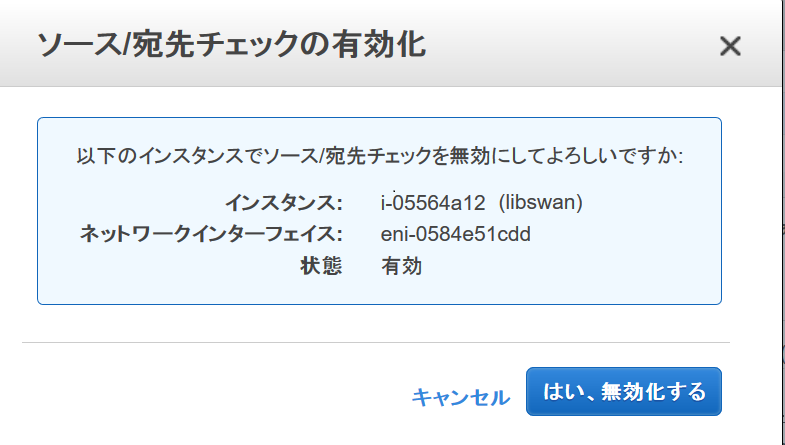
2) ソース/宛先チエックの無効化設定
AWSコンソールで Libreswanインストールしたインスタンスをチェックし、
[ネットワーキング] → [ソース/宛先チエックの有効化] をクリック
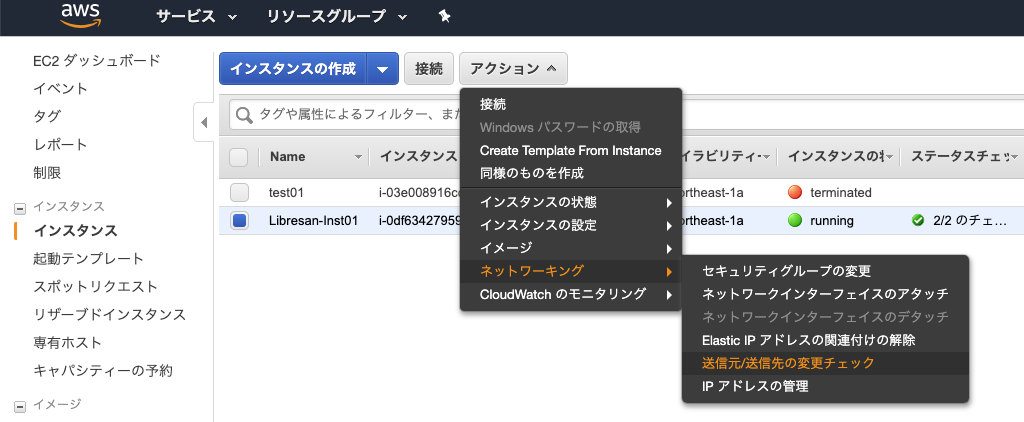
[はい、無効化する]をクリックして設定
3) IP_forward 設定
・ viで下記設定
[ec2-user@libreswan-inst01 ~]$ sudo vi /etc/sysctl.conf
 ・・・
 net.ipv4.ip_forward=1
 net.ipv4.conf.all.accept_redirects = 0
 net.ipv4.conf.all.send_redirects = 0
 net.ipv4.conf.default.send_redirects = 0
 net.ipv4.conf.eth0.send_redirects = 0
 net.ipv4.conf.default.accept_redirects = 0
 net.ipv4.conf.eth0.accept_redirects = 0
・ 設定反映
[ec2-user@libreswan-inst01 ~]$ sudo sysctl -p
 net.ipv4.ip_forward = 1
 net.ipv4.conf.all.accept_redirects = 0
 net.ipv4.conf.all.send_redirects = 0
 net.ipv4.conf.default.send_redirects = 0
 net.ipv4.conf.eth0.send_redirects = 0
 net.ipv4.conf.default.accept_redirects = 0
 net.ipv4.conf.eth0.accept_redirects = 0
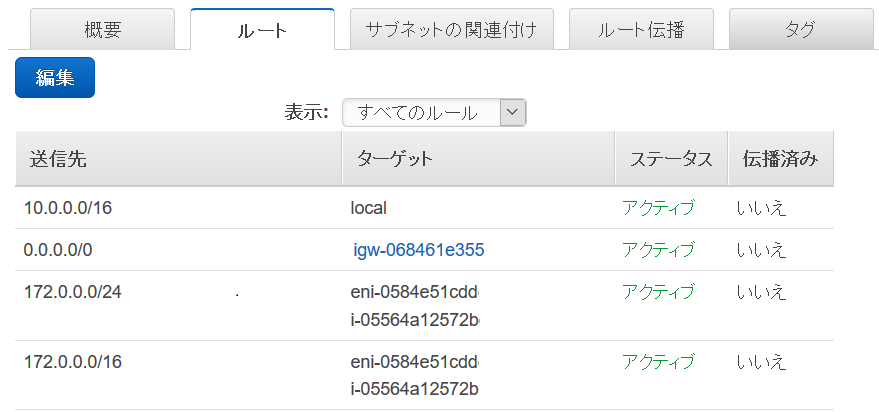
4) AWSコンソールでルートテーブル設定
VCN SIDR 172.24.0.0/16 に Libreswan インスタンスの IDをターゲット追加
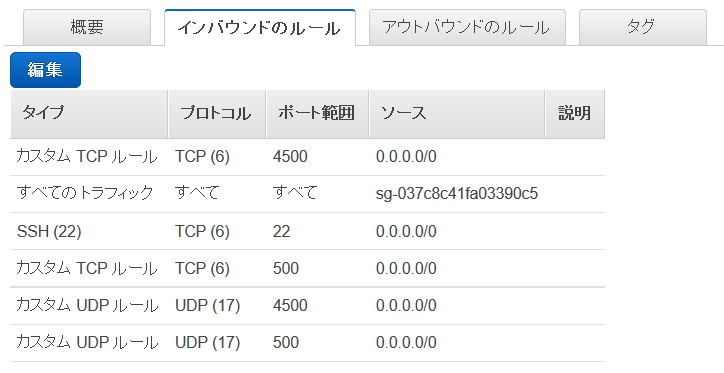
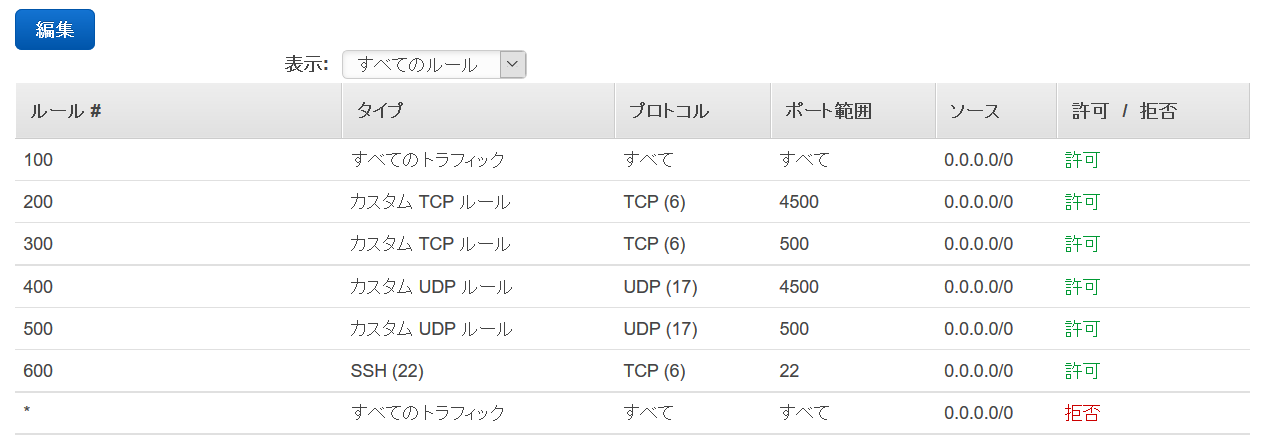
5) AWSコンソールでネットワークACLの設定
IPSec VPN通信を可能にするために、UDPプロトコルに対してポート番号4500と500をインバウンドのルールに追加
・ セキュリティグループ設定:
・ ネットワークACL設定:
■ Oracle Cloud 側設定
1) Customer-Premises Equipment (CPE)作成
Libreswan AWS instance の Public IP address(100.100.100.101)をポイントしてCPE作成

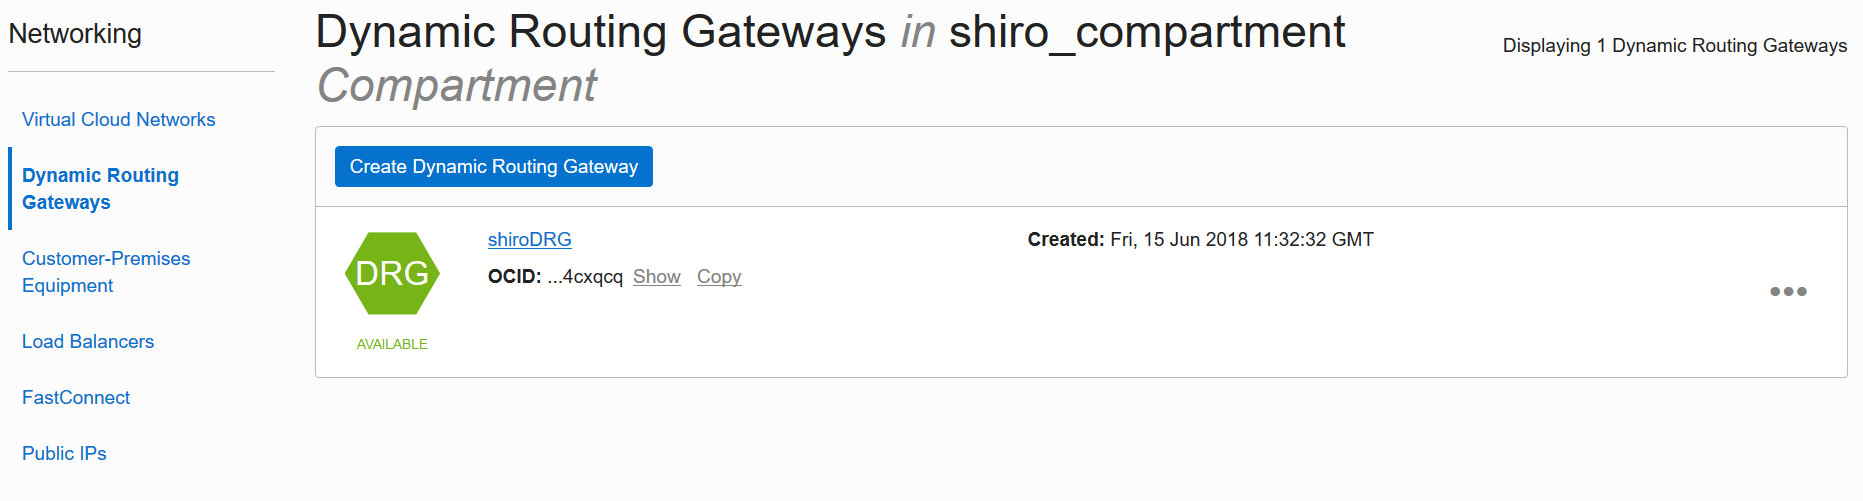
2) DRG作成
VCN (172.24.0.0/16)をアタッチして DRGを作成
3) IPSec Connections作成
作成した DRGに point it to the AWS VPC CIDR (10.0.0.0/16)をポイントして作成

作成後 右端の ・・・(Actions icon) からTunnel Informationメニューをクリックして
DOWN state (まだAWS Libreswan側の設定ができていなため)であることを確認
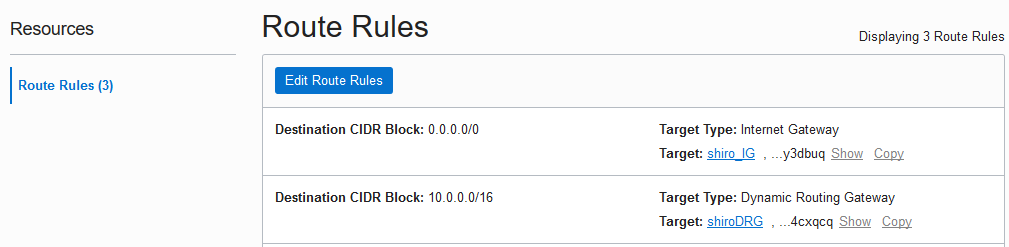
4) VCNの Route Rules設定
DRGに AWS VPC CIDR (10.0.0.0/16)を Route tablesに追加
■ AWS側の Libreswan 設定
● Libreswan設定
1) /etc/ipsec.d/oci.conf設定
[root@libreswan-inst01 ~]# vi /etc/ipsec.d/ipsec.conf
     conn oracle-tunnel-1
          left=10.0.0.254
          leftid=100.100.100.101
          leftnexthop=%defaultroute
          right=200.200.200.201
          authby=secret
          leftsubnet=0.0.0.0/0
          rightsubnet=0.0.0.0/0
          auto=start
          mark=10/0xffffffff
          vti-interface=vti01
          vti-routing=no
          encapsulation=no
          nat-keepalive=yes
     conn oracle-tunnel-2
          left=10.0.0.254
          leftid=100.100.100.101
          leftnexthop=%defaultroute
          right=200.200.200.202
          authby=secret
          leftsubnet=0.0.0.0/0
          rightsubnet=0.0.0.0/0
          auto=start
          mark=15/0xffffffff
          vti-interface=vti02
          vti-routing=no
          encapsulation=no
          nat-keepalive=yes
2) /etc/ipsec.d/oci.secrets設定
[root@libreswan-inst01 ~]# vi /etc/ipsec.d/oci.secrets
    #OCI_DRG-Public-IP-IPSEC-Tunel1  AWS_LibreSwan-PublicIP   :   PSK    "DRG Secret Key"
    200.200.200.201  100.100.100.101  : PSK   "EXAMPLE1PfAMkD7nTH3SWr6OFabdT6exXn1"
    200.200.200.202  100.100.100.101  : PSK   "EXAMPLE2DPfAMkD7nT3SWr6OFabdT6exXn2"
● Libreswan起動
1) Libreswan起動
[root@libreswan-inst01 ~]# ipsec restart
2) ipsec established確認
/etc/ipsec.d/ipsec.conf で設定した2つの Tunnnel(racle-tunnel-1とracle-tunnel-2)が establishedであることを確認
[root@libreswan-inst01 ~]# ipsec status | grep established
     000 #87: "oracle-tunnel-1":500 STATE_MAIN_I4 (ISAKMP SA established); EVENT_SA_REPLACE in 2236s; newest ISAKMP; lastdpd=8s(seq in:0 out:0); idle; import:admin initiate
     000 #88: "oracle-tunnel-2":500 STATE_MAIN_I4 (ISAKMP SA established); EVENT_SA_REPLACE in 2399s; newest ISAKMP; lastdpd=8s(seq in:0 out:0); idle; import:admin initiate
3) ipsec verify確認
すべて[OK]であることを確認
[root@libreswan-inst01 ~]# ipsec verify
     Verifying installed system and configuration files

     Version check and ipsec on-path                        [OK]
     Libreswan 3.25 (netkey) on 4.14.35-1818.5.4.el7uek.x86_64
     Checking for IPsec support in kernel                   [OK]
      NETKEY: Testing XFRM related proc values
              ICMP default/send_redirects                   [OK]
              ICMP default/accept_redirects                 [OK]
              XFRM larval drop                              [OK]
     Pluto ipsec.conf syntax                                [OK]
     Two or more interfaces found, checking IP forwarding   [OK]
     Checking rp_filter                                     [OK]
     Checking that pluto is running                         [OK]
      Pluto listening for IKE on udp 500                    [OK]
      Pluto listening for IKE/NAT-T on udp 4500             [OK]
      Pluto ipsec.secret syntax                             [OK]
     Checking 'ip' command                                  [OK]
     Checking 'iptables' command                            [OK]
     Checking 'prelink' command does not interfere with FIPS     [OK]
     Checking for obsolete ipsec.conf options               [OK]
4) VTIインターフェス確認
/etc/ipsec.d/ipsec.conf で設定した2つの VTIインターフェス(vti01,vti02)があることを確認
[root@libreswan-inst01 ~]# ifconfig
     ens3: flags=4163<UP,BROADCAST,RUNNING,MULTICAST>  mtu 9000
             inet 10.0.0.254  netmask 255.255.255.0  broadcast 10.0.0.255
             ether 00:00:00:00:de:ab  txqueuelen 1000  (Ethernet)
             RX packets 11309  bytes 4251663 (4.0 MiB)
             RX errors 0  dropped 0  overruns 0  frame 0
             TX packets 13469  bytes 7600882 (7.2 MiB)
             TX errors 0  dropped 0 overruns 0  carrier 0  collisions 0

     lo: flags=73<UP,LOOPBACK,RUNNING>  mtu 65536
             inet 127.0.0.1  netmask 255.0.0.0
             loop  txqueuelen 1000  (Local Loopback)
             RX packets 6  bytes 416 (416.0 B)
             RX errors 0  dropped 0  overruns 0  frame 0
             TX packets 6  bytes 416 (416.0 B)
             TX errors 0  dropped 0 overruns 0  carrier 0  collisions 0

     vti01: flags=209<UP,POINTOPOINT,RUNNING,NOARP>  mtu 8832
             tunnel   txqueuelen 1000  (IPIP Tunnel)
             RX packets 0  bytes 0 (0.0 B)
             RX errors 0  dropped 0  overruns 0  frame 0
             TX packets 0  bytes 0 (0.0 B)
             TX errors 0  dropped 0 overruns 0  carrier 0  collisions 0

     vti02: flags=209<UP,POINTOPOINT,RUNNING,NOARP>  mtu 8832
             tunnel   txqueuelen 1000  (IPIP Tunnel)
             RX packets 8  bytes 672 (672.0 B)
             RX errors 0  dropped 0  overruns 0  frame 0
             TX packets 8  bytes 672 (672.0 B)
             TX errors 0  dropped 0 overruns 0  carrier 0  collisions 0
5) ip link VTIインターフェス Peer確認
2つの VTIインターフェス(vti01,vti02)が OCIの DRGと Peerしていることを確認
[root@libreswan-inst01 ~]# ip link show
     1: lo: <LOOPBACK,UP,LOWER_UP> mtu 65536 qdisc noqueue state UNKNOWN mode DEFAULT group default qlen 1000
         link/loopback 00:00:00:00:00:00 brd 00:00:00:00:00:00
     2: ens3: <BROADCAST,MULTICAST,UP,LOWER_UP> mtu 9000 qdisc mq state UP mode DEFAULT group default qlen 1000
         link/ether 04:00:13:00:00:c4 brd ff:ff:ff:ff:ff:ff
     3: ip_vti0@NONE: <NOARP> mtu 1332 qdisc noop state DOWN mode DEFAULT group default qlen 1000
         link/ipip 0.0.0.0 brd 0.0.0.0
     4: vti01@NONE: <POINTOPOINT,NOARP,UP,LOWER_UP> mtu 8832 qdisc noqueue state UNKNOWN mode DEFAULT group default qlen 1000
         link/ipip 10.0.0.254 peer 200.200.200.201
     5: vti02@NONE: <POINTOPOINT,NOARP,UP,LOWER_UP> mtu 8832 qdisc noqueue state UNKNOWN mode DEFAULT group default qlen 1000
         link/ipip 10.0.0.254 peer 200.200.200.202
6) route設定前確認
2つのVTIインターフェス(vti01,vti02)を routeに登録する前の確認
[root@libreswan-inst01 ~]# ip route
     default via 10.0.0.1 dev ens3
     10.0.0.0/24 dev ens3 proto kernel scope link src 10.0.0.254
     169.254.0.0/16 dev ens3 proto static scope link
     169.254.0.0/16 dev ens3 scope link metric 1002
7) route設定
OCI の VCNへIPsec通信が2つのVTIインターフェース(vti01,vti02)を通るように routeを設定
[root@libreswan-inst01 ~]# ip route add 172.24.0.0/16 nexthop dev vti01 nexthop dev vti02
8) route設定確認
2つの VTIインターフェス(vti01,vti02)を routeに登録されていることを確認
[root@libreswan-inst01 ~]# ip route
     default via 10.0.0.1 dev ens3
     172.24.0.0/16
          nexthop dev vti01 weight 1
          nexthop dev vti02 weight 1
     10.0.0.0/24 dev ens3 proto kernel scope link src 10.0.0.254
     169.254.0.0/16 dev ens3 proto static scope link
     169.254.0.0/16 dev ens3 scope link metric 1002
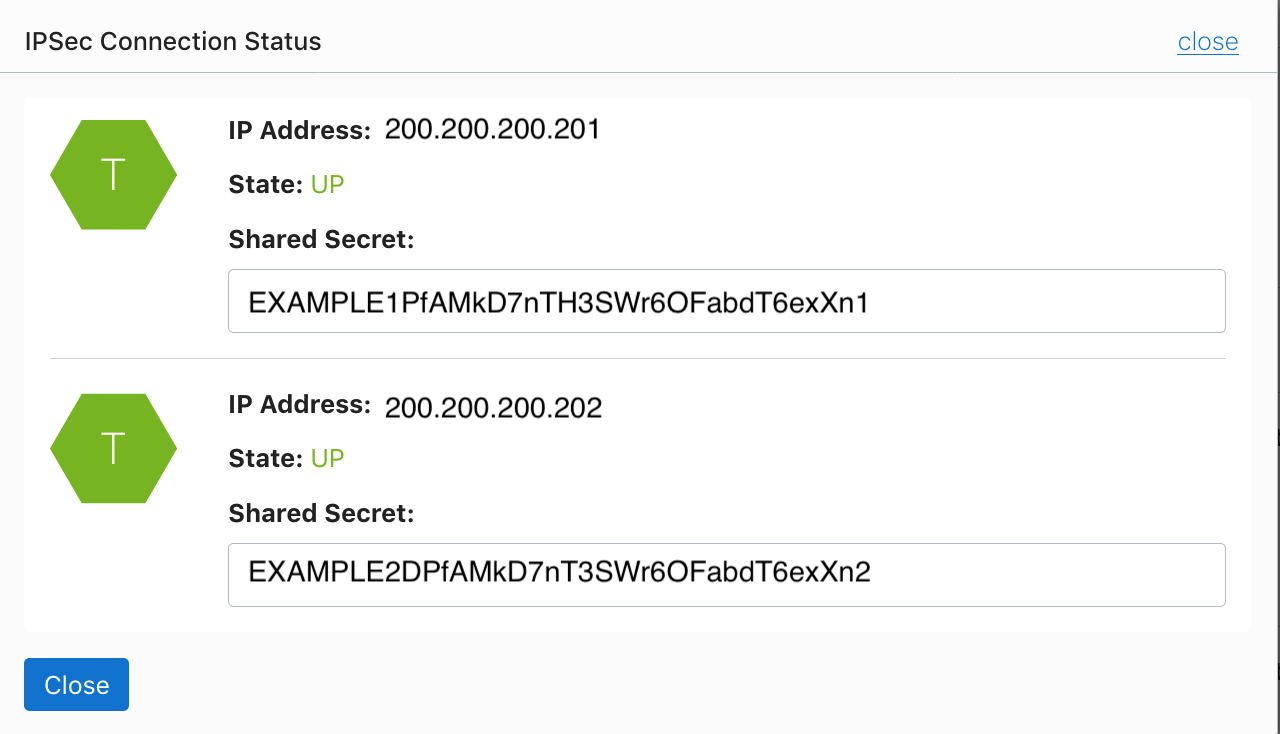
9) OCIコンソールでIPSec接続確認
・ Tunnel Information画面
DOWN state が UP state になっていることを確認
■ VPN接続テスト
・ OCIインスタンスから AWSインスタンス接続テスト
sshで相手側のホスト名が出力されることを確認
1) OCI -> AWS インスタンスへssh接続
[opc@oci-inst1 ~]$ ssh -i AWS_EC2.pem  ec2-user@10.0.0.202 hostname
	ec2-inst01.us-east-2.compute.internal
2) AWS -> OCI インスタンスへssh接続
[ec2-user@libreswan-inst01 ~]$ ssh -i <OCIssh鍵>  opc@172.24.0.2 hostname
	oci-inst01
■ NWスループット確認
1) firewalld 停止
iperf3 実行するために firewallを停止しますが、
以下のコマンドのように 5201のTCPとUDPを個別にFrewallを通すように設定してもOKです。
firewall-cmd --add-port=5201/tcp
firewall-cmd --add-port=5201/udp
・ OCI、AWS両方の接続インスタンスのFirewallを一時的に停止
[opc@oci-inst1 ~]# systemctl stop firewalld
success
2) iperf3 帯域測定
クライアントからサーバに TCPパケットを送信して負荷を計測
・ サーバー側コマンド実行
[ec2-user@libreswan-inst01 ~]# iperf3 -s
-----------------------------------------------------------
Server listening on 5201
-----------------------------------------------------------
・ クライアント側コマンド実行
[opc@oci-inst1 ~]$  iperf3 -c 10.0.0.202
	Connecting to host 10.0.0.202, port 5201
	[  4] local 172.24.0.2 port 50842 connected to 10.0.0.202 port 5201
	[ ID] Interval           Transfer     Bandwidth       Retr  Cwnd
	[  4]   0.00-1.00   sec  43.0 MBytes   361 Mbits/sec   45    944 KBytes
	[  4]   1.00-2.00   sec  45.0 MBytes   377 Mbits/sec    0   1.02 MBytes
	[  4]   2.00-3.00   sec  45.0 MBytes   377 Mbits/sec    0   1.09 MBytes
	[  4]   3.00-4.00   sec  46.2 MBytes   388 Mbits/sec    0   1.14 MBytes
	[  4]   4.00-5.00   sec  42.5 MBytes   356 Mbits/sec    8    866 KBytes
	[  4]   5.00-6.00   sec  43.8 MBytes   367 Mbits/sec    0    922 KBytes
	[  4]   6.00-7.00   sec  42.5 MBytes   357 Mbits/sec    0    962 KBytes
	[  4]   7.00-8.00   sec  43.8 MBytes   367 Mbits/sec    0    987 KBytes
	[  4]   8.00-9.00   sec  42.5 MBytes   357 Mbits/sec    0   1001 KBytes
	[  4]   9.00-10.00  sec  42.5 MBytes   356 Mbits/sec    0   1008 KBytes
	- - - - - - - - - - - - - - - - - - - - - - - - -
	[ ID] Interval           Transfer     Bandwidth       Retr
	[  4]   0.00-10.00  sec   437 MBytes   366 Mbits/sec   53             sender
	[  4]   0.00-10.00  sec   434 MBytes   364 Mbits/sec                  receiver

	iperf Done.
3) firewalld 有効(切り戻し)
・ OCI、AWS両方の接続インスタンスのFirewallを一時的に停止したのを起動し直します。
[opc@oci-inst1 ~]# systemctl start firewalld
success
■ OCI CLIによる IPsec Connectionステータス確認
ping を使用してステータス確認を通常おこないますが、oci cliコマンドでもステータスを確認することができます
・ oci cli出力例
lifecycle-state項で、"UP" もしくは "DOWN"を確認できます
[opc@oci-inst1 ~]$ oci network ip-sec-connection get-status --ipsc-id <ipsecconnectionのOCID>
	{
	  "data": {
	    "compartment-id": "ocid1.compartment.oc1..aaaaaaaatfesjsrtktest",
	    "id": "ocid1.ipsecconnection.oc1.iad.aaaaaaaatjsrt575scrtest",
	    "time-created": "2018-01-16T09:15:30.567000+00:00",
	    "tunnels": [
	      {
	        "ip-address": "200.200.200.201",
	        "lifecycle-state": "UP",
	        "time-created": "2018-01-16T16:52:05.047000+00:00",
	        "time-state-modified": "2019-02-07T08:01:56.003000+00:00"
	      },
	    ]
	  }
	}

# JMESPath queryで "lifecycle-state" の値("UP" or "DOWN")だけ出力
[opc@oci-inst1 ~]$ oci network ip-sec-connection get-status --ipsc-id <ipsecconnectionのOCID> --query 'data.tunnels[?"ip-address"==`200.200.200.201`]."lifecycle-state"|[0]' --raw-output
  UP

# Shellで "lifecycle-state" の値("UP" or "DOWN")だけ出力
[opc@oci-inst1 ~]$ oci network ip-sec-connection get-status --ipsc-id <ipsecconnectionのOCID> |grep lifecycle | awk -F: '{print $2}' | sed 's/"//g' | sed 's/,//'
  UP
■ 参考
・ Libreswan
- Libreswan VPN software
・ Oracle Cloud Infrastructure Documents
- Access to Other Clouds with Libreswan
- Site-to-Site VPN CPE Configuration
- Site-to-Site VPN
- Site-to-Site VPN Metrics
- Site-to-Site VPN Troubleshooting
- Creating an IPSec connection to OCI using Libreswan as a CPE
- Creating a Secure Connection simulating On-Premises environment using LibreSwan on OCI.
- OCI VPN IPSec to Libreswan with BGP Routing Advertise Configuration Steps