「ゼロから作るDeep Learning」(斎藤 康毅 著 オライリー・ジャパン刊)を読んでいる時に、参照したサイト等をメモしていきます。 その11 ← → その13
8.1.1 よりディープなネットワークへ
P243で、ネットワークの定義はフォルダch08内のdeep_convnet.py、訓練用のコードは、train_deepnet.py 、学習済みの重みパラメータはdeep_conv_net_params.pkl、と説明してありますが、重みパラメータを読み込んでテストデータを処理するプログラムは misclassified_mnist.py です。
このプログラムはフォルダch08にJupyterNoteを作って実行できるようになっています。
baseディレクトリ上で実行しようとすると、deep_convert.pyとdeep_conv_net_params.pklの置き場所や呼び出しのあたりをいろいろ変更しないといけなくなります。
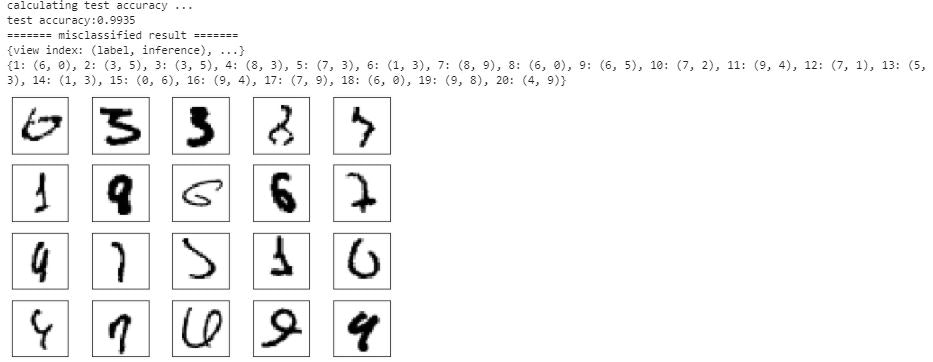
misclassified_mnist.pyの実行結果
DeepConvNetクラスの内容は、これまで説明があったものばかりで、改めて内容を確認する必要はないかと思います。
で、
今回はこのクラスを使って、Kaggleの犬猫データセットを処理してみようかと。
Kaggleの猫と犬のデータセット
データの内容
下記サイトからダウンロード
https://www.microsoft.com/en-us/download/details.aspx?id=54765
フォルダ PetImages の下にあるフォルダ Cat と Dog に、画像が入っています。
0.jpg から 12499.jpg とファイル名が連番になっています。
犬、猫それぞれ 12500枚 ずつの画像があるということになります。
画像はカラーで、大きさはそれぞれ違っています。
この画像の1枚0.jpgをNumPy配列に格納して内容を見てみると
(375, 500, 3)
(高さ, 幅, 色)の3次元の配列として格納されています。
色が 0は赤、1が緑、2が青 です。
メモ6の2ではグレースケールに変換しましたが、今回は3色、3チャンネルのデータに変換します。
画像の大きさをそろえて、処理できる形式に変換する
画像データを チャンネル3、高さ80、幅80の配列にします。
import os
import glob
from PIL import Image
import numpy as np

dataset_dir = os.path.dirname(os.path.abspath('__file__'))+'/dataset'
catfiles = glob.glob(dataset_dir + '/Cat/*.jpg')
dogfiles = glob.glob(dataset_dir + '/Dog/*.jpg')

fsize = 80

for f in catfiles:
    try:
        lblA = 0
        pad_u, pad_d, pad_l, pad_r = 0,0,0,0
        img = Image.open(f)
        w,h=img.size
        if w>h:
            imgr = img.resize((fsize, int(h*fsize/w)))
            wr,hr = imgr.size
            pad_u = int((fsize - hr)/2)
            pad_d = fsize - hr - pad_u
        else:
            imgr = img.resize((int(w*fsize/h),fsize))
            wr,hr = imgr.size
            pad_l = int((fsize - wr)/2)
            pad_r = fsize - wr - pad_l

        imgtr = np.array(imgr).transpose(2,0,1)
        imgA = np.pad(imgtr, [(0, 0),(pad_u,pad_d),(pad_l,pad_r)], 'constant')
        imgA = imgA.tolist()
    except Exception as e:
        print(f+" : " + str(e))
PILで読み込んだ画像ファイルの情報
img = Image.open(f)
print(img.format, img.size, img.mode)
JPEG (500, 375) RGB
ファイルのサイズが(幅、高さ)となっています。
これをnumpy配列に変換すると、こうなります。
imgA = np.array(img)
print(imgA.size, imgA.shape)
562500 (375, 500, 3)
(高さ、幅、色)となっています。
これをふまえて、画像のサイズを80×80にresizeし、次元の軸を入れ替えて、チャンネル3、高さ80、幅80の配列にします。
ところが、上のプログラムでフォルダ内のファイルを連続処理していると、こんなエラーが発生します。
C:\Users\021133/dataset/Cat\10125.jpg : axes don't match array
C:\Users\021133/dataset/Cat\10501.jpg : axes don't match array
C:\Users\021133/dataset/Cat\1074.jpg : Python int too large to convert to C ssize_t
C:\Users\021133/dataset/Cat\666.jpg : cannot identify image file
どうも、transpose(2,0,1)あたりで、次元の軸があってないようです。
1074.jpgはメモ6の2で処理した時にもエラーになっています。ファイル読み込み時にエラーになっているようです。
666.jpgは、0バイトで空ファイルです。
10125.jpgを調べて見ると
img=Image.open(dataset_dir + '/10125.jpg')
print(img.format, img.size, img.mode)
imgA = np.array(img)
print(imgA.size, imgA.shape,imgA.ndim)
GIF (259, 346) P
89614 (346, 259) 2
ビューアで見た限りではカラーの画像で問題なく表示されています。問題は、P パレットモードとなっているからのようです。そこで読み込み方法を修正してみました。
img=Image.open(dataset_dir + '/10501.jpg').convert('RGB')
print(img.format, img.size, img.mode)
imgA = np.array(img)
print(imgA.size, imgA.shape,imgA.ndim)
None (400, 299) RGB
358800 (299, 400, 3) 3
どうやらこれでいけそうです。
問題のファイル CAt 1074.jpg 5127.jpg 666.jpg Dog 11702.jpg 829.jpg 8366.jpg を別のフォルダに移動させ、メモリーエラーを回避するためにテストデータを100件、訓練データを4000件に絞ることにしました。
import os
import glob
import numpy as np

from PIL import Image

dataset_dir = os.path.dirname(os.path.abspath('__file__'))+'/dataset'
catfiles = glob.glob(dataset_dir + '/Cat/*.jpg')
dogfiles = glob.glob(dataset_dir + '/Dog/*.jpg')

fsize = 80

tsl = []
tsi = []
trl = []
tri = []
tst_count = 0
trn_count = 0

count = 0

for f in catfiles:
    try:
        lblA = 0
        img = Image.open(f).convert('RGB')
        w,h=img.size
        pad_u, pad_d, pad_l, pad_r = 0,0,0,0
        if w>h:
            imgr = img.resize((fsize, int(h*fsize/w)))
            wr,hr = imgr.size
            pad_u = int((fsize - hr)/2)
            pad_d = fsize - hr - pad_u
        else:
            imgr = img.resize((int(w*fsize/h),fsize))
            wr,hr = imgr.size
            pad_l = int((fsize - wr)/2)
            pad_r = fsize - wr - pad_l

        imgtr = np.array(imgr).transpose(2,0,1)
        imgA = np.pad(imgtr, [(0, 0),(pad_u,pad_d),(pad_l,pad_r)], 'constant')
        imgA = imgA.tolist()
    except Exception as e:
        print(f+" : " + str(e))

    if count < 50:
        tsl.append(lblA)
        tsi.append(imgA)
        tst_count += 1
    elif count < 2050:
        trl.append(lblA)
        tri.append(imgA)
        trn_count += 1
    else:
        break

    count += 1

count = 0

for f in dogfiles:
    try:
        lblA = 1
        img = Image.open(f).convert('RGB')
        w,h=img.size
        pad_u, pad_d, pad_l, pad_r = 0,0,0,0
        if w>h:
            imgr = img.resize((fsize, int(h*fsize/w)))
            wr,hr = imgr.size
            pad_u = int((fsize - hr)/2)
            pad_d = fsize - hr - pad_u
        else:
            imgr = img.resize((int(w*fsize/h),fsize))
            wr,hr = imgr.size
            pad_l = int((fsize - wr)/2)
            pad_r = fsize - wr - pad_l

        imgtr = np.array(imgr).transpose(2,0,1)
        imgA = np.pad(imgtr, [(0, 0),(pad_u,pad_d),(pad_l,pad_r)], 'constant')
        imgA = imgA.tolist()

    except Exception as e:
        print(f+" : " + str(e))

    if count < 50:
        tsl.append(lblA)
        tsi.append(imgA)
        tst_count += 1
    elif count < 2050:
        trl.append(lblA)
        tri.append(imgA)
        trn_count += 1
    else:
        break

    count += 1

dataset = {}
dataset['test_label']  = np.array(tsl, dtype=np.uint8)
dataset['test_img']    = np.array(tsi, dtype=np.uint8)
dataset['train_label'] = np.array(trl, dtype=np.uint8)
dataset['train_img']   = np.array(tri, dtype=np.uint8)

import pickle

save_file = dataset_dir + '/catdog.pkl'
with open(save_file, 'wb') as f:
    pickle.dump(dataset, f, -1)
dataset['test_img'].shape
(100, 3, 80, 80)
dataset['train_img'].shape
(4000, 3, 80, 80)
DeepConvNetクラス
DeepConvNetクラスのコードは、フォルダch08内のdeep_convnet.pyにありますが、これには(1,28,28)の入力に合わせた部分があるようです。
    def __init__(self, input_dim=(1, 28, 28),
                 conv_param_1 = {'filter_num':16, 'filter_size':3, 'pad':1, 'stride':1},
                 conv_param_2 = {'filter_num':16, 'filter_size':3, 'pad':1, 'stride':1},
                 conv_param_3 = {'filter_num':32, 'filter_size':3, 'pad':1, 'stride':1},
                 conv_param_4 = {'filter_num':32, 'filter_size':3, 'pad':2, 'stride':1},
                 conv_param_5 = {'filter_num':64, 'filter_size':3, 'pad':1, 'stride':1},
                 conv_param_6 = {'filter_num':64, 'filter_size':3, 'pad':1, 'stride':1},
                 hidden_size=50, output_size=10):
input_dim=(1, 28, 28)は当然ですが、これはパラメータとして別の値を与えればいいので、問題ではありません。問題となるのは重みW7のサイズです。
        # 重みの初期化===========
        # 各層のニューロンひとつあたりが、前層のニューロンといくつのつながりがあるか(TODO:自動で計算する)
        pre_node_nums = np.array([1*3*3, 16*3*3, 16*3*3, 32*3*3, 32*3*3, 64*3*3, 64*4*4, hidden_size])
        weight_init_scales = np.sqrt(2.0 / pre_node_nums)  # ReLUを使う場合に推奨される初期値
ここは、各層で使うフィルタの チャネル×高×横 を指定すればいいのですが、入力データが(3,80,80)になることで、こうなります。
pre_node_nums = np.array([3*3*3, 16*3*3, 16*3*3, 32*3*3, 32*3*3, 64*3*3, 64*10*10, hidden_size])
重み W7 のサイズもこうなってましたが、
self.params['W7'] = weight_init_scales[6] * np.random.randn(64*4*4, hidden_size)
こう変えないと、プログラムがうまく動きません。
self.params['W7'] = weight_init_scales[6] * np.random.randn(64*10*10, hidden_size)
どうして、10×10なのかと言うと、これは入力データの 高×横 が元になっているから。
今回の入力データは 80×80 ですが、これが途中でpooling層を1回通ると半分のサイズになります。
このクラス定義では3回通るので 80 → 40 → 20 → 10 になります。
元のプログラムの 4×4 というのも 28 → 14 → 7 → 4 ということです。
学習処理
import sys, os
import pickle
import numpy as np
from common.functions import *
from common.optimizer import *
from deep_convnet import DeepConvNet

def to_one_hot(label):
    t = np.zeros((label.size, 2))
    for i in range(label.size):
        t[i][label[i]] = 1
    return t

dataset_dir = os.path.dirname(os.path.abspath('__file__'))+'/dataset'

mnist_file = dataset_dir + '/catdog.pkl'
with open(mnist_file, 'rb') as f:
    dataset = pickle.load(f)
x_train = dataset['train_img']
t_train = to_one_hot(dataset['train_label'])

# ハイパーパラメータ
iters_num = 30
train_size = x_train.shape[0]
batch_size = 12
learning_rate = 0.1

train_loss_list = []

network = DeepConvNet( input_dim=(3, 80, 80),
                 conv_param_1 = {'filter_num':16, 'filter_size':3, 'pad':1, 'stride':1},
                 conv_param_2 = {'filter_num':16, 'filter_size':3, 'pad':1, 'stride':1},
                 conv_param_3 = {'filter_num':32, 'filter_size':3, 'pad':1, 'stride':1},
                 conv_param_4 = {'filter_num':32, 'filter_size':3, 'pad':2, 'stride':1},
                 conv_param_5 = {'filter_num':64, 'filter_size':3, 'pad':1, 'stride':1},
                 conv_param_6 = {'filter_num':64, 'filter_size':3, 'pad':1, 'stride':1},
                 hidden_size=50, output_size=2)

optimizer = Adam(lr=learning_rate)

for i in range(iters_num):
    # ミニバッチの取得
    batch_mask = np.random.choice(train_size, batch_size)
    x_batch = x_train[batch_mask]
    t_batch = t_train[batch_mask]

    # 勾配の計算
    grads = network.gradient(x_batch, t_batch)
    optimizer.update(network.params, grads)

    #学習経過の記録
    loss = network.loss(x_batch, t_batch)
    train_loss_list.append(loss)

# networkオブジェクトを、pickleで保存する。保存したオブジェクトは、推論処理で使う
import pickle
save_file = dataset_dir + '/catdogA.pkl'
with open(save_file, 'wb') as f:
    pickle.dump(network, f, -1)
これで一応、プログラムは動きましたが、実際には学習できていません。推論処理してみても、正解率が50%になりません。
やはり、1バッチで訓練するデータ数がたったの12件というのがいけないのでしょうか?
でも、これ以上処理するとメモリーエラーになってしまいます。
network.layers
[common.layers.Convolution at 0x3610030,
common.layers.Relu at 0xbad8170,
common.layers.Convolution at 0xbabf990,
common.layers.Relu at 0xbabf870,
common.layers.Pooling at 0xbabf950,
common.layers.Convolution at 0xbabf430,
common.layers.Relu at 0xbabf0f0,
common.layers.Convolution at 0xbabf230,
common.layers.Relu at 0xbabf570,
common.layers.Pooling at 0xbabf130,
common.layers.Convolution at 0xbabf4d0,
common.layers.Relu at 0xbabf1f0,
common.layers.Convolution at 0xbabf210,
common.layers.Relu at 0xbabf190,
common.layers.Pooling at 0xbabf9f0,
common.layers.Affine at 0xbabf970,
common.layers.Relu at 0xbabf270,
common.layers.Dropout at 0xbabf9b0,
common.layers.Affine at 0xbabf470,
common.layers.Dropout at 0xbabf370]
print(x_batch.shape)
print(network.params['W1'].shape)
print(network.params['W2'].shape)
print(network.params['W3'].shape)
print(network.params['W4'].shape)
print(network.params['W5'].shape)
print(network.params['W6'].shape)
print(network.params['W7'].shape)
print(network.params['W8'].shape)
(12, 3, 80, 80)
(16, 3, 3, 3)
(16, 16, 3, 3)
(32, 16, 3, 3)
(32, 32, 3, 3)
(64, 32, 3, 3)
(64, 64, 3, 3)
(6400, 50)
(50, 2)
推論処理
# テストデータで評価
import numpy as np
import sys, os
import pickle
from deep_convnet import DeepConvNet

dataset_dir = os.path.dirname(os.path.abspath('__file__'))+'/dataset'

mnist_file = dataset_dir + '/catdog.pkl'
with open(mnist_file, 'rb') as f:
    dataset = pickle.load(f)
x_test = dataset['test_img']
t_test = dataset['test_label']

test_size = 10
test_mask = np.random.choice(100, test_size)
x = x_test[test_mask]
t = t_test[test_mask]

# network = DeepConvNet()
weight_file = dataset_dir + '/catdogA.pkl'
with open(weight_file, 'rb') as f:
    network = pickle.load(f)

y = network.predict(x)
accuracy_cnt = 0
for i in range(len(y)):
    p= np.argmax(y[i])
    if p == t[i]:
        accuracy_cnt += 1

print("Accuracy:" + str(float(accuracy_cnt) / len(x)))
Accuracy:0.5
import matplotlib.pyplot as plt
class_names = ['cat', 'dog']

def showImg(x):
    example = x.transpose(1,2,0)
    plt.figure()
    plt.xticks([])
    plt.yticks([])
    plt.grid(False)
    plt.imshow(example, cmap=plt.cm.binary)
    plt.show()
    return

for i in range(test_size):
    c = t[i]
    print("正解 " + str(c) + " " + class_names[c])
    p = np.argmax(y[i])
    v = y[p]
    print("判定 " + str(p) + " " + class_names[p] + " " + str(v) )
    showImg(x[i])
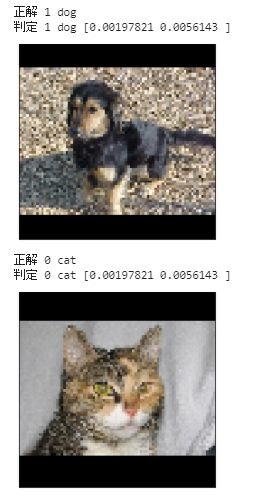
判定結果の確率が非常に小さい値になっています。やはり、正常に処理されていないのでしょう。
とは言え、すぐにメモリエラーになる環境ではテストを繰り返すのも厳しいし・・・
重みの内容を見てみた
import numpy as np
import matplotlib.pyplot as plt
dataset_dir = os.path.dirname(os.path.abspath('__file__'))+'/dataset'

def filter_show(filters, nx=8, margin=3, scale=10):
    """
    c.f. https://gist.github.com/aidiary/07d530d5e08011832b12#file-draw_weight-py
    """
    FN, C, FH, FW = filters.shape
    ny = int(np.ceil(FN / nx))

    fig = plt.figure()
    fig.subplots_adjust(left=0, right=1, bottom=0, top=1, hspace=0.05, wspace=0.05)

    for i in range(FN):
        ax = fig.add_subplot(ny, nx, i+1, xticks=[], yticks=[])
        ax.imshow(filters[i][0], cmap=plt.cm.binary, interpolation='nearest')

    plt.show()

# network = DeepConvNet()
weight_file = dataset_dir + '/catdogA.pkl'
with open(weight_file, 'rb') as f:
    network = pickle.load(f)

filter_show(network.params['W1'])
W1
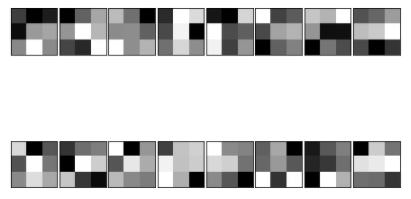
W2
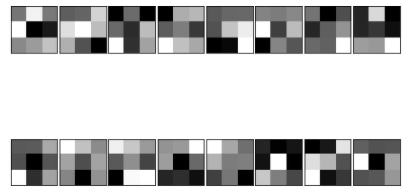
パターンがあるようには見えません。
その11 ← → その13
メモの目次等はこちらから 読めない用語集