3度目のデプロイなのにほとんどやり方がわかっておらずまた勉強し直したので、その備忘録として投稿します。もう何番煎じか分かりませんが、筆者がハマってしまったエラーとその対策についても細かく書きました。また、なぜインストールするのかについてもまとめました。
環境
- Ruby 2.7.1
- Rails 6.0.3.4
- MySQL 8.0
- Node.js 10.21.0
- Unicorn 5.7.0
- Nginx 1.12.2
前提
EC2とRDSは環境によって差異が少ないため作成手順を省略し、以下を前提とします。
- AWSでEC2インスタンス作成済み
- EC2インスタンスへElastic IPを関連付け済み
- RDSのインスタンス及びデータベース作成済み
EC2へログイン
何度もEC2にログインすることになるので、まずはログインを下記コマンドで行えるように設定します。
$ ssh アプリ名_key_rsa
通常の方法でEC2にログイン(鍵はDesktopにあるとします)
$ cd ~
$ ssh -i ~/Desktop/my-key.pem ec2-user@***.**.***.** # インスタンスを作成した際に作った公開鍵を指定し、@以下はElastic IPを入力します。

はじめてログインする場合は以下のように聞かれます。
Are you sure you want to continue connecting (yes/no)?
# yesを入力しEnter
ユーザを作成している記事が多いですが、自分しかログインすることを想定していないため作成しません。
ローカルで秘密鍵と公開鍵を作成します。
$ cd ~/.ssh
$ ssh-keygen -t rsa

# 以下のメッセージが表示されるので、「アプリ名_key_rsa」と入力
Enter file in which to save the key ():アプリ名_key_rsa

# 何もせずにそのままエンター
Enter passphrase (empty for no passphrase):

# 何もせずにそのままエンター
Enter same passphrase again:
鍵が作成されたことを確認
$ ls
# アプリ名_key_rsaとアプリ名_key_rsa.pubが表示されるはずです
設定ファイルを作成
vi config

#以下を追記

Host アプリ名_key_rsa
  Hostname Elastic IP #自分のWebサーバーのもの
  Port 22
  User ec2-user
  IdentityFile ~/.ssh/アプリ名_key_rsa #先程作成した秘密鍵
公開鍵の中身をコピー
$ cat アプリ名_key_rsa.pub

ssh-rsa AAA***************.local #コピーする
サーバーへ公開鍵の設置
EC2では公開鍵は~/.ssh/authorized_keysに置かれる。
$ mkdir .ssh
$ chmod 700 .ssh
$ cd .ssh
$ vi authorized_keys

#開いたファイルに先ほどコピーした鍵の中身を上書き
ssh-rsa ~~~~~ .local
:wq で保存&編集完了
$ chmod 600 authorized_keys
$ exit
ログインできるか確認
$ ssh アプリ名_key_rsa
EC2へログインできたら完了です。この先はこのコマンドでEC2へログインします。
必要なパッケージのインストール
yum(パッケージマネージャ)をアップデート
sudo yum update
パッケージをインストール
$ sudo yum install git make gcc-c++ patch openssl-devel libyaml-devel libffi-devel libicu-devel libxml2 libxslt libxml2-devel libxslt-devel zlib-devel readline-devel ImageMagick ImageMagick-devel epel-release
MySQL8.0のインストール
EC2にデフォルトでインストールされているMaria-DBを削除
$ sudo yum remove mariadb-libs
yumにMySQL8.0のリポジトリ追加
$ sudo yum localinstall https://dev.mysql.com/get/mysql80-community-release-el7-3.noarch.rpm
インストール
$ sudo yum install --enablerepo=mysql80-community mysql-community-server
さらにmysql-develをインストール
$ sudo yum install mysql-devel
(注意)
mysql-develをインストールしておかないとbundle install時にmysql2のインストールで失敗します。
current directory:
/submane/ra_submane_server/vendor/bundle/ruby/3.1.0/gems/mysql2-0.5.4/ext/mysql2
/home/centos/.rbenv/versions/3.1.2/bin/ruby -I
/home/centos/.rbenv/versions/3.1.2/lib/ruby/3.1.0 -r
./siteconf20221022-1263-4wayr6.rb extconf.rb
checking for rb_absint_size()... yes
checking for rb_absint_singlebit_p()... yes
checking for rb_wait_for_single_fd()... yes
checking for rb_enc_interned_str() in ruby.h... yes
*** extconf.rb failed ***
Could not create Makefile due to some reason, probably lack of necessary
libraries and/or headers.  Check the mkmf.log file for more details.  You may
need configuration options.

Provided configuration options:
        --with-opt-dir
        --without-opt-dir
        --with-opt-include
        --without-opt-include=${opt-dir}/include
        --with-opt-lib
        --without-opt-lib=${opt-dir}/lib
        --with-make-prog
        --without-make-prog
        --srcdir=.
        --curdir
        --ruby=/home/centos/.rbenv/versions/3.1.2/bin/$(RUBY_BASE_NAME)
        --with-mysql-dir
        --without-mysql-dir
        --with-mysql-include
        --without-mysql-include=${mysql-dir}/include
        --with-mysql-lib
        --without-mysql-lib=${mysql-dir}/lib
        --with-mysql-config
        --without-mysql-config
        --with-mysqlclient-dir
        --without-mysqlclient-dir
        --with-mysqlclient-include
        --without-mysqlclient-include=${mysqlclient-dir}/include
        --with-mysqlclient-lib
        --without-mysqlclient-lib=${mysqlclient-dir}/lib
        --with-mysqlclientlib
        --without-mysqlclientlib
/home/centos/.rbenv/versions/3.1.2/lib/ruby/3.1.0/mkmf.rb:1086:in `block in
find_library': undefined method `split' for nil:NilClass (NoMethodError)

    paths = paths.flat_map {|path| path.split(File::PATH_SEPARATOR)}
                                       ^^^^^^
        from /home/centos/.rbenv/versions/3.1.2/lib/ruby/3.1.0/mkmf.rb:1086:in `each'
from /home/centos/.rbenv/versions/3.1.2/lib/ruby/3.1.0/mkmf.rb:1086:in
`flat_map'
from /home/centos/.rbenv/versions/3.1.2/lib/ruby/3.1.0/mkmf.rb:1086:in
`find_library'
        from extconf.rb:103:in `<main>'

To see why this extension failed to compile, please check the mkmf.log which can
be found here:

/submane/ra_submane_server/vendor/bundle/ruby/3.1.0/extensions/x86_64-linux/3.1.0/mysql2-0.5.4/mkmf.log

extconf failed, exit code 1

An error occurred while installing mysql2 (0.5.3), and Bundler cannot continue.
インストールされたMySQLのバージョンを確認
$ yum list installed | grep mysql

# 以下のように表示されたら成功(バージョンは時期により異なるかもしれません)
mysql-community-client.x86_64      8.0.22-1.el7                      @mysql80-community
mysql-community-client-plugins.x86_64
                                   8.0.22-1.el7                      @mysql80-community
mysql-community-common.x86_64      8.0.22-1.el7                      @mysql80-community
mysql-community-devel.x86_64       8.0.22-1.el7                      @mysql80-community
mysql-community-libs.x86_64        8.0.22-1.el7                      @mysql80-community
mysql-community-server.x86_64      8.0.22-1.el7                      @mysql80-community
mysql80-community-release.noarch   el7-3                             installed
ログファイル作成
$ sudo touch /var/log/mysqld.log
Node.js v10インストール
筆者の場合、ローカル環境のNode.jsのバージョンが10.21.0だったのでこれをEC2にインストールする。
Node.js, npm, libuvをインストール
下のコマンドより、これらがインストールされる。この内、npmとlibuvが必要となる。これらがないとこの先railsコマンドを打とうとすると下のようなエラーになる。
Could not find a JavaScript runtime. See https://github.com/rails/execjs for a list of available runtimes. (ExecJS::RuntimeUnavailable)
補足するとNode.jsが必要ないというのは、このコマンドでインストールされるNode.jsが古いバージョンなためです。では、インストールします。
$ sudo amazon-linux-extras install epel
$ sudo yum install nodejs npm --enablerepo=epel
ここでインストールされたnode.jsは6.17だったので、10.21.0にバージョンを変更する。
nvm(パッケージマネージャ)をclone
$ git clone https://github.com/creationix/nvm.git ~/.nvm
パスを通す
$ source ~/.nvm/nvm.sh
(注意)
一度EC2からログアウトするとnvmコマンドが使えなくなるので、もう一度パスを通します。
インストール可能なNode.js一覧を表示し、自分のインストールしたいバージョンがあるか確認
$ nvm ls-remote
インストール
$ nvm install 10.21.0
使用するバージョンを指定
$ nvm use v10.21.0
バージョンの確認
$ nvm use v10.21.0
(注意)
ここで、古いバージョンのNode.jsのままデプロイをすると、下のようなエラーが起こるので、ローカルでインストールしたバージョンと同じものをインストールするのが無難。
ActionView::Template::Error (Autoprefixer doesn’t support Node v6.17.1. Update it
yarnのインストール
Rails6.0から標準となっているwebpackの実行環境を構築するため、yarnをインストールします。ちなみにwebpackが動くためにはyarnとnode.jsが必要になります。
yarnのインストール
curl -o- -L https://yarnpkg.com/install.sh | bash
パスを通す
source ~/.bashrc
インストールできたか確認
yarn -v
(注意)
yarnを入れ忘れるとしたのよなエラーになりハマります
ActionView::Template::Error (Webpacker can't find application in /var/www/rails/live_share/public/packs/manifest.json. Possible causes:
1. You want to set webpacker.yml value of compile to true for your environment
   unless you are using the `webpack -w` or the webpack-dev-server.
2. webpack has not yet re-run to reflect updates.
3. You have misconfigured Webpacker's config/webpacker.yml file.
4. Your webpack configuration is not creating a manifest.
Your manifest contains:
rbenvのインストール
$ git clone https://github.com/sstephenson/rbenv.git ~/.rbenv
$ echo 'export PATH="$HOME/.rbenv/bin:$PATH"' >> ~/.bash_profile
$ echo 'eval "$(rbenv init -)"' >> ~/.bash_profile
$ source ~/.bash_profile
ruby-buildのインストール
$ git clone https://github.com/sstephenson/ruby-build.git ~/.rbenv/plugins/ruby-build
$ rbenv rehash
Rubyのインストール
rubyのインストールはきちんとローカルで使っているバージョンをインストールする。(ローカルで.ruby-versionというファイルを確認)
$ rbenv install -v 2.7.1
$ rbenv global 2.7.1
$ rbenv rehash
$ ruby -v
RDSへの接続確認
念の為RDSへ接続できるか確認しておきます。
$ mysql -h エンドポイント -P 3306 -u root -p

# 下のように表示されれば成功
Welcome to the MySQL monitor.  Commands end with ; or \g.
Your MySQL connection id is 1037
Server version: 8.0.20 Source distribution

Copyright (c) 2000, 2020, Oracle and/or its affiliates. All rights reserved.

Oracle is a registered trademark of Oracle Corporation and/or its
affiliates. Other names may be trademarks of their respective
owners.

Type 'help;' or '\h' for help. Type '\c' to clear the current input statement.

mysql>
エンドポイントはAWSへログインし、RDS→データベース→接続とセキュリティに記載があります。
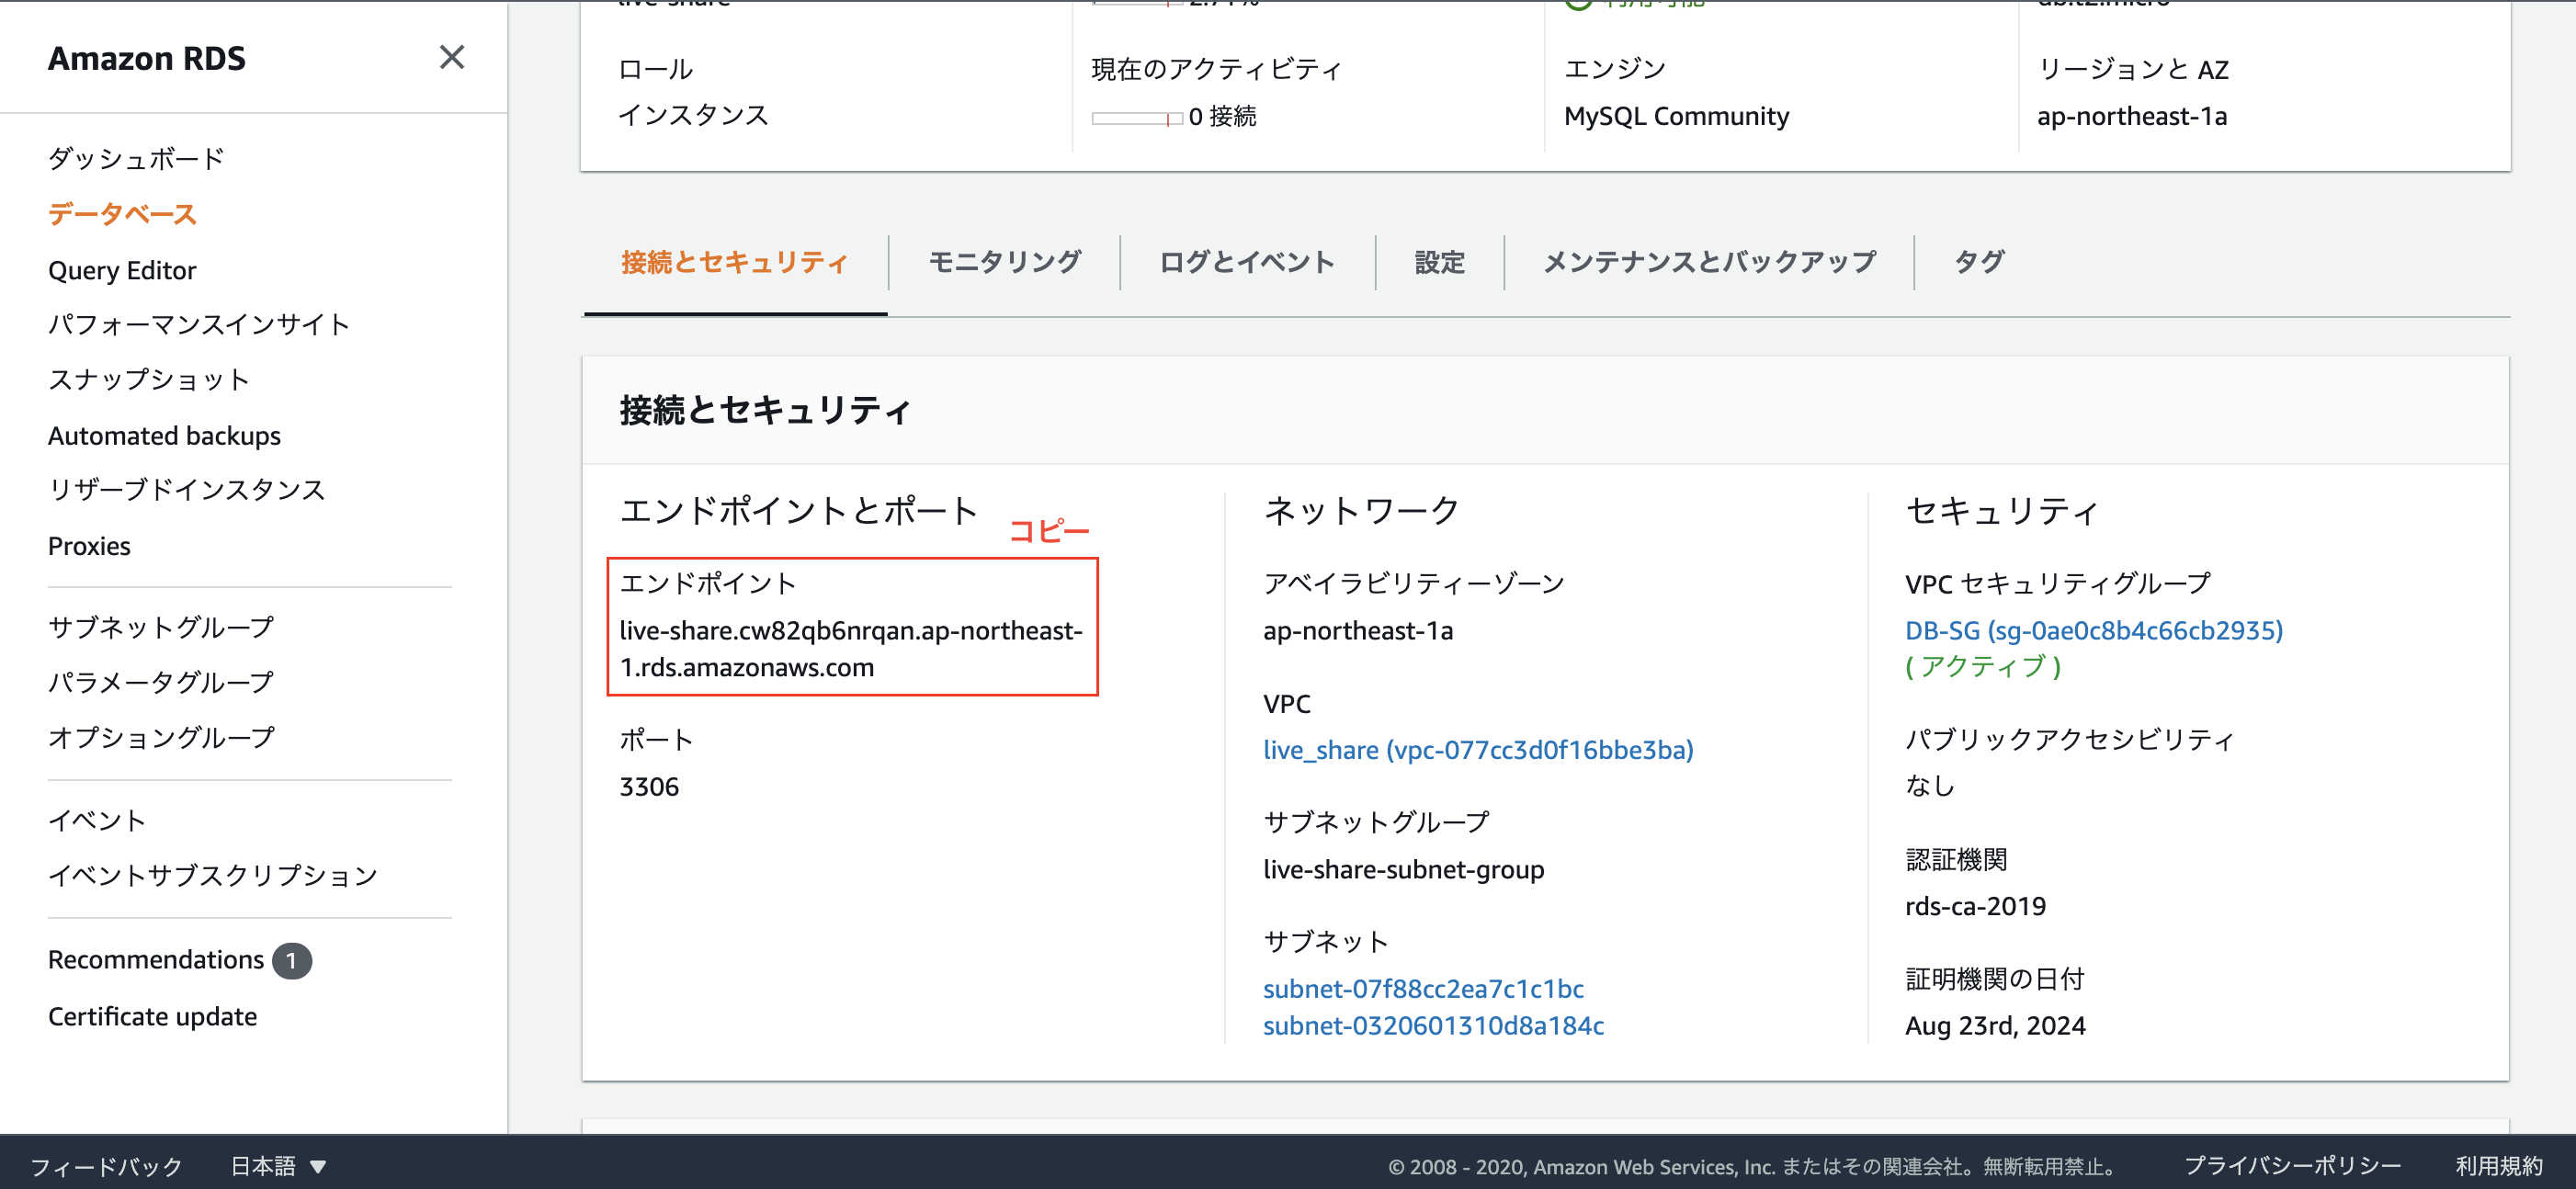
接続できない場合はRDSのセキュリティーグループを確認
GitHubとの連携
ホームディレクトリに.gitconfigを作成し、編集する。
$ cd ~
$ vi .gitconfig

# .gitconfigの中身編集
[user]
  name = your_name #gitに登録した自分の名前
  email = hoge@hoge.com #gitの登録メールアドレス

[alias] #好きなようにカスタマイズします。
  br = branch
  co = checkout
  st = status

[color] #色付け
  ui = true

[url "github:"] #pull、pushのための設定
    InsteadOf = https://github.com/
    InsteadOf = git@github.com:
esc + :wqで保存して終了
gitとの接続に必要な鍵の生成
EC2サーバーにログインする際にローカルで行った作業をEC2サーバー上で行います。
公開鍵と秘密鍵の作成
$ cd ~
$ chmod 700 .ssh
$ cd .ssh
$ ssh-keygen -t rsa

以下のメッセージが表示されるので、「aws_git_rsa」と入力
Enter file in which to save the key ():aws_git_rsa

何もせずにそのままエンター
Enter passphrase (empty for no passphrase):

何もせずにそのままエンター
Enter same passphrase again:
鍵が生成されていることを確認
$ ls
aws_git_rsa aws_git_rsa_pub
設定ファイルを編集
$ vi config

# 以下のように編集
Host github github.com
  Hostname github.com
  User git
  IdentityFile ~/.ssh/aws_git_rsa
esc + :wqで保存して終了
(注意)
ローカルと違い、.sshディレクトリはrootディレクトリ(/)以下に作ります。
(アプリはrootディレクトリ以下に配置するため)
作成した公開鍵をgithubに登録
公開鍵をコピー
$ cat aws_git_rsa.pub

ssh-rsa AAAAB3NzaC1yc*************compute.internal #コピーする
githubのページで右上のアイコン→Setting→SSH and GPG keys→new SSH keyをクリック
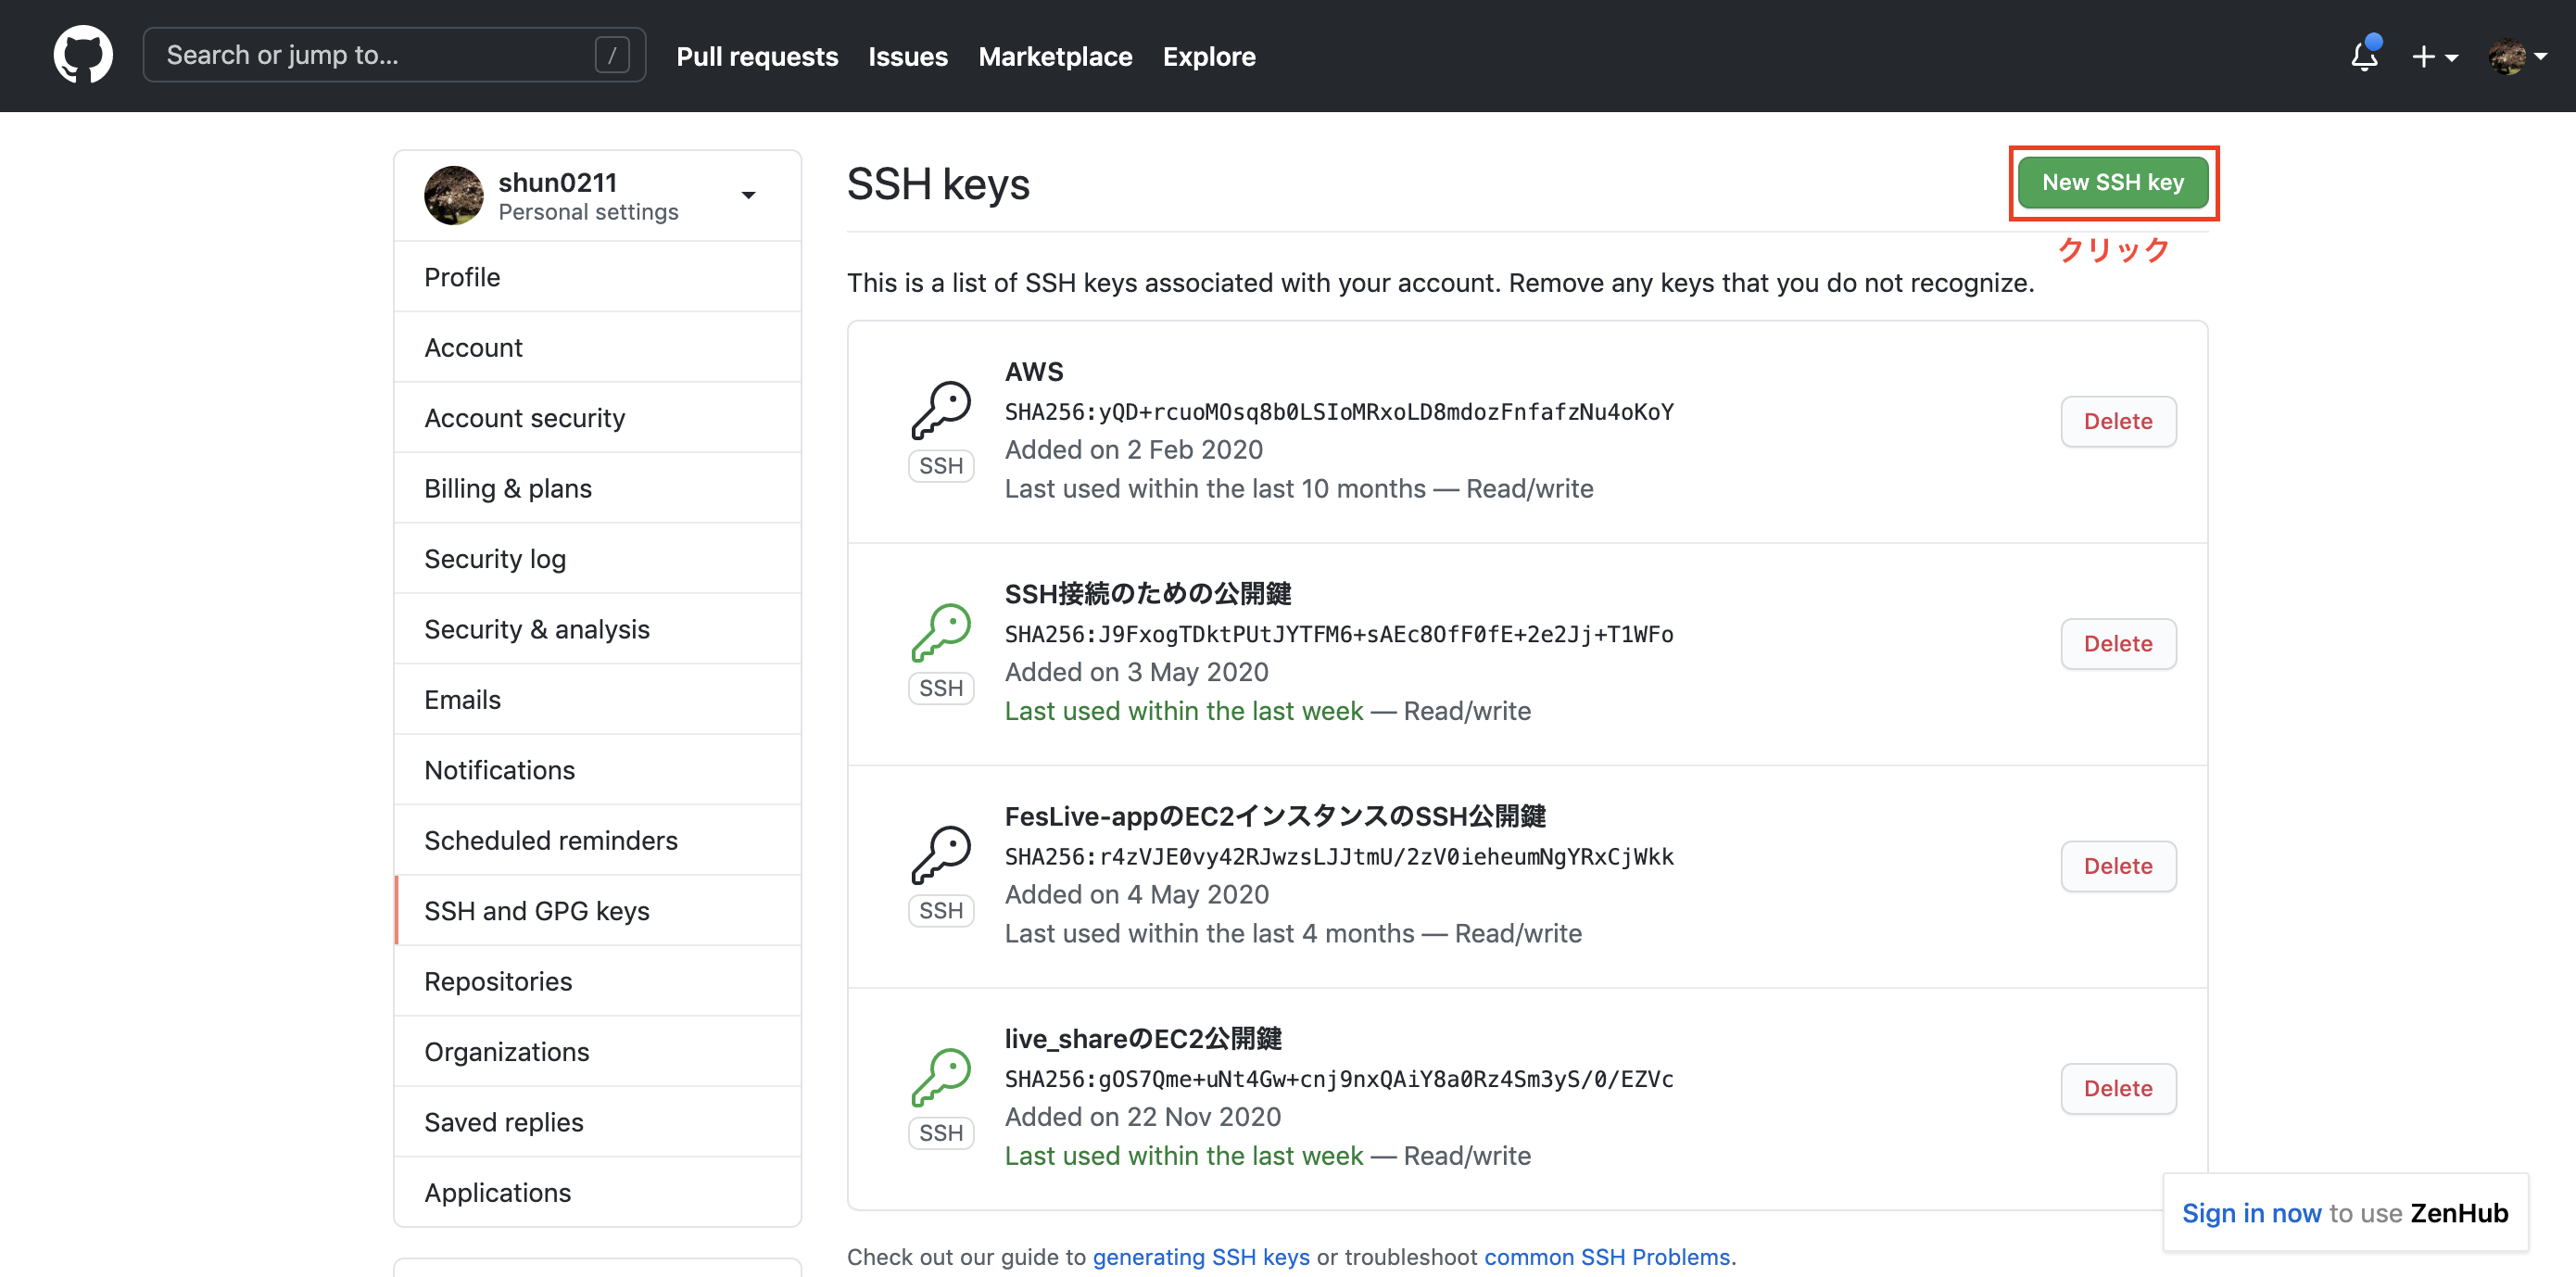
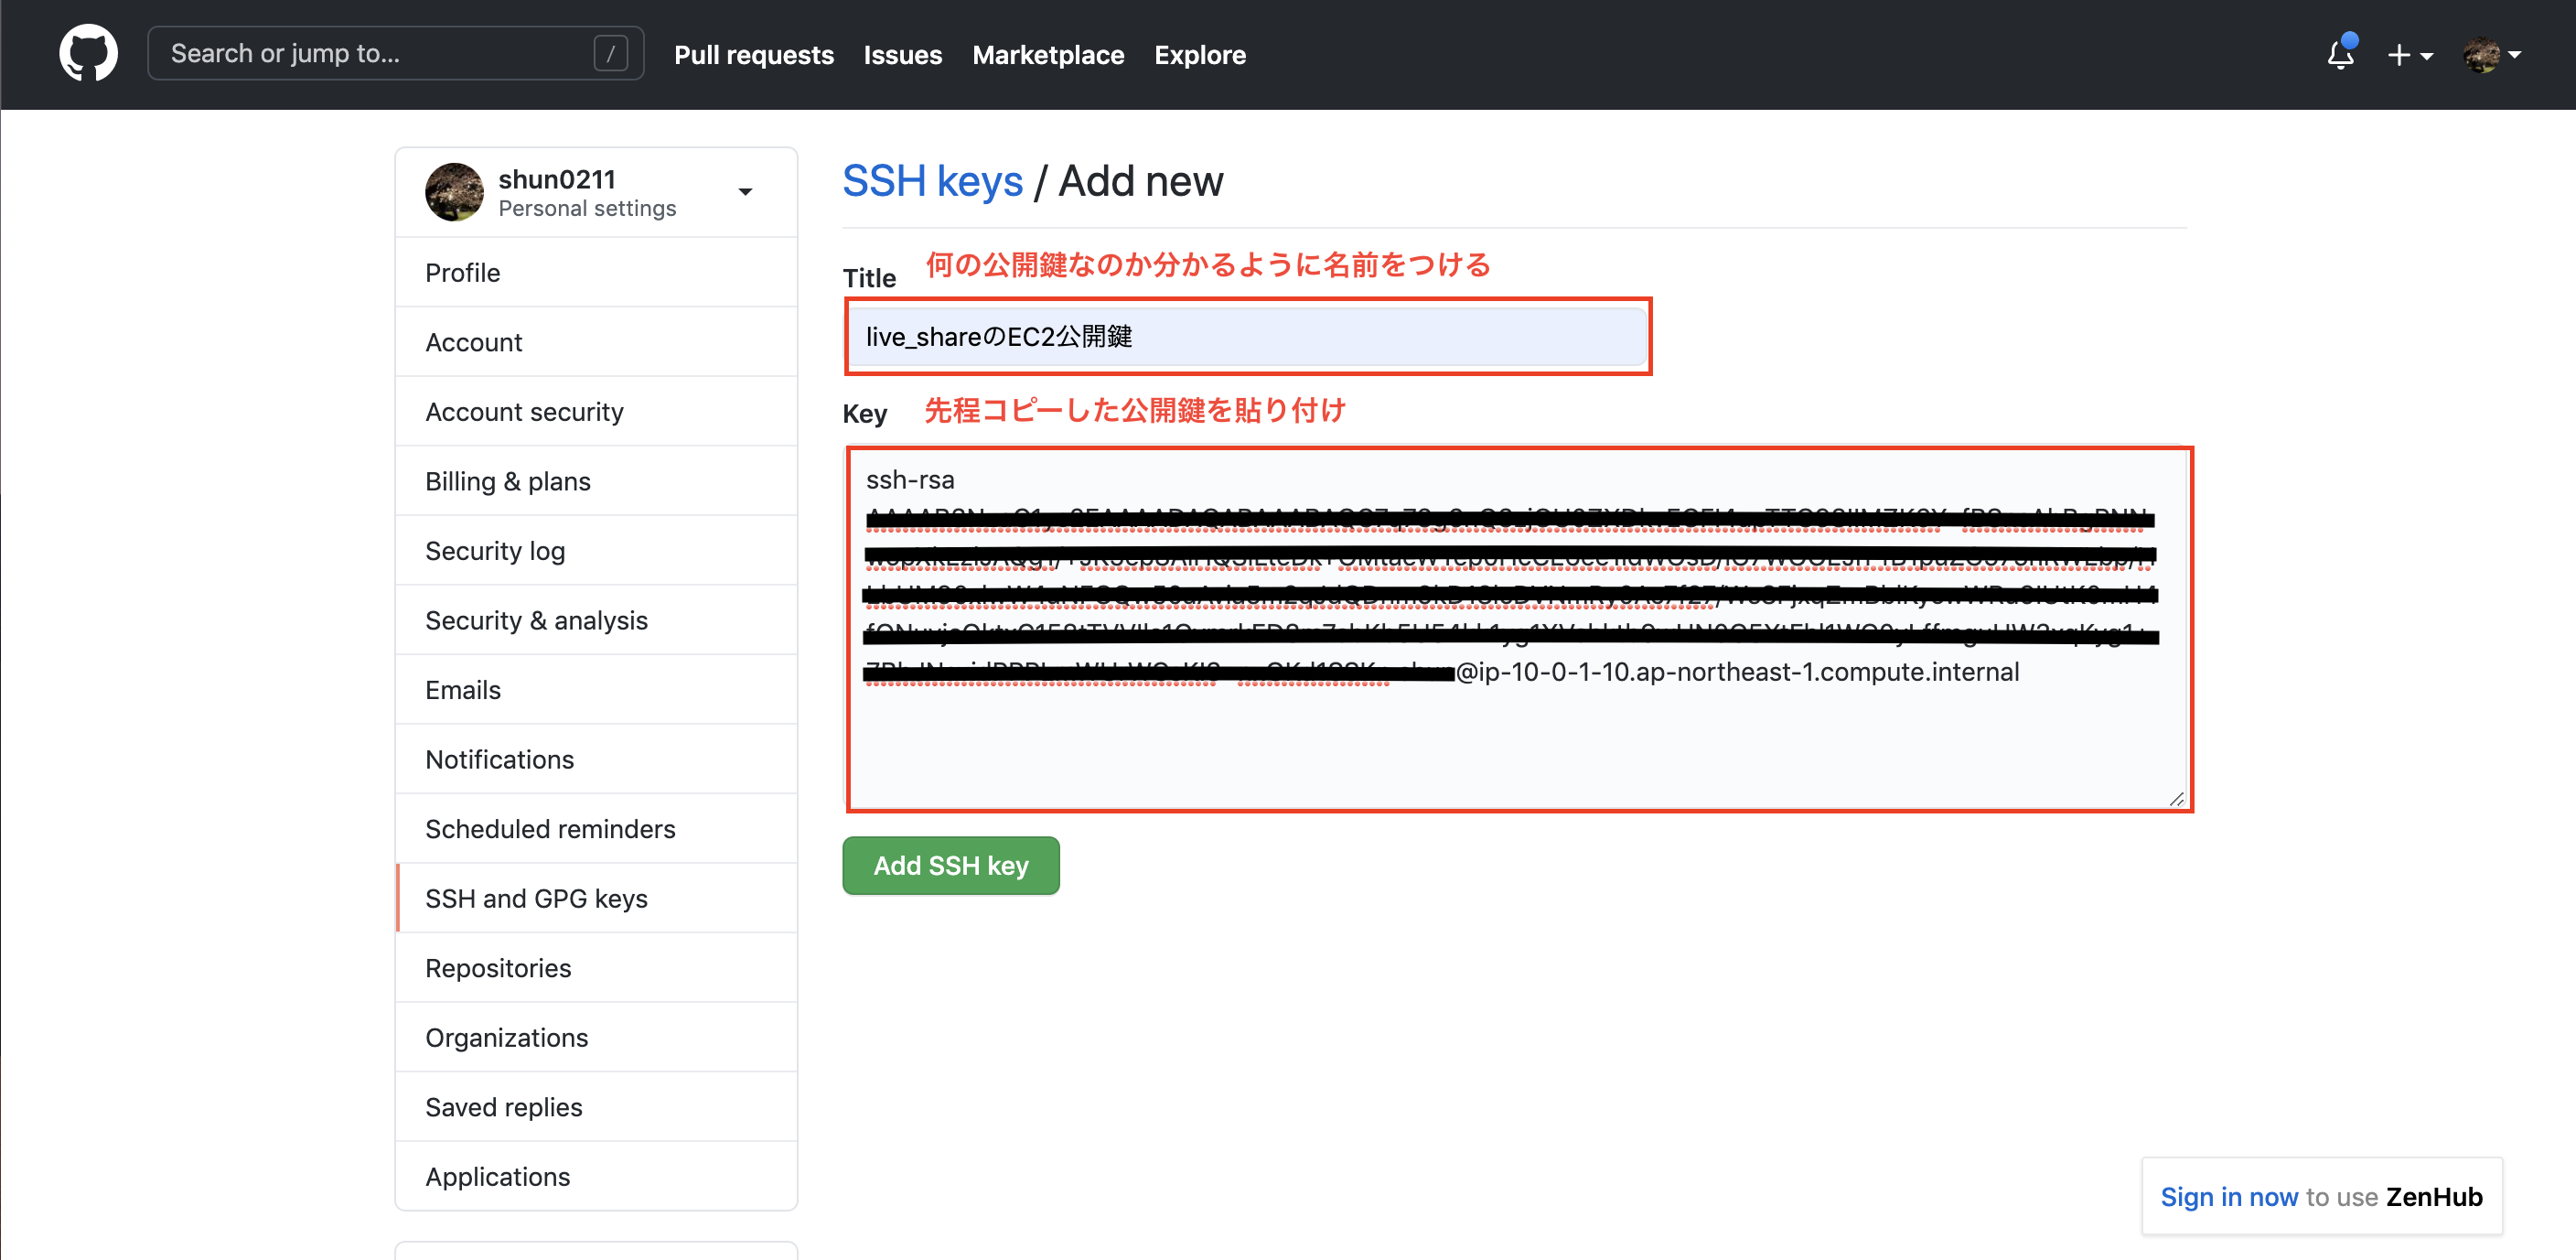
Githubに公開鍵を登録します。
title: 何の鍵なのか分かるように名前をつける
key: 先程コピーした公開鍵の貼り付け
gitへ接続可能か確認
# ターミナルへ戻り設定ファイルの権限を変更
$ chmod 600 config

$ ssh -T git@github.com

# 接続してしたのような反応が返ってきたら成功
Hi shun0211! You've successfully authenticated, but GitHub does not provide shell access.
アプリのclone
いよいよアプリをcloneしますが、その前に2点確認を行います。
アプリをcloneする前に①
アセットコンパイルの設定を変更
config.assets.compile = true
これをしないとアセットコンパイルが行われず、デプロイ後にアクセスしても下のようなエラーがでます。
ActionView::Template::Error (The asset "application.css" is not present in the asset pipeline.):
アプリをcloneする前に②
cssなどで背景画像を挿入している場合、下のように記述している場合が多いと思いますが、アセットパイプラインを使用した場合、画像の名前が変わるためアクセスできなくなってしまうため、Railsのヘルパーメソッドを使う必要がります。
.class{
  background-image: url(/assets/thumbnail.png)
}
背景画像を指定している場合は以下のように修正する。
.class{
  background-image: image-url(/assets/thumbnail.png)
}
いよいよclone
準備が整ったのでサーバーにcloneします。
アプリを配置するディレクトリを作成
$ sudo mkdir var/www
$ sudo mkdir var/www/rails
$ sudo chown ec2-user var
$ cd var/
$ sudo chown -R ec2-user www
$ cd /var/www/rails
githubのリポジトリに行き、clone用のパスをコピー
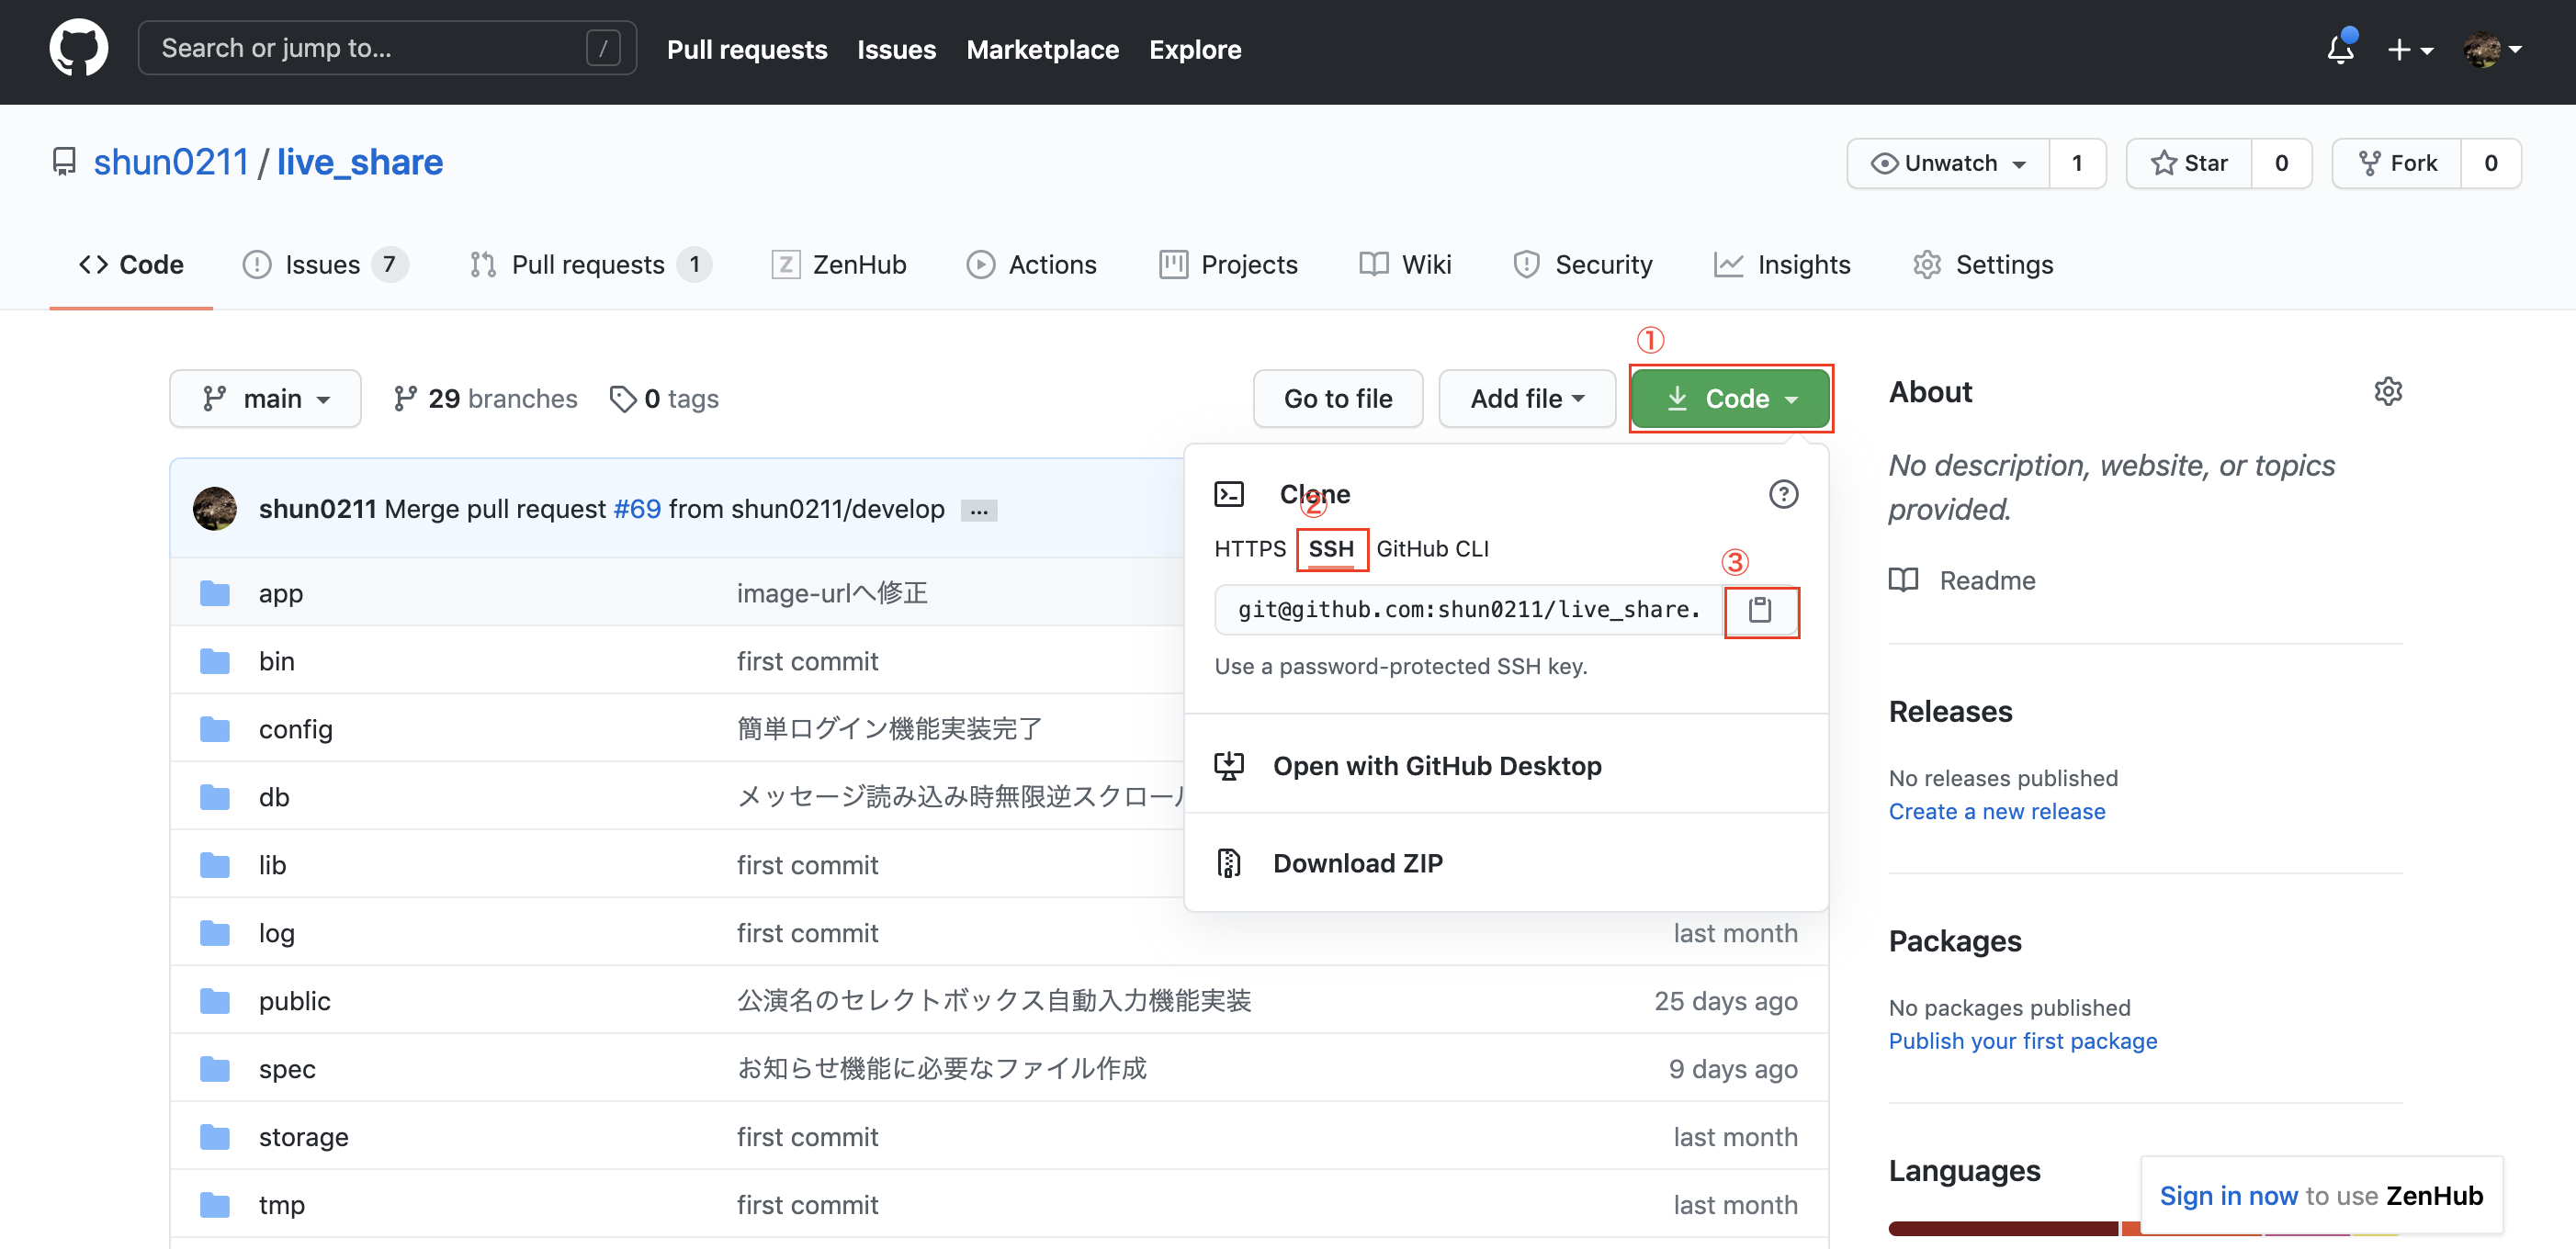
実際にcloneします。
$ git clone git@github.com:~~~~~~
$ cd アプリ名
$ bundle install
問題なくbundle installできれば成功です。ここでエラーが出ることが多いですが、ググればたくさん記事がヒットするのであきらめず試行錯誤すれば必ず解決するはずです。
本番環境でmaster.keyファイルを作成
master.keyはセキュリティ上の問題からデフォルトでgitの管理対象から外れているので、本番環境にはありません。そのため、自分で作成します。
vim config/master.key

# ローカルにあるmaster.keyの中身をコピペ
************************************
esc + :wqで保存して終了
Unicornの設定
まずはインストール
vim Gemfile

# Gemfile編集
group :production, :staging do
    gem 'unicorn'
end
esc + :wqで保存して終了
$ bundle install
設定ファイルを作成
$ vi config/unicorn.conf.rb

# 以下のように設定ファイルを編集
# set lets
  $worker  = 2
  $timeout = 30
  $app_dir = "/var/www/rails/<アプリ名>" #自分のアプリケーション名
  $listen  = File.expand_path 'tmp/sockets/.unicorn.sock', $app_dir
  $pid     = File.expand_path 'tmp/pids/unicorn.pid', $app_dir
  $std_log = File.expand_path 'log/unicorn.log', $app_dir
  # set config
  worker_processes  $worker
  working_directory $app_dir
  stderr_path $std_log
  stdout_path $std_log
  timeout $timeout
  listen  $listen
  pid $pid
  # loading booster
  preload_app true
  # before starting processes
  before_fork do |server, worker|
    defined?(ActiveRecord::Base) and ActiveRecord::Base.connection.disconnect!
    old_pid = "#{server.config[:pid]}.oldbin"
    if old_pid != server.pid
      begin
        Process.kill "QUIT", File.read(old_pid).to_i
      rescue Errno::ENOENT, Errno::ESRCH
      end
    end
  end
  # after finishing processes
  after_fork do |server, worker|
    defined?(ActiveRecord::Base) and ActiveRecord::Base.establish_connection
  end
esc + :wqで保存して終了
Nginxの設定
Nginxのインストール
$ sudo amazon-linux-extras install nginx1.12 -y
Nginxの自動起動設定
$ sudo systemctl start nginx # Nginx起動
$ sudo systemctl enable nginx # 自動起動の設定
$ systemctl status nginx # 起動確認
設定ファイルの作成
$ cd /etc/nginx/conf.d/
$ sudo vi アプリ名.conf

# 以下のように設定ファイルを編集
# log directory
error_log  /var/www/rails/<アプリ名>/log/nginx.error.log; #自分のアプリケーション名に変更
access_log /var/www/rails/<アプリ名>/log/nginx.access.log; #自分のアプリケーション名に変更

upstream unicorn_server {
    server unix:/var/www/rails/<アプリ名>/tmp/sockets/.unicorn.sock fail_timeout=0; #自分のアプリケーション名に変更
}

server {
    listen 80;
    client_max_body_size 4G;
    server_name ~~~.~~~.~~~.~~~; #アプリのElastic IPに変更

    keepalive_timeout 5;

    # Location of our static files
    root /var/www/rails/<アプリ名>/public; #自分のアプリケーション名に変更

    location ~ ^/assets/ {
        root /var/www/rails/<アプリ名>/public; #自分のアプリケーション名に変更
    }

    location / {
        proxy_set_header X-Forwarded-For $proxy_add_x_forwarded_for;
        proxy_set_header Host $http_host;
        proxy_redirect off;

        if (!-f $request_filename) {
            proxy_pass http://unicorn_server;
            break;
        }
    }

    error_page 500 502 503 504 /500.html;
    location = /500.html {
        root /var/www/rails/<アプリ名>/public; #自分のアプリケーション名に変更
    }
}
esc + :wqで保存して終了
データベースの設定
環境変数を使うため、これを管理するためのGemを導入
$ cd /var/www/rails/アプリ名
$ vi Gemfile

# Gemfile編集
gem 'dotenv-rails'
esc + :wqで保存して終了
bundle install
.envファイルの作成
vim .env

# .envファイルを編集
DB_NAME=データベース名_production #RDSで作成したDB名
DB_USERNAME=root #RDSのユーザー名
DB_PASSWORD=********* #RDSのパスワード
DB_HOSTNAME=***.ap-northeast-1.rds.amazonaws.com # RDSのエンドポイント
esc + :wqで保存して終了
環境変数が設定されたか確認
$ source .env
$ echo $DB_NAME
$ echo $DB_USERNAME
$ echo $DB_PASSWORD
$ echo $DB_HOSTNAME
database.ymlを編集
$ vi config/database.yml

# 以下を編集
production:
  <<: *default
  database: <%= ENV['DB_NAME'] %>
  username: <%= ENV['DB_USERNAME'] %>
  password: <%= ENV['DB_PASSWORD'] %>
  host: <%= ENV['DB_HOSTNAME'] %>
esc + :wqで保存して終了
(注意)
後々エラーに悩まされたくないので、ローカルのdatabase.ymlも編集しておくのがベター
データベースを起動
$ sudo service mysqld start
アプリの起動
マイグレーションしてテーブルを作成します。
$ bundle exec rails db:create RAILS_ENV=production
$ bundle exec rake db:migrate RAILS_ENV=production
コンパイル実行
CSSファイルやJSファイル、imageファイルをプリコンパイル
これをしないと本番環境でCSSファイルなどが読み込まれない。
$ bundle exec rake assets:precompile RAILS_ENV=production
Nginx再起動
$ sudo service nginx restart
Unicorn起動
$ bundle exec unicorn_rails -c /var/www/rails/アプリ名/config/unicorn.conf.rb -D -E production
ブラウザでElastic IPにアクセスしてアプリが表示できていればデプロイ完了です!!
お疲れさまでした。
補足
エラー画面が表示される場合、まずはエラーログを確認します。
$ tail -n 30 log/production.log
そこで出ているエラー文をググりながら試行錯誤します。
そのままでは変更が反映されないため、一度Unicornのプロセスをkillする必要があります。
Unicornのプロセス確認
ps -ef | grep unicorn | grep -v grep

# 下のようにプロセスが表示されるので、この内masterのプロセスID(この場合16066)をコピー
ec2-user 16066     1  0 13:48 ?        00:00:02 unicorn_rails master -c /var/www/rails/live_share/config/unicorn.conf.rb -D -E production
ec2-user 16072 16066  0 13:48 ?        00:00:06 unicorn_rails worker[0] -c /var/www/rails/live_share/config/unicorn.conf.rb -D -E production
ec2-user 16073 16066  0 13:48 ?        00:00:06 unicorn_rails worker[1] -c /var/www/rails/live_share/config/unicorn.conf.rb -D -E production
プロセスをkill
$ kill 16066
再度Unicorn起動
$ bundle exec unicorn_rails -c /var/www/rails/アプリ名/config/unicorn.conf.rb -D -E production
そしてブラウザでIPアドレスにアクセスし、まだ表示されないなら再度エラーログを確認し・・・の繰り返しです。中々苦しい作業ですが、ググれば色んなパターンの解決法がたくさん出てくるのであきらめずに粘りましょう!
MYSQLの初期パスワードを変更する
少しだけ詰まってのでメモ📝
もし、mysql -u root -pを使ってログインしていた場合、下のコマンドを使うとできた。
ALTER USER 'root'@'localhost' IDENTIFIED BY 'MyNewPass';
参考
https://qiita.com/miriwo/items/eb09c065ee9bb7e8fe06!
https://qiita.com/Yuki_Nagaoka/items/dbb185feb6d4f051c2f2#6unicorn%E3%81%AE%E8%A8%AD%E5%AE%9A
https://qiita.com/paranishian/items/bddaed7c3aacedb11967
https://qiita.com/azusanakano/items/771dc9919f347de061d7
https://railsguides.jp/asset_pipeline.html
https://qiita.com/oishihiroaki/items/bc663eb1282d87c46e97