はじめに
本記事では、最近話題の技術であるMCPとPentahoの連携方法を説明します。
MCP (Model Context Protocol)は、Anthropicが2024年に提唱したAIと外部ツール・データソースの連携を標準化するオープンプロトコルで、最近急速に注目を集めています。
この記事ではPentahoからMCPサーバーの呼び出しを試します。Pentahoはデータ収集・抽出・加工・出力を実行する「データ統合基盤(ETL)」と、 データ可視化・データ分析を実行する「データ分析基盤(BI)」をオールインワンで提供し、アジャイルでのデータ利活用を可能にするプラットフォームです。
PentahoはGUIによってノーコード・ローコードでETL開発できる点が特徴で、大量データの加工定義を直感的な操作で高速に実現できます。
MCPサーバーとの連携により、Pentahoの強みである直感的な操作性で様々なデータソースからのデータを統合し、生成AI活用するフローを効率的に開発できます。
1. 環境
- Pentaho: 10.2.0.0-222 評価版
- Python: 3.13.2
- Node.JS: 23.11.0
2. 前提モジュールのインストール
2.1 Python
以下のモジュールをインストールします。バージョンは今回の作業で動作したものを記載しています。
今回はuvを用いてこれらのモジュールをインストールしました。
asyncio==3.4.3
autogen==0.9.2
autogen-agentchat==0.6.1
autogen-core==0.6.1
autogen-ext==0.6.1
dotenv==0.9.9
matplotlib==3.10.3
mcp==1.9.3
numpy==2.3.0
openai==1.86.0
pandas==2.3.0
py4j==0.10.9.9
2.2 Node.JS
npmでMCPサーバーをインストールします。今回は、filesystemというMCPサーバーを利用します。
npm install @modelcontextprotocol/server-filesystem
このMCPサーバーはローカルファイルやディレクトリを操作するエージェントで、作成・読み込み・更新・削除など一通りの操作をすることができます。
[参考]npmのリンク:https://www.npmjs.com/package/@modelcontextprotocol/server-filesystem
3. 実装
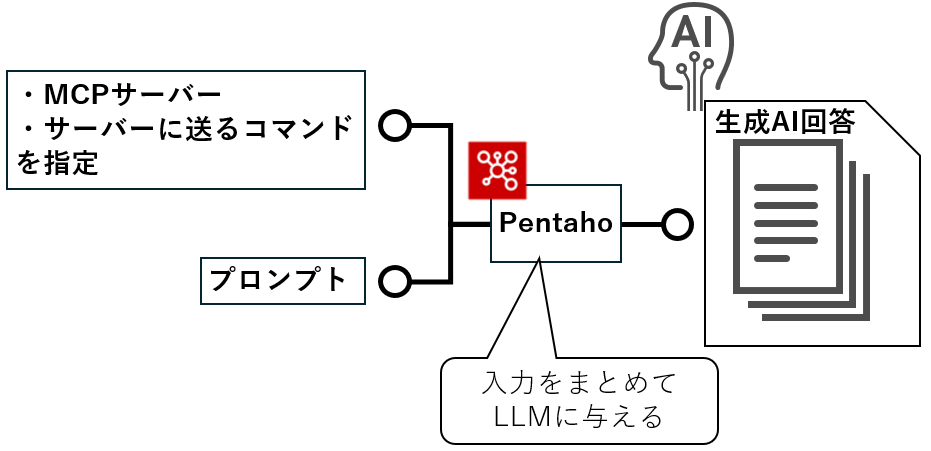
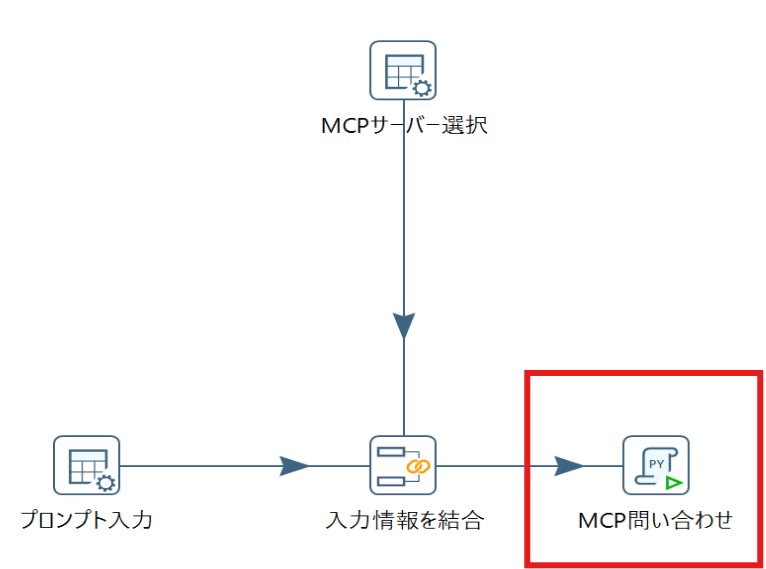
3.1 システム構成
今回は次の図のようなシステムを構成します。
使いたいMCPサーバーと、そのサーバーに与えるコマンド引数が記載されたデータと、LLMに指示を送るデータがあり、それらを統合してLLMに送って必要があればMCPサーバーを用いて指示を遂行するというモデルです。
3.2 PentahoのETL定義
Pentahoで、以下のようなデータ変換定義を作成します。
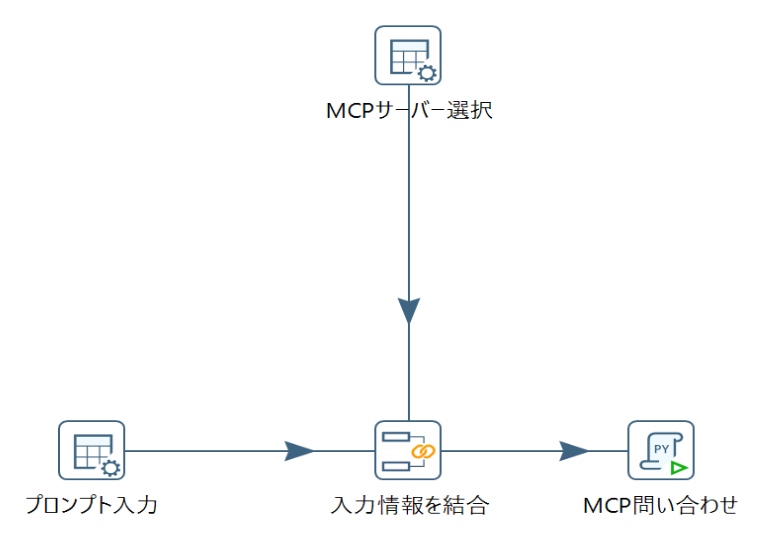
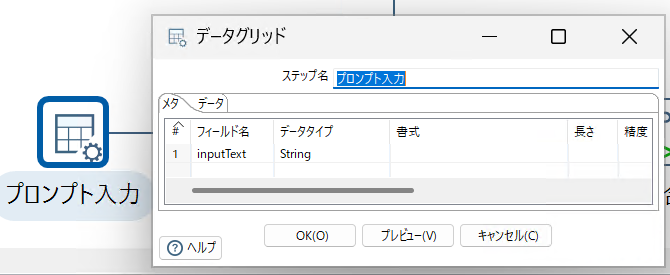
以下のデータグリッド部品で、プロンプトを入力します。
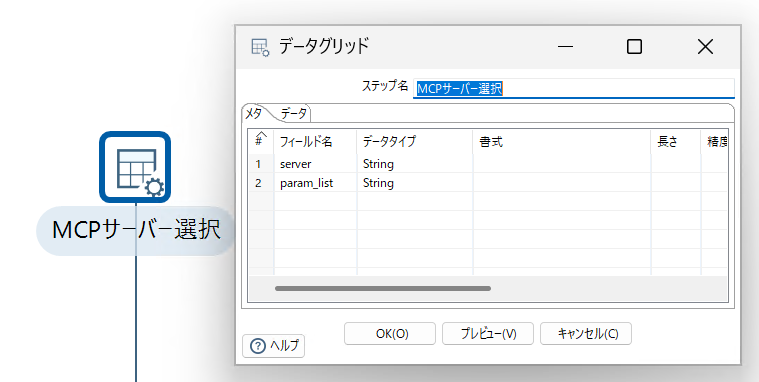
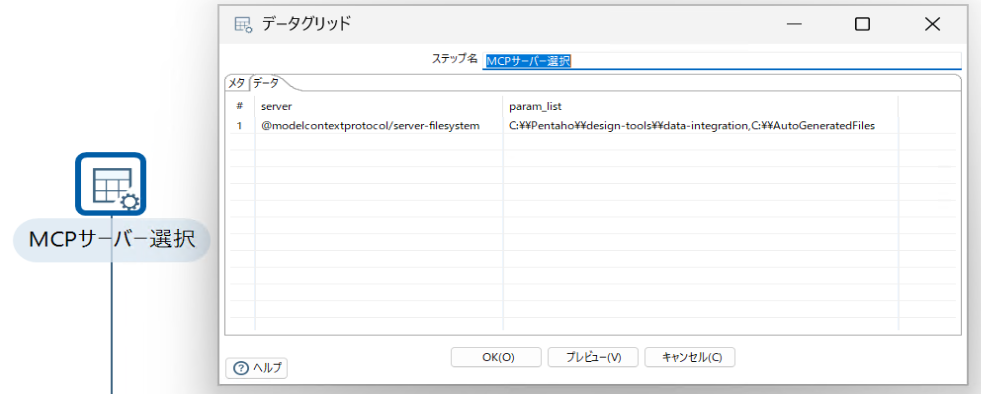
以下のデータグリッド部品で接続するMCPサーバーとサーバーに渡す引数を送ります。
3.3 MCPクライアントの実装
MCPサーバーとの連携のためにはPython連携の部品を使用します。
Pentahoでプロンプトや接続先とするMCPサーバーを決定したのち、Pythonのモジュールを用いてエージェントにタスクを実施してもらいます。
import asyncio
import os
import warnings
from dotenv import load_dotenv
from autogen_ext.models.openai import AzureOpenAIChatCompletionClient
from autogen_ext.tools.mcp import StdioServerParams, mcp_server_tools
from autogen_agentchat.agents import AssistantAgent
from autogen_core import CancellationToken
import re
import json
import argparse
import io
import sys

# 日本語の出力対応
sys.stdout = io.TextIOWrapper(sys.stdout.buffer, encoding='utf-8')

# 環境変数の読み込み
load_dotenv()

# Azure OpenAI APIの設定
def create_model_client():
    return AzureOpenAIChatCompletionClient(
        azure_deployment=os.getenv("AZURE_OPENAI_DEPLOYMENT"),
        api_key=os.getenv("AZURE_OPENAI_API_KEY"),
        api_version=os.getenv("AZURE_OPENAI_API_VERSION"),
        azure_endpoint=os.getenv("AZURE_OPENAI_ENDPOINT"),
        model=os.getenv("AZURE_OPENAI_MODEL"),
    )

# メインロジック
async def run_agent_task(prompt: str, mcp_server: str, mcp_command: list):
    server_params = StdioServerParams(
        command="npx",
        args=[
            "-y",
            mcp_server,
            *mcp_command,
        ],
    )
    try:
        tools = await mcp_server_tools(server_params)
        agent = AssistantAgent(
            name="file_manager",
            model_client=create_model_client(),
            tools=tools,
        )

        result = await agent.run(
            task=prompt,
            cancellation_token=CancellationToken(),
        )
        inputText = result.messages[0].content
        response = parse_text_content(result.messages[-1].content)
        data = json.loads(response)
        responseText = data["text"]

        if responseText is None:
            responseText = result.messages[-1].content

        return (inputText,responseText)

    except (RuntimeError, ValueError) as error:
        print(f"Error: {error}")

# テキストでリスト出力されているデータをJSONに変換
def parse_text_content(raw):
    type_match = re.search(r"type='(.*?)'", raw)
    text_match = re.search(r"text='(.*?)'", raw)
    annotations_match = re.search(r"annotations=(.*?)\)", raw)

    # 正規表現でマッチ
    type_value = type_match.group(1) if type_match else None
    text_value = text_match.group(1) if text_match else None
    annotations_value = annotations_match.group(1) if annotations_match else None

    result = {
        "type": type_value,
        "text": text_value,
        "annotations": annotations_value
    }
    return json.dumps(result, indent=2)

# main
if __name__ == "__main__":
    parser = argparse.ArgumentParser(description="Run AssistantAgent task")
    parser.add_argument("--prompt", type=str, required=True, help="Task to run")
    parser.add_argument("--mcp_server", type=str, required=True, help="MCP server module (e.g. @modelcontextprotocol/server-filesystem)")
    parser.add_argument("--mcp_command", nargs='+', required=True, help="MCP command arguments (e.g. one or more paths)")
    args = parser.parse_args()

    inputText, responseText = asyncio.run(run_agent_task(args.prompt, args.mcp_server, args.mcp_command))
    print(inputText,responseText)

    # JSONにパラメータを出力
    with open("output_vars.json", "w", encoding = "utf-8") as f:
        json.dump({"inputText": inputText, "responseText": responseText}, f, ensure_ascii=False, indent=2)
このようなMCPクライアントに相当するスクリプトを作成したら、Pentahoからこのスクリプトを呼び出します。
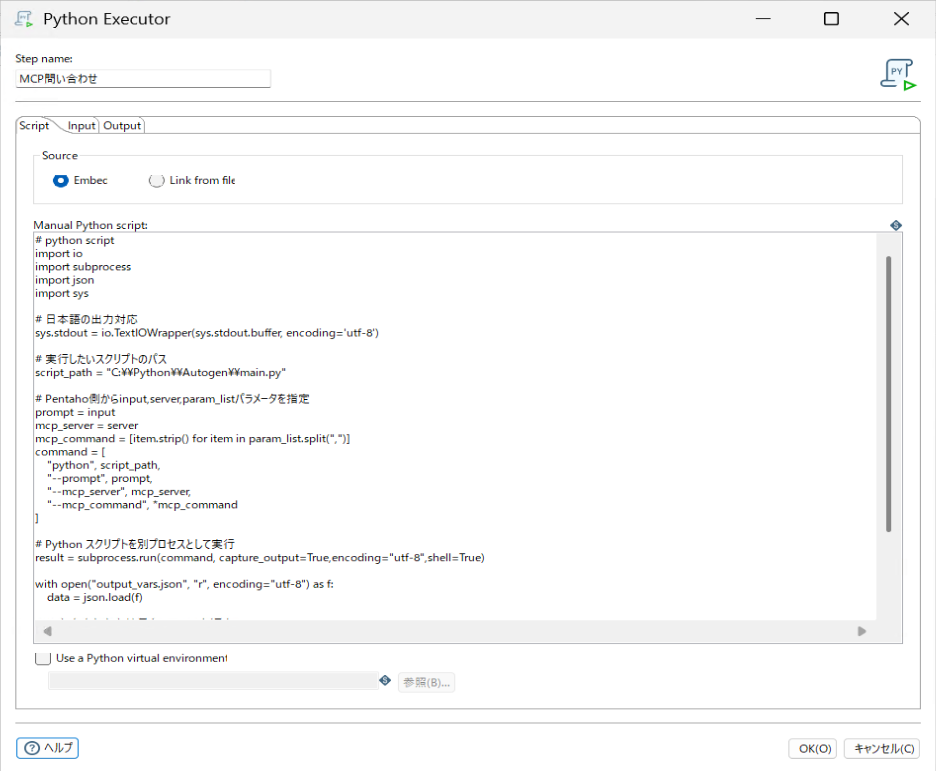
以下のスクリプトをPentahoのPython Executorに入れて実行します。
# python script
import io
import subprocess
import json
import sys

# 日本語の出力対応
sys.stdout = io.TextIOWrapper(sys.stdout.buffer, encoding='utf-8')

# 実行したいスクリプトのパス
script_path = "main.py"

# Pentaho側からinput,server,param_listパラメータを指定
prompt = input
mcp_server = server
mcp_command = [item.strip() for item in param_list.split(",")]
command = [
    "python", script_path,
    "--prompt", prompt,
    "--mcp_server", mcp_server,
    "--mcp_command", *mcp_command
]

# Python スクリプトを別プロセスとして実行
result = subprocess.run(command, capture_output=True,encoding="utf-8",shell=True)

with open("output_vars.json", "r", encoding="utf-8") as f:
    data = json.load(f)

# 入力内容と出力結果をPentahoに返す
inputText = data["inputText"]
responseText = data["responseText"]

# 出力をログに表示
print("STDOUT:", result.stdout)
print("STDERR:", result.stderr)
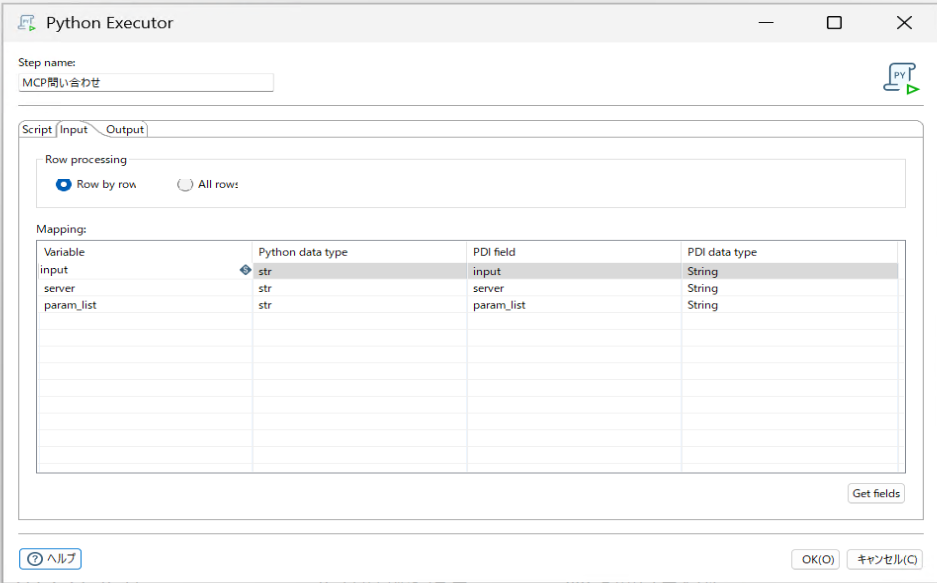
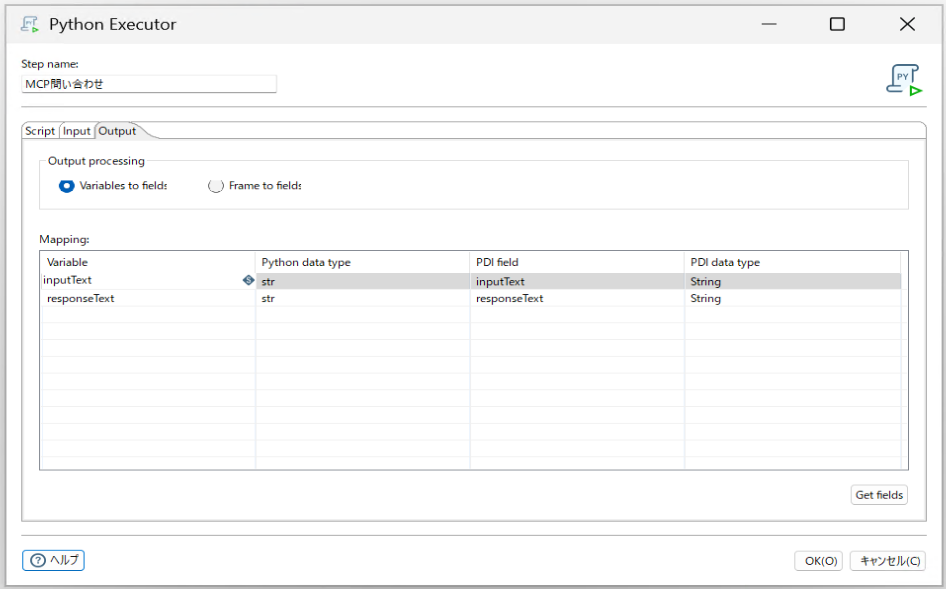
PythonとPentahoの間のデータのやり取りは、下に示すようにInputとOutputのタブで設定することができます。
4. 動作確認
それでは実装したETLを用いてMCPサーバーを用いることができるか確認していきます。
入力をこのように設定して実行します。
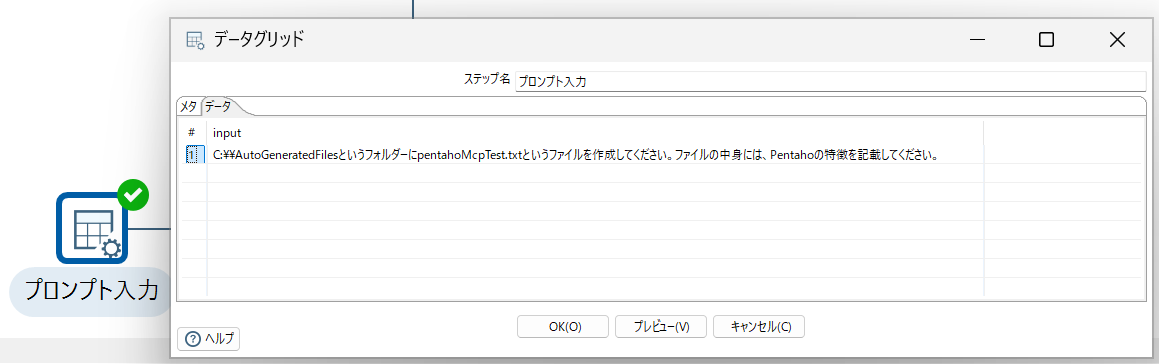
- プロンプト:
C:\\AutoGeneratedFiles\\pentahoMcpTest.txtというテキストファイルを作成してください。ファイルの中身には、Pentahoの特徴を記載してください。 - 使用するMCPサーバー:
@modelcontextprotocol/server-filesystem - 操作を許可するディレクトリ(カンマ区切りで複数指定できます):
C:\\Pentaho\\design-tools\\data-integration,C:\\AutoGeneratedFiles
出力は以下のようになります。
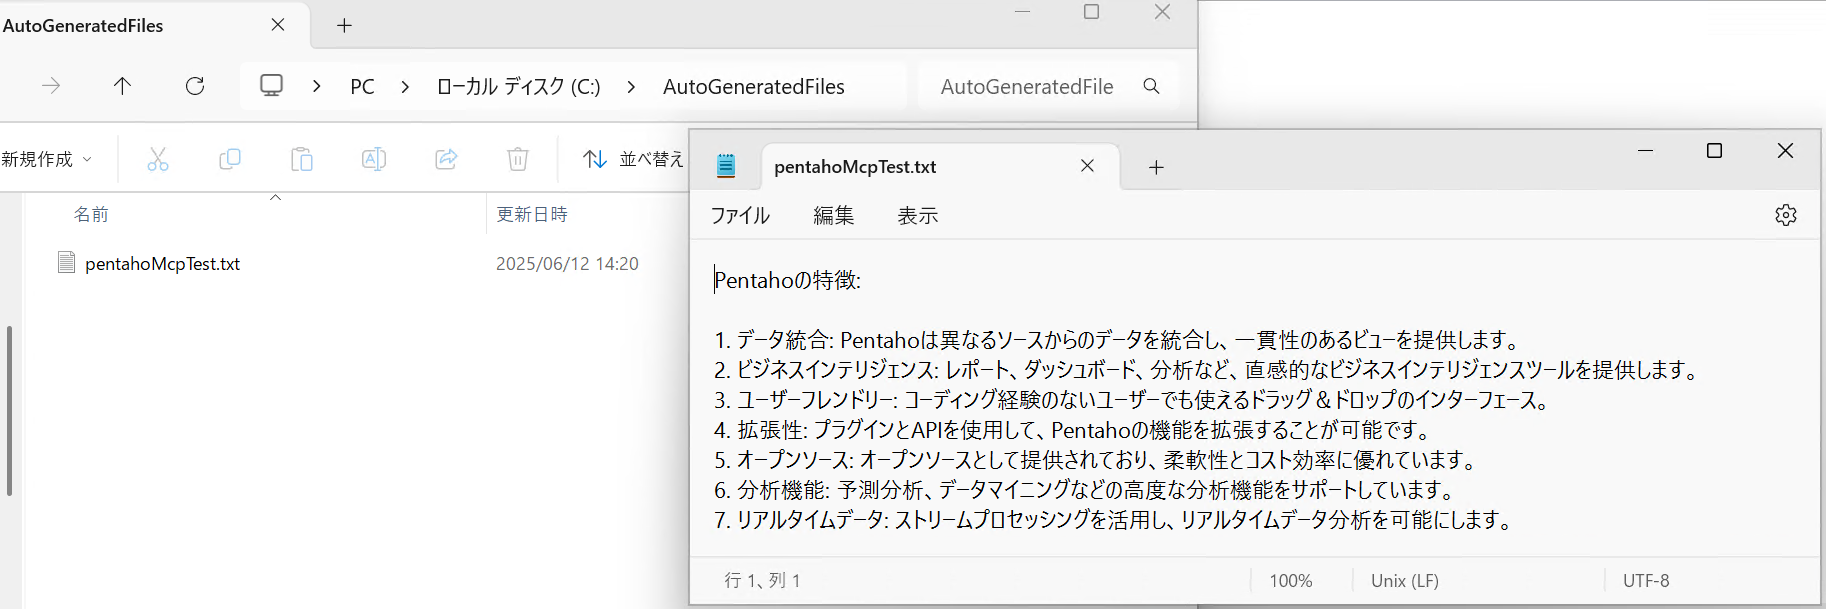
ファイルが新しく作成され、指示通り文章を書いてもらうことができました。
おわりに
本記事ではPentahoを用いて話題のMCPサーバーと連携してみました。
もし、Pentahoに興味を持っていただけた場合は、以下の記事を参考にトライアル版をインストールしてみてください。
ETLツール Pentahoのトライアル版をインストールしてみよう!【Pentaho ファーストステップガイド インストール編】
他社商品名、商標等の引用に関する表示
HITACHIは、株式会社 日立製作所の商標または登録商標です。
Pentahoは、Hitachi Vantara LLCの商標または登録商標です。
その他記載の会社名、製品名などは、それぞれの会社の商標もしくは登録商標です。