はじめに
- こちらは私自身の機械学習やディープラーニングの勉強記録のアウトプットです。
- これまで**deeplearningで柴犬の写真からうちの子かどうか判定(1)とdeeplearningで柴犬の写真からうちの子かどうか判定(2)データ増量・転移学習・ファインチューニングとdeeplearningで柴犬の写真からうちの子かどうか判定(3)Grad-CAMによる可視化**に引き続き、Google Colaboratoryで deep learningの分析結果の重みを、別のアプローチでも可視化します。
- 様々なエラーでつまずいた箇所などもなるべく記述し、なるべく誰でも再現がしやすいように記載します。
この記事の対象者・参考にした記事
- 対象者:以前と同じです。詳細は**こちら**。
- 参考にした記事
○日本一詳しくGrad-CAMとGuided Grad-CAMのソースコードを解説してみる(Keras実装)
私について
- 2019年9月にJDLA Deep Learning for Engeneer 2019#2を取得。
- 2020年3月末までは公益法人の事務職。2020年4月からはデータエンジニアにキャリアチェンジ。
前回(3)の分析の概要
- Grad-CAMを実装し、柴犬の写真の分類の根拠となっている特徴についてヒートマップを作成しました。
今回(4)の手順概要
手順1 前準備
手順2 Grad-CAMとGuided Grad-CAMの実装に必要な関数の登録
手順3 Grad-CAMのメイン処理の実装
手順4 Guided Grad-CAMのメイン処理の実装
※今回使用するGrad-CAMのコードは前回(3)で実装したものとは異なるものです。
- @kinziroさんのこちらの記事**(日本一詳しくGrad-CAMとGuided Grad-CAMのソースコードを解説してみる (Keras実装)))でGuided Grad-CAMの実装が紹介されていました。こちらがgithub.com**です。
- この記事で紹介されていたコードを、とにかくまず動かすことを目的に実装します。引き続き柴犬の写真データを使用して、Grad-CAMによる可視化、そしてGuided Grad-CAMによる可視化を行いたいと思います。両者の表示結果を比較して、特徴の表現の仕方についてさらに観察を深めます。
- 以下の実装は、基本的に参考にした記事のコードをそのまま書いていきます。また、以前の分析(2)でセットアップしたGoogle Driveのデータをそのまま使用します。
手順1 前準備
(1) Google Driveのマウント
柴犬の画像が入っているフォルダからColabにデータが読み込めるよう、マウントします。
# Google Driveマウント
from google.colab import drive
drive.mount('/content/drive')
(2) 必要なライブラリをインポートします
次のコードでインポート。
# ライブラリのインポート
from __future__ import print_function
import keras
from keras.applications import VGG16
from keras.models import Sequential, load_model, model_from_json
from keras import models, optimizers, layers
from keras.optimizers import SGD
from keras.layers import Dense, Dropout, Activation, Flatten
from sklearn.model_selection import train_test_split
from PIL import Image
from keras.preprocessing import image as images
from keras.preprocessing.image import array_to_img, img_to_array, load_img
from keras import backend as K
import os
import numpy as np
import glob
import pandas as pd
import cv2
(3) kerasのバージョンチェック
インポートしたkerasのバージョンを確認してみます(この記事を書いている2020/1/19現在では)このバージョンになっています)
print(keras.__version__)

2.2.5
ここで注意すべき点があります。元記事についた**コメントに気になる内容が書き込まれていましたが、kerasのバージョンが2.2.4**以下でないと、ソースコートを実行した際にエラーが発生するらしいのです。試しにやってみると、一連のソースコード実行した一番最後の一行で次のようなエラー表示が出ました。やはりkerasのバージョンを下げてから実行しないといけないようです。
AttributeError: module 'keras.backend' has no attribute 'image_dim_ordering'
(4) kerasのバージョンを下げます
次のコードを実行します。
# kerasを特定のバージョン(2.2.4)へ変更する
# 実行後にランタイムの再起動が必要
!pip install keras==2.2.4
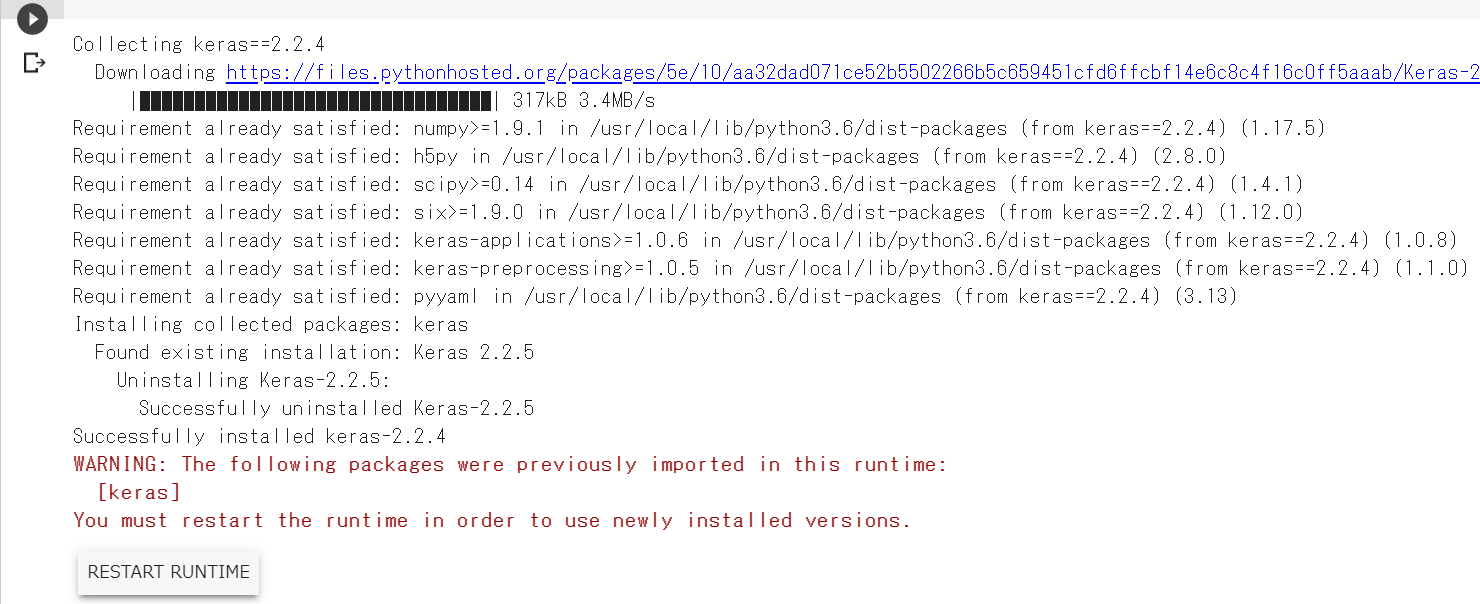
実行すると、次のような画面が出てライブラリが指定したバージョンに変更されます。が、茶色のテキストで警告表示が出ているとおり、この変更を有効にするにはランタイムの再起動が必要です。

ランタイムの再起動はメニューバーの「ランタイム」から「ランタイムを再起動」をクリックします。

(5) 手順1の(1)~(3)までを再試行
ランタイムの再起動後に、手順1のこれまでのステップを再度すべて実行して、kerasのバージョンが2.2.4になっていることを確認します。
print(keras.__version__)

2.2.4
手順2 Grad-CAMとGuided Grad-CAMの実装に必要な関数の登録
(1) 元記事に掲載されていた関数の定義コードを実行
以下のコードをすべて実行します。
def target_category_loss(x, category_index, nb_classes):
    return tf.multiply(x, K.one_hot([category_index], nb_classes))

def target_category_loss_output_shape(input_shape):
    return input_shape

def normalize(x):
    # utility function to normalize a tensor by its L2 norm
    return x / (K.sqrt(K.mean(K.square(x))) + 1e-5)

def load_image(path):
    #img_path = sys.argv[1]
    img_path = path
    # 引数で指定した画像ファイルを読み込む
    # サイズはVGG16のデフォルトである224x224にリサイズされる
    img = image.load_img(img_path, target_size=(224, 224))
    # 読み込んだPIL形式の画像をarrayに変換
    x = image.img_to_array(img)
    # 3次元テンソル(rows, cols, channels) を
    # 4次元テンソル (samples, rows, cols, channels) に変換
    # 入力画像は1枚なのでsamples=1でよい
    x = np.expand_dims(x, axis=0)
    x = preprocess_input(x)
    return x


def register_gradient():
    # GuidedBackPropが登録されていなければ登録
    if "GuidedBackProp" not in ops._gradient_registry._registry:
        # 自作勾配を登録するデコレーター
        # 今回は_GuidedBackProp関数を"GuidedBackProp"として登録
        @ops.RegisterGradient("GuidedBackProp")
        def _GuidedBackProp(op, grad):
            '''逆伝搬してきた勾配のうち、順伝搬/逆伝搬の値がマイナスのセルのみ0にして逆伝搬する'''
            dtype = op.inputs[0].dtype
            # grad : 逆伝搬してきた勾配
            # tf.cast(grad > 0., dtype) : gradが0以上のセルは1, 0以下のセルは0の行列
            # tf.cast(op.inputs[0] > 0., dtype) : 入力のが0以上のセルは1, 0以下のセルは0の行列
            return grad * tf.cast(grad > 0., dtype) * \
                tf.cast(op.inputs[0] > 0., dtype)


def compile_saliency_function(model, activation_layer='block5_conv3'):
    '''指定レイヤーのチャンネル方向最大値に対する入力の勾配を計算する関数の作成'''
    # モデルのインプット
    input_img = model.input
    # 入力層の次の層以降をレイヤー名とインスタンスの辞書として保持
    layer_dict = dict([(layer.name, layer) for layer in model.layers[1:]])
    # 引数で指定したレイヤー名のインスタンスの出力を取得 shape=(?, 14, 14, 512)
    layer_output = layer_dict[activation_layer].output
    # チャンネル方向に最大値を取る shape=(?, 14, 14)
    max_output = K.max(layer_output, axis=3)
    # 指定レイヤーのチャンネル方向最大値に対する入力の勾配を計算する関数
    saliency = K.gradients(K.sum(max_output), input_img)[0]
    return K.function([input_img, K.learning_phase()], [saliency])


def modify_backprop(model, name):
    ''' ReLU関数の勾配を"name"勾配に置き換える'''

    # with内のReLUは"name"に置き換えられる
    g = tf.get_default_graph()
    with g.gradient_override_map({'Relu': name}):

        # ▽▽▽▽▽ 疑問4 : 新規モデルをreturnしているのに、引数のモデルのreluの置き換えが必要なのか? ▽▽▽▽▽

        # activationを持っているレイヤーのみ抜き出して配列化
        # get layers that have an activation
        layer_dict = [layer for layer in model.layers[1:]
                      if hasattr(layer, 'activation')]

        # kerasのRelUをtensorflowのReLUに置き換え
        # replace relu activation
        for layer in layer_dict:
            if layer.activation == keras.activations.relu:
                layer.activation = tf.nn.relu

        # △△△△△△△△△△△△△△△△△△△△△△△△△△△△△△△△△△△△△△△△△△△△△△△△△△△

        # 新しくモデルをインスタンス化
        # 自作モデルを使用する場合はこちらを修正
        # re-instanciate a new model
        new_model = VGG16(weights='imagenet')
    return new_model

def deprocess_image(x):
    '''
    Same normalization as in:
    https://github.com/fchollet/keras/blob/master/examples/conv_filter_visualization.py

    '''
    if np.ndim(x) > 3:
        x = np.squeeze(x)
    # normalize tensor: center on 0., ensure std is 0.1
    x -= x.mean()
    x /= (x.std() + 1e-5)
    x *= 0.1

    # clip to [0, 1]
    x += 0.5
    x = np.clip(x, 0, 1)

    # convert to RGB array
    x *= 255
    if K.image_dim_ordering() == 'th':
        x = x.transpose((1, 2, 0))
    x = np.clip(x, 0, 255).astype('uint8')
    return x

def grad_cam(input_model, image, category_index, layer_name):
    '''
    Parameters
    ----------
    input_model : model
        評価するKerasモデル
    image : tuple等
        入力画像(枚数, 縦, 横, チャンネル)
    category_index : int
        入力画像の分類クラス
    layer_name : str
        最後のconv層の後のactivation層のレイヤー名.
        最後のconv層でactivationを指定していればconv層のレイヤー名.
        batch_normalizationを使う際などのようなconv層でactivationを指定していない場合は、
        そのあとのactivation層のレイヤー名.

    Returns
    ----------
    cam : tuple
        Grad-Camの画像
    heatmap : tuple
        ヒートマップ画像
    '''
    # 分類クラス数
    nb_classes = 1000

    # ----- 1. 入力画像の予測クラスを計算 -----

    # 入力のcategory_indexが予想クラス

    # ----- 2. 予測クラスのLossを計算 -----

    # 入力データxのcategory_indexで指定したインデックス以外を0にする処理の定義
    target_layer = lambda x: target_category_loss(x, category_index, nb_classes)

    # 引数のinput_modelの出力層の後にtarget_layerレイヤーを追加
    # modelのpredictをすると予測クラス以外の値は0になる
    x = input_model.layers[-1].output
    x = Lambda(target_layer, output_shape=target_category_loss_output_shape)(x)
    model = keras.models.Model(input_model.layers[0].input, x)

    # 予測クラス以外の値は0なのでsumをとって予測クラスの値のみ抽出
    loss = K.sum(model.layers[-1].output)
    # 引数のlayer_nameのレイヤー(最後のconv層)のoutputを取得する
    conv_output = [l for l in model.layers if l.name is layer_name][0].output

    # ----- 3. 予測クラスのLossから最後のconv層への逆伝搬(勾配)を計算 -----

    # 予想クラスの値から最後のconv層までの勾配を計算する関数を定義
    # 定義した関数の
    # 入力 : [判定したい画像.shape=(1, 224, 224, 3)]、
    # 出力 : [最後のconv層の出力値.shape=(1, 14, 14, 512), 予想クラスの値から最後のconv層までの勾配.shape=(1, 14, 14, 512)]
    grads = normalize(K.gradients(loss, conv_output)[0])
    gradient_function = K.function([model.layers[0].input], [conv_output, grads])

    # 定義した勾配計算用の関数で計算し、データの次元を整形
    # 整形後
    # output.shape=(14, 14, 512), grad_val.shape=(14, 14, 512)
    output, grads_val = gradient_function([image])
    output, grads_val = output[0, :], grads_val[0, :, :, :]

    # ----- 4. 最後のconv層のチャンネル毎に勾配を平均を計算して、各チャンネルの重要度(重み)とする -----

    # weights.shape=(512, )
    # cam.shape=(14, 14)
    # ※疑問点1:camの初期化はzerosでなくて良いのか?
    weights = np.mean(grads_val, axis = (0, 1))
    cam = np.ones(output.shape[0 : 2], dtype = np.float32)
    #cam = np.zeros(output.shape[0 : 2], dtype = np.float32)    # 私の自作モデルではこちらを使用

    # ----- 5. 最後のconv層の順伝搬の出力にチャンネル毎の重みをかけて、足し合わせて、ReLUを通す -----

    # 最後のconv層の順伝搬の出力にチャンネル毎の重みをかけて、足し合わせ
    for i, w in enumerate(weights):
        cam += w * output[:, :, i]

    # 入力画像のサイズにリサイズ(14, 14) → (224, 224)
    cam = cv2.resize(cam, (224, 224))
    # 負の値を0に置換。処理としてはReLUと同じ。
    cam = np.maximum(cam, 0)
    # 値を0~1に正規化。
    # ※疑問2 : (cam - np.min(cam))/(np.max(cam) - np.min(cam))でなくて良いのか?
    heatmap = cam / np.max(cam)
    #heatmap = (cam - np.min(cam))/(np.max(cam) - np.min(cam))    # 私の自作モデルではこちらを使用

    # ----- 6. 入力画像とheatmapをかける -----

    # 入力画像imageの値を0~255に正規化. image.shape=(1, 224, 224, 3) → (224, 224, 3)
    #Return to BGR [0..255] from the preprocessed image
    image = image[0, :]
    image -= np.min(image)
    # ※疑問3 : np.uint8(image / np.max(image))でなくても良いのか?
    image = np.minimum(image, 255)

    # heatmapの値を0~255にしてカラーマップ化(3チャンネル化)
    cam = cv2.applyColorMap(np.uint8(255*heatmap), cv2.COLORMAP_JET)
    # 入力画像とheatmapの足し合わせ
    cam = np.float32(cam) + np.float32(image)
    # 値を0~255に正規化
    cam = 255 * cam / np.max(cam)
    return np.uint8(cam), heatmap
手順3 Grad-CAMのメイン処理の実装
(1) 入力画像の指定
以下のコードを入力します。画像は任意の画像を指定します。(この例ではmydog7.jpgを指定)
# cd '/content/drive/'My Drive/'Colab Notebooks'内の作業フォルダへ移動
%cd '/content/drive/'My Drive/Colab Notebooks/Self_Study/02_mydog_or_otherdogs/

# ① 入力画像の読み込み
# 入力画像を変換する場合はこちらを変更
# preprocessed_input = load_image(sys.argv[1])
preprocessed_input = load_image("./use_data/train/mydog/mydog07.jpg")
(2) VGG16モデルの読み込み
- VGG16モデルを読み込みます。今回はImageNetでトレーニングされたモデルをそのまま使用します。(うちの子と他の子の違いを判定している重みについては、別の機会に実装したいと思います)
# ② モデルの読み込み
# 自作モデルを使用する場合はこちらを変更
model = VGG16(weights='imagenet')
model.summary()
モデルは次のように表示されます。
Model: "vgg16"
_________________________________________________________________
Layer (type)                 Output Shape              Param #
=================================================================
input_1 (InputLayer)         (None, 224, 224, 3)       0
_________________________________________________________________
block1_conv1 (Conv2D)        (None, 224, 224, 64)      1792
_________________________________________________________________
block1_conv2 (Conv2D)        (None, 224, 224, 64)      36928
_________________________________________________________________
block1_pool (MaxPooling2D)   (None, 112, 112, 64)      0
_________________________________________________________________
block2_conv1 (Conv2D)        (None, 112, 112, 128)     73856
_________________________________________________________________
block2_conv2 (Conv2D)        (None, 112, 112, 128)     147584
_________________________________________________________________
block2_pool (MaxPooling2D)   (None, 56, 56, 128)       0
_________________________________________________________________
block3_conv1 (Conv2D)        (None, 56, 56, 256)       295168
_________________________________________________________________
block3_conv2 (Conv2D)        (None, 56, 56, 256)       590080
_________________________________________________________________
block3_conv3 (Conv2D)        (None, 56, 56, 256)       590080
_________________________________________________________________
block3_pool (MaxPooling2D)   (None, 28, 28, 256)       0
_________________________________________________________________
block4_conv1 (Conv2D)        (None, 28, 28, 512)       1180160
_________________________________________________________________
block4_conv2 (Conv2D)        (None, 28, 28, 512)       2359808
_________________________________________________________________
block4_conv3 (Conv2D)        (None, 28, 28, 512)       2359808
_________________________________________________________________
block4_pool (MaxPooling2D)   (None, 14, 14, 512)       0
_________________________________________________________________
block5_conv1 (Conv2D)        (None, 14, 14, 512)       2359808
_________________________________________________________________
block5_conv2 (Conv2D)        (None, 14, 14, 512)       2359808
_________________________________________________________________
block5_conv3 (Conv2D)        (None, 14, 14, 512)       2359808
_________________________________________________________________
block5_pool (MaxPooling2D)   (None, 7, 7, 512)         0
_________________________________________________________________
flatten (Flatten)            (None, 25088)             0
_________________________________________________________________
fc1 (Dense)                  (None, 4096)              102764544
_________________________________________________________________
fc2 (Dense)                  (None, 4096)              16781312
_________________________________________________________________
predictions (Dense)          (None, 1000)              4097000
=================================================================
Total params: 138,357,544
Trainable params: 138,357,544
Non-trainable params: 0
_________________________________________________________________
(3) 残りのステップを入力します。
次のコードを実行します。
# ③ 入力画像の予測確率(predictions)と予測クラス(predicted_class)の計算
# VGG16以外のモデルを使用する際はtop_1=~から3行はコメントアウト
predictions = model.predict(preprocessed_input)
top_1 = decode_predictions(predictions)[0][0]
print('Predicted class:')
print('%s (%s) with probability %.2f' % (top_1[1], top_1[0], top_1[2]))

predicted_class = np.argmax(predictions)

# ④ Grad-Camの計算
# 自作モデルの場合、引数の"block5_conv3"を自作モデルの最終conv層のレイヤー名に変更.
cam, heatmap = grad_cam(model, preprocessed_input, predicted_class, "block5_conv3")

# ⑤ 画像の保存
cv2.imwrite("gradcam.jpg", cam)
Grad-CAMのヒートマップ画像が02_mydog_or_otherdogsフォルダ内に生成されます。

手順4 Guided Grad-CAMのメイン処理の実装
(1) 入力画像の指定
次のコードをすべて実行します。
# ① GuidedBackPropagation用勾配の実装
register_gradient()
# ② ReLUの勾配計算をGuidedBackPropagationの勾配計算に変更
guided_model = modify_backprop(model, 'GuidedBackProp')
# ③ GaidedBackPropagation計算用の関数の定義
# 自作クラスを使う場合は、こちらの引数に最後のconv層のレイヤー名を追加で指定
saliency_fn = compile_saliency_function(guided_model)
# ④ GaidedBackPropagationの計算
saliency = saliency_fn([preprocessed_input, 0])
# ⑤ Guided Grad-CAMの計算
gradcam = saliency[0] * heatmap[..., np.newaxis]
# ⑥ 画像の保存
cv2.imwrite("guided_gradcam.jpg", deprocess_image(gradcam))
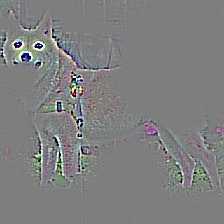
Guided Grad-CAMのヒートマップ画像が02_mydog_or_otherdogsフォルダ内に生成されます。

こういう感じで出てくるんですね。確かにヒートマップで見るよりも輪郭というか、人間が理解しやすい形での特徴をとらえているという気がします。
以下、何枚かmydog及びotherdogsで処理したものを掲載してみます。
mydog


otherdogs


今回は Grad-CAMとGuided Grad-CAMによる特徴をとらえた画像の作成を実施しました。画像に表れるそれぞれの手法での特徴量の表現は大きく異なるため、deeplearningがとらえた特徴を説明する際には、なるべく様々な切り口を併用し、総合的に理解を求めたほうが、納得感が得られそうではあります。
引き続き、様々な手法についてのアウトプットを続けていきたいと思います。
