1.事前知識
- 【初心者でもできる‼】Windows10にEclipseをインストールする方法(Java環境構築)
- 【実践‼】Spring Boot で Hello World を表示する
- 【実践‼】Javaデータベース連携(Connector/J 8.0.20)
事前知識として、上記リンクの内容が必要です。
2.事前準備
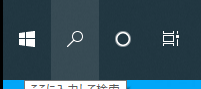
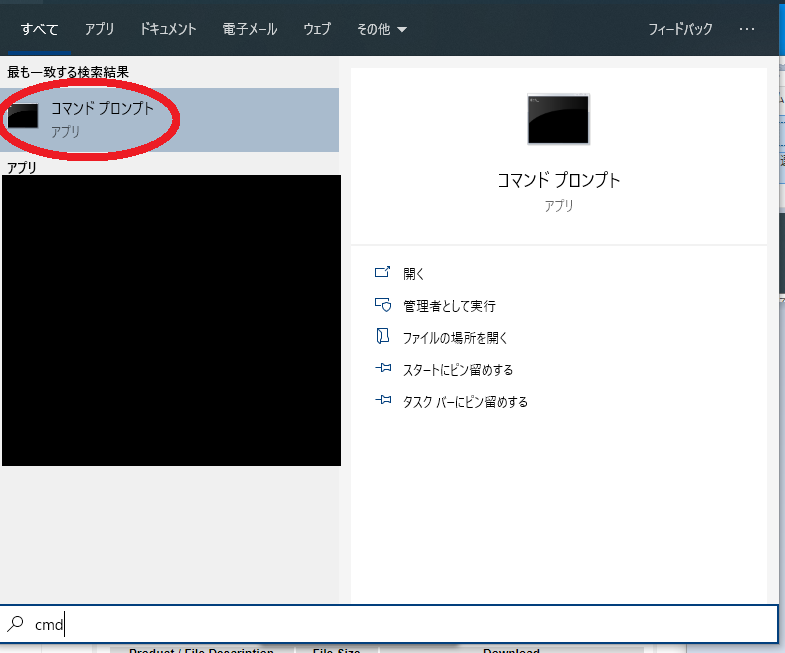
- 検索ボックスに
cmdと入力し、コマンドプロンプトを起動する。
-
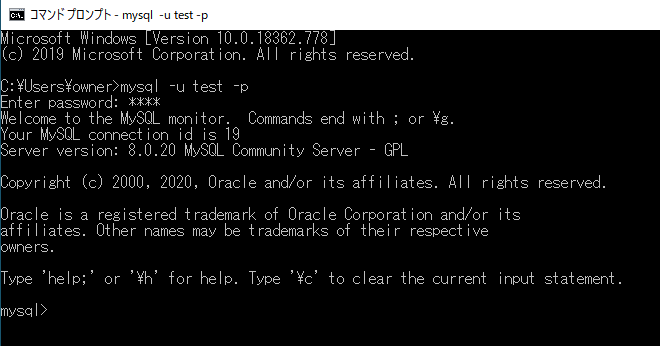
mysql -u ユーザ名 -pでログインする。
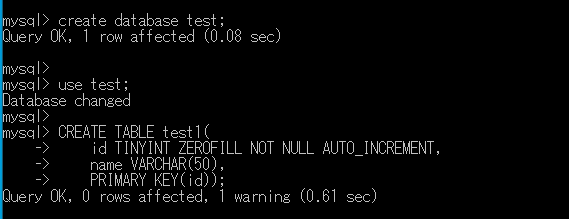

test.sql
create database test DEFAULT CHARACTER SET utf8 COLLATE utf8_general_ci;

CREATE USER 'test'@'localhost' IDENTIFIED BY 'test';
GRANT ALL PRIVILEGES ON test.* TO 'test'@'localhost';

use test;

CREATE TABLE test1(
    id TINYINT ZEROFILL NOT NULL AUTO_INCREMENT,
    name VARCHAR(50),
    PRIMARY KEY(id));

INSERT INTO `test1`(`name`) VALUES ("test1");
INSERT INTO `test1`(`name`) VALUES ("test2");
INSERT INTO `test1`(`name`) VALUES ("test3");
INSERT INTO `test1`(`name`) VALUES ("test4");
- 上記の
SQL文をコピーし、コマンドプロンプト内で実行する。 - 画像のように
Query OKが出れば成功。
3.Spring Boot プロジェクトの作成
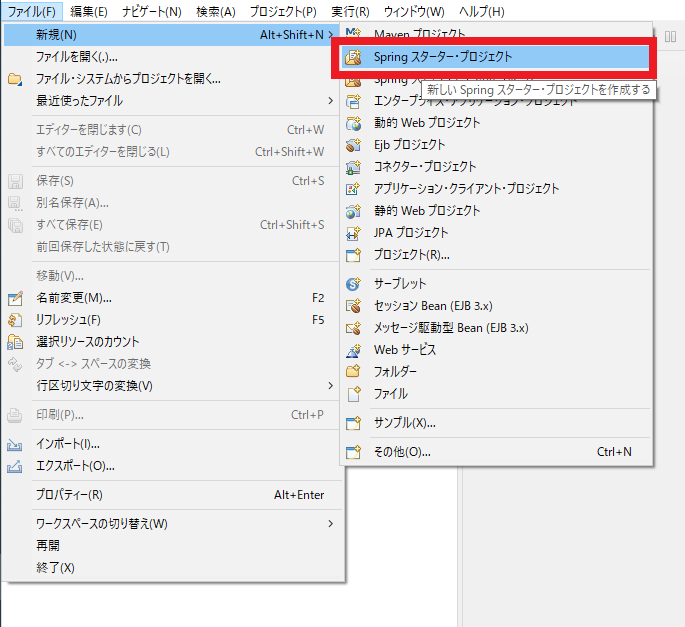
-
[ファイル(F)]→[新規(N)]→[Spring スターター・プロジェクト]を選択する。
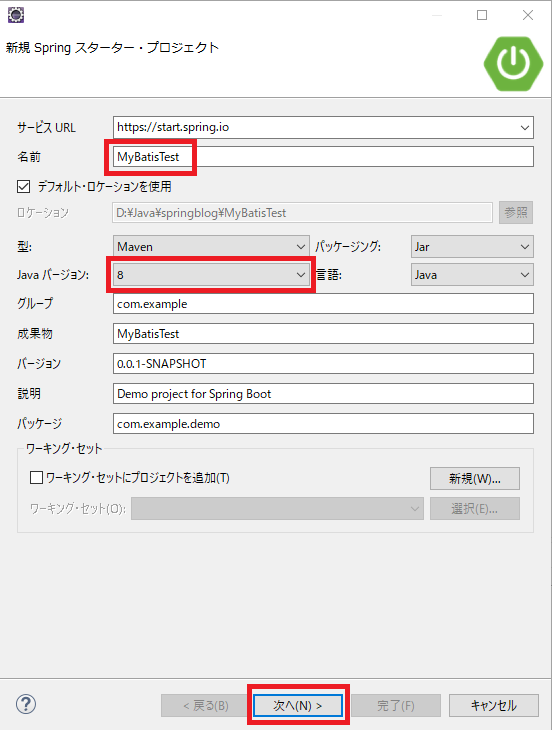
- 名前に
MyBatisTestと入力し、Javaバージョン:8を選択して次へ(N) >ボタンをクリックする。
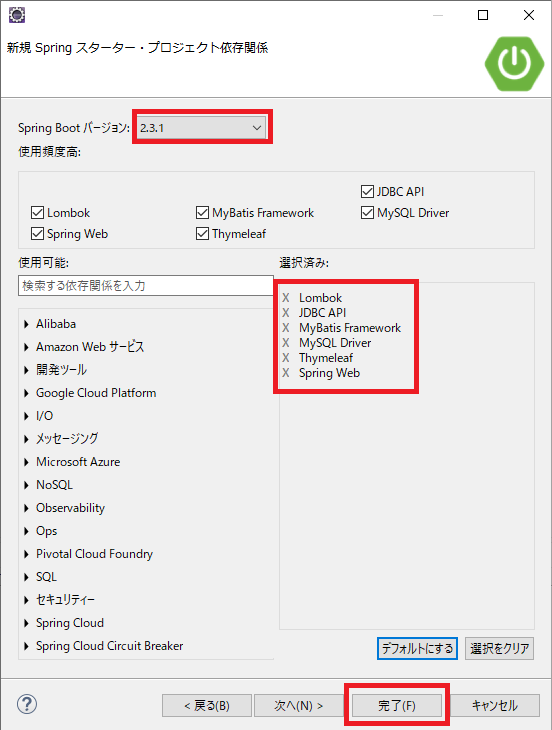
-
Spring Boot バージョン:2.3.1,Lombok,JDBC API,MyBatis Framework,MySQL Driver,Thymeleaf,Spring Webを選択し、完了ボタンをクリックする。
4.Spring Boot プロジェクトの実行
フォルダ構成
MyBatisTest
└─ src
     └─ main
          ├─ java
          │   └─ com
          │        └─ example
          │             └─ demo
          │                  ├─ Entity.java
          │                  └─ TestController.java
          └─ resources
               ├─ application.properties
               ├─ mybatis-config.xml
               ├─ sample_mapper.xml
               │
               ├─ static
               └─ templates
                    └─ index.html
Entity.java
package com.example.demo;

import lombok.Data;

@Data
public class Entity {
	private int id;
	private String name;
}
TestController.java
package com.example.demo;

import java.io.InputStream;
import java.util.List;

import org.apache.ibatis.session.SqlSession;
import org.apache.ibatis.session.SqlSessionFactory;
import org.apache.ibatis.session.SqlSessionFactoryBuilder;
import org.springframework.stereotype.Controller;
import org.springframework.ui.Model;
import org.springframework.web.bind.annotation.GetMapping;

@Controller
public class TestController {
    // ルートとなる設定ファイルを読み込む
	InputStream in = TestController.class.getResourceAsStream("/mybatis-config.xml");

	// 設定ファイルを元に SqlSessionFactory を作成する
	SqlSessionFactory factory = new SqlSessionFactoryBuilder().build(in);

	// SqlSessionFactory から SqlSession を生成する
	SqlSession session = factory.openSession();

    @GetMapping("/")
    public String index(Model model) {

    	// SqlSession を使って SQL を実行する
    	List<Entity> result = session.selectList("sample.mybatis.selectTest");

        model.addAttribute("Test", result);
        return "index";
    }
}
application.properties
spring.datasource.url=jdbc:mysql://localhost:3306/test?characterEncoding=UTF-8&serverTimezone=JST
spring.datasource.username=test
spring.datasource.password=test
spring.datasource.driver-class-name=com.mysql.cj.jdbc.Driver
spring.jpa.generate-ddl=true
spring.jpa.hibernate.ddl-auto = update
mybatis-config.xml
<?xml version="1.0" encoding="UTF-8" ?>
<!DOCTYPE configuration
  PUBLIC "-//mybatis.org//DTD Config 3.0//EN"
  "http://mybatis.org/dtd/mybatis-3-config.dtd">
<configuration>
  <environments default="sample_id">
    <environment id="sample_id">
      <transactionManager type="JDBC"/>
      <dataSource type="POOLED">
        <property name="driver" value="com.mysql.cj.jdbc.Driver"/>
        <property name="url" value="jdbc:mysql://localhost/test?serverTimezone=JST"/>
        <property name="username" value="test"/>
        <property name="password" value="test"/>
      </dataSource>
    </environment>
  </environments>
  <mappers>
    <mapper resource="sample_mapper.xml"/>
  </mappers>
</configuration>
sample_mapper.xml
<?xml version="1.0" encoding="UTF-8" ?>
<!DOCTYPE mapper
  PUBLIC "-//mybatis.org//DTD Mapper 3.0//EN"
  "http://mybatis.org/dtd/mybatis-3-mapper.dtd">
<mapper namespace="sample.mybatis">
  <select id="selectTest" resultType="com.example.demo.Entity">
    select * from test1
  </select>
</mapper>
index.html
<!DOCTYPE html>
<html xmlns:th="http://www.thymeleaf.org/">
  <head>
    <title>Test</title>
    <meta charset="utf-8" />
  </head>
  <body>
    <ul>
      <li th:each="entity : ${Test}">
        [[${entity.getId()}]]
        [[${entity.getName()}]]
      </li>
    </ul>
  </body>
</html>
- 上記のフォルダ構成のようにファイルを配置し、
MyBatisTest [boot]を右クリックして[実行(R)]→[5 Maven install]選択する。

[INFO] ------------------------------------------------------------------------
[INFO] BUILD SUCCESS
[INFO] ------------------------------------------------------------------------
[INFO] Total time:  4.125 s
[INFO] Finished at: 2020-07-05T21:50:22+09:00
[INFO] ------------------------------------------------------------------------
2.コンソール に 上記の文が表示されれば成功。
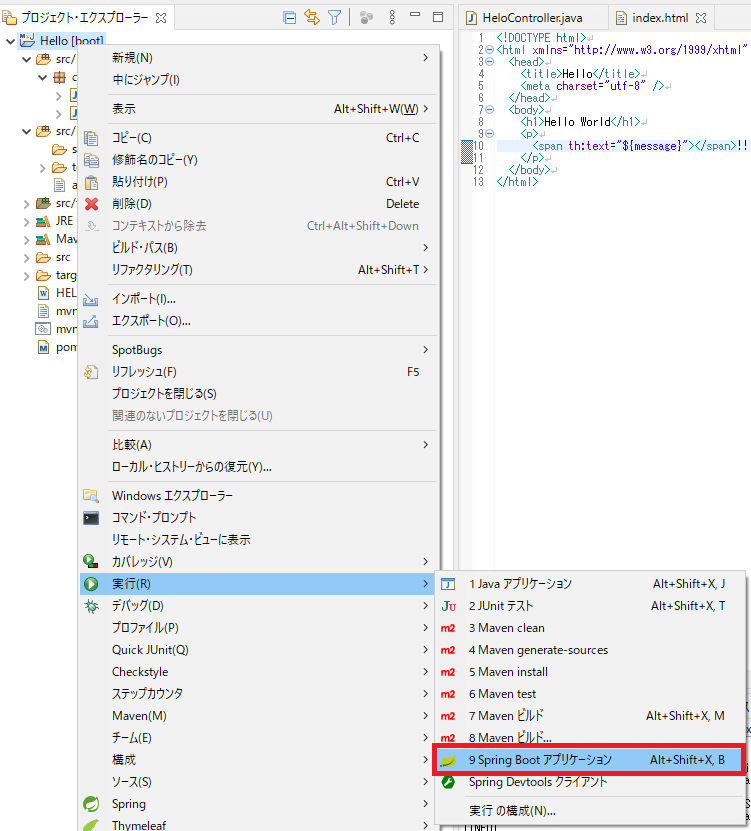
3.MyBatisTest [boot] を右クリックして [実行(R)]→[9 Spring Boot アプリケーション] 選択する。
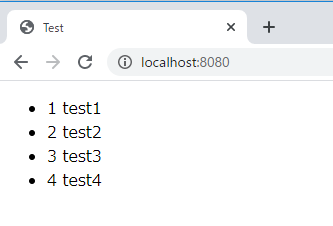
4. localhost:8080 にアクセスし、画像のように表示されれば成功。
5.GitHub
GitHubにソースコードを公開しています。
6.関連
- 【覚えておくと便利!!!】Eclipseにおけるコンストラクタとgetter/setterの簡易作成
- 【覚えておくと便利!!!】Eclipseにおける継承クラスの簡易作成
- 【覚えておくと便利!!!】MySQLの文字コード変更
- 【初心者でもできる‼】Javadocの書き方
- 【わかりやすく解説‼】Javaのオーバーロードの使い方
- 【わかりやすく解説‼】Javaのカプセル化の使い方
- 【わかりやすく解説‼】Javaの継承の使い方【オーバーライドの解説あり】
- 【わかりやすく解説‼】Javaにおける参照型の型変換
- 【わかりやすく解説‼】Javaのポリモーフィズムの使い方
- 【わかりやすく解説‼】ArrayListの使い方【Java】
- 【実践‼】JFrameの導入(画面作成まで解説)
- 【実践‼】Javaデータベース連携(Connector/J 8.0.20)
- 【実践‼】SQLステートメントの実行
- Javaプログラミングの全て