2021/01/08 追記
Firebase Trigger Emailを使う方法で書き直しました。
Firebase Trigger Email で作る SPA サイトのお問い合わせフォーム
Firebase hosting + Vue.jsでコーポレートサイトを作成する際に困るのが、お問い合わせフォームをどうするかだと思います。
Googleフォームやフォームランなどのフォーム作成サービスを設置するしかないかと思っていたのですが、Firebaseのfunctionsを利用することで、かなり簡単に実装できました。
Fireabse Hostingでホストして、Functionsでメール送信機能を実装するまでをチュートリアル形式で記載します。
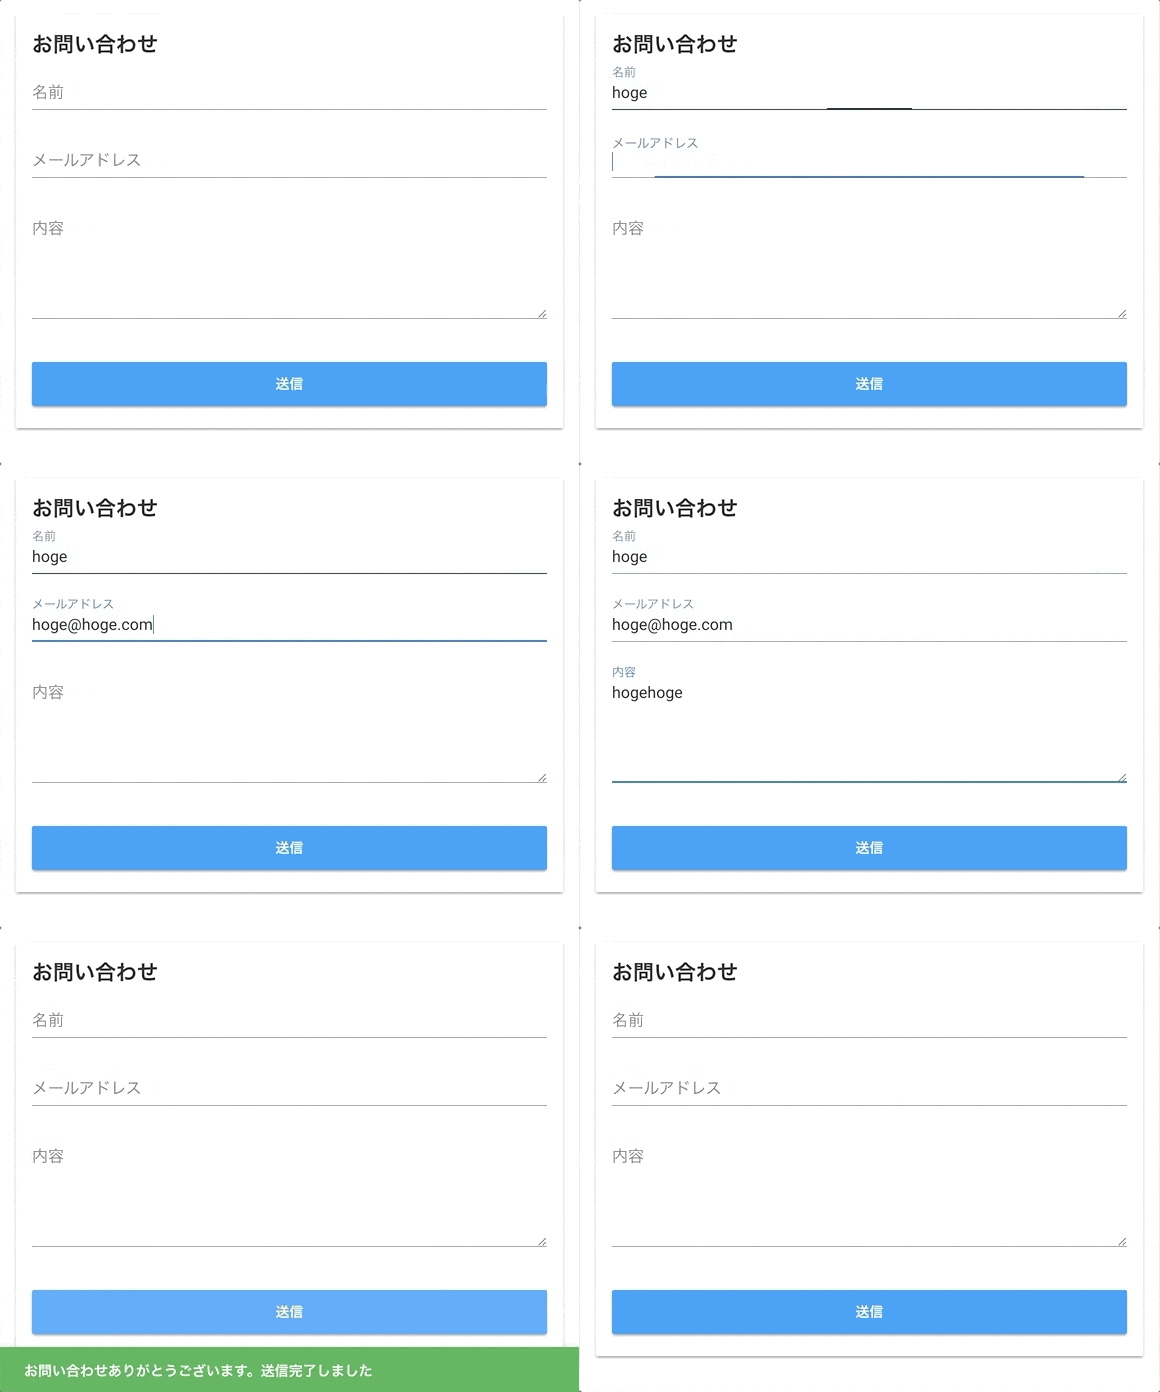
以下のようなフォームを作成します。
またここで説明するコードは以下Githubリポジトリで確認できます。
1. プロジェクトの準備
1-1. Vueプロジェクトの作成
元なるvueプロジェクトを作成します。選択はデフォルトでOKです。
$ vue create sendmail-demo
以下コマンドでlocalhost:8080にアクセスして初期画面が表示されれば準備完了です。
$ cd sendmail-demo
$ yarn serve

1-2. Firebaseの設定
事前にこちらを参考にFirebaseCLIのインストールを行ってください。
Firebase cliでFirebaseの設定を行います。
選択肢ではFunctionsとHostingにチェックを入れます。
$ firebase init
     ######## #### ########  ######## ########     ###     ######  ########
     ##        ##  ##     ## ##       ##     ##  ##   ##  ##       ##
     ######    ##  ########  ######   ########  #########  ######  ######
     ##        ##  ##    ##  ##       ##     ## ##     ##       ## ##
     ##       #### ##     ## ######## ########  ##     ##  ######  ########

You're about to initialize a Firebase project in this directory:

  /Users/kawamataryou/firebase_training/sendmail-demo

? Which Firebase CLI features do you want to setup for this folder? Press Space to select features, then Enter to confirm your choices.
 ◯ Database: Deploy Firebase Realtime Database Rules
 ◯ Firestore: Deploy rules and create indexes for Firestore
 ◉ Functions: Configure and deploy Cloud Functions
❯◉ Hosting: Configure and deploy Firebase Hosting sites
 ◯ Storage: Deploy Cloud Storage security rules

=== Project Setup

First, let's associate this project directory with a Firebase project.
You can create multiple project aliases by running firebase use --add,
but for now we'll just set up a default project.

? Select a default Firebase project for this directory: [don't setup a default project]
Functionsの設定はデフォルトでOKです。
=== Functions Setup

A functions directory will be created in your project with a Node.js
package pre-configured. Functions can be deployed with firebase deploy.

? What language would you like to use to write Cloud Functions? JavaScript
? Do you want to use ESLint to catch probable bugs and enforce style? No
? File functions/package.json already exists. Overwrite? No
i  Skipping write of functions/package.json
? File functions/index.js already exists. Overwrite? No
i  Skipping write of functions/index.js
? Do you want to install dependencies with npm now? Yes
audited 4168 packages in 3.772s
found 0 vulnerabilities
Hostingの選択肢では、dist, yesを入力してください。
=== Hosting Setup

Your public directory is the folder (relative to your project directory) that
will contain Hosting assets to be uploaded with firebase deploy. If you
have a build process for your assets, use your build's output directory.

? What do you want to use as your public directory? dist
? Configure as a single-page app (rewrite all urls to /index.html)? Yes
✔  Wrote dist/index.html

i  Writing configuration info to firebase.json...
i  Writing project information to .firebaserc...

✔  Firebase initialization complete!
1-3. Firebaseコンソールでのプロジェクト作成、設定
プラウザでFireabseコンソールにアクセスしてプロジェクトを作成します。
作成後,先程作ったsendmail-demoにプロジェクトを適応します。
これで下準備は整いました。
$ firebase use --add send-mail-demo
2. Firebase functionでのメール通知処理の実装
2-1 nodemailerの追加
functinonsでのメール通知を実現するため、node.jsからメール送信を可能にするモジュールnodemailerを追加します。
# 1でfirebase functionsの設定を行うとfunctionsディレクトリが自動で作られます。
$ cd functions
$ yarn add nodemailer
2-2. 設定ファイルの追加
今回は送信サーバーとしてgmailを使うので、そのログイン情報、パスワード及び、ページ管理者(問い合わせメールの送信先)の情報を
functionsの環境変変数に追加します
$ firebase functions:config:set gmail.email="メールサーバーとして使うgmailのログインID" gmail.password="メールサーバーとして使うgmailのパスワード" admin.email="問い合わせメールの送信先となるページ管理者のアドレス"
functions内では、以下構文でこれらの環境変数にアクセスできます。
const gmailEmail = functions.config().gmail.email;
const gmailPassword = functions.config().gmail.password;
const adminEmail = functions.config().admin.email;
2-3. functionの作成
そしてfunctionsのindex.jsに以下を記述し、sendmailというfunctionを作成します。
# functionsディレクトリにて
$ vi index.js
const functions = require("firebase-functions");
const nodemailer = require("nodemailer");
const gmailEmail = functions.config().gmail.email;
const gmailPassword = functions.config().gmail.password;
const adminEmail = functions.config().admin.email;

// 送信に使用するメールサーバーの設定
const mailTransport = nodemailer.createTransport({
  service: "gmail",
  auth: {
    user: gmailEmail,
    pass: gmailPassword
  }
});

// 管理者用のメールテンプレート
const adminContents = data => {
  return `以下内容でホームページよりお問い合わせを受けました。

お名前:
${data.name}

メールアドレス:
${data.email}

内容:
${data.contents}
`;
};

exports.sendMail = functions.https.onCall(async (data, context) => {
  // メール設定
  let adminMail = {
    from: gmailEmail,
    to: adminEmail,
    subject: "ホームページお問い合わせ",
    text: adminContents(data)
  };

  // 管理者へのメール送信
  try {
    await mailTransport.sendMail(adminMail);
   } catch (e) {
    console.error(`send failed. ${e}`);
    throw new functions.https.HttpsError('internal', 'send failed');
   }
  }
});
これでfunctionsの設定は完了です。
3. Vue.jsでFormの作成
最後にクライアント側のForm作成を行います。
3-1 fireabse, vuetifyのモジュールを追加
フォーム作成で楽をするために、コンポーネントライブラリのVuetifyを使用します。
# プロジェクト直下で。選択肢はデフォルトでOK。
$ vue add vuetify
次にFirebase functionsのクライアントとして使用するため、firebaseのモジュールを追加します。
# プロジェクト直下で
$ yarn add firebase
3-2. Firebaseの初期設定
pluginsディレクトリにFireabaseの初期化用のjsファイルを追加します。
$ vi src/plugins/firebase.js
config内の値は、Firebaseのプロジェクトコンソールにて、確認してください。
import firebase from "firebase";

const config = {
  apiKey: "xxxxxx",
  authDomain: "xxxxxx.firebaseapp.com",
  databaseURL: "xxxxxx.firebaseio.com",
  projectId: "xxxxxx",
  storageBucket: "xxxxxx.appspot.com",
  messagingSenderId: "xxxxxx"
};
firebase.initializeApp(config);
export const functions = firebase.functions();
3-3. Formコンポーネントの作成
components配下でformのコンポーネントを作成します。
$ vi src/components/ContactForm.vue
そして、以下内容を記載します。
<template>
    <div>
        <v-card>
            <v-container>
                <h2>お問い合わせ</h2>
                <v-form ref="form" v-model="contactFormValidation.valid" lazy-validation>
                    <v-text-field
                            v-model="contactForm.name"
                            :rules="contactFormValidation.nameRules"
                            label="名前"
                            required
                    ></v-text-field>
                    <v-text-field
                            v-model="contactForm.email"
                            :rules="contactFormValidation.emailRules"
                            label="メールアドレス"
                            required
                    ></v-text-field>
                    <v-textarea
                            v-model="contactForm.contents"
                            :rules="contactFormValidation.contentsRules"
                            label="内容"
                            required
                    ></v-textarea>
                    <v-btn
                            :loading="contactForm.loading"
                            :disabled="!contactFormValidation.valid"
                            @click="sendMail()"
                            block
                            large
                            color="info"
                            class="mt-4 font-weight-bold"
                    >送信
                    </v-btn>
                </v-form>
            </v-container>
        </v-card>
        <v-snackbar
                v-model="snackBar.show"
                :color="snackBar.color"
                bottom
                right
                :timeout="6000"
                class="font-weight-bold"
        >
            {{snackBar.message}}
        </v-snackbar>
    </div>
</template>

<script>
  import { functions } from '@/plugins/firebase'

  export default {
    data: () => ({
      contactForm: {
        name: '',
        contents: '',
        email: '',
        loading: false
      },
      contactFormValidation: {
        valid: false,
        nameRules: [v => !!v || '名前は必須項目です'],
        emailRules: [v => !!v || 'メールアドレスは必須項目です'],
        contentsRules: [v => !!v || '内容は必須項目です']
      },
      snackBar: {
        show: false,
        color: '',
        message: ''
      }
    }),
    methods: {
      sendMail: function () {
        if (this.$refs.form.validate()) {
          this.contactForm.loading = true
          const mailer = functions.httpsCallable('sendMail')

          mailer(this.contactForm)
            .then(() => {
              this.formReset()
              this.showSnackBar(
                'success',
                'お問い合わせありがとうございます。送信完了しました'
              )
            })
            .catch(err => {
              this.showSnackBar(
                'error',
                '送信に失敗しました。時間をおいて再度お試しください'
              )
              console.log(err)
            })
            .finally(() => {
              this.contactForm.loading = false
            })
        }
      },
      showSnackBar: function (color, message) {
        this.snackBar.message = message
        this.snackBar.color = color
        this.snackBar.show = true
      },
      formReset: function () {
        this.$refs.form.reset()
      }
    }
  }
</script>
次に、App.vueでContactForm.vueを読み込むように設定します。
vi src/App.vue
<template>
  <v-app>
    <v-toolbar app>
      <v-toolbar-title class="headline text-uppercase">
        <span>Vuetify</span>
        <span class="font-weight-light">MATERIAL DESIGN</span>
      </v-toolbar-title>
      <v-spacer></v-spacer>
      <v-btn
        flat
        href="https://github.com/vuetifyjs/vuetify/releases/latest"
        target="_blank"
      >
        <span class="mr-2">Latest Release</span>
      </v-btn>
    </v-toolbar>

    <v-content>
      <ContactForm/>
    </v-content>
  </v-app>
</template>

<script>
import ContactForm from './components/ContactForm'

export default {
  name: 'App',
  components: {
    ContactForm
  },
  data () {
    return {
      //
    }
  }
}
</script>
これでクライアント側の設定は完了です。
4. メールサーバーの設定・デプロイ
4-1. gmailの設定
ここまででいざデプロイと行きたいところなのですが、gmailをメールサーバーとして使用する場合、安全性の低いアプリのアクセスを有効にする必要があります。
メールサーバーとして利用するGoogleアカウントにログイン後、以下URLにアクセスして、設定を有効にしてください。
https://myaccount.google.com/lesssecureapps

4-2. Vueプロジェクトのbuild
Vueプロジェクトのbuildを行います。実行するとdistディレクトリに実行ファイルが作成されます。
$ yarn run build
デプロイ
いよいよ最後。
以下コマンドを実行してDeploy complete!が表示されればデプロイ完了です。
Hosting URL:xxxxにアクセスして実際にフォームに送信してみてください。
$ firebase deploy

=== Deploying to 'send-mail-demo'...

i  deploying functions, hosting
i  functions: ensuring necessary APIs are enabled...
⚠  functions: missing necessary APIs. Enabling now...
✔  functions: all necessary APIs are enabled
i  functions: preparing functions directory for uploading...
i  functions: packaged functions (72.49 KB) for uploading
✔  functions: functions folder uploaded successfully
i  hosting[send-mail-demo]: beginning deploy...
i  hosting[send-mail-demo]: found 1 files in dist
✔  hosting[send-mail-demo]: file upload complete
i  functions: creating Node.js 6 function sendMail(us-central1)...
✔  functions[sendMail(us-central1)]: Successful create operation.
Function URL (sendMail): https://us-central1-xxxx.cloudfunctions.net/sendMail
i  hosting[send-mail-demo]: finalizing version...
✔  hosting[send-mail-demo]: version finalized
i  hosting[send-mail-demo]: releasing new version...
✔  hosting[send-mail-demo]: release complete

✔  Deploy complete!

Project Console: https://console.firebase.google.com/project/send-mail-demo/overview
Hosting URL: https://xxxx.firebaseapp.com
感想
Firebase本当にすごいですね。ここまで全て無料です。
今後もFireabse Vue.jsで色々作っていきたいです。
