Requirements
以下のモジュール/環境を使います。
言語はすべてJavscriptです。vue-cliはインストール済みとして話を進めます。
Overview
Vuejs側で用意したメール送信ボタンを押すとFirebase Functionに用意されたメール送信プログラムが起動し、指定したアドレスにメールを送る流れです。
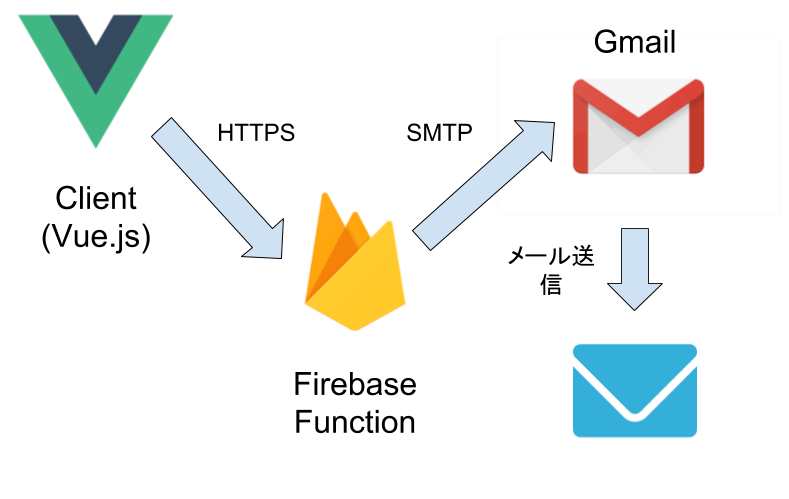
メールサーバーにはGmailを想定していますが、SengGridなどでも可能です。ただしその場合はクロスドメインの関係でfirebaseのプランを有料プランにアップグレードする必要があります。Gmailを利用する分には無料です。
サーバーサイド側の実装
1. firebase functionのインストール
npm install -g firebase-tools
正常にインストールされれば、以下のようにディレクトリが作成されているはずです。
myproject
 +- .firebaserc    # Hidden file that helps you quickly switch between
 |                 # projects with `firebase use`
 |
 +- firebase.json  # Describes properties for your project
 |
 +- functions/     # Directory containing all your functions code
      |
      +- .eslintrc.json  # Optional file containing rules for JavaScript linting.
      |
      +- package.json  # npm package file describing your Cloud Functions code
      |
      +- index.js      # main source file for your Cloud Functions code
      |
      +- node_modules/ # directory where your dependencies (declared in
                       # package.json) are installed
2. nodemailerのインストール
サーバーサイド側のプログラムはfunctions/の中に書きます
cd functions
npm install nodemailer --save
4. メールサーバーへのログイン情報を設定する
ソースコードに書くのはセキュリティ上よろしくないので直接firebaseの環境変数に書き込みましょう。ちなみにこのときのユーザーはfirebaseプロジェクトのオーナーと異なっていても大丈夫です。
firebase functions:config:set gmail.email="myusername@gmail.com" gmail.password="secretpassword"
なお、アプリからのアクセスを許可するために、指定したGmailの設定で安全性の低いアプリのアクセスの許可をしておきましょう。
5. メール送信関数の実装
functions の中にあるindex.jsを編集しましょう
const functions = require('firebase-functions');
const nodemailer = require('nodemailer')
const gmailEmail = functions.config().gmail.email
const gmailPassword = functions.config().gmail.password
const mailTransport = nodemailer.createTransport({
    service: 'gmail',
    auth: {
        user: gmailEmail,
        pass: gmailPassword
    }
})

exports.sendMail = functions.https.onCall((data, context) => {
    let email = {
        from: gmailEmail,
        to: data.destination,
        subject: 'test message',
        text: 'This is a test message from vue.'
    }
    mailTransport.sendMail(email, (err, info) => {
        if (err) {
            return console.log(err)
        }
        return console.log('success')
    })
})
6. デプロイ
firebase deploy --only functionsで関数をデプロイします。正常に終了すれば関数のリクエスト先が
https://us-central1-xxxxxxx.cloudfunctions.net/sendMail
のような形で表示されるのでこれをコピーしておきます。アドレスはfirebase functionsのconsoleでいつでも確認できます。
クライアント側の実装
1. ボタンの作成
今回はVuetifyを使います。
<template>
  <v-btn @click="sendMail"><v-icon>mail</v-icon>メール送信</v-btn>
</template>
2. イベント先の関数の実装
下のコードではtemplate内にsnackbarを追加して正常にメールが送信されたらポップアップ通知するようにしています。
export default {...
  methods: {
    sendMail: function () {
      const sendMail = ff.httpsCallable('sendMail')
      let parent = this
      sendResults({destination: 'hoge@hoge.com'}).then(function (result) {
        parent.snackbar = true
      })
    }
  }
}
3. デプロイ
firebase deployでfirebase hosting にデプロイされます。コマンドの実行ディレクトリはfunctionsの中ではなくてプロジェクトのルートディレクトリです。
結果
これでウェブアプリ上からGmail経由で指定したアドレスにメールを送る機能が実装できました。ただアプリを通して自動的にGoogle アカウントにログインする都合上、実行すると「不審なアクティビティを検出しました」という旨が自分のグーグルアカウントに表示されます。実際にGoogleアカウントのセキュリティを一段階落としたことになるので、この方法で使うGmailのアカウントはメインのアカウントではなく、余っている別アカウントを使ってやるか、有料プランにして外部のメールサーバーを利用することをおすすめします。