目的
docker+Node.js(Express)の最小構成プロジェクトを作成する
こちらの記事の続きになります。
上記でつくったものをdockerのnginxにて、リバースプロキシを使い表示させるようにします。
※以前の内容と重複する部分の説明をいくつか割愛しています。
環境
macOS High Sierra 10.13.6
Docker version 18.06.1-ce
docker-compose version 1.22.0
完成品
この記事で作ったソースは以下のgithubにあげています
https://github.com/ryo-ohnishi/node_express_nginx
作成
dockerファイル作成
dockerで使用するファイルを作っていきます。
docker部分は以下のようなファイル構成になります。construct_web部分が追加されています
.
├── docker
│   ├── construct_app
│   │   └── Dockerfile-app
│   └── construct_web
│       ├── Dockerfile-web
│       └── default.conf
├── docker-compose.yml
各ファイルの中身を見ていきます。
Dockerfile
# ベースイメージを指定
FROM nginx:1.15

# default.cof 書き換え
COPY ./default.conf /etc/nginx/conf.d/default.conf
WEB用のDockerfileなので、Dockerfile-webという名前で作成しています。
各コマンドの解説は以下になります。
FROM nginx:1.15
nginxのイメージを取得しています。バージョンは作成時の最新バージョンの1.15です。
COPY ./default.conf /etc/nginx/conf.d/default.conf
Nngixの設定ファイルの書き換えを行なっています。
Nginx設定ファイル
server {
    listen       80;
    server_name  localhost;
    location / {
        proxy_set_header Host $host;
        proxy_set_header X-Real-IP $remote_addr;
        proxy_set_header X-Forwarded-Host $host;
        proxy_set_header X-Forwarded-Server $host;
        proxy_set_header X-Forwarded-For $proxy_add_x_forwarded_for;
        proxy_pass http://app:3000/;
    }
}
listen
接続ポート、httpデフォルトポートの80番を指定
server_name
ドメイン名を指定。今回はlocalhostで接続するのでlocalhost
proxy_set_header
proxy先にヘッダー情報を渡す
proxy_pass
転送先を指定。ここで指定されているドメインとポートはdocker-composeで指定したnodejs側のサービス名(app)とポート(3000)
docker-compose.yml
web部分が追記されています。
※作成されるイメージ名とコンテナ名は、前の記事で作成したものから変更しています。
version: '3'
services:
  web:
    build:
      context: ./docker/construct_web      # Dockerfile保存場所
      dockerfile: Dockerfile-web    # Dockerfileファイル名
    image: nn-web      # docker image name
    container_name: nn-web       # docker container name
    ports:
      - 80:80

  app:
    build:
      context: ./docker/construct_app      # Dockerfile保存場所
      dockerfile: Dockerfile-app    # Dockerfileファイル名
    image: nn-app                  # イメージ名
    container_name: nn-app         # コンテナ名
    ports:                          # ポート接続
      - 3000:3000
    volumes:                        # mount workdir
      - ./myapp:/src
    command: [sh, -c, npm install && npm start]
ports:
ポート接続を指定しています。80番ポートでアクセスした場合、コンテナ内の80番ポートにアクセスするようになっています。
docker-compose起動
docker-compose up --build
以下のURLにアクセスすると、画像のようなページが表示されます。
http://localhost/

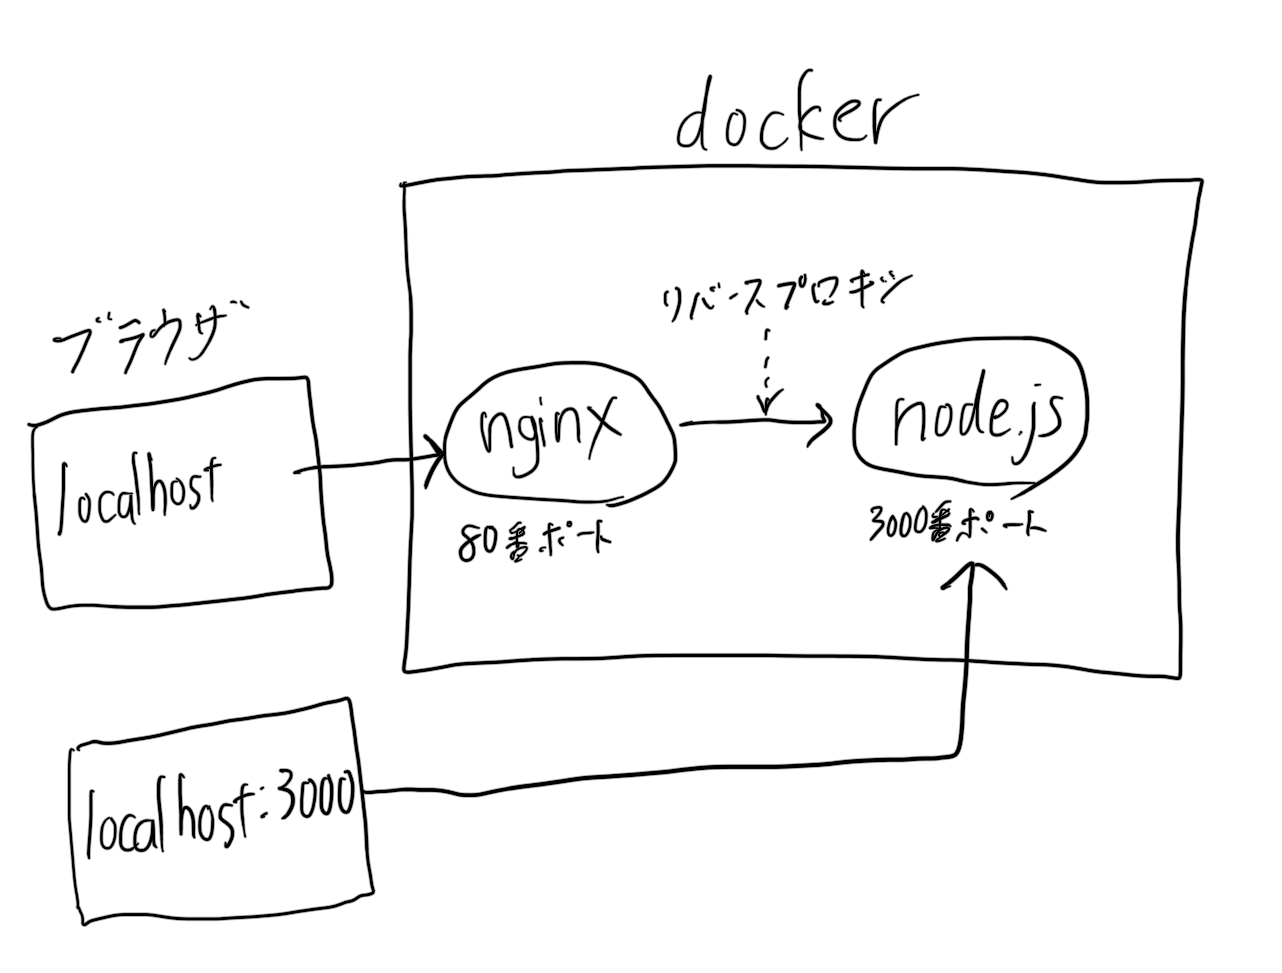
接続の流れ
イメージ図

ブラウザにてhttp://localhostにアクセスする。
80番ポートのアクセスはdocker-composeにてdockerのnginxの80番ポートに接続される。
ドメインがlocalhost、ポートが80番でアクセスした場合、nginxの設定によりドメインapp、ポート3000に転送される。
appはdocker-composeによりnodejsに指定されているので、nodejsの3000番ポートの内容が表示される。
もしホストのブラウザでhttp://localhost:3000を叩いた場合は、docker-composeのポート設定によりnginxを介さずにnodejsに接続されます。