はじめに
これは筆者の勉強まとめページですので、指摘しまくってい頂けると幸いです
ロジスティック回帰を多クラス分類に持ち込む
ロジスティック回帰は上記のページでTensorFlowを用いて実装しました
これを多クラス分類に使用してみます
損失関数自体は変化しませんが、正解データの構造が少しだけ変化します
1クラス分類では、setosaとversicolorに対して1というデータ、virginicaには0というデータを与え、Sigmoid関数の出力の値がこの値に近づくようにパラメータを学習しました
今回は、[setosa] = [1, 0, 0], [versicolor] = [0, 1, 0], [virginica] = [0, 0, 1] とワンホットベクトルと呼ばれるものに正解データを変換します
以下がコードになります
import matplotlib.pyplot as plt
import tensorflow as tf
import numpy as np
from sklearn import datasets

# シード値を固定して実行の度に同じ乱数が発生するようにしている
tf.set_random_seed(1000)
np.random.seed(1000)
sess = tf.Session()

# setosa, versicolor, virginicaの分類を行う

iris = datasets.load_iris()
x_vals = iris.data
target = iris.target

# ワンホットベクトルの作成
y1 = [[1, 0, 0] for i in target if i == 0]
y2 = [[0, 1, 0] for i in target if i == 1]
y3 = [[0, 0, 1] for i in target if i == 2]

y_vals = np.array(y1+y2+y3)

learning_rate = 0.05
batch_size = 25

x_data = tf.placeholder(shape = [None, 4], dtype = tf.float32)
y_target = tf.placeholder(shape = [None, 3], dtype = tf.float32)

A = tf.Variable(tf.random_normal(shape = [4, 3]))
b = tf.Variable(tf.random_normal(shape = [3]))

model_output = tf.add(tf.matmul(x_data, A), b)

loss = tf.reduce_mean(tf.nn.sigmoid_cross_entropy_with_logits(logits = model_output, labels = y_target))
# loss = tf.reduce_mean(tf.nn.softmax_cross_entropy_with_logits(logits = model_output, labels = y_target))

init = tf.global_variables_initializer()
sess.run(init)

optimizer = tf.train.GradientDescentOptimizer(learning_rate)
train = optimizer.minimize(loss)

prediction = tf.round(tf.sigmoid(model_output))
prediction_correct = tf.cast(tf.equal(prediction, y_target), tf.float32)
accuracy = tf.reduce_mean(prediction_correct)

loss_vec = []
accuracy_vec = []

for i in range(1500):

    rand_index = np.random.choice(len(x_vals), size = batch_size)
    rand_x = x_vals[rand_index]
    rand_y = y_vals[rand_index]

    sess.run(train, feed_dict = {x_data: rand_x, y_target: rand_y})

    tmp_accuracy, temp_loss = sess.run([accuracy, loss], feed_dict = {x_data: rand_x, y_target: rand_y})

    loss_vec.append(temp_loss)
    accuracy_vec.append(tmp_accuracy)

    if (i + 1) % 25 == 0:

        print("Step #" + str(i + 1) + " A = " + str(sess.run(A)) + " b = " + str(sess.run(b)))
        print("Loss = " + str(temp_loss))
        print("Acc = " + str(tmp_accuracy))

plt.plot(loss_vec, "k-")
plt.title("Loss per Generation")
plt.xlabel("Generation")
plt.ylabel("Loss")
plt.show()

plt.plot(accuracy_vec, "k-")
plt.title("Accuracy per Generation")
plt.xlabel("Generation")
plt.ylabel("Accuracy")
plt.show()
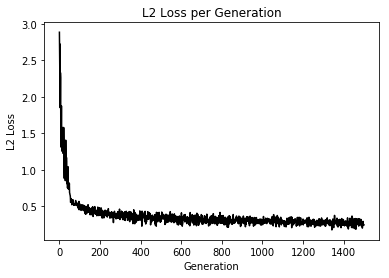
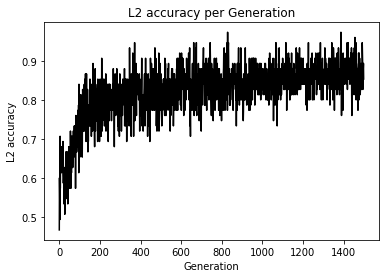
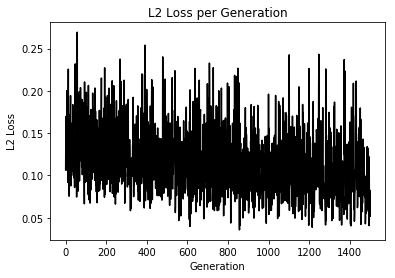
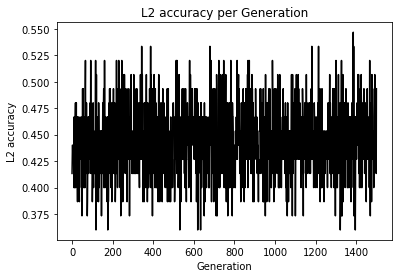
Loss値とAccuracyの変化
うん、学習はしているけど今回もテスト検証めんどくちゃかったのでしてません、ごめんなちゃい
てか、これってSoftmaxCrossEntropyとどっちが評価として良いのかなあと思い損失関数を変化させ実験
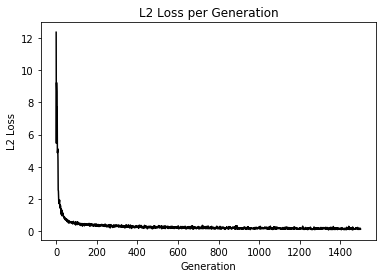
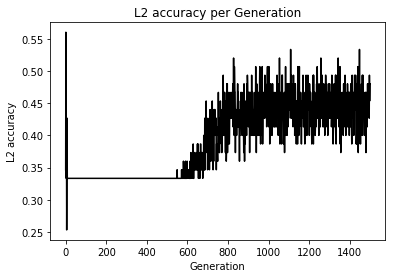
Loss値とAccuracyの変化
え、めっちゃ差が出てるんだけど...
追加学習して変化をもう一度みてみよう
やはり変化なしでした
初期値やデータにも依存するのかな?
こんなに顕著に変化に現れると思いませんでしたってのが今回の感想です
