はじめに
2025 年は AI エージェントが外部ツールを使って様々なタスクを実行する仕組みが注目されました。ツールの呼び出しは安全面も考慮する必要がありますが、ツールを繋ぐことで LLM がより多様な出力を生成できるようになります。
この記事では、以下の技術を組み合わせてHuman-in-the-Loop 対応の AI エージェントを作る方法を紹介します。
- MCP (Model Context Protocol):AI にツールを提供する標準プロトコル
- LangGraph:エージェントのワークフローを構築するフレームワーク
- Human-in-the-Loop:ツール実行前にユーザーの承認を求める仕組み
以下は、作成したアプリのスクショです。

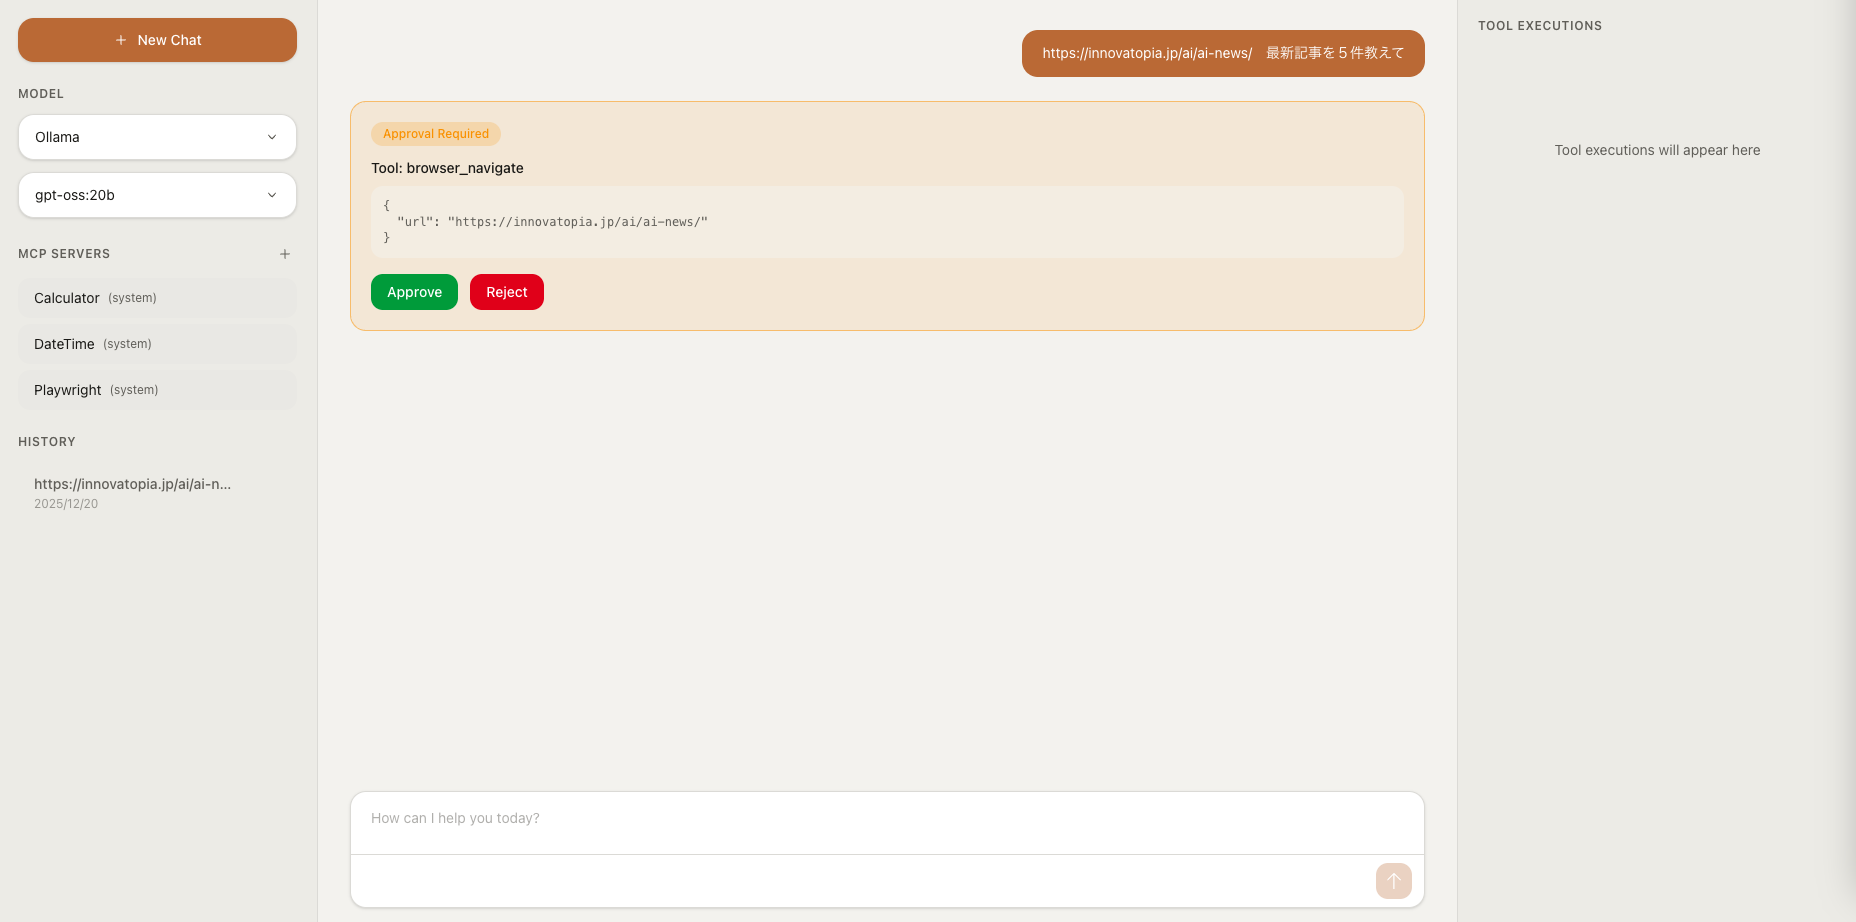

左側で MCP サーバを登録し、中央チャットで AI と対話(右側でツール実行履歴を確認)
ソースコードはこちら:
MCP とは
MCP (Model Context Protocol) は、Anthropic 社が提唱する AI エージェントにツールを提供するためのオープンな標準プロトコルです。
MCP の特徴:
- 標準化されたインターフェース:どの LLM からも同じ方法でツールを呼び出せる
- サーバ/クライアントモデル:ツールを提供する MCP サーバと、それを利用するクライアントが分離
-
複数のトランスポート:
stdio(ローカルプロセス)とstreamable_http(HTTP 経由)をサポートし、ローカル・リモート両方のサーバに接続可能
LangGraph とは
LangGraph は、LangChain チームが開発したエージェントワークフロー構築フレームワークです。
LangGraph の特徴:
- 状態管理: 会話の状態を永続化・復元できる
- グラフベースのワークフロー: ノードとエッジでエージェントの処理フローを定義
-
Human-in-the-Loop:
interrupt_beforeで特定のノード実行前に中断できる
アーキテクチャ概要
MCP サーバには、あらかじめ用意した四則演算サーバ(Calculator)や日時サーバ(DateTime)を登録しています。
環境構築
クイックスタート
# リポジトリを取得
git clone git@github.com:massu2357/mcp-agent.git
cd mcp-agent

# 環境変数を設定
cp .env.example .env

# Docker環境で起動
docker compose up --build -d
ブラウザで http://localhost:3000 にアクセス
ローカル開発環境
# バックエンド
cd backend
uv sync
uv run uvicorn src.main:app --reload --port 8000

# フロントエンド
cd frontend
pnpm install
pnpm dev
ブラウザで http://localhost:3000 にアクセス
実装の中身
MCP サーバの実装
まず、AI エージェントに機能を提供する MCP サーバを作ります。
fastmcpライブラリを使うと、とても簡単に実装できます。
日時サーバの例
# backend/src/mcp_servers/datetime_tools.py
"""MCP server for date and time operations."""

from datetime import datetime
from typing import TypedDict
from zoneinfo import ZoneInfo

from fastmcp import FastMCP

mcp = FastMCP("DateTime")


class CurrentTimeResponse(TypedDict):
    """Response type for current time."""
    datetime: str
    date: str
    time: str
    timezone: str
    unix_timestamp: int


@mcp.tool()
def get_current_time(tz: str = "Asia/Tokyo") -> CurrentTimeResponse:
    """Get the current date and time.

    Args:
        tz: Timezone name (e.g., Asia/Tokyo, UTC, America/New_York)

    Returns:
        Current date and time information
    """
    try:
        zone = ZoneInfo(tz)
    except Exception:
        zone = ZoneInfo("UTC")
        tz = "UTC"

    now = datetime.now(zone)
    return {
        "datetime": now.isoformat(),
        "date": now.strftime("%Y-%m-%d"),
        "time": now.strftime("%H:%M:%S"),
        "timezone": tz,
        "unix_timestamp": int(now.timestamp()),
    }


if __name__ == "__main__":
    mcp.run()
実装のポイント:
-
@mcp.tool()デコレータでツールを定義 - docstring は英語で記述:LLM がツールの説明を理解するため
- 型アノテーションは必須:入出力の型が LLM に伝わる
-
TypedDictで戻り値の構造を明示:LLM が出力形式を理解できる
サーバ設定ファイル
MCP サーバは mcp_servers.json に登録します:
{
  "servers": [
    {
      "id": "calculator",
      "name": "Calculator",
      "description": "Basic calculator operations",
      "transport": "stdio",
      "command": "uv",
      "args": ["run", "fastmcp", "run", "src/mcp_servers/calculator.py"]
    },
    {
      "id": "datetime",
      "name": "DateTime",
      "description": "Date, time, and timezone utilities",
      "transport": "stdio",
      "command": "uv",
      "args": ["run", "fastmcp", "run", "src/mcp_servers/datetime_tools.py"]
    }
  ]
}
トランスポートの種類:
-
stdio: ローカルプロセスとして起動(標準入出力で通信) -
streamable_http: 外部 HTTP サーバに接続
外部 MCP サーバの接続
streamable_http を使えば、外部で稼働している MCP サーバにも接続できます。
{
  "id": "playwright-mcp",
  "name": "PlaywrightMCP",
  "description": "Browser automation with Playwright",
  "transport": "streamable_http",
  "url": "http://another-host:8931/mcp"
}
これにより、プロジェクト内に用意したローカルサーバだけでなく、別プロセスや別マシンで動作する MCP サーバも統合できます。例えば、Playwright MCP サーバを接続すれば、AI エージェントがブラウザ操作を行えるようになります。
LangGraph エージェントとの統合
MCP ツールを LangGraph エージェントで使えるようにします。
langchain-mcp-adapters
langchain-mcp-adaptersライブラリを使うと、MCP サーバからツールを読み込んで LangChain/LangGraph で使えます。
from langchain_mcp_adapters.client import MultiServerMCPClient

# 複数のMCPサーバに接続
client = MultiServerMCPClient({
    "calculator": {
        "transport": "stdio",
        "command": "uv",
        "args": ["run", "fastmcp", "run", "src/mcp_servers/calculator.py"],
    },
    "datetime": {
        "transport": "stdio",
        "command": "uv",
        "args": ["run", "fastmcp", "run", "src/mcp_servers/datetime_tools.py"],
    },
})

# MCPサーバからツールを取得
tools = await client.get_tools()
LangGraph エージェントの構築
backend/src/agent.py で LangGraph エージェントを定義しています。
以下は backend/src/agent.py の抜粋です。
# backend/src/agent.py(抜粋)

class AgentState(TypedDict):
    """Agent state definition."""
    messages: Annotated[list, add_messages]


async def get_agent(
    checkpointer: MemorySaver,
    system_mcp_server_ids: list[str],
    user_mcp_servers: list[UserServerConfig] | None = None,
    provider: str | None = None,
    model: str | None = None,
) -> CompiledStateGraph:
    """Create a LangGraph agent with MCP tools."""

    # MCP サーバ接続情報を取得
    connections = get_server_connections(system_mcp_server_ids, user_mcp_servers)

    # LLM を初期化(OpenAI / Ollama など切り替え可能)
    llm = get_llm(provider=provider, model=model)

    # MCP ツールを読み込み
    tools: list[BaseTool] = []
    if connections:
        client = MultiServerMCPClient(connections)
        tools = await client.get_tools()

    # LLM にツールをバインド
    llm_with_tools = llm.bind_tools(tools) if tools else llm

    # エージェントノードを定義
    async def agent_node(state: AgentState) -> dict[str, Any]:
        response = await llm_with_tools.ainvoke(state["messages"])
        return {"messages": [response]}

    # ルーティング関数(ツール呼び出しがあれば "tools" へ)
    def should_continue(state: AgentState) -> str:
        last_message = state["messages"][-1]
        if hasattr(last_message, "tool_calls") and last_message.tool_calls:
            return "tools"
        return END

    # グラフを構築
    builder = StateGraph(AgentState)
    builder.add_node("agent", agent_node)
    builder.add_node("tools", ToolNode(tools))
    builder.add_edge(START, "agent")
    builder.add_conditional_edges("agent", should_continue, {"tools": "tools", END: END})
    builder.add_edge("tools", "agent")

    # コンパイル(Human-in-the-Loop のための interrupt_before)
    graph = builder.compile(
        checkpointer=checkpointer,
        interrupt_before=["tools"] if tools else [],
    )

    return graph
実装のポイント:
-
MultiServerMCPClient: 複数の MCP サーバに同時接続し、全ツールを取得 -
bind_tools: LLM にツールをバインドし、関数呼び出しを可能にする -
StateGraph: ノード(処理)とエッジ(遷移)でワークフローを定義 -
interrupt_before=["tools"]:toolsノード実行前にグラフを中断
Human-in-the-Loop の実装
なぜ必要か?
AI エージェントがツールを自由に実行すると、以下のリスクがあります。
- ファイル削除など破壊的な操作
- 意図しない外部 API 呼び出し
- 機密情報の送信
Human-in-the-Loop を導入することで、ツール実行前にユーザーが内容を確認・承認 できるようになります。
実装の仕組み
バックエンド API の実装
バックエンドの入り口として、FastAPI を使って backend/src/api/chat.py に各エンドポイントを実装しています。以下は抜粋です。
# backend/src/api/chat.py(抜粋)

@router.post("/")
async def create_chat(request: ChatRequest) -> EventSourceResponse:
    """Create a new chat or continue existing thread."""
    thread_id = request.thread_id or str(uuid.uuid4())

    return EventSourceResponse(
        stream_response(
            thread_id,
            request.user_id,
            request.message,
            request.system_mcp_servers,
            request.user_mcp_servers,
            provider=request.provider,
            model=request.model,
        ),
        media_type="text/event-stream",
    )


@router.post("/approve", response_model=None)
async def approve_tool(request: ToolApprovalRequest) -> EventSourceResponse | dict[str, str]:
    """Approve or reject tool execution."""
    if not request.approved:
        return {"status": "cancelled", "message": "Tool execution was rejected by user"}

    return EventSourceResponse(
        resume_agent_stream(
            request.thread_id,
            request.user_id,
            request.system_mcp_servers,
            request.user_mcp_servers,
            request.provider,
            request.model,
        ),
        media_type="text/event-stream",
    )


async def stream_response(
    thread_id: str,
    user_id: str,
    message: str,
    system_mcp_servers: list[str],
    user_mcp_servers: list[UserMCPServerInput],
    provider: str | None = None,
    model: str | None = None,
) -> AsyncIterator[dict[str, str]]:
    """Stream agent response via SSE."""
    # スレッド情報を保存
    create_or_update_thread(thread_id, user_id, title=message[:50])

    # thread_id を最初に送信
    yield create_sse_event("thread", {"type": "thread", "thread_id": thread_id})

    # エージェントを初期化
    checkpointer = get_checkpointer()
    agent = await get_agent(
        checkpointer,
        system_mcp_server_ids=system_mcp_servers,
        user_mcp_servers=user_server_configs,
        provider=provider,
        model=model,
    )
    config: RunnableConfig = {"configurable": {"thread_id": thread_id}}

    # エージェント実行(ストリーミング)
    input_data = {"messages": [{"role": "user", "content": message}]}
    async for event in process_agent_events(agent, config, input_data):
        yield event

    # 中断状態をチェック
    async for event in check_and_yield_interrupt(agent, config):
        yield event

    yield create_sse_event("done", {"type": "done"})
実装のポイント:
-
EventSourceResponse: FastAPI で SSE ストリーミングを実現(sse-starletteライブラリ) -
stream_response: ユーザーメッセージを受け取り、エージェントを初期化して実行 -
process_agent_events: 内部でastream_eventsを使い、LLM 応答やツール実行をリアルタイムに yield -
check_and_yield_interrupt:agent_stateで中断状態を確認し、interruptイベントを送信 -
resume_agent_stream: 承認後にinput_data=Noneで呼び出し、中断時点から再開
フロントエンドとの連携
SSE でリアルタイム表示
フロントエンドは Server-Sent Events (SSE) でバックエンドからイベントを受信します。以下は frontend/src/lib/sse.ts の抜粋です。
// frontend/src/lib/sse.ts

import { StreamEvent } from "@/types";

/**
 * Parse SSE stream from a Response and yield StreamEvent objects.
 */
export async function* parseSSEStream(response: Response): AsyncGenerator<StreamEvent> {
  const reader = response.body?.getReader();
  if (!reader) {
    throw new Error("No response body");
  }

  const decoder = new TextDecoder();
  let buffer = "";

  try {
    while (true) {
      const { done, value } = await reader.read();
      if (done) break;

      buffer += decoder.decode(value, { stream: true });
      const lines = buffer.split("\n");
      buffer = lines.pop() || "";

      for (const line of lines) {
        if (line.startsWith("data: ")) {
          try {
            const event: StreamEvent = JSON.parse(line.slice(6));
            yield event;
          } catch {
            // Skip invalid JSON
          }
        }
      }
    }
  } finally {
    reader.releaseLock();
  }
}
実装のポイント:
-
AsyncGenerator (
async function*):SSE イベントを 1 つずつyieldすることで、呼び出し側でfor await...ofを使ってストリーミング処理できる -
ReadableStream によるデータ取得:
response.body.getReader()で取得し、チャンクごとにデータを読み取る -
バッファリング:SSE データは複数チャンクに分割されて届く可能性があるため、
bufferに蓄積して改行で分割 -
data:プレフィックス:SSE の標準フォーマットに従い、data:で始まる行から JSON をパース
ツール承認 UI
interrupt イベントを受信したら、承認 UI を表示します。承認 UI は frontend/src/components/ToolApprovalCard.tsx で実装しています。
// frontend/src/components/ToolApprovalCard.tsx

import { ToolExecution } from "@/types";

interface ToolApprovalCardProps {
  tool: ToolExecution;
  onApprove: (approved: boolean) => void;
}

export function ToolApprovalCard({ tool, onApprove }: ToolApprovalCardProps) {
  return (
    <div className="rounded-xl border border-amber-500/50 bg-amber-500/10 p-5">
      <div className="mb-3 flex items-center gap-2">
        <span className="inline-flex items-center rounded-full bg-amber-500/20 px-3 py-1 text-xs font-medium text-amber-500">
          Approval Required
        </span>
      </div>
      <div className="mb-4">
        <div className="mb-2 text-sm font-medium text-foreground">Tool: {tool.name}</div>
        <pre className="overflow-x-auto rounded-lg bg-background/50 p-3 text-xs text-muted-foreground">
          {JSON.stringify(tool.input, null, 2)}
        </pre>
      </div>
      <div className="flex gap-3">
        <button
          onClick={() => onApprove(true)}
          className="rounded-lg bg-green-600 px-4 py-2 text-sm font-medium text-white transition-colors hover:bg-green-700"
        >
          Approve
        </button>
        <button
          onClick={() => onApprove(false)}
          className="rounded-lg bg-red-600 px-4 py-2 text-sm font-medium text-white transition-colors hover:bg-red-700"
        >
          Reject
        </button>
      </div>
    </div>
  );
}
まとめ
この記事では、MCP + LangGraph を組み合わせて Human-in-the-Loop 対応の AI エージェントを作る方法を紹介しました。
今後は、以下のような機能拡張が考えられます。
- 複数ツールの同時承認
- 条件付き自動承認(信頼度の高いツールは自動実行)
- ツール実行履歴の永続化(外部 DB を使うなど)