今回やること
以下の機能を追加します。
- 鑑賞記録の記録を更新する。
更新する記録は、一覧表示をクリック(選択)した行とする。
ダイアログボックスの変更
Index.html
- 「ID」を追加します。テキストボックスを入力不可とする為に、
<input>タグにreadonlyを付加します。 - 「ID」「鑑賞日」「初見」「鑑賞種別」について、ラベルとテキストを1行で表示する為に、各タグを
<div class="input-group">で括ります。
◆参考サイト 「Qiita」Bootstrapでフォームを利用する方法
<div class="modal fade" id="exampleModal" tabindex="-1" role="dialog" aria-labelledby="exampleModalLabel" aria-hidden="true">
<div class="modal-dialog" role="document">
<div class="modal-content">
<div class="modal-header">
<h5 class="modal-title" id="exampleModalLabel">New message</h5>
<button type="button" class="close" data-dismiss="modal" aria-label="Close">
<span aria-hidden="true">×</span>
</button>
</div>
<div class="modal-body">
<form>
<div class="form-group" id="data-id-group">
<div class="input-group">
<label for="data-id" class="col-form-label">ID:</label>
<input type="text" class="form-control" id="data-id" readonly>
</div>
</div>
<div class="form-group">
<div class="input-group">
<label for="viewing-date" class="col-form-label">鑑賞日:</label>
<input type="text" class="form-control" id="viewing-date">
</div>
</div>
<div class="form-group">
<label for="movie-name" class="col-form-label">タイトル:</label>
<input type="text" class="form-control" id="movie-name">
</div>
<div class="form-group">
<label for="theater-name" class="col-form-label">映画館:</label>
<input type="text" class="form-control" id="theater-name">
</div>
<div class="form-group">
<div class="input-group">
<label for="first-look" class="col-form-label">初見:</label>
<input type="text" class="form-control" id="first-look">
</div>
</div>
<div class="form-group">
<div class="input-group">
<label for="viewing-type" class="col-form-label">鑑賞種別:</label>
<input type="text" class="form-control" id="viewing-type">
</div>
</div>
</form>
</div>
<div class="modal-footer">
<button type="button" class="btn btn-secondary" data-dismiss="modal">閉じる</button>
<button type="button" class="btn btn-primary" id="add-btn" data-dismiss="modal"> 追 加 </button>
</div>
</div>
</div>
</div>
記録更新の処理
Index.html
Javascript(プログラム)の処理を、更新処理用に変更します。
- ダイアログボックスにデータを連携する為に、
var button = $(event.relatedTarget)とbutton.data('XXXXX')を使用します。
本体側のHTMLのタグでdata-toggle="modal" data-target="#exampleModal" data-XXXXX="※※※"を記述する事により、XXXXXの値(※※※)を受け渡す事ができます。(javascript.html の一覧に行を追加する記述を参照。) - 追加処理と更新処理を区別する為に、追加処理の場合は「ID」に
0をセットする。 - 「ID」は、更新処理時に表示して追加処理時は非表示とする為に、クラスに
d-noneを指定します。
Javascriptでは、.addClass()(クラスの追加)と.removeClass()(クラスの削除)を使用します。
◆参考サイト 「WEBST8」Bootstrap4 displayクラスの使い方を徹底解説
◆参考サイト 「Build INSIDER」要素にスタイルクラスを適用/除外するには?(addClass/removeClass/toggleClass/hasClass)
  <script>
  $('#exampleModal').on('show.bs.modal', function (event) {
    var button = $(event.relatedTarget); // Button that triggered the modal
    var processingType = button.data('processing-type'); // 処理
    var dataId = '';      // ID
    var viewingDate = ''; // 鑑賞日
    var movieName = '';   // タイトル
    var firstLook = '';   // 初見
    var viewingType = ''; // 鑑賞種別
    var theaterName = ''; // 映画館
    var modal = $(this);
    if(processingType == '記録更新') {
      modal.find('#data-id-group').removeClass('d-none');
      modal.find('#add-btn').text(' 更 新 ');
      dataId = button.data('data-id');
      var pastDay = moment(button.data('viewing-date'));
      viewingDate = (pastDay.month() + 1) + '/' + pastDay.date();
      movieName = button.data('movie-name');
      firstLook = button.data('first-look');
      viewingType = button.data('viewing-type');
      theaterName = button.data('theater-name');
    }
    else {
      modal.find('#data-id-group').addClass('d-none');
      modal.find('#add-btn').text(' 追 加 ');
      dataId = '0';  // 追加処理では「ID」を 0 にする。
      var today = moment(new Date());
      viewingDate = (today.month() + 1) + '/' + today.date();
    }
    modal.find('.modal-title').text('◆' + processingType);
    modal.find('#data-id').val(dataId);
    modal.find('#viewing-date').val(viewingDate);
    modal.find('#movie-name').val(movieName);
    modal.find('#first-look').val(firstLook);
    modal.find('#viewing-type').val(viewingType);
    modal.find('#theater-name').val(theaterName);
  });

  $('#add-btn').on('click', function() {
    var modal = $('#exampleModal');
    var dataId = modal.find('#data-id').val();
    var viewingDate = modal.find('#viewing-date').val();
    var movieName = modal.find('#movie-name').val();
    var theaterName = modal.find('#theater-name').val();
    var firstLook = modal.find('#first-look').val();
    var viewingType = modal.find('#viewing-type').val();
    var cond = {};
    cond.id = dataId;
    cond.viewingDate = viewingDate;
    cond.movieName = movieName;
    cond.theaterName = theaterName;
    cond.firstLook = firstLook;
    cond.viewingType = viewingType;
    addData(cond);
  });
  </script>
javascript.html
一覧の行を選択した場合にダイアログボックスを表示する為に、<tr>タグにdata-toggle="modal" data-target="#exampleModal" data-XXXXX="※※※"を追加します。
data-XXXXX="※※※"で、ダイアログボックスに値を渡す事ができます。(Index.html のJavascriptについても参照。)
  function drawTable(data) {
    var records = JSON.parse(data)
    //console.log(records);
    var tag = '';
    //for(var i = 0; i < records.rows.length; i++) {
    for(var i = 0; i < records.length; i++) {
      tag += '<tr data-toggle="modal" data-target="#exampleModal" data-processing-type="記録更新" data-data-id="' + records[i][0] + '" ';
      tag += 'data-viewing-date="' + records[i][1] + '" data-movie-name="' + records[i][2] + '" data-first-look="' + records[i][3] + '" ';
      tag += 'data-viewing-type="' + records[i][4] + '" data-theater-name="' + records[i][5] + '">';
      tag += '<td class="col01">'+ records[i][0] + '</td>';
      tag += '<td class="col02">'+ convDate(records[i][1]) + '</td>';
      tag += '<td class="col03">'+ records[i][2] + '</td>';
      tag += '<td class="col04">'+ records[i][3] + '</td>';
      tag += '<td class="col05">'+ records[i][4] + '</td>';
      tag += '<td class="col06">'+ records[i][5] + '</td>';
      tag += '</tr>';
    }
    $('#resultList tbody').html(tag);
  }
「鑑賞日」表示の修正。(前回のバグの修正)
前回はdateをそのまま使っていた為、タイムゾーンの関係で意図する日にちが表示されていませんでした。
  function convDate(date) {
    var day = moment(date);
    var res = (day.month() + 1) + '/' + day.date();
    return res;
  }
ViewingRecord.gs
サーバ側の処理のaddDate()を修正して、更新処理に対応させます。
「ID」が0ではない場合に、更新処理として処理します。
function addData(cond) {
  var sheet = SpreadsheetApp.openById(ViewingRecordID).getSheetByName('鑑賞履歴');
  var targetRow;
  if(cond.id == '0') {
    var lastRow = sheet.getLastRow();
    targetRow = lastRow + 1;
    cond.id = String(lastRow - 1);
  }
  else {
    targetRow = Number(cond.id) + 2;
  }
  sheet.getRange(targetRow, 2, 1, 6).setValues([[cond.id, cond.viewingDate, cond.movieName, cond.firstLook, cond.viewingType, cond.theaterName]]);
}
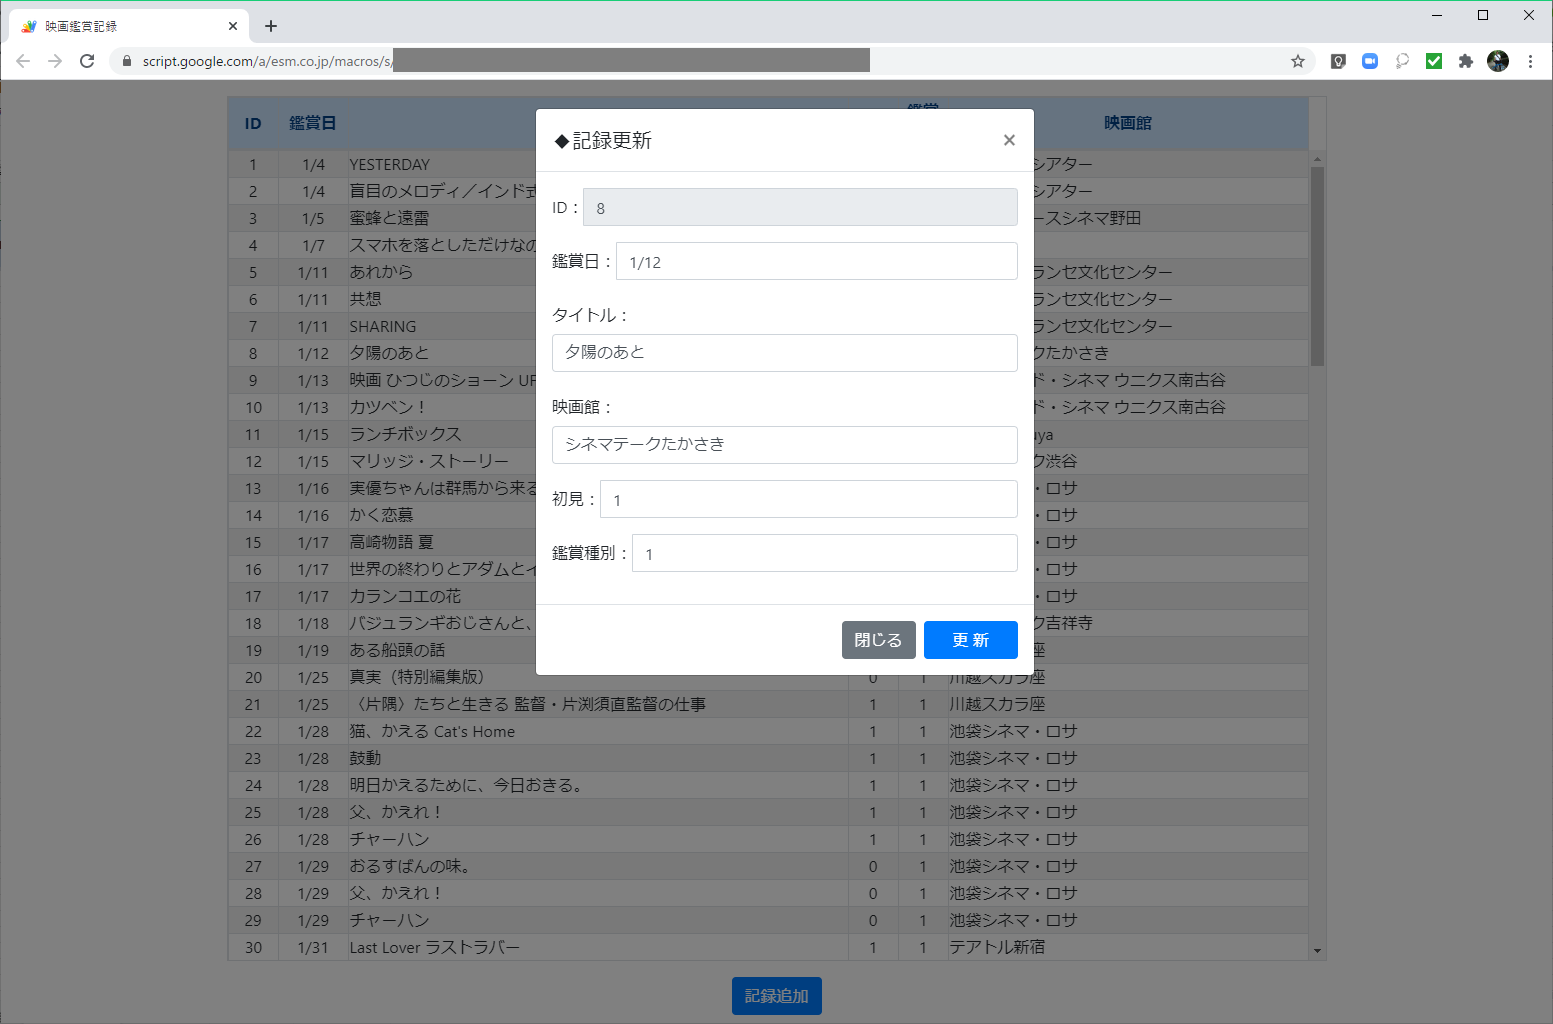
結果
一覧表示で選択した行が、ダイアログボックスに表示されました。
〔更新〕ボタンをクリックすると、該当のデータが更新されます。
◆前の記事 GASでWebアプリ「映画鑑賞記録」を作る③
◆次の記事 GASでWebアプリ「映画鑑賞記録」を作る⑤