概要
毎回GCPのコンソールからデプロイするのも面倒なので、ローカルからコマンドで関数をデプロイできるようにします。
- 前回までの記事はこちら
開発環境
- 開発環境
- MacOS
- python3.7
- pycharm
gcloudツールのインストール
ローカルからデプロイするには、gcloudコマンドが使えるようになる必要があります。Macの場合brewでインストールします。
$ brew cask install google-cloud-sdk
インストールが終わったらinitでSDKを初期化します。以下のコマンドを実行するとgoogleアカウントやプロジェクトIDが質問されるので、適宜答えていくと初期化が完了します。
$ gcloud init
デプロイの準備
ソースの準備
ローカルからデプロイする場合、対象のソースファイルはmain.pyという名前にする必要があります。今まで作成してきたソースを別ファイル名にしたり、あるいは複数の関数をデプロイするためにmain.pyに追加していくのは、少し残念な感じです。
そこでファイルを分けてソースの管理を楽にします。以下の記事が非常に参考になります。
Cloud Functions(Python)でコードファイルを分割する
記事の通り、外部ソースからデプロイ対象の関数をmain.pyにimportします。
from functions.getFilteredUser import get_filtered_user
ソースの内容はPt1やPt2の記事を参照してください。
別関数をデプロイしたい場合、以下のようにimport文を増やすだけOKです。
from functions.getFilteredUser import get_filtered_user
from functions.getUser import get_user  # 追加関数
requirements.txtの準備
コンソールからのデプロイ時と同様に、外部パッケージは指定する必要があります。ローカルでmain.pyと同じパスにrequirements.txtを作成します。
# Function dependencies, for example:
# package>=version
google-cloud-firestore==1.2.0
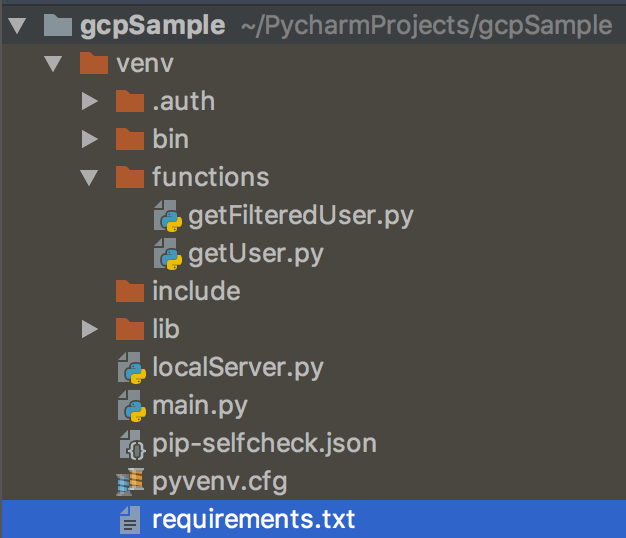
フォルダの最終形
以下のようなフォルダ構成になっていると思います。「.auth」はデプロイ時には不要です。

デプロイ
というわけでようやく本題のデプロイです。venvなどmain.pyがあるディレクトリで以下コマンドを実行します。
$ gcloud functions deploy get_filtered_user --runtime python37 --trigger-http
コマンドではmain.pyに含まれる関数をget_filtered_userという名前でデプロイします。2分くらい待つとデプロイが完了します。
Deploying function (may take a while - up to 2 minutes)...done.
availableMemoryMb: 256
entryPoint: get_filtered_user
httpsTrigger:
  url: https://<リージョン>-<プロジェクトID>.cloudfunctions.net/get_filtered_user
labels:
  deployment-tool: cli-gcloud
name: projects/<プロジェクトID>/locations/<リージョン>/functions/get_filtered_user
runtime: python37
(以下省略)
エンドポイントのURLは指定が無ければ関数名と同じになります。変更する場合や、main.py内の別関数をデプロイする場合は、--entry-pointのオプションを付けてデプロイします。
$ gcloud functions deploy get-user --runtime python37 --trigger-http --entry-point get_user
このコマンドでは、main.pyにimportしたget_user関数がデプロイされます。また、URLはget-userになります。
その他オプションの使い方は公式に書かれています。
Deploying from Your Local Machine
おわりに
Pt1〜Pt3を通じて、GCP, Firebaseを使うと、ローカルで作成した関数を簡単にAPIとしてデプロイすることができます。ハッカソンなどで簡単なアプリケーションを作りたい場合には便利だと思いますので、ぜひ試してみてください。