はじめに
顔認識で知られるArcFaceが顔認識以外にも使えるのではないかと思い,ペットボトルの分類に使用してみました.
ArcFaceは普通の分類にレイヤーを一層追加するだけで距離学習ができる優れものです!
Pytorchの実装しかなかったので今回はKerasで実装でしました.

図:マージンによりclass間の分散が大きくなっているのがわかる.cosfaceなど亜種が色々あります.
ArcFaceの詳細の際はこちらの記事を参照してください
→モダンな深層距離学習(deep metric learning) 手法: SphereFace, CosFace, ArcFace
環境
windows10 64bit
python 3.6.7
Keras 2.2.4
CUDA 9.0_0
cuDNN 7.3.1
GEFORCE GTX 1070
目的
クラス分類ではカテゴリーにないものは再学習になってしまう.
例えば商品を追加するときに一から学習するのはとてもコストがかかる.
距離学習を使い,特徴抽出器を学習することでその商品特有のベクトルを獲得すると
再学習なしに新商品を判別できると考えられる.
今回ただの分類に加えて商品かそうでないかの判別,さらに追加したペットボトルで認識することを目的とした.
ラズベリーパイからペットボトルを物体検出して画像にするのは違うメンバーが担当したのでこちらも見てください
→背景差分で物体検出をしてみた
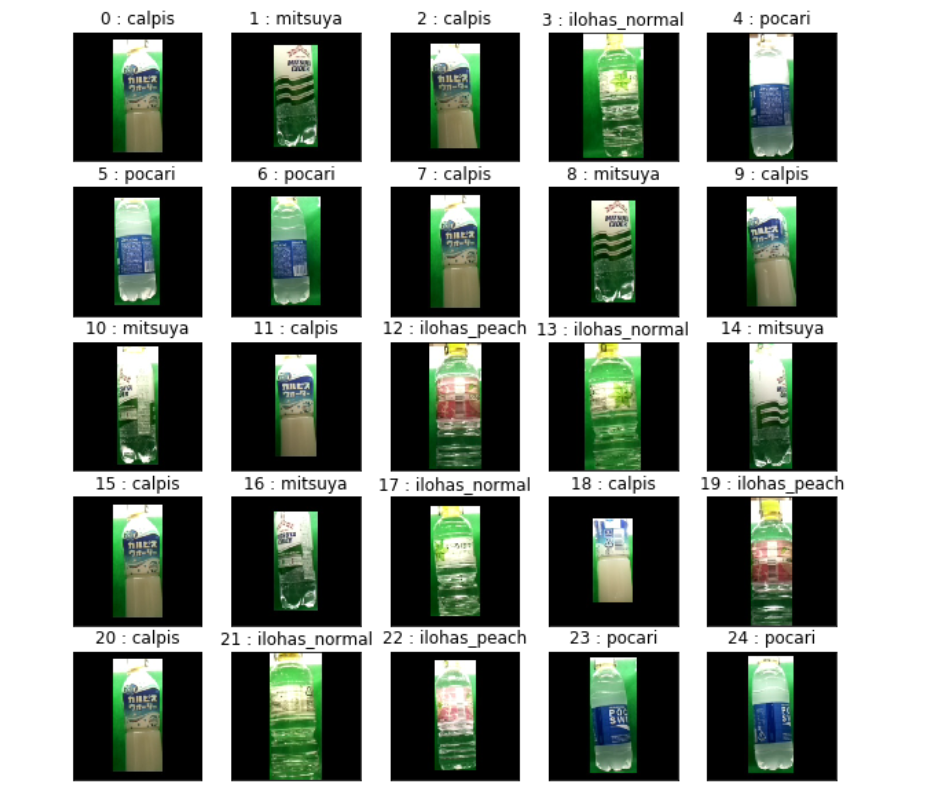
予測結果
分類は全て正確!!
商品以外のものはほとんどが閾値を下回り,はじくことができた.
既存の5classに4商品加えて9classでの分類はaccuracyが約0.87に下がった.
これは学習時のclass数を増やすと改善すると思われる.
モデル
- ラズベリーパイを使用したのであまり大きいモデルを使うことができないことからMobileNetV2を使用
- ArcFaceLayerをKerasのカスタムレイヤーで自作
- ArcFacsLayerは正解ラベルも使用するので正解ラベルも取り出すGeneratorを作成
- predict時はMobileNetV2のみなので再構築
評価
- 学習には770枚,テストには145枚のデータを使用
- 推定時はMobileNetV2の出力vectorと予め登録し保持している画像から抽出したvectorとをコサイン類似度で比較する
- コサイン類似度が0.95以上なら商品とし,下回るときは商品でないとした.
- 最も高い類似度のlabelが正解labelと合っている割合をaccuracyとして評価.
code
- kerasで実装したArcFaceLayerと構築したモデル
- 正解ラベルも取り出すGeneratorを作成
- Fine-tuningによる学習出力に近い層から学習しては解凍を繰り返しval_lossが向上したら重みを保存!
- accuracyを算出する関数
実際のデータを使用しての詳細はグループgithubのmodelを参照してください.
→model.ipynb
ArcFaceLayer
入力は[x,y]
正解クラス:cos(θ+m) 他のクラス:cosθにする
cosθ= X.W / (||X||2 * ||W||2)
from keras import backend as K
from keras.engine.topology import Layer
import numpy as np
import tensorflow as tf
class Arcfacelayer(Layer):
    # s:softmaxの温度パラメータ, m:margin
    def __init__(self, output_dim, s=30, m=0.50, easy_margin=False):
        self.output_dim = output_dim
        self.s = s
        self.m = m
        self.easy_margin = easy_margin
        super(Arcfacelayer, self).__init__()

    # 重みの作成
    def build(self, input_shape):
        # Create a trainable weight variable for this layer.
        self.kernel = self.add_weight(name='kernel',
                                      shape=(input_shape[0][1], self.output_dim),
                                      initializer='uniform',
                                      trainable=True)
        super(Arcfacelayer, self).build(input_shape)


    # mainの処理
    def call(self, x):
        y = x[1]
        x_normalize = tf.math.l2_normalize(x[0]) # x = x'/ ||x'||2
        k_normalize = tf.math.l2_normalize(self.kernel) # Wj = Wj' / ||Wj'||2

        cos_m = K.cos(self.m)
        sin_m = K.sin(self.m)
        th = K.cos(np.pi - self.m)
        mm = K.sin(np.pi - self.m) * self.m

        cosine = K.dot(x_normalize, k_normalize) # W.Txの内積
        sine = K.sqrt(1.0 - K.square(cosine))

        phi = cosine * cos_m - sine * sin_m #cos(θ+m)の加法定理

        if self.easy_margin:
            phi = tf.where(cosine > 0, phi, cosine)

        else:
            phi = tf.where(cosine > th, phi, cosine - mm)

        # 正解クラス:cos(θ+m) 他のクラス:cosθ
        output = (y * phi) + ((1.0 - y) * cosine)
        output *= self.s

        return output

    def compute_output_shape(self, input_shape):

        return (input_shape[0][0], self.output_dim) #入力[x,y]のためx[0]はinput_shape[0][0]
学習model構築
# 学習に使用するmodelを作成する関数
def create_mobilenet_with_arcface(n_categories, file_path=None):
    base_model=MobileNetV2(input_shape=(224,224,3),
                       weights='imagenet',
                       include_top=False)


    #add new layers
    x = base_model.output
    yinput = Input(shape=(n_categories,)) #ArcFaceで使用
    # stock hidden model
    hidden = GlobalAveragePooling2D()(x)
    x = Arcfacelayer(5, 30, 0.05)([hidden,yinput]) #outputをクラス数と同じ数に
    prediction = Activation('softmax')(x)
    model = Model(inputs=[base_model.input,yinput],outputs=prediction)

    # 重みをloadするとき
    if file_path:
        model.load_weights(file_path)
        print('weightは{}'.format(file_path))

    return model
predictのmodel構築
# predict用のmodel. ArcFaceLayerを除き,重みはloadして使用する
def create_predict_model(n_categories, file_path):
    arcface_model = create_mobilenet_with_arcface(n_categories, file_path) #学習と同じlayer数
    predict_model = Model(arcface_model.get_layer(index=0).input, arcface_model.get_layer(index=-4).output) # MobileNetV2の出力までにして再構築
    predict_model.summary()

    return predict_model
yも入力として使うのでXとyを取り出せるようにしたGenerator
class train_Generator_xandy(object): # rule1
    def __init__(self):
        datagen = ImageDataGenerator(
                             vertical_flip = False,
                             width_shift_range = 0.1,
                             height_shift_range = 0.1,
                             rescale=1.0/255.,
                             zoom_range=0.2,
                             fill_mode = "constant",
                             cval=0)
        train_generator=datagen.flow_from_directory(
          train_dir,
          target_size=(224,224),
          batch_size=25,
          class_mode='categorical',
          shuffle=True)

        self.gene = train_generator

    def __iter__(self):
    # __next__()はselfが実装してるのでそのままselfを返す

        return self

    def __next__(self):
        # XとYを取り出す
        X, Y = self.gene.next()

        return [X,Y], Y


class val_Generator_xandy(object):
    def __init__(self):
        validation_datagen=ImageDataGenerator(rescale=1.0/255.)

        validation_generator=validation_datagen.flow_from_directory(
            validation_dir,
            target_size=(224,224),
            batch_size=25,
            class_mode='categorical',
            shuffle=True)

        self.gene = validation_generator

    def __iter__(self):
    # __next__()はselfが実装してるのでそのままselfを返す

        return self

    def __next__(self):
        X, Y = self.gene.next()

        return [X,Y], Y
重みが壊れないように徐々に解凍してval_lossが下がる度重みを保存,val_lossが下がらないときは学習率も変更
# layerを徐々に解凍する
from keras import callbacks

touketulayerlists = [
   model.layers.index(model.get_layer("arcfacelayer_1")),
   model.layers.index(model.get_layer("block_16_expand")),
   model.layers.index(model.get_layer("block_15_expand")),
   model.layers.index(model.get_layer("block_14_expand")),
   model.layers.index(model.get_layer("block_13_expand")),
   model.layers.index(model.get_layer("block_12_expand")),
   model.layers.index(model.get_layer("block_11_expand")),
   model.layers.index(model.get_layer("block_10_expand")),
   model.layers.index(model.get_layer("block_9_expand")),
   model.layers.index(model.get_layer("block_8_expand")),
   model.layers.index(model.get_layer("block_7_expand")),
   model.layers.index(model.get_layer("block_6_expand"))
]

maenosavepath = None
for touketu in touketulayerlists:
    print('touketu{}'.format(touketu))

    # 保存する場所のpath
    modelsavepath = "zidolege_model/m02_fine{}kara_weights".format(touketu)

    # 保存した前のmodelをループの度に呼び出す
    if maenosavepath:
        model.load_weights(maenosavepath)

    maenosavepath = modelsavepath
    #凍結
    for layer in model.layers[:touketu]:
        layer.trainable=False
    #凍結しない
    for layer in model.layers[touketu:]:
        layer.trainable=True

    model.compile(optimizer=Adam(lr=0.001),
                  loss='categorical_crossentropy',
                  metrics=['accuracy'])

    callbacks_list = [
        #バリデーションlossが改善したらモデルをsave
        callbacks.ModelCheckpoint(
        filepath=modelsavepath,
        monitor="val_loss",
        save_weights_only=True,
        save_best_only=True),

        #バリデーションlossが改善しなくなったら学習率を変更する
        callbacks.ReduceLROnPlateau(
            monitor="val_loss",
            factor=0.8,
            patience=5,
            verbose=1)]

    # 学習の実行
    model.fit_generator(train_gene, steps_per_epoch=80, epochs=30, validation_steps=20, validation_data=val_gane, callbacks=callbacks_list)
商品をhold_vectorとして保存して,予測が商品化どうか判断し精度を算出する
角度が変わってもいいようにhold_vector用の画像は4枚ずつある
def test_acc(model, test_dir, hold_dir, classes, thresh=0, sample=100):
    """
    テスト用
    model: 特徴抽出用モデル(predict)
    X: array
    test_dir: str 画像入ってるフォルダ
    hold_dir:str 登録データのフォルダ ファイル名はclass名.jpgにしてください
    classes: フォルダ名のリスト
    """
    correct = 0
    # 商品のvectorの呼び出し
    hold_vector = get_hold_vector(model, classes, hold_dir)

    # test画像の作成
    test_datagen=ImageDataGenerator(rescale=1.0/255.)
    test_generator=test_datagen.flow_from_directory(
            test_dir,
            target_size=(224,224),
            batch_size=1,
            class_mode='categorical',
            classes=classes)

    # 判定
    for i in range(sample):
        X, Y = test_generator.next()
        Y = np.argmax(Y, axis=1) # YはOneHotされているのでlabelのみ取り出す
        predict_vector = model.predict(X)
        index = judgment(predict_vector,hold_vector, thresh)
        label_index = index // 4 # hold_vector用の画像は4枚ずつあるのでlabelは4で割った商になる
        if Y == label_index:
            correct += 1

        print('label_index{}'.format(label_index))
        print('Y{}'.format(Y))
    acc = correct / sample # 正解/全体
    print("acc: {}".format(acc))
    return acc

# コサイン類似度の計算
def cosine_similarity(x1, x2):
    if x1.ndim == 1:
        x1 = x1[np.newaxis]
    if x2.ndim == 1:
        x2 = x2[np.newaxis]
    x1_norm = np.linalg.norm(x1, axis=1)
    x2_norm = np.linalg.norm(x2, axis=1)
    cosine_sim = np.dot(x1, x2.T)/(x1_norm*x2_norm+1e-10)
    return cosine_sim

# cos類似度を比較して一番値が高いindexを取り出し閾値を超えるならindexを閾値以下ならをNoneを返す
def judgment(predict_vector, hold_vector, thresh):
    """
    predict_vector : shape(1,1028)
    hold_vector : shape(5, 1028)
    """
    cos_similarity = cosine_similarity(predict_vector, hold_vector) # shape(1, 5)
    print('cos_similarity{}'.format(cos_similarity[0]))
    # 最も値が高いindexを取得
    high_index = np.argmax(cos_similarity[0]) # int

    # cos類似度が閾値を超えるか
    if cos_similarity[0, high_index] > thresh:
        return high_index

    else:
        return None

# 学習した重みで商品用のvectorを作成
def get_hold_vector(model, classes, hold_dir):
    """
    classes: クラス名のリスト イメージの名前はこのリスト名にしてください
    hold_dir: str イメージが入ったフォルダpath
    """
    img_array = np.empty((0, 224,224,3))

    for clas in classes:
        for i in range(4):
            imagepath = os.path.join(hold_dir, clas + str(i) +".jpg")
            img = load_img(imagepath, target_size=(224,224))
            array = img_to_array(img).reshape(1, 224, 224, 3)
            img_array = np.vstack((img_array, array))

    img_array = img_array/255.0
    hold_vector = model.predict(img_array)

    return hold_vector
考察
非常に少ないデータセットでも精度が高く,ArcFaceが機能した.実装自体も比較的容易であった.
ArcFaceがないときは通常の分類ならいいが、cos類似度の値に差が出づらくなってしまい,閾値で切ることが難しくなってしまった.
参考文献
MobileNetV2: Inverted Residuals and Linear Bottlenecks
MobileNetV2 : paper
ArcFace: Additive Angular Margin Loss for Deep Face Recognition
ArcFace : paper
