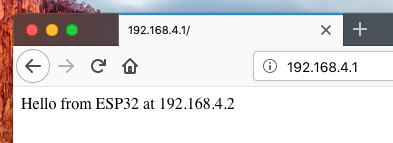
タイトルの通りですが、ESP32(ESP32-WROOM-32)をArduinoIDEで動かす為に調べていたら、Webサーバが動かせることに気がついたので、サンプルをちょっとカスタマイズして動かしてみた備忘録です。
環境
- Macbook-Air (Early2015 macOS Mojave 10.14.5)
- ESP32-WROOM-32(Amazonで購入)
- ArduinoIDE(1.8.9)
ArduinoIDEでESP32を扱えるようにする
諸先輩方の素晴らしい文書があるので割愛。
(ご参考)
ESP32にWiFiアクセスポイントを設定し、Webサーバも立てる
参考にさせて頂いたのはこちら。
プログラムはこちら。
# include <WiFi.h>
# include <ESPmDNS.h>
# include <WiFiClient.h>

const char *ssid = "ESP32ap";
const char *password = "12345678";

/* TCP server at port 80 will respond to HTTP requests */
WiFiServer server(80);

///////////////////////////
void setup() {
  Serial.begin(115200);
  Serial.println();
  Serial.print("Configuring access point...");
  /* You can remove the password parameter if you want the AP to be open. */
  //アクセスポイントを起動する
  WiFi.softAP(ssid, password);

  IPAddress myIP = WiFi.softAPIP();
  Serial.print("AP IP address: ");
  Serial.println(myIP);
  //
  //サーバーセットアップ
  //
  /* Set up mDNS */
  if (!MDNS.begin("esp32")) {
      Serial.println("Error setting up MDNS responder!");
      while(1) {
          delay(1000);
      }
  }
  Serial.println("mDNS responder started");
  /* Start Web Server server */
  server.begin();
  Serial.println("Web server started");

  /* Add HTTP service to MDNS-SD */
  MDNS.addService("http", "tcp", 80);
}

void loop() {
  /* Check if a client has connected */
    WiFiClient client = server.available();
    if (!client) {
        return;
    }
    Serial.println("");
    Serial.println("New client");
    if (client) {
      Serial.println("new client");
      /* check client is connected */
      while (client.connected()) {
          /* client send request? */
          if (client.available()) {
              /* request end with '\r' -> this is HTTP protocol format */
              String req = client.readStringUntil('\r');
              /* First line of HTTP request is "GET / HTTP/1.1"
                here "GET /" is a request to get the first page at root "/"
                "HTTP/1.1" is HTTP version 1.1
              */
              /* now we parse the request to see which page the client want */
              int addr_start = req.indexOf(' ');
              int addr_end = req.indexOf(' ', addr_start + 1);
              if (addr_start == -1 || addr_end == -1) {
                  Serial.print("Invalid request: ");
                  Serial.println(req);
                  return;
              }
              req = req.substring(addr_start + 1, addr_end);
              Serial.print("Request: ");
              Serial.println(req);
              //client.flush();

              String s = "";
              /* if request is "/" then client request the first page at root "/" -> we process this by return "Hello world"*/
              if (req == "/")
              {
//                  IPAddress ip = client.localIP();  // サーバ側のIPアドレス
                  IPAddress ip = client.remoteIP();   // クライアント側のIPアドレス
                  String ipStr = String(ip[0]) + '.' + String(ip[1]) + '.' + String(ip[2]) + '.' + String(ip[3]);
                  s = "HTTP/1.1 200 OK\r\nContent-Type: text/html\r\n\r\n<!DOCTYPE HTML>\r\n<html>Hello from ESP32 at ";
                  s += ipStr;
                  s += "</html>\r\n\r\n";
                  Serial.println("Sending 200");
              }
              else
              {
                  /* if we can not find the page that client request then we return 404 File not found */
                  s = "HTTP/1.1 404 Not Found\r\n\r\n";
                  Serial.println("Sending 404");
              }
              /* send response back to client and then close connect since HTTP do not keep connection*/
              client.print(s);
              client.flush();
              client.stop();

            }
        }
    }
    Serial.println("Done with client");
}
参考先のプログラムのままだとなぜか自分の環境では動作しなかったので、トライ&エラーで一部改良を加えています。
プログラム実行
ArduinoIDE経由でESP32に書き込みを行い、リセットボタンなどで再起動すると、シリアルモニタで確認している場合は以下のように表示されていると思います。
Configuring access point...AP IP address: 192.168.4.1
mDNS responder started
Web server started
IPアドレスを好きなように設定も可能ですが、今回のプログラムでは自前でアクセスポイント設定しているので、自動的に割り振りが行われ、ESP32側のIPアドレスは上記の通りとなります。固定IPに設定したい場合は、
IPAddress local_IP(192, 168, 31, 115);
IPAddress gateway(192, 168, 31, 1);
IPAddress subnet(255, 255, 0, 0);
IPAddress primaryDNS(8, 8, 8, 8); //optional
IPAddress secondaryDNS(8, 8, 4, 4); //optional

if (!WiFi.config(local_IP, gateway, subnet, primaryDNS, secondaryDNS)) {
    Serial.println("STA Failed to configure");
}
というような感じにすると設定が可能です。
アクセスポイントに繋ぐ
無事に起動するとWiFiの電波が飛んでいると思いますので、プログラム中で設定していた"ESP32ap"というアクセスポイントを探します。

居ました。このネットワークにMacを参加させます。
パスワードはプログラム中に記載のある"12345678"です。
IPアドレスを調べる
先ほど、ESP32側のIPアドレスはシリアルモニタにもあったように"192.168.4.1"でしたが、Mac側はどうなっているでしょうか?ifconfigで確認すると以下のようになっていました。
inet 192.168.4.2 netmask 0xffffff00 broadcast 192.168.4.255
ブラウザでESP32のWebサーバにアクセスしてみる
Webサーバにブラウザからアクセスするとシリアルコンソールには以下のように表示されます。
New client
new client
Request: /
Sending 200
Done with client
ESP32側のIPを取得したい場合は、プログラム中でコメントアウトしているように、
IPAddress ip = client.localIP(); // サーバ側のIPアドレス
アクセスしている側(クライアント側)は、
IPAddress ip = client.remoteIP(); // クライアント側のIPアドレス
となります。
詳しくはexampleがあるようですので、そちらをご確認下さい。
※リファレンスは個人ではまとめてる方もいらっしゃいましたが、公式は見つけられませんでした。
