* IBM Cloud上のSaaS版についての記載です
watsonx.dataは「単一の統合データ・プラットフォームですべての企業データを収集、保存、照会、分析するためのデータ管理ソリューションです。オープン・データ・フォーマットに最適化された、柔軟で信頼性の高いプラットフォームを提供します」とのことで、いわゆるデータレイクハウスです。SW版とSaaS版があります。
当記事はwatsonx.data SaaS版のPrestoエンジンにpythonからアクセスするための方法について説明します。
尚、公式ドキュメントではConnecting to Presto serverに記述されている内容です。
今回試した実行環境は以下です:
- Python 3.11.4
- Apple M1 Pro
2024/08/08 最新の情報で改訂
1. 事前準備
watsonx.data SaaS版のPrestoエンジンにアクセスするための事前情報取得を参考に
watsonx.data SaaS版のPrestoエンジンにアクセスするための事前情報
- ホスト名
- ポート番号
- IBM API key
- IBM IAM token (オプション)
を取得しておいてください。
尚、ドキュメントによるとIBM IAM tokenの方がワークロード的におすすめとのことです。
ただIBM API key は一度取得したら削除するまで使えますが、IBM IAM tokenは作成後1時間有効となり、有効期限があります。どちらも使用可能なので、状況に合わせて選択してください。
2. 必要な情報の変数へのセット
一旦必要な情報を変数にセットします:
- 接続するusernameはIBM apikey を使う場合は
ibmlhapikey, IBM IAM tokenを使う場合はibmlhtoken_<your-username>とします。- IBM IAM tokenを使う場合の
ibmlhtoken_<your-username>の<your-username>部分にはアクセスに使用するIBM CloudのIDを入れてください - IBM CloudのIDが
aaa@bbb.comであればibmlhtoken_aaa@bbb.com - (2024/08/08現在ibmlhtokenではアクセスできなかったので修正)
- IBM IAM tokenを使う場合の
- 接続するpasswordは
IBM API keyの値またはIBM IAM tokenの値、どちらか使う方をセットします。 - hostnameはホスト名を文字列でセットします
- portnumberはポート番号を数値でセットします。
username="<ibmlhapikey または ibmlhtoken_<your-username> >" # IBM apikey を使う場合は ibmlhapikey, IBM IAM tokenをを使う場合は ibmlhtoken_<your-username>
password="<IBM apikey または IBM IAM tokenの値>" # IBM apikey または IBM IAM token
hostname="<ホスト名>" # ホスト名
portnumber=99999 # ポート番号(数値)
参考までにIBM IAM tokenをを使う場合は、上記のコードのusernameはibmlhtoken_<your-username>、passwordにIBM apikeyの値を入れ、次に以下を実行すればのpasswordがIBM IAM tokenで上書きされます。
- 上記
<your-username>は必ず自分のものに書き換えてください:- IBM CloudのIDが
aaa@bbb.comであればibmlhtoken_aaa@bbb.com
- IBM CloudのIDが
import requests
import sys

endpoint = 'https://iam.cloud.ibm.com/identity/token'
headers = {}
headers ['content-type'] = "application/x-www-form-urlencoded"
params = {}
params['grant_type'] = "urn:ibm:params:oauth:grant-type:apikey"
params['apikey'] = password

try:
    r = requests.post(endpoint,  headers=headers, data=params)
except Exception as err:
    print("RESTful call failed. Detailed information follows.")
    print(err)
    sys.exit()

try:
    access_token = r.json()['access_token']
    #print(r.json())
except:
    print("RESTful call did not return an access token.")
    print(r.json())
    sys.exit()


password = access_token
2. presto-python-clientライブラリを使ったアクセス (dbapi使用)
参考:
- Connecting to Presto engine using Python scripts
- presto-python-client: https://github.com/prestodb/presto-python-client
こちらは公式ドキュメントに記載された方法です。
presto-python-client未導入の場合は、事前に導入しておきます。
pip install presto-python-client
以下はprestoエンジンを作成すると標準で作成されるテーブルtpch.tiny.customerに、DB接続後、SQLを実行するサンプルコードでです。
import prestodb

with prestodb.dbapi.connect(
   host=hostname,
   port=portnumber,
   user=username,
   # catalog='tpch', # オプション、指定しなくとも繋がる
   # schema='tiny',  # オプション、指定しなくとも繋がる
   http_scheme='https',
   auth=prestodb.auth.BasicAuthentication(username,password)
   ) as conn:
    # SQLの実行例
    cur = conn.cursor()
    cur.execute('select * from tpch.tiny.customer limit 10') # サンプルSQL
    rows = cur.fetchall()
    print(rows)
出力は以下のようになります:
[[902, 'Customer#000000902', 'A1hnMyYPSkXf7QgOPD2H', 4, '14-209-883-5797', 5858.48, 'AUTOMOBILE', ' sometimes regular epitaphs. furiously regular gifts against'], [903, 'Customer#000000903', 'URTiQupkhObWG39,kZ3CfU', 7, '17-706-779-2078', 509.23, 'FURNITURE', 'kly doggedly even instructions. regular, regular accounts along the even, bold packa'], [904, 'Customer#000000904', 'YdJEbNygDU6DrgWXQY6orasq', 5, '15-940-929-4572', 9562.82, 'BUILDING', 'nic dolphins alongside of the slyly final ideas run'], [905, 'Customer#000000905', 'f iyVEgCU2lZZPCebx5bGp5', 3, '13-803-156-2231', -600.73, 'BUILDING', 'slyly closely ironic dolphins. blithely ironic asymptotes haggle carefully ironic theodolites. furiously'], [906, 'Customer#000000906', '1Uavkms1A5z', 6, '16-594-569-6627', -613.45, 'HOUSEHOLD', ' accounts. furiously silent ins'], [907, 'Customer#000000907', 'UeVLwnnpccsG1pbQmN7pzD', 10, '20-501-816-7673', 5751.31, 'HOUSEHOLD', 'sits haggle quickly above the excuses. slyly ironic packages print furiously. carefully pending reques'], [908, 'Customer#000000908', 'Fa5bchMKUMsaNKOXAiu9pX ME', 12, '22-814-669-9320', 3215.96, 'AUTOMOBILE', 'quickly express packages. blithely fina'], [909, 'Customer#000000909', 'b 2X284A5AGpt8skuYwMvTyK68srMKikPst6X', 24, '34-717-350-9722', 5565.58, 'MACHINERY', 'se carefully around the special, regular requests. ironic theodolites cajole quickly theodolites. regular, ev'], [910, 'Customer#000000910', 'Qg8TJTCT1mJ9H', 9, '19-899-463-4292', 5794.69, 'BUILDING', 'uctions. silent requests after the regular theodolites haggle furiously across the ca'], [911, 'Customer#000000911', 'VS0fia,lJ RvUf68 l4Unv,Vx', 13, '23-121-746-7339', 6364.6, 'BUILDING', 'gular foxes! permanently regular packages wake. quickly regular deposits detect blithely. carefully express']]
3. pandasライブラリを使ったアクセス (sqlalchemy使用)
pandasをよく使う人にはこちらの方が馴染みやすいですよね。
参考:
sqlalchemy未導入の場合は、事前に導入しておきます。
pip install SQLAlchemy
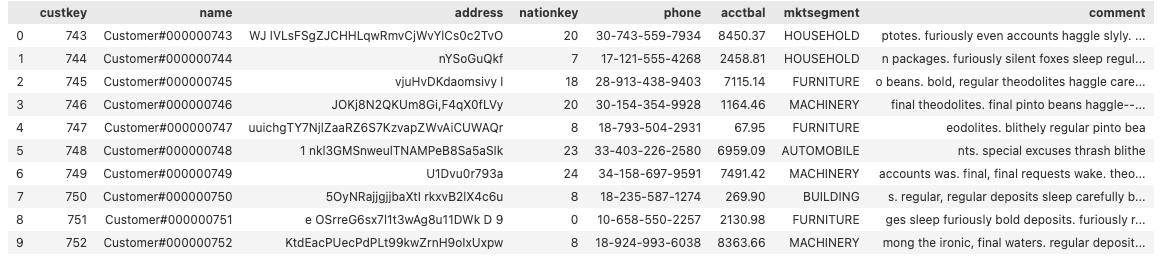
以下はprestoエンジンを作成すると標準で作成されるテーブルtpch.tiny.customerに、DB接続後、SQLを実行し、pandasのDataFrameに結果を入れるコードです。
import pandas as pd
from sqlalchemy import create_engine
from sqlalchemy import text as q_text

connect_args={'protocol': 'https'}

# create engine
engine = create_engine(
   f"presto://{username}:{password}@{hostname}:{portnumber}",
   connect_args=connect_args
   )

sqlstr = 'select * from tpch.tiny.customer limit 10'
df = pd.read_sql_query(q_text(sqlstr), engine.connect())
2024/08/06 SQLAlchemy の ver2.0以上に対応させてCode修正
2023/12/20追記:
実行時Can't load plugin: sqlalchemy.dialects:prestoというエラーが出た場合は、以下のコマンドでpyhive[presto]を追加導入してください。pip install pyhive[presto]
Jupyrer notebook でのdfの出力は以下のようになります:
以上です。