背景・目的
SharePoint Framework を使えば、サーバ構築などのインフラ整備を意識することなく、普段お使いの SharePoint Online と Windows PC のみでアプリケーション開発を始めることができます。
そもそも標準的な機能を使ったり、 Power Platform を使えば、より簡単に実現できると思いますが、基本操作の練習として TODO管理アプリを作ってみたいと思います。
完成イメージ(4/4)
Teams のタブにもいい感じにおさまります。
来週の Global Microsoft 365 Developer Bootcamp 前に SharePoint Framework を予習しよう!Teams のタブにもなるよ!
— nan_oka (@nanoka7o8) November 6, 2020
Qiita用にツイート。#OfficeDev #SharePointOnline #SharePointFramework #MicrosoftTeams pic.twitter.com/m4oSyYCAP3
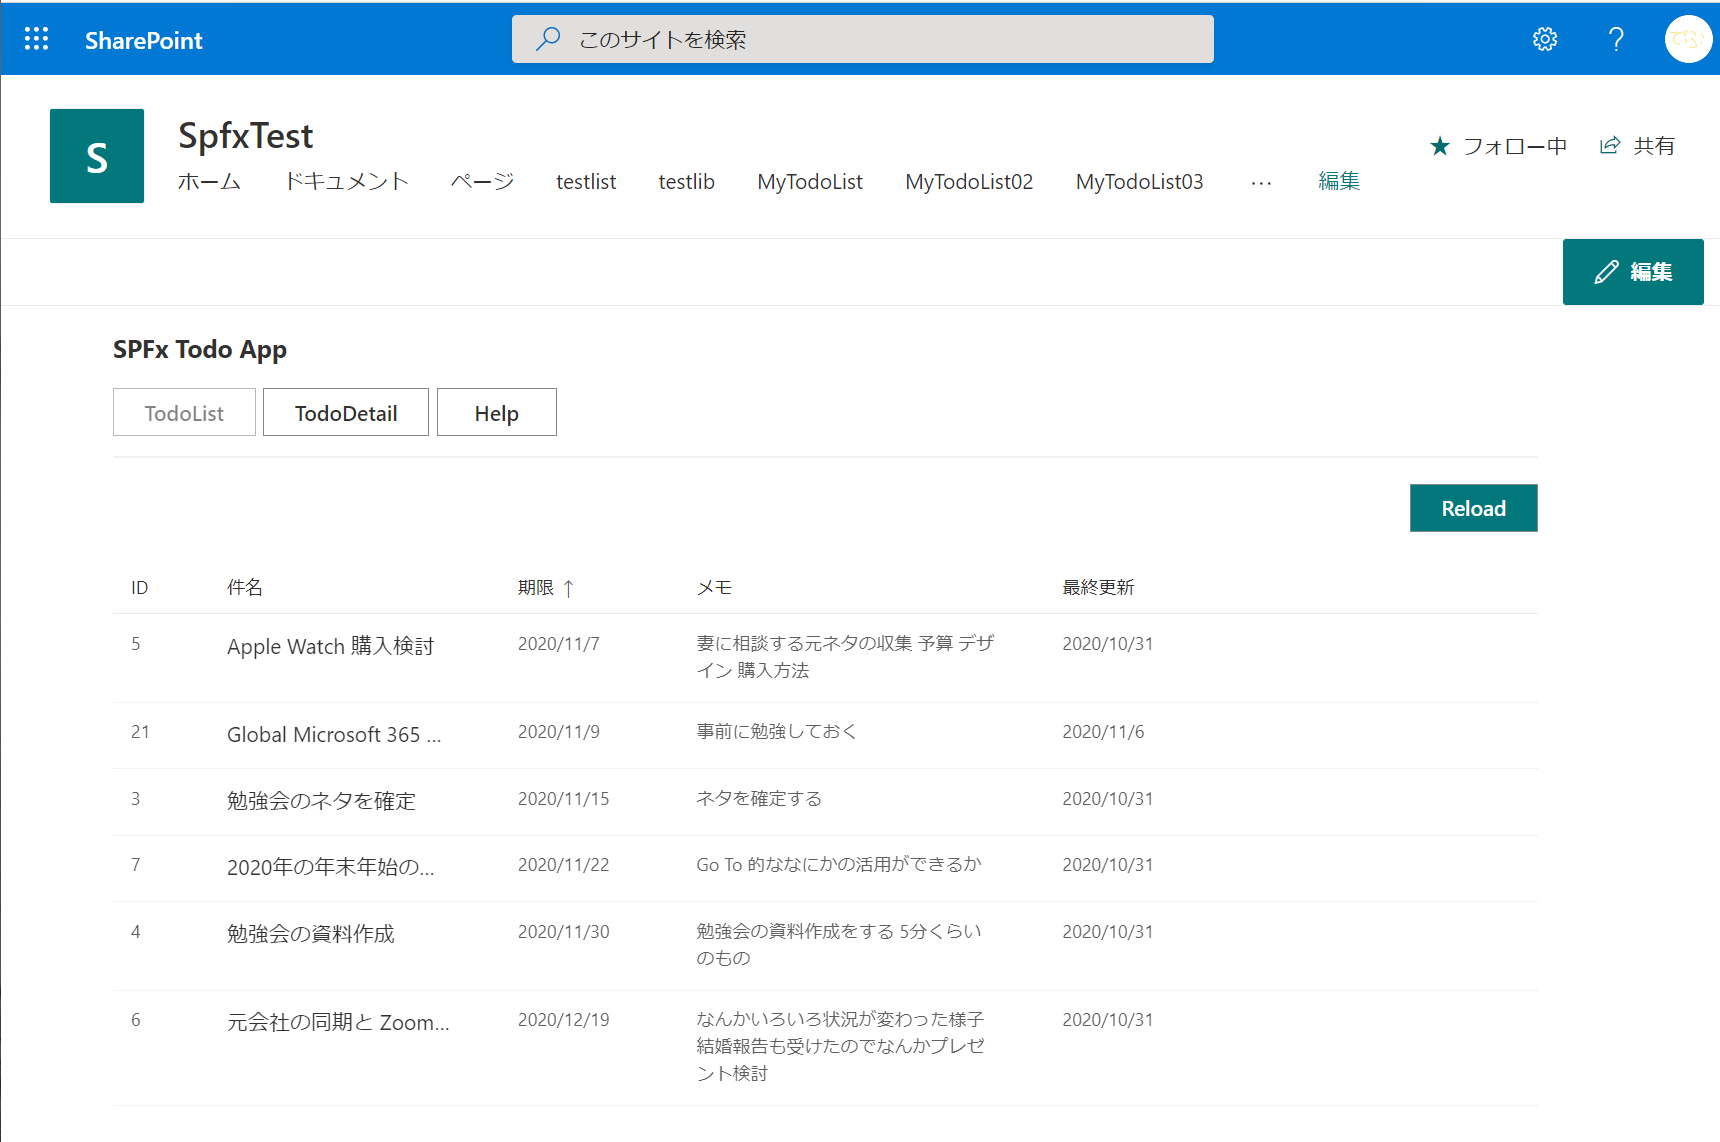
もちろん SharePoint Online のページとしても使えます。
関連記事
Webパーツ初期設定編 1/4
https://qiita.com/nanoka/items/834ee5216a5437dc04bc
画面レイアウトと画面遷移編 2/4
https://qiita.com/nanoka/items/35dea4791ad767497ed6
一覧画面編 3/4
https://qiita.com/nanoka/items/fbda2f09796a445dd9e2
詳細画面編 4/4
https://qiita.com/nanoka/items/92093ca05096728e2deb
手順
環境の準備
1. SharePoint Onlineで任意のサイトを作成
クライアントの開発環境設定
2. ソフトウェアのインストールと初期設定(外部サイトのご紹介)
3. TODO管理アプリ用のnpmインストール
アプリケーション開発(画面やロジックを作成)
4. フォルダ構成の決定
5. Webパーツの初期設定(SPAとして利用するための設定と、Webパーツのプロパティの設定)
手順の説明
1.SharePoint Onlineで任意のサイトを作成
表題の通り、デバッグに使用する SharePoint Online のサイトを作成します。
特にどのようなサイトでも構いませんが、出来上がりの見た目的にモダンなチームサイト、コミュニケーションサイトが望ましいです。
SharePoint Online の環境をお持ちでない場合、以下のサイトで開発者プログラムに参加することで条件付きではありますが無料で利用することができます。
https://developer.microsoft.com/ja-JP/microsoft-365/dev-program
2. ソフトウェアのインストールと初期設定(外部サイトのご紹介)
環境構築に関しては、以下のサイトが非常に詳しいです。(毎度お世話になっています。ありがとうございます!)
以下のサイトの"Docker を使った SharePoint Framework 開発環境の構築 その1"から"その3"を参考に環境構築と初期設定を行います。
必ずしも Docker を使う必要はないので、ご自身の環境に合わせてご準備ください。
[参考]SharePoint Developer SharePoint Framework 開発入門 まとめ
https://sharepoint.orivers.jp/sharepoint-framework-dev
"Docker を使った SharePoint Framework 開発環境の構築 その3"の"プロジェクトの作成"にて設定するパラメータは以下の通りです。
? ==========================================================================
We're constantly looking for ways to make yo better!
May we anonymously report usage statistics to improve the tool over time?
More info: https://github.com/yeoman/insight & http://yeoman.io
========================================================================== No
     _-----_
    |       |    .--------------------------.
    |--(o)--|    |      Welcome to the      |
   `---------´   |  SharePoint Client-side  |
    ( _´U`_ )    |    Solution Generator    |
    /___A___\    '--------------------------'
     |  ~  |
   __'.___.'__
 ´   `  |° ´ Y `

The npm package manager will be used.
Let's create a new SharePoint solution.
? What is your solution name? SpfxTodo
? Which baseline packages do you want to target for your component(s)? SharePoint Online only (latest)
? Where do you want to place the files? Use the current folder
? Do you want to allow the tenant admin the choice of being able to deploy the solution to all sites immediately without running any feature deployment or adding apps in sites? No
? Will the components in the solution require permissions to access web APIs that are unique and not shared with other components in the tenant? No
? Which type of client-side component to create? WebPart
Add new Web part to solution spfx-todo.
? What is your Web part name? SpfxTodo
? What is your Web part description? SpfxTodo description
? Which framework would you like to use? React
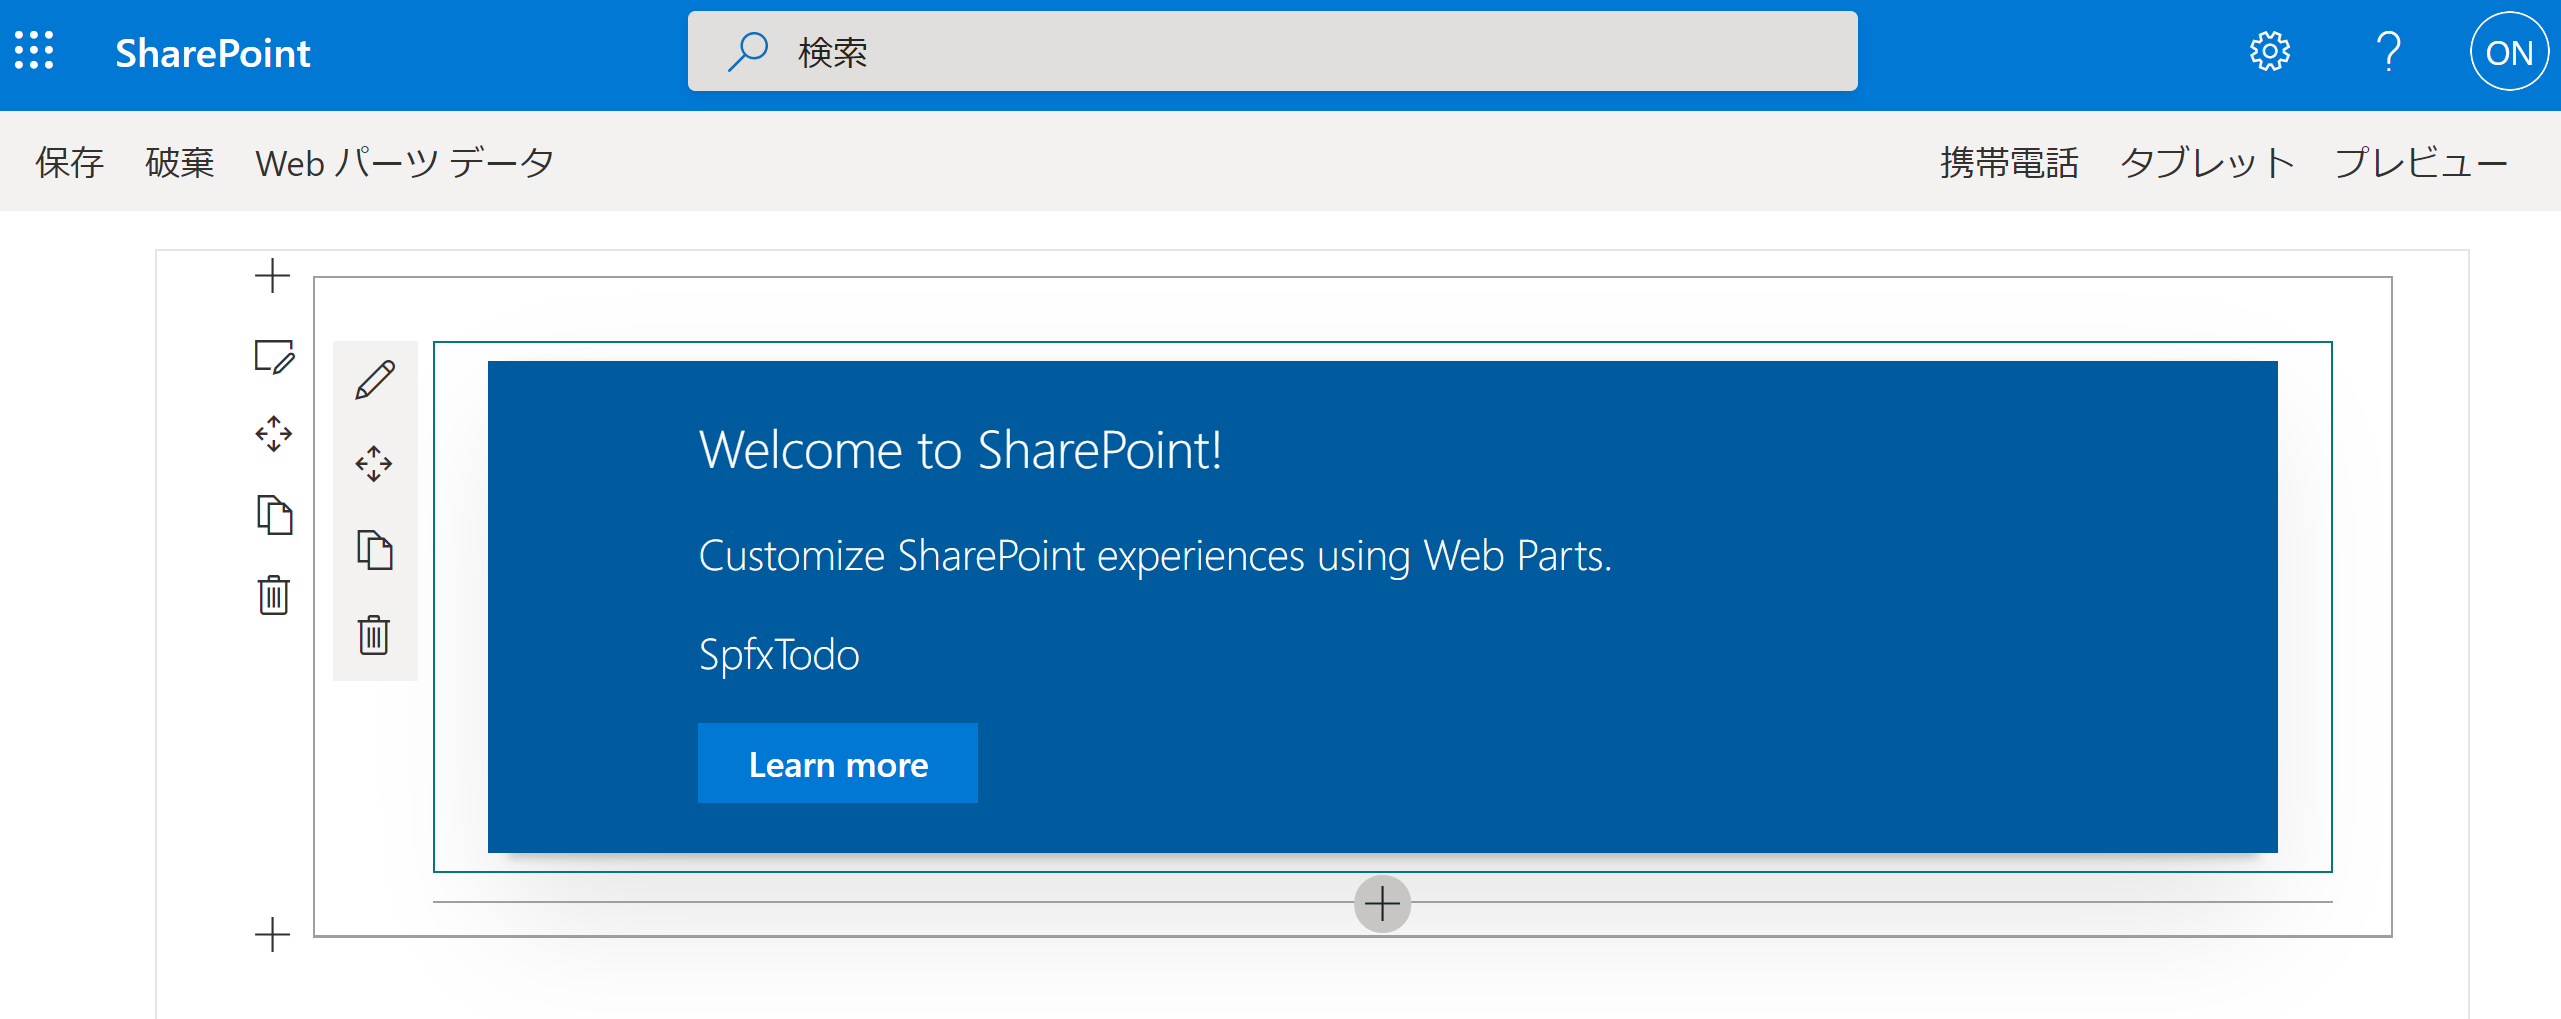
Hosted workbench の実行で以下の画面が表示できていれば成功です。
- Webパーツが表示できない場合、同一ウィンドウ、別タブで、Local workbench のURLを表示することで、一時的に localhost にアクセスさせることができます。
3. TODO管理アプリ用の npm インストール
今回はのアプリはWebパーツといいながらも単独で利用する機能を想定していますので、Single Part App Pages (以下SPA)を想定して開発します。
[参考] SharePoint Online での Single Part App Pages の使用
https://docs.microsoft.com/ja-jp/sharepoint/dev/spfx/web-parts/single-part-app-pages?tabs=pnpposh
Webパーツ内での複数の機能が存在するため、画面が切り換えられたほうがいいですので、以下の npm をインストールします。
npm install react-router-dom
npm install @types/react-router-dom
4. フォルダ構成の決定
悩みだすと楽しくなくなるし進まなくなるので、あくまで自分がわかりやすい範囲でフォルダ構成を決めてみてください。
今回は超ざっくりな開発とし、以下の構成とし、以下は spfxTodo フォルダを基準としてファイルパスを記載します。
...src/
 └ webparts/
  └ spfxTodo/
     ├ api/  (SharePoint にアクセスする関数やロジックを管理)
     ├ assets/
     │ └ stylesheets/  (グローバルなスタイルを管理)
     ├ components/
     │ ├ atoms/  (小さい部品を管理)
     │ ├ molecules/  (中くらいの部品を管理)
     │ └ organisms/  (大きめの部品を管理)
     │ └ pages/  (画面を管理)
     │ └ templates/  (画面レイアウトを管理)
     └ loc/
5. Webパーツの初期設定(SPAとして利用するための設定と、Webパーツのプロパティの設定)
ここから、やっと開発っぽいことができます。
SPA として利用するための設定
まず SPA として利用するための準備をします。
以下に SharePointFullPage を追加します。
"supportedHosts": ["SharePointWebPart","SharePointFullPage"]
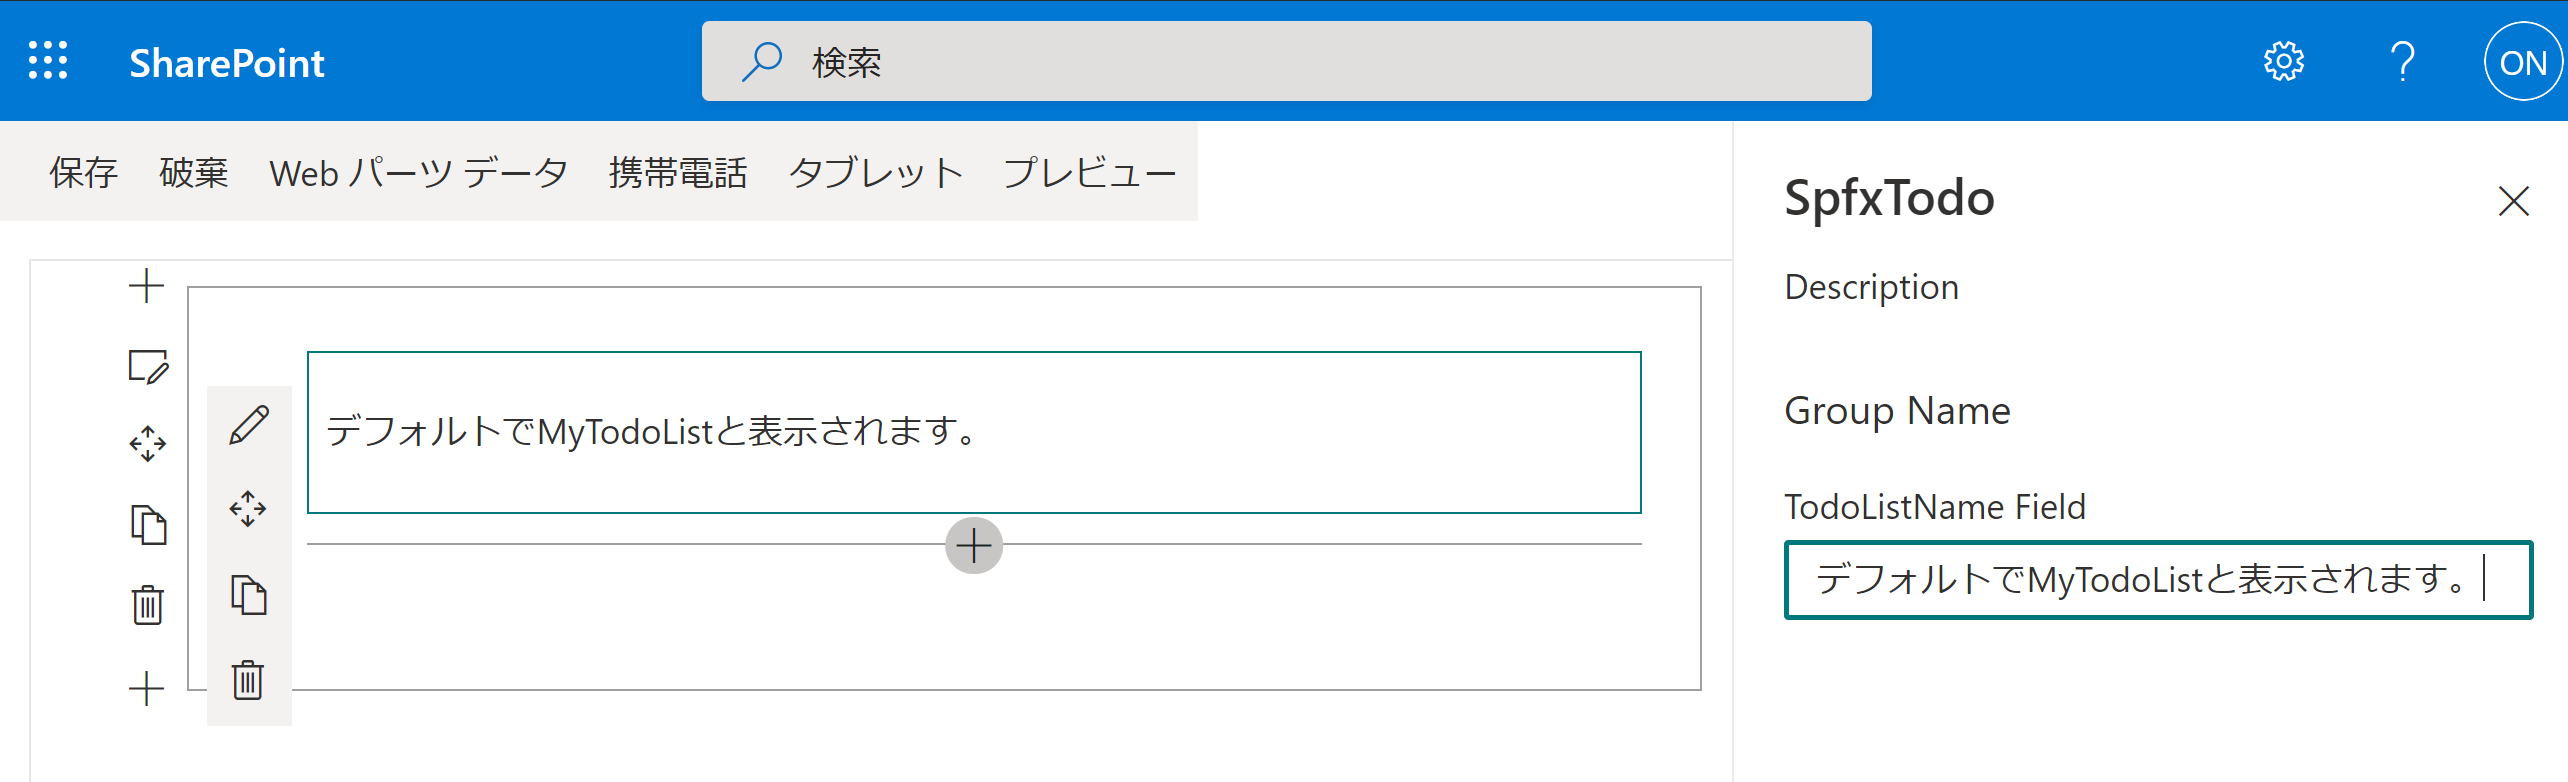
Webパーツのプロパティの設定
次に Webパーツのプロパティとして、Webパーツごとに割り当てる変数を設定します。
今回 TODO の情報を補完する予定のカスタムリスト名と、様々な場面で使用するwebPartContext を設定します。
- Webパーツのプロパティの初期値の設定として以下を追加します。
    "properties": {
      "todoListName": "MyTodoList"
    }
- Webパーツのプロパティ設定画面の調整と、Webパーツに渡す変数を設定として以下のように書き換えます。
import * as React from 'react';
import * as ReactDom from 'react-dom';
import { Version } from '@microsoft/sp-core-library';
import {
  IPropertyPaneConfiguration,
  PropertyPaneTextField
} from '@microsoft/sp-property-pane';
import { BaseClientSideWebPart } from '@microsoft/sp-webpart-base';

import * as strings from 'SpfxTodoWebPartStrings';
import SpfxTodo from './components/SpfxTodo';
import { ISpfxTodoProps } from './components/ISpfxTodoProps';

export interface ISpfxTodoWebPartProps {
  todoListName: string;
}

export default class SpfxTodoWebPart extends BaseClientSideWebPart<ISpfxTodoWebPartProps> {

  public render(): void {
    const element: React.ReactElement<ISpfxTodoProps> = React.createElement(
      SpfxTodo,
      {
        todoListName: this.properties.todoListName,
        webPartContext: this.context,
      }
    );

    ReactDom.render(element, this.domElement);
  }

  protected onDispose(): void {
    ReactDom.unmountComponentAtNode(this.domElement);
  }

  protected get dataVersion(): Version {
    return Version.parse('1.0');
  }

  protected getPropertyPaneConfiguration(): IPropertyPaneConfiguration {
    return {
      pages: [
        {
          header: {
            description: strings.PropertyPaneDescription
          },
          groups: [
            {
              groupName: strings.BasicGroupName,
              groupFields: [
                PropertyPaneTextField('todoListName', {
                  label: strings.TodoListNameFieldLabel
                })
              ]
            }
          ]
        }
      ]
    };
  }
}
import { WebPartContext } from "@microsoft/sp-webpart-base";

export interface ISpfxTodoProps {
  todoListName: string;
  webPartContext: WebPartContext;
}
declare interface ISpfxTodoWebPartStrings {
  PropertyPaneDescription: string;
  BasicGroupName: string;
  TodoListNameFieldLabel: string;
}

declare module 'SpfxTodoWebPartStrings' {
  const strings: ISpfxTodoWebPartStrings;
  export = strings;
}
define([], function() {
  return {
    "PropertyPaneDescription": "Description",
    "BasicGroupName": "Group Name",
    "TodoListNameFieldLabel": "TodoListName Field"
  }
});
- 表示されるWebパーツの画面として、以下のように書き換えます。
import * as React from 'react';
import styles from './SpfxTodo.module.scss';
import { ISpfxTodoProps } from './ISpfxTodoProps';
import { escape } from '@microsoft/sp-lodash-subset';

export default class SpfxTodo extends React.Component<ISpfxTodoProps, {}> {
  public render(): React.ReactElement<ISpfxTodoProps> {
    return (
      <div>
        <p>{this.props.todoListName}</p>
      </div>
    );
  }
}
Hosted workbench の実行で以下のように、プロパティの値が表示できていれば成功です。
以下に実際に動作させたファイルを置いておきますので、うまくいかない場合は参考にしてください。
まとめ
まず環境構築と初期設定まで開発することができました。
ここまでできれば、この後は React でアプリ開発された経験がある方は自由に開発できるのではないでしょうか。
続いて、画面レイアウトと画面遷移(2/4)、一覧画面(3/4)、登録、更新、削除画面(4/4)と記事にしたいと思います。