初学者のためのAWS入門シリーズ
- [初学者のためのAWS入門(1)] (https://qiita.com/mshinoda88/items/e7557227f7060b52d8ae)
- 初学者のためのAWS入門(2) - CloudFormation入門1
- 初学者のためのAWS入門(3) - CloudFormation入門2 -> この記事です。
- 初学者のためのAWS入門(4) - S3でBasic認証を設定してリポジトリを公開
- 初学者のためのAWS入門(5) - S3+Athena+QuickSightでデータ分析結果の可視化
- 初学者のためのAWS入門(6) - Lambdaでサーバレス実行してみる
1. 概要
ここではEC2インスタンスをCloudFormation で生成します。
今回作成する環境は下の表になります。
| OS | Ubuntu16.04 |
|---|---|
| AMI | ami-10504277 |
| Instance Type | t2.micro |
| Root Volume | 8GiB |
| VPC IP Range | 10.0.0.0/16 |
| Subnet IP Range | 10.0.0.0/24 |
| SecurityGroup | SSH(port:22) source:0.0.0.0/0 |
| New Key Pair | NO |
2. サンプルテンプレートの作成
2-1. サンプルテンプレート
以下のようにテンプレートを準備する。
{
  "AWSTemplateFormatVersion" : "2010-09-09",
  "Description" : "AWS CloudFormation Test Template vpc_single_instance_in_subnet.template: Create a VPC and add an EC2 instance with a security group. ",

  "Parameters" : {
    "InstanceType" : {
      "Description" : "EC2 instance type",
      "Type" : "String",
      "Default" : "t2.micro",
      "AllowedValues" : [ "t1.micro","t2.micro","m1.small","m1.medium","m1.large","m1.xlarge","m2.xlarge","m2.2xlarge","m2.4xlarge","m3.xlarge","m3.2xlarge","c1.medium","c1.xlarge","cc1.4xlarge","cc2.8xlarge","cg1.4xlarge"],
      "ConstraintDescription" : "must be a valid EC2 instance type."
    },
    "KeyName": {
      "Description" : "Name of an existing EC2 KeyPair to enable SSH access to the instance",
      "Type": "String",
      "MinLength": "1",
      "MaxLength": "255",
      "AllowedPattern" : "[\\x20-\\x7E]*",
      "ConstraintDescription" : "can contain only ASCII characters."
    },
    "SSHLocation" : {
      "Description" : " The IP address range that can be used to SSH to the EC2 instances",
      "Type": "String",
      "MinLength": "9",
      "MaxLength": "18",
      "Default": "0.0.0.0/0",
      "AllowedPattern": "(\\d{1,3})\\.(\\d{1,3})\\.(\\d{1,3})\\.(\\d{1,3})/(\\d{1,2})",
      "ConstraintDescription": "must be a valid IP CIDR range of the form x.x.x.x/x."
    }
  },

  "Resources" : {
    "VPC" : {
      "Type" : "AWS::EC2::VPC",
      "Properties" : {
        "CidrBlock" : "10.0.0.0/16",
        "Tags" : [ {"Key" : "Application", "Value" : { "Ref" : "AWS::StackId"} } ]
      }
    },
    "Subnet" : {
      "Type" : "AWS::EC2::Subnet",
      "Properties" : {
        "VpcId" : { "Ref" : "VPC" },
        "CidrBlock" : "10.0.0.0/24",
        "MapPublicIpOnLaunch" : "True",
        "Tags" : [ {"Key" : "Application", "Value" : { "Ref" : "AWS::StackId"} } ]
      }
    },
    "InternetGateway" : {
      "Type" : "AWS::EC2::InternetGateway",
      "Properties" : {
        "Tags" : [ {"Key" : "Application", "Value" : { "Ref" : "AWS::StackId"} } ]
      }
    },
    "AttachGateway" : {
       "Type" : "AWS::EC2::VPCGatewayAttachment",
       "Properties" : {
         "VpcId" : { "Ref" : "VPC" },
         "InternetGatewayId" : { "Ref" : "InternetGateway" }
       }
    },
    "RouteTable" : {
      "Type" : "AWS::EC2::RouteTable",
      "Properties" : {
        "VpcId" : {"Ref" : "VPC"},
        "Tags" : [ {"Key" : "Application", "Value" : { "Ref" : "AWS::StackId"} } ]
      }
    },
    "Route" : {
      "Type" : "AWS::EC2::Route",
      "DependsOn" : "AttachGateway",
      "Properties" : {
        "RouteTableId" : { "Ref" : "RouteTable" },
        "DestinationCidrBlock" : "0.0.0.0/0",
        "GatewayId" : { "Ref" : "InternetGateway" }
      }
    },
    "SubnetRouteTableAssociation" : {
      "Type" : "AWS::EC2::SubnetRouteTableAssociation",
      "Properties" : {
        "SubnetId" : { "Ref" : "Subnet" },
        "RouteTableId" : { "Ref" : "RouteTable" }
      }
    },
    "NetworkAcl" : {
      "Type" : "AWS::EC2::NetworkAcl",
      "Properties" : {
        "VpcId" : {"Ref" : "VPC"},
        "Tags" : [ {"Key" : "Application", "Value" : { "Ref" : "AWS::StackId"} } ]
      }
    },

    "InboundNetworkAclEntry" : {
      "Type" : "AWS::EC2::NetworkAclEntry",
      "Properties" : {
        "NetworkAclId" : {"Ref" : "NetworkAcl"},
        "RuleNumber" : "100",
        "Protocol" : "-1",
        "RuleAction" : "allow",
        "Egress" : "false",
        "CidrBlock" : "0.0.0.0/0"
      }
    },
    "OutBoundNetworkAclEntry" : {
      "Type" : "AWS::EC2::NetworkAclEntry",
      "Properties" : {
        "NetworkAclId" : {"Ref" : "NetworkAcl"},
        "RuleNumber" : "100",
        "Protocol" : "-1",
        "RuleAction" : "allow",
        "Egress" : "true",
        "CidrBlock" : "0.0.0.0/0"
      }
    },
    "SubnetNetworkAclAssociation" : {
      "Type" : "AWS::EC2::SubnetNetworkAclAssociation",
      "Properties" : {
        "SubnetId" : { "Ref" : "Subnet" },
        "NetworkAclId" : { "Ref" : "NetworkAcl" }
      }
    },
    "InstanceSecurityGroup" : {
      "Type" : "AWS::EC2::SecurityGroup",
      "Properties" : {
        "VpcId" : { "Ref" : "VPC" },
        "GroupDescription" : "Enable SSH access via port 22",
        "SecurityGroupIngress" : [
          {"IpProtocol" : "tcp", "FromPort" : "22", "ToPort" : "22", "CidrIp" : { "Ref" : "SSHLocation"}}
         ]
      }
    },
    "EC2Instance" : {
      "Type" : "AWS::EC2::Instance",
      "Properties" : {
        "ImageId" : "ami-10504277",
        "SecurityGroupIds" : [{ "Ref" : "InstanceSecurityGroup" }],
        "SubnetId" : { "Ref" : "Subnet" },
        "InstanceType" : { "Ref" : "InstanceType" },
        "KeyName" : { "Ref" : "KeyName" },
        "Tags" : [ { "Key" : "Application", "Value" : "string" } ]
         }
      }
   }
}
2-2. 設定値の解説
AWS::EC2::VPC
CidrBlock
VPCのネットワークアドレス。ここでは 10.0.0.0/16
AWS::EC2::Subnet
CidrBlock
サブネットのネットワークアドレス。ここでは 10.0.0.0/24
MapPublicIpOnLaunch
このサブネットで起動されたインスタンスが起動時にパブリック IP アドレスを設定するか。
初期値は false。ここでは外部からアクセス可能にするので true
2-3. CloudFormation実行
スタック作成を実行すると、パラメータの入力欄が表示される。
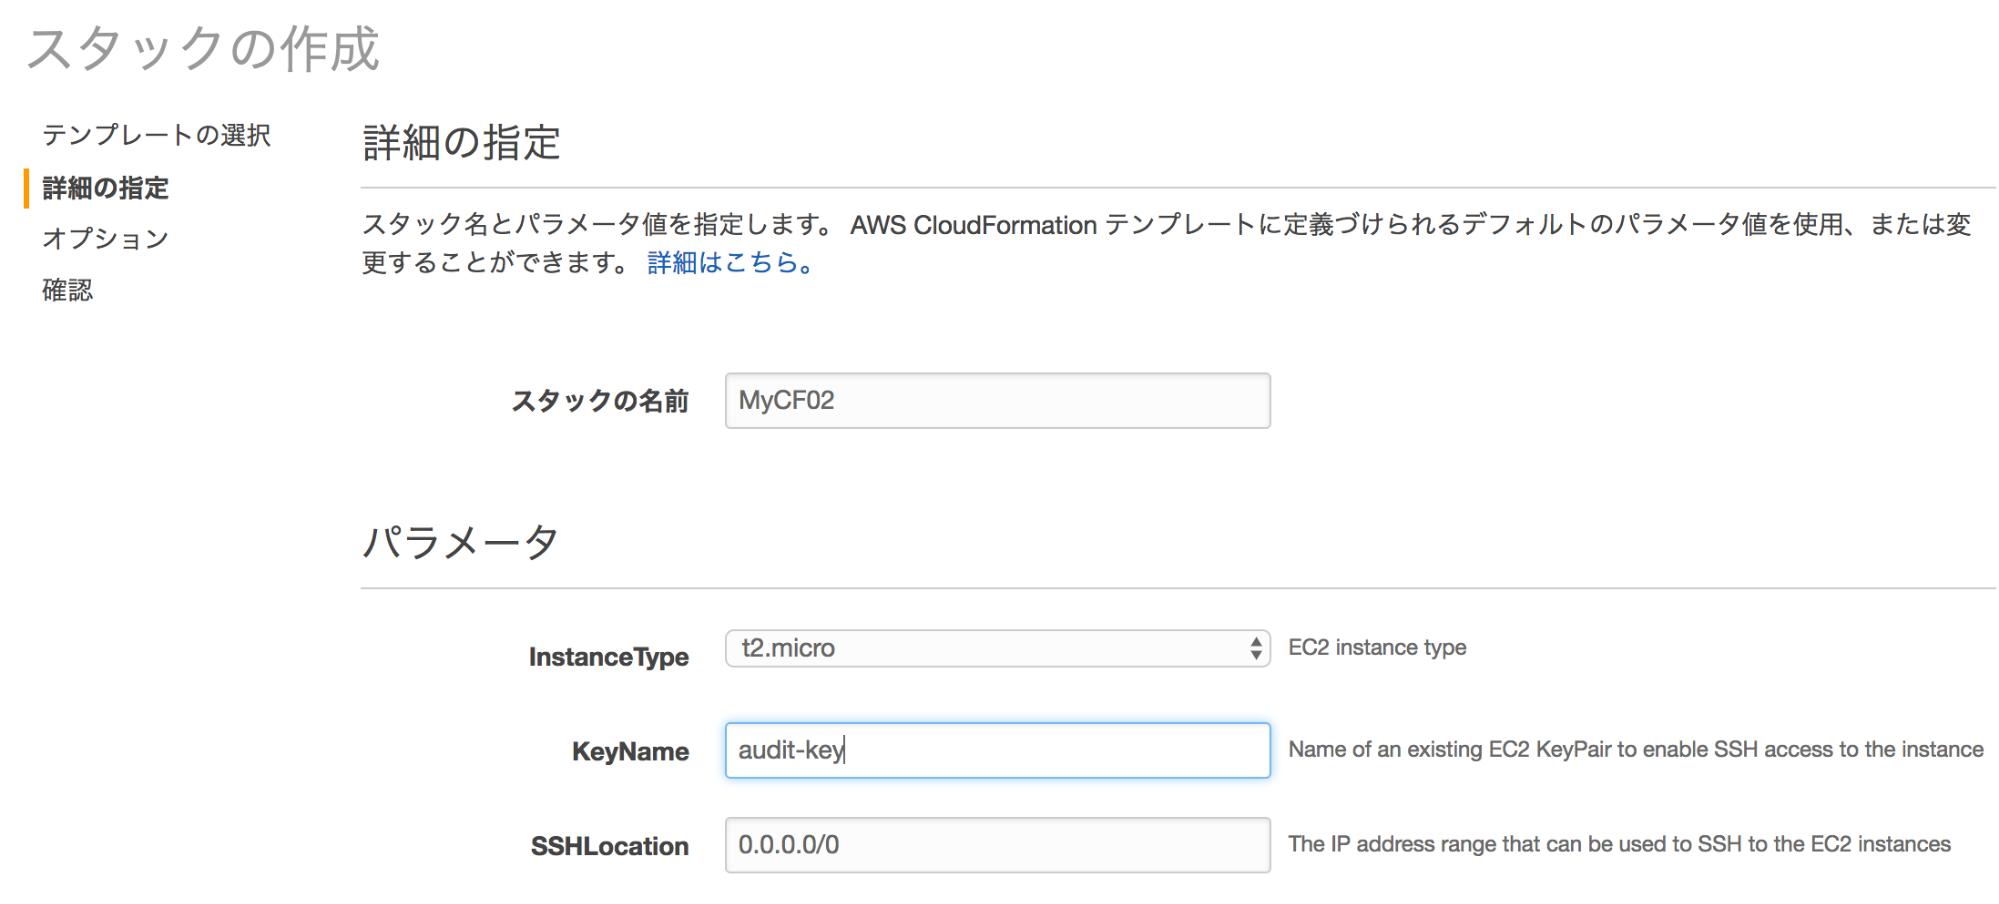
後は同様にスタック作成を行う。
もちろん、全自動にする場合は、パラメータの値をテンプレートに予め埋め込んでおく。
2-4. SecurityGroup とNetworkACLの違い
| セキュリティグループ | ネットワーク ACL |
|---|---|
| インスタンスレベルで動作します (第1保護レイヤー) | サブネットレベルで動作します (第2保護レイヤー) |
| ルールの許可のみサポート | ルールの許可と拒否がサポートされます |
| ステートフル: ルールに関係なく、返されたトラフィックが自動的に許可されます | ステートレス: 返されたトラフィックがルールによって明示的に許可されます |
| トラフィックを許可するかどうかを決める前に、すべてのルールを評価します | トラフィックを許可するかどうかを決めるときに、順番にルールを処理します |
| インスタンスの起動時に誰かがセキュリティグループを指定した場合、または後でセキュリティグループをインスタンスに関連付けた場合にのみ、インスタンスに適用されます。 | 関連付けられたサブネット内のすべてのインスタンスに自動的に適用されます (バックアップの保護レイヤーなので、セキュリティグループを指定する人物に依存する必要はありません) |
2-5. 擬似パラメータ
AWS CloudFormation で事前定義されているパラメーター。テンプレートでは宣言しない。
パラメーターと同じように、Ref 関数の引数として使用します。
| パラメータ | 解説 |
|---|---|
| AWS::AccountId | 123456789012 など、スタックが作成されているアカウントの AWS アカウント ID を返します。 |
| AWS::Region | us-west-2 など、包括的なリソースが作成されている AWS リージョンを表す文字列を返します。 |
| AWS::StackId | arn:aws:cloudformation:us-west-2:123456789012:stack/teststack/51af3dc0-da77-11e4-872e-1234567db123 など、aws cloudformation create-stack コマンドで指定されたようにスタックの ID を返します。 |
| AWS::StackName | teststack など、aws cloudformation create-stack コマンドで指定されたようにスタックの名前を返します。 |
3. テンプレート作成フロー
3-1. VPCを設定する
- AWS::EC2::VPCのリソースを追加
- PropertiesにCIDRを記載(CidrBlock 属性)
"VPC": {
  "Type": "AWS::EC2::VPC",
  "Properties": {
    "CidrBlock": "192.168.10.0/24"
  }
}
3-2. サブネットを設定する
- AWS::EC2::Subnet のリソースを追加
- PropertiesにVpcId(VPCのリソースID),CIDR(CidrBlock 属性),MapPublicIpOnLaunch(起動時のパブリックID有効か) を記載
"Subnet": {
  "Type": "AWS::EC2::Subnet",
  "Properties": {
    "VpcId": {
      "Ref": "VPC"
    },
    "CidrBlock": "192.168.10.0/26"
  }
}
3-3. インターネットゲートウェイを設定する
- インターネットゲートウェイをAWS::EC2::InternetGateway のリソースとして追加、
- インターネットゲートウェイとVPCの紐付けを行う矢印は AWS::EC2::VPCGatewayAttachment というリソースとして追加します。
"InternetGateway" : {
  "Type" : "AWS::EC2::InternetGateway",
  "Properties" : {
      "Tags" : [ {"Key" : "Application", "Value" : { "Ref" : "AWS::StackId"} } ]
  }
},
"AttachGateway" : {
  "Type" : "AWS::EC2::VPCGatewayAttachment",
  "Properties" : {
      "VpcId" : { "Ref" : "VPC" },
      "InternetGatewayId" : { "Ref" : "InternetGateway" }
  }
}
3-4. ルートテーブルとルートを設定する
-
ルートテーブルをAWS::EC2::RouteTable のリソースとして追加
-
ルートテーブルはVPCとの紐付けを指定。
-
ルーティング情報は AWS::EC2::Route に記載します。
-
RouteTableId は、ルートテーブルのリソースIDを指定。
-
インターネット宛てのルートを指定。
- "DestinationCidrBlock": "0.0.0.0/0",
- "GatewayId":
-
サブネットをルートテーブルに関連付けるには、
AWS::EC2::SubnetRouteTableAssociation を利用します。
"RouteTable": {
    "Type": "AWS::EC2::RouteTable",
    "Properties": {
        "VpcId": {
            "Ref": "VPC"
        }
    }
},
"Route" : {
  "Type" : "AWS::EC2::Route",
  "DependsOn" : "AttachGateway",
  "Properties" : {
    "RouteTableId" : { "Ref" : "RouteTable" },
    "DestinationCidrBlock" : "0.0.0.0/0",
    "GatewayId" : { "Ref" : "InternetGateway" }
  }
},
"SubnetRouteTableAssociation" : {
  "Type" : "AWS::EC2::SubnetRouteTableAssociation",
  "Properties" : {
    "SubnetId" : { "Ref" : "Subnet" },
    "RouteTableId" : { "Ref" : "RouteTable" }
  }
},
3-5. NetworkACLの設定
AWS::EC2::NetworkAcl
VpcId:VPCのIDを指定。
AWS::EC2::NetworkAclEntry
-
Egress
サブネットからの送信トラフィックに適用される (true) か、
サブネットへの受信トラフィックに適用される (false) か。
初期値は false 。 -
Protocol
ルールが適用される IP プロトコル。-1 またはプロトコル番号を指定する必要があります。 -
RuleAction
ルールに一致するトラフィックを許可または拒否するかどうか。有効な値は "allow" または "deny" 。 -
RuleNumber
エントリに割り当てるルール番号 (100 など)。ACL エントリは、ルール番号の昇順で処理されます。
エントリには同じルール番号を使用できません
"NetworkAcl" : {
  "Type" : "AWS::EC2::NetworkAcl",
  "Properties" : {
    "VpcId" : {"Ref" : "VPC"},
    "Tags" : [ {"Key" : "Application", "Value" : { "Ref" : "AWS::StackId"} } ]
  }
},
"InboundNetworkAclEntry" : {
  "Type" : "AWS::EC2::NetworkAclEntry",
  "Properties" : {
    "NetworkAclId" : {"Ref" : "NetworkAcl"},
    "RuleNumber" : "100",
    "Protocol" : "-1",
    "RuleAction" : "allow",
    "Egress" : "false",
    "CidrBlock" : "0.0.0.0/0"
  }
},
"OutBoundNetworkAclEntry" : {
  "Type" : "AWS::EC2::NetworkAclEntry",
  "Properties" : {
    "NetworkAclId" : {"Ref" : "NetworkAcl"},
    "RuleNumber" : "100",
    "Protocol" : "-1",
    "RuleAction" : "allow",
    "Egress" : "true",
    "CidrBlock" : "0.0.0.0/0"
  }
},
"SubnetNetworkAclAssociation" : {
  "Type" : "AWS::EC2::SubnetNetworkAclAssociation",
  "Properties" : {
    "SubnetId" : { "Ref" : "Subnet" },
    "NetworkAclId" : { "Ref" : "NetworkAcl" }
  }
}
3-6. セキュリティグループを設定する
セキュリティグループをAWS::EC2::SecurityGroup のリソースとして追加。
- VpcId:VPCのIDを指定。
- SecurityGroupIngress
- Amazon EC2 セキュリティグループの Ingress ルールのリスト。
"InstanceSecurityGroup" : {
  "Type" : "AWS::EC2::SecurityGroup",
  "Properties" : {
    "VpcId" : { "Ref" : "VPC" },
    "GroupDescription" : "Enable SSH access via port 22",
    "SecurityGroupIngress" : [
      {"IpProtocol" : "tcp", "FromPort" : "22", "ToPort" : "22", "CidrIp" : { "Ref" : "SSHLocation"}}
     ]
  }
}
3-7. EC2を設定する
EC2のインスタンスは AWS::EC2::Instance のリソースとして追加。
-
SubnetId
インスタンスの起動先となるサブネットの ID -
ImageId
登録時に割り当てられた Amazon Machine Image (AMI) の一意の ID -
InstanceType
インスタンスタイプ (t2.micro など)。デフォルトのタイプは「m3.medium」。 -
SecurityGroupIds
Amazon EC2 インスタンスに割り当てる VPC セキュリティグループのセキュリティグループ ID を含んだリスト。
"EC2Instance" : {
  "Type" : "AWS::EC2::Instance",
  "Properties" : {
    "ImageId" : "ami-10504277",
    "SecurityGroupIds" : [{ "Ref" : "InstanceSecurityGroup" }],
    "SubnetId" : { "Ref" : "Subnet" },
    "InstanceType" : { "Ref" : "InstanceType" },
    "KeyName" : { "Ref" : "KeyName" },
    "Tags" : [ { "Key" : "Application", "Value" : "string" } ]
   }
}
Amazon EC2 インスタンスへの既存の Elastic IP の割り当て
参考: Amazon EC2 テンプレートスニペット
"IPAssoc" : {
  "Type" : "AWS::EC2::EIPAssociation",
  "Properties" : {
    "InstanceId" : { "Ref" : "logical name of an AWS::EC2::Instance resource" },
    "EIP" : "existing Elastic IP address"
  }
}
4. パラメータの指定
パラメータ指定は以下で指定する。
"Parameters" : {
    (パラメータの指定),
    (パラメータの指定),...
    (パラメータの指定)
},
| パラメータ項目 | 説明 |
|---|---|
| Description | 入力欄の右に表示される。 |
| Type | Stringなど |
| MinLength | 最小文字数 |
| MaxLength | 最長文字数 |
| Default | 初期表示 |
| AllowedValues | プルダウン表示される選択肢 |
| AllowedPattern | 入力可能な文字パターン |
| ConstraintDescription | 文字パターンが不正な場合の表示メッセージ |
4-1. パラメータ利用シーン
- キーペア等、AWS固有パラメータを利用すると、毎回検証して表示してくれる
- 認証情報はテンプレートに直接記載するのではなく、入力パラメータとして使用する
4-2. EC2作成時のパラメータ利用例
"Parameters" : {
  "InstanceType" : {
    "Description" : "EC2 instance type",
    "Type" : "String",
    "Default" : "t2.micro",
    "AllowedValues" : [ "t1.micro","t2.micro","m1.small","m1.medium","m1.large","m1.xlarge","m2.xlarge","m2.2xlarge","m2.4xlarge","m3.xlarge","m3.2xlarge","c1.medium","c1.xlarge","cc1.4xlarge","cc2.8xlarge","cg1.4xlarge"],
    "ConstraintDescription" : "must be a valid EC2 instance type."
  },
  "KeyName": {
    "Description" : "Name of an existing EC2 KeyPair to enable SSH access to the instance",
    "Type": "String",
    "MinLength": "1",
    "MaxLength": "255",
    "AllowedPattern" : "[\\x20-\\x7E]*",
    "ConstraintDescription" : "can contain only ASCII characters."
  },
  "SSHLocation" : {
    "Description" : " The IP address range that can be used to SSH to the EC2 instances",
    "Type": "String",
    "MinLength": "9",
    "MaxLength": "18",
    "Default": "0.0.0.0/0",
    "AllowedPattern": "(\\d{1,3})\\.(\\d{1,3})\\.(\\d{1,3})\\.(\\d{1,3})/(\\d{1,2})",
    "ConstraintDescription": "must be a valid IP CIDR range of the form x.x.x.x/x."
  }
},
5. 削除ポリシーの指定
スタックを削除すると、スタック内のAWSリソースはすべて削除される。
削除ポリシーにより、削除したくないリソースを削除しないように出来ます。
CloudFormationには [DeletionPolicy] という項目があります。[DeletionPolicy] は削除時にリソースがどのような動きをするかを定義する項目です。
5-1. 削除ポリシーの種類
| ポリシー | 説明 |
|---|---|
| Delete | 削除 |
| Retain | 保持。消さない。 |
| Snapshot | スナップショット |
スナップショット可能なリソースは以下のみ。
- AWS::EC2::Volume
- AWS::RDS::DBInstance
- AWS::Redshift::Cluster
例1 S3のバケットを「Retain」指定で作成した場合
"myS3Bucket" : {
  "Type" : "AWS::S3::Bucket",
  "DeletionPolicy" : "Retain"
}
→ スタック削除時にもバケットは保持されてデータは残ります。
例2 RDBを「Snapshotn」指定で作成した場合
"MyDB" : {
  "Type" : "AWS::RDS::DBInstance",
  "Properties" : {
    "DBName" : { "Ref" : "DBName" },
    "AllocatedStorage" : { "Ref" : "DBAllocatedStorage" },
    "DBInstanceClass" : { "Ref" : "DBInstanceClass" },
    "Engine" : "MySQL",
    "EngineVersion" : "5.5",
    "MasterUsername" : { "Ref" : "DBUser" },
    "MasterUserPassword" : { "Ref" : "DBPassword" },
    "Tags" : [ { "Key" : "Name", "Value" : "My SQL Database" } ]
  },
  "DeletionPolicy" : "Snapshot"
}
→スタック削除時にスナップショットが取れます。
6. CloudFormationの便利機能
-
スタックのネスト
テンプレートにテンプレートを指定できる。例えば、ロードバランサのテンプレート、EC2テンプレートを参照するテンプレートを作成できる
→この時に、ロードバランサのテンプレートを更新した場合、それを参照するスタックの更新時に反映できる -
CloudTrailの利用
CloudTrailを利用し、CloudFormationAPI呼び出しを追跡できる。 -
CloudFormerの利用
既存のAWSリソースからテンプレートを作成できる。
CloudFormer専用のインスタンスを一時的に起動させ、Webアクセス、対象のリソースを選択、あとは待つだけ。- 専用インスタンスは利用が終わったら削除
- 実際に利用すときは、作成されたテンプレート内容を確認・修正して問題ないことを確認してから利用する(そのまま使わない)
→別途検証を行う予定。
-
カスタムリソース
AWSリソース(EC2やS3)ではないリソースをCloudFormationに含めることができる。→必要時に検証を行う。 -
ヘルパースクリプト
ソフトウェアをインストールしたい場合はヘルパースクリプトを利用する。
7. ベストプラクティス
事前検証
テンプレートを利用する前に検証をする
コマンドは以下の通り。
# aws cloudformation validate-template --template-body file:////Users/cloud-formation/aws.template
# aws cloudformation validate-template --template-url https://s3-ap-northeast-1.amazonaws.com/stacks/aws.template
-
アクセス制御
CloudFormationの操作(スタックの作成・表示・削除・更新)をIAMの権限で制御できる。テンプレートに記載されているAWSリソースの操作権限も必要になる。
さらに、EC2やS3等のAWSリソースの利用権限も必要。たとえば、ネットワークチームはVPC、運用チームはEC2起動・停止、開発は全ての権限等チームごとにIAMユーザを作成し、権限を設定できる -
バージョン管理
テンプレートをバージョン管理する。バージョン管理することで、インフラのバージョン管理が可能。
任意の過去の状態に戻すことが可能 -
作成前の注意
スタック作成前に、VPCやEC2等の作成数上限に達していないか確認する。 -
リソース更新時の注意
- リソースをマネジメントコンソールで直接変更しない
- CloudFomationスタックとリソース情報に不整合が生じエラーになる
- リソース変更時は、必ずテンプレート更新、スタック更新する
-
スタックポリシーを使用する
重要なスタックリソースを保護する→スタックポリシーは別途詳細を確認する。
参考資料
【AWS】CloudFormationまとめ
http://qiita.com/iron-breaker/items/a12d1228de12663e7d32
AWS CLIとCloudFormationでVPCを作ってEC2を立ち上げてみた②
~CloudFormation編~
https://recipe.kc-cloud.jp/archives/8090
AWSのSecurityGroupとNetworkACL
http://yuheikagaya.hatenablog.jp/entry/2015/05/21/000000
セキュリティグループとネットワーク ACL の比較
http://docs.aws.amazon.com/ja_jp/AmazonVPC/latest/UserGuide/VPC_Security.html
AWS CloudFormation のベストプラクティス
http://docs.aws.amazon.com/ja_jp/AWSCloudFormation/latest/UserGuide/best-practices.html
CloudFormationデザイナーをはじめよう
http://dev.classmethod.jp/cloud/aws/cfndesigner/