Goでプログラミングの基礎を学ぶシリーズ
スクールでは教えてくれないプログラミングの基礎、データ構造とアルゴリズムをGoで学んでいくシリーズです。
そのデータ構造がどのようなものであるかは、理解を助けてくれるサイトを紹介しつつ、簡単に説明に留めさせていただきます。(ご自身でも調べてみてください!)
筆者自身、Exerciseに取り組みながら理解を深めていったので、コードの解説を中心に記事を書いていきたいと思います。
| タイトル | |
|---|---|
| #0 | はじめに (環境構築と勉強方法) |
| #1 | Pointer, Array, String (ポインタと配列と文字列と) |
| #2 | File operations (ファイル操作) |
| #3 | Linked List (連結リスト) |
| #4 | Stack & Queue (スタックとキュー) |
| #5 | Search algorithms (探索アルゴリズム) ☜ here |
| #6 | Tree (木構造) |
| #7 | Sorting algorithms (ソートアルゴリズム) |
| #8 | String pattern matching algorithms (文字列探索アルゴリズム) |
今回は**#5 Search algorithms (探索アルゴリズム)**です。
Search algorithms
google.comやyahoo.comを使って調べ物をしたり、データベースからデータを抽出したりする場合に、探索(検索)をすると思います。
その探索をするためのアルゴリズムは一つではありません。
今回は代表的な探索アルゴリズムを扱っていきます。
Liner Search (線型探索)
Sequential Searchとも呼ばれる探索アルゴリズムです。
先頭から順番にデータを比較していき、探索したい値が見つかったら探索を終了するというアルゴリズムです。
一番シンプルで直感的ですね。
package main

import (
	"fmt"
)

func linerSearch(numbers []int, target int) int {
	for i, n := range numbers {
		if n == target {
			fmt.Printf("%d is found: %d\n", target, i)
			return i
		}
	}
	return -1
}

func main() {
	numbers := []int{6, 86, 24, 56, 1, 33, 68, 9, 77}

	i := linerSearch(numbers, 86)
	if i < 0 {
		fmt.Println("target not found")
	}

	i = linerSearch(numbers, 9)
	if i < 0 {
		fmt.Println("target not found")
	}

	i = linerSearch(numbers, 10)
	if i < 0 {
		fmt.Println("target not found")
	}
}
☟ 出力結果
86 is found: 1
9 is found: 7
target not found
Liner Search の問題は、探索の効率があまり良くないことです。
時間計算量が $O(n)$ となります。
効率を良くする手法として、 Self Organized List があります。
Self Organized List
探索自体は、 Liner Search と変わりないですが、探索したい値が見つかった場合に、その要素をデータの先頭に移動させます。
そうすると、次回以降、同じ値を探索しようとしたときには、以前よりも先に比較が行われるため、探索にかかる時間が短くなります。
これは、一度探索された値は、再度探索される可能性が高い場合に有効です。
反対に、一度探索された値は、再度探索される可能性が低い場合には、探索された要素をデータの最後尾に移動させるということも考えられます。
※ データ構造によっては、要素を移動させるという動作自体が非常に遅い場合もあるので、注意が必要です。
参考: Self Organizing List | Set 1 (Introduction)
Binary Search (二分探索)
すでにソートされている配列に対する探索アルゴリズムの一つです。
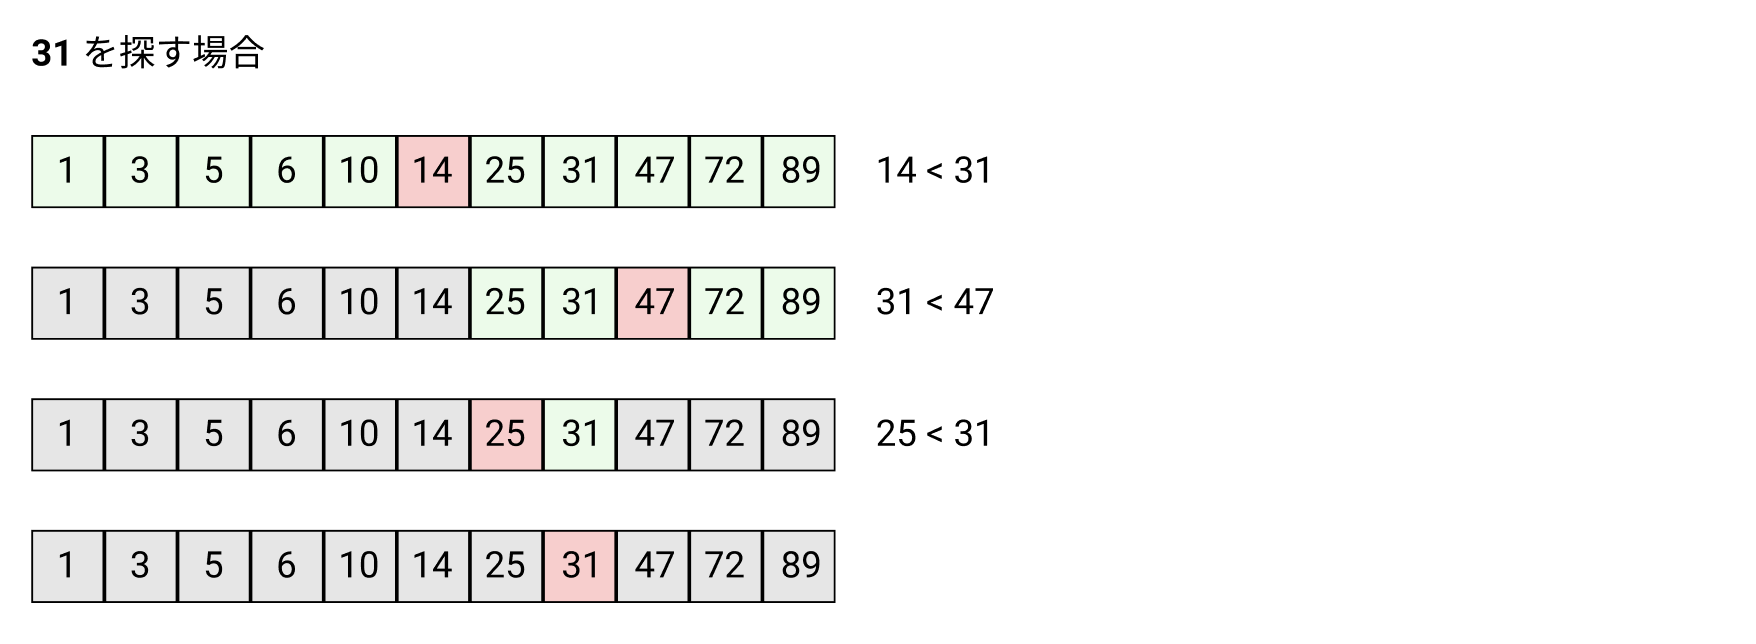
同一の値がないソート済みの配列の中央にある値と、探索したい値との大小関係を用いて、探索したい値が中央の値の右にあるか、左にあるかを判断して、探索したい値が含まれないほうは比較をしません。

Liner Searchでは先頭から順に比較をしていくため、 31 を探すためには 8 回比較をしなくてはなりませんが、 Binary Search では 4 回で済んでいます。
時間計算量で表すと $O(logn)$ となり、 Liner Search よりも効率が良いことが期待できます。
💻 Exercise
0~99が昇順にソートされている配列から、入力した値を探索するアルゴリズムを、Binary Search で実装してみましょう。
何回の比較で数値を見つけ出すことができたかも出力しましょう。
これまで扱っていない、 Recursive function (再帰関数) を使う必要がありますので、わからないよ!という方は、以下をご参考ください。
☟ 解答例
package main

import "fmt"

func binarySearch(slice []int, low int, high int, target int, count int) (int, int) {
	if len(slice) < 1 || target < slice[0] || slice[high] < target {
		return -1, count
	}

	mid := (low + high) / 2 // 中央の index を定義
	count++                 // 比較回数をプラス

	if slice[mid] == target {
		return mid, count
	}

	if low >= high {
		return -1, count // これ以上探索できるデータがないので return
	}

	if slice[mid] > target {
		return binarySearch(slice, low, mid-1, target, count)
	}

	if slice[mid] < target {
		return binarySearch(slice, mid+1, high, target, count)
	}

	return -1, count
}

func main() {
	// 0~99 の slice を定義する
	slice := []int{}
	for i := 0; i < 100; i++ {
		slice = append(slice, i)
	}

	// 探索する数字を入力
	var target int
	fmt.Printf("input target number ▶︎ ")
	fmt.Scanf("%d", &target)

	count := 0 // 探索する数字が見つかるまでに、何回比較が行われたかをカウントする変数を定義
	index, count := binarySearch(slice, 0, len(slice)-1, target, count)
	if index < 0 {
		fmt.Printf("target not found")
	} else {
		fmt.Printf("index: %d, count: %d", index, count)
	}
}
☟ 出力結果
input target number ▶︎ 19
index: 19, count: 7

input target number ▶︎ 100
target not found
slice[mid] > target と slice[mid] < target で Recursive function (再帰関数) を使っています。
19 を探索する例でいくと、以下のようになります。
- まず、
slice: 0~99の配列,low: 0,high: 99,target: 19,count: 0がbinarySearchに渡る -
mid := (0 + 99)/2で49となる -
slice[49] == 49なので、49 > 19となり、slice,low: 0,high: 48,target,count: 1がbinarySearchの引数となる (以下、sliceとtargetは変わらないため省略) -
mid == 24,slice[mid] > targetとなり、low: 0,high: 23,count: 2がbinarySearchの引数となる -
mid == 11,slice[mid] < targetとなり、low: 12,high: 23,count: 3がbinarySearchの引数となる -
mid == 17,slice[mid] < targetとなり、low: 18,high: 23,count: 4がbinarySearchの引数となる -
mid == 20,slice[mid] > targetとなり、low: 18,high: 19,count: 5がbinarySearchの引数となる -
mid == 18,slice[mid] < targetとなり、low: 19,high: 19,count: 6がbinarySearchの引数となる -
mid == 19,slice[mid] == targetとなり、index: 19とcount: 7が return される
Recursive function は次のデータ構造とアルゴリズムである Tree でよく使いますので、理解しておく必要がありますね。
おわりに
Exerciseの解答例はあくまで例なので、もっといい書き方あるよ!という方、ぜひコメントをお寄せください!
説明についても、筆者自身が初心者であるため、ご指摘や補足は大歓迎でございます。
株式会社Link Sportsでは、あらゆるスポーツを楽しむ人たちに送る、チームマネジメントアプリを開発しています。
未経験でも経験豊富なエンジニアの方でも、スポーツ好きなら活躍できる環境があります!
絶賛エンジニア募集中です!
Wantedly ▶︎ https://www.wantedly.com/projects/324177
Green ▶︎ https://www.green-japan.com/job/82003
次回は、データ構造とアルゴリズム**#6 Tree (木構造)**です。