ここまでのおさらい
前回 Nuxt.js + Auth0 + Spring Boot で作る認証付きSPA 【 vol.3 Nuxtとauth0組み込み編 】 で
Nuxtとauth0を利用してgoogleでユーザ認証することができました。
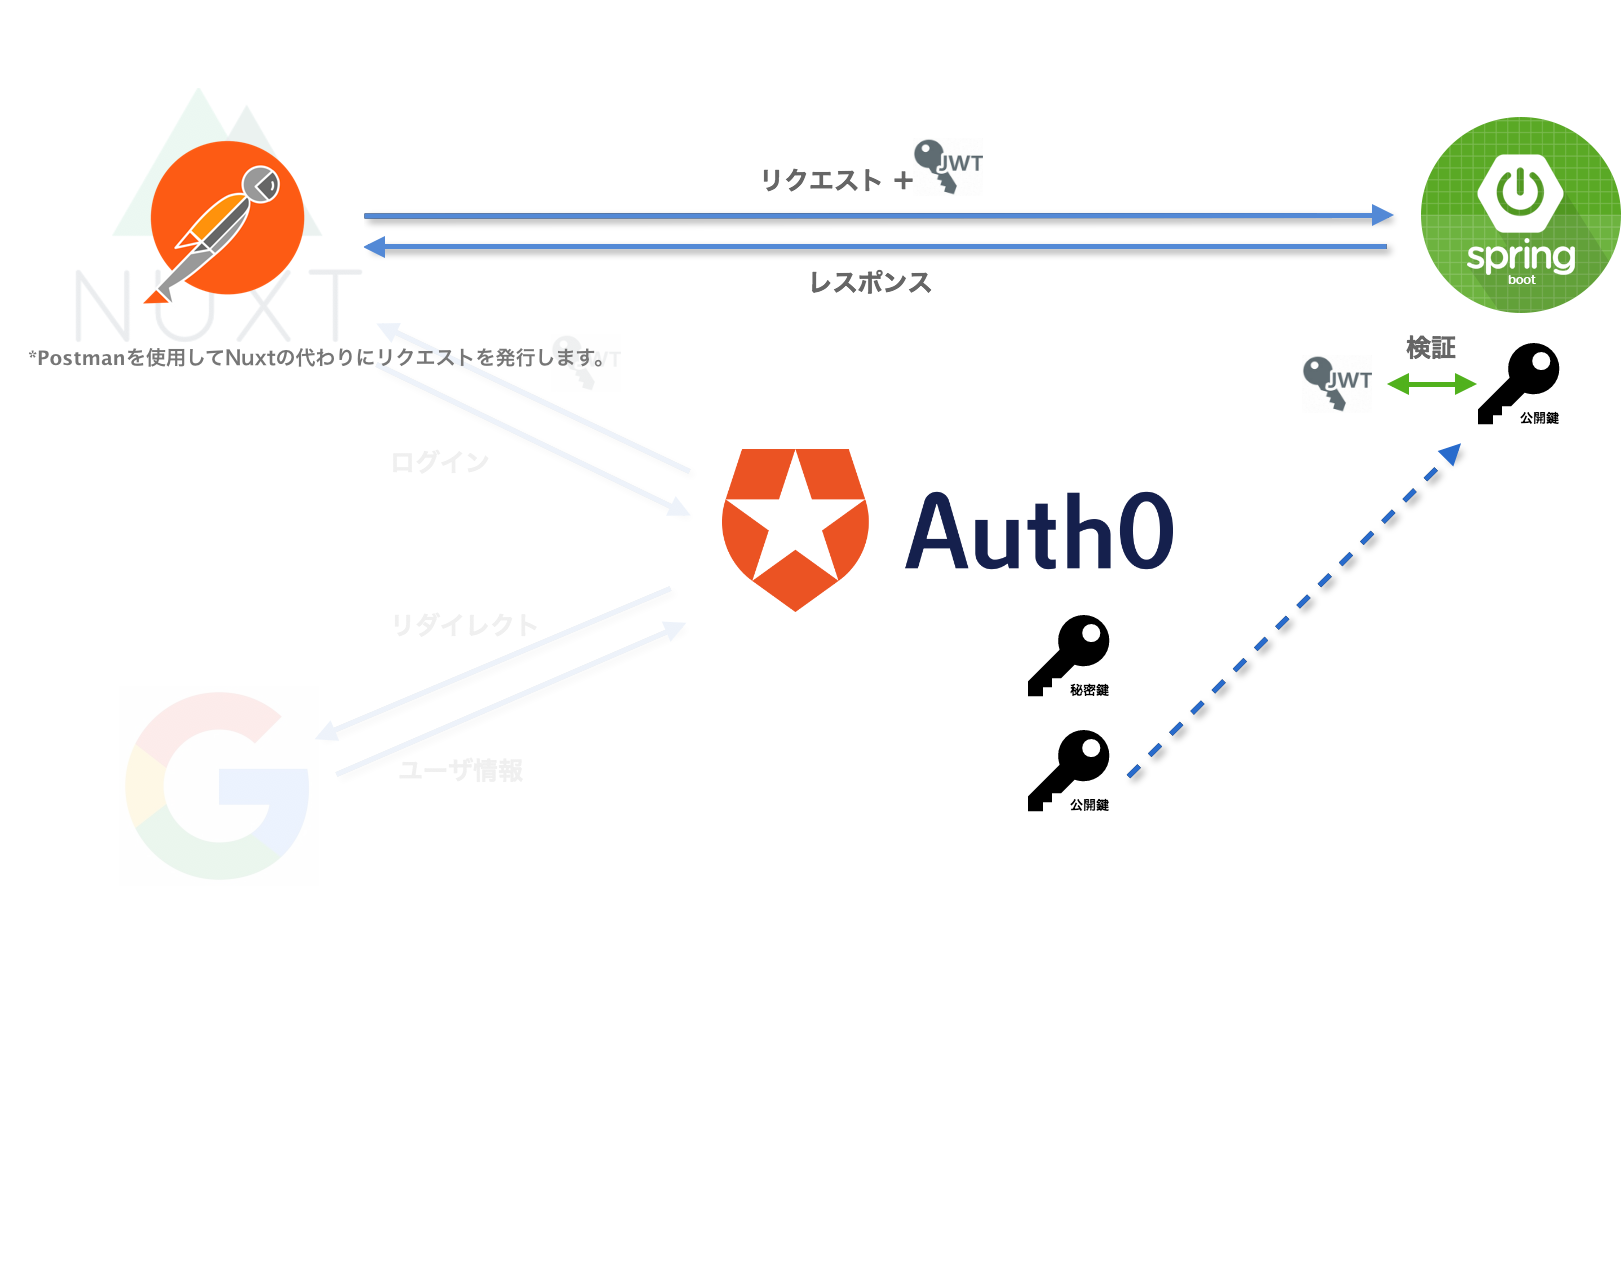
今回はSpringとauth0を利用してサーバサイドを作成していきます。
今回やることのイメージ
Spring boot プロジェクトのテンプレートを作る
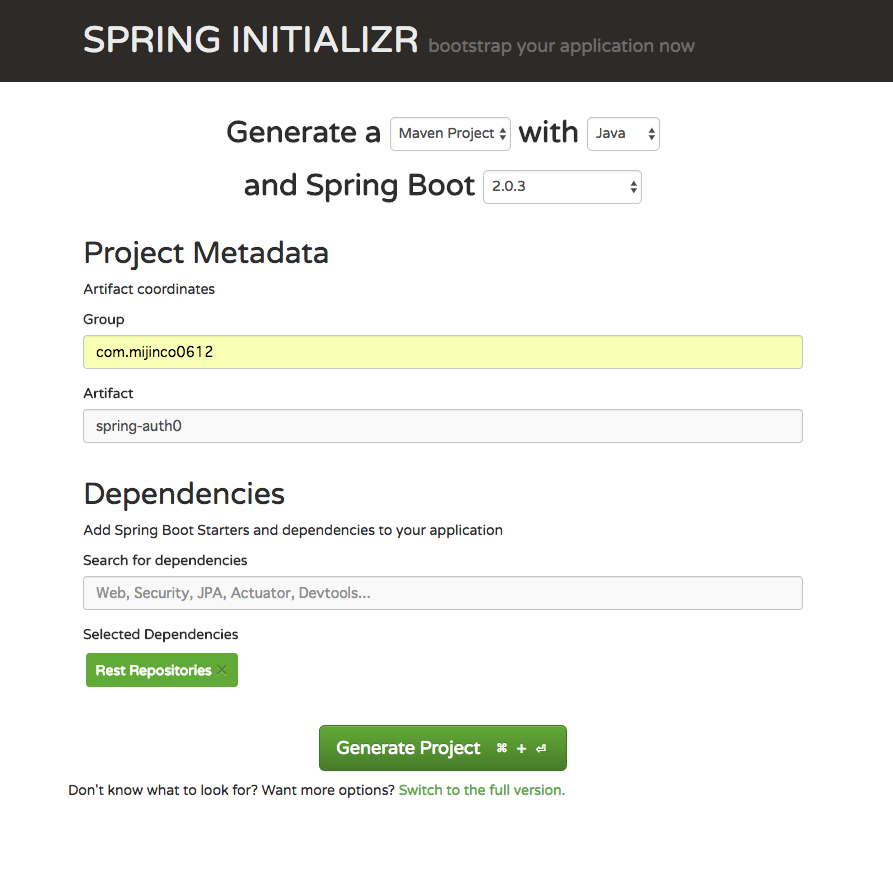
SPRING INITIALIZRでプロジェクトのテンプレートを作成します。
今回は DependenciesにRestRepositoriesのみ追加しました。
pom.xmlに以下のDependenciesの追加する
		<dependency>
			<groupId>org.springframework.boot</groupId>
			<artifactId>spring-boot-starter-security</artifactId>
		</dependency>

		<dependency>
			<groupId>com.auth0</groupId>
			<artifactId>auth0</artifactId>
			<version>1.0.0</version>
		</dependency>

		<dependency>
			<groupId>com.auth0</groupId>
			<artifactId>auth0-spring-security-api</artifactId>
			<version>1.0.0-rc.3</version>
		</dependency>
aplication.ymlを追加する
aplicaiton.propertiesからapplicaiton.ymlに置換し
起動ポートを28080に変更します。1
auth0-spring-security-apiを使用する際にauth0のaudienceとissuerの接続情報が必要になります。
ymlにハードコードするのは避けたかったので環境変数から参照するようにします。
前回、環境変数を登録したときと同じように環境変数を追加します。
vi ~/.bashrc
# 以下を.bashrcに追加
export auth0issuer=https://**************/ #****には前回登録したauth0Domainと同じ値が入ります

# : wqで保存後、以下を実行するかターミナルを再起動させる。
source ~/.bashrc
*audienceは前回登録したauth0ClientIDと同じ値を使用するので追加は割愛しました。
server:
  port: 28080
auth0:
  audience : ${auth0ClientID}
  issuer : ${auth0issuer}
controllerの設置
public/privateという文字列を返すだけのシンプルなEndPointを設置します。
package com.mijinco0612.springauth0.controller.api.v1;

import org.springframework.web.bind.annotation.GetMapping;
import org.springframework.web.bind.annotation.ResponseBody;
import org.springframework.web.bind.annotation.RestController;

@RestController
public class DemoController {

    @ResponseBody
    @GetMapping(value = "/api/v1/public")
    public String publicApi() {
        return "public";
    }

    @ResponseBody
    @GetMapping("/api/v1/private")
    public String privateApi() {
        return "private";
    }
}
最終的には
/api/v1/publicへのリクエストは認証なしで許可
/api/v1/privateへのリクエストは認証済の場合許可するように制御します。
現時点では保護されていないためどちらもリクエストが通ります。
WebSecurityConfigを追加
さあ、apiを保護していきましょう。といっても以下を追加するだけです。
package com.mijinco0612.springauth0.security;

import com.auth0.spring.security.api.JwtWebSecurityConfigurer;
import org.springframework.beans.factory.annotation.Value;
import org.springframework.context.annotation.Configuration;
import org.springframework.security.config.annotation.web.builders.HttpSecurity;
import org.springframework.security.config.annotation.web.configuration.EnableWebSecurity;
import org.springframework.security.config.annotation.web.configuration.WebSecurityConfigurerAdapter;

@Configuration
@EnableWebSecurity
public class WebSecurityConfig extends WebSecurityConfigurerAdapter {
    @Value("${auth0.audience}")
    private String audience;  //ymlに設定したaudienceを代入

    @Value("${auth0.issuer}")
    private String issuer; //ymlに設定したissuerを代入

    @Override
    protected void configure(HttpSecurity http) throws Exception {
        http.authorizeRequests()
                .antMatchers("/api/v1/public").permitAll() // publicは制限なし
                .antMatchers("/**").authenticated(); // それ以外は認証済みの場合のみ許可

        JwtWebSecurityConfigurer
                .forRS256(audience, issuer)  //Request Headers Authorization tokenを検証
                .configure(http);
    }
}
動作確認してみる
ここまでで、サーバサイドの準備は完了です。実際にリクエストを行って挙動を確認してみましょう。
Postmanについてはこちらとかこちらを参照してみてください。
今回はPostman for Macを使用しました。
アプリケーションを起動させます。
~/s/spring-auth0 ❯❯❯ cd ~/study-auth0/spring-auth0/  #作成したプロジェクトのルートディレクトリへ移動
mvn clean spring-boot:run
[INFO] Scanning for projects...
[INFO]
[INFO] --------------------< com.mijinco0612:spring-auth0 >--------------------
[INFO] Building spring-auth0 0.0.1-SNAPSHOT
[INFO] --------------------------------[ jar ]---------------------------------
~~~~~~~~~~~~中略~~~~~~~~~~~~
2018-07-06 07:36:54.821  INFO 33804 --- [           main] o.s.j.e.a.AnnotationMBeanExporter        : Registering beans for JMX exposure on startup
2018-07-06 07:36:55.054  INFO 33804 --- [           main] o.s.b.w.embedded.tomcat.TomcatWebServer  : Tomcat started on port(s): 28080 (http) with context path ''
2018-07-06 07:36:55.068  INFO 33804 --- [           main] c.m.springauth0.SpringAuth0Application   : Started SpringAuth0Application in 15.998 seconds (JVM running for 24.986)
port:28080でアプリケーションが起動しました。
Postmanを使ってリクエストをしてみる。
先ずはhttp://localhost:28080/api/v1/publicにリクエストしてみます。
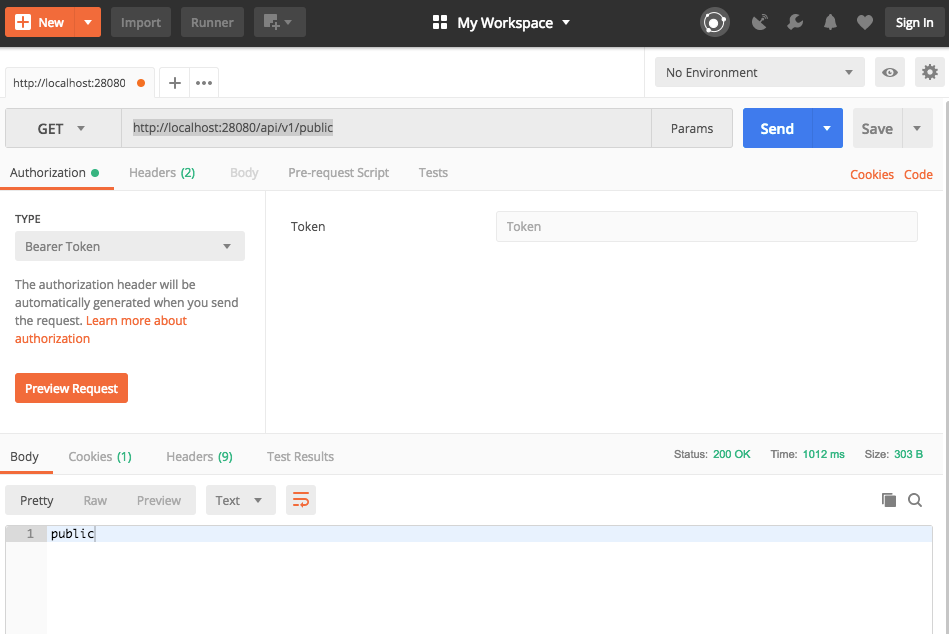
response body に publicの文字列が返ってきてますね。成功です。
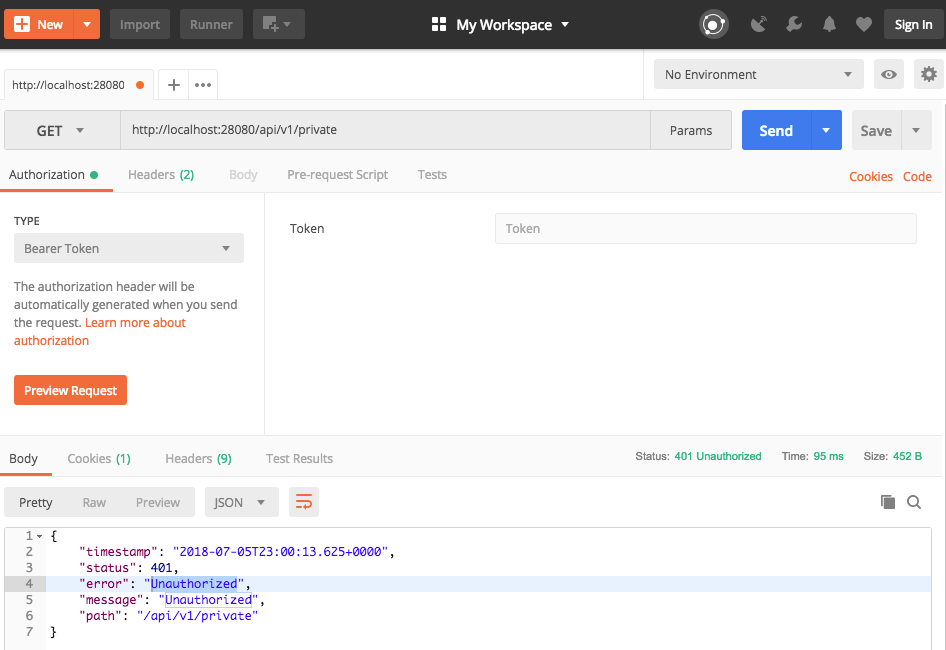
次にhttp://localhost:28080/api/v1/privateにリクエストしてみます。
認証はまだしていませんので、401:Unauthorizedが返ってくるはずです。
想定したとおりの挙動ですね。成功です!
では認証済みの場合の挙動を確認しましょう。
前回 Nuxt.js + Auth0 + Spring Boot で作る認証付きSPA 【 vol.3 Nuxtとauth0組み込み編 】で作成したNuxtアプリケーションでログインを行いchrome developer toolでLocal StorageのidTokenの値をコピーしましょう。
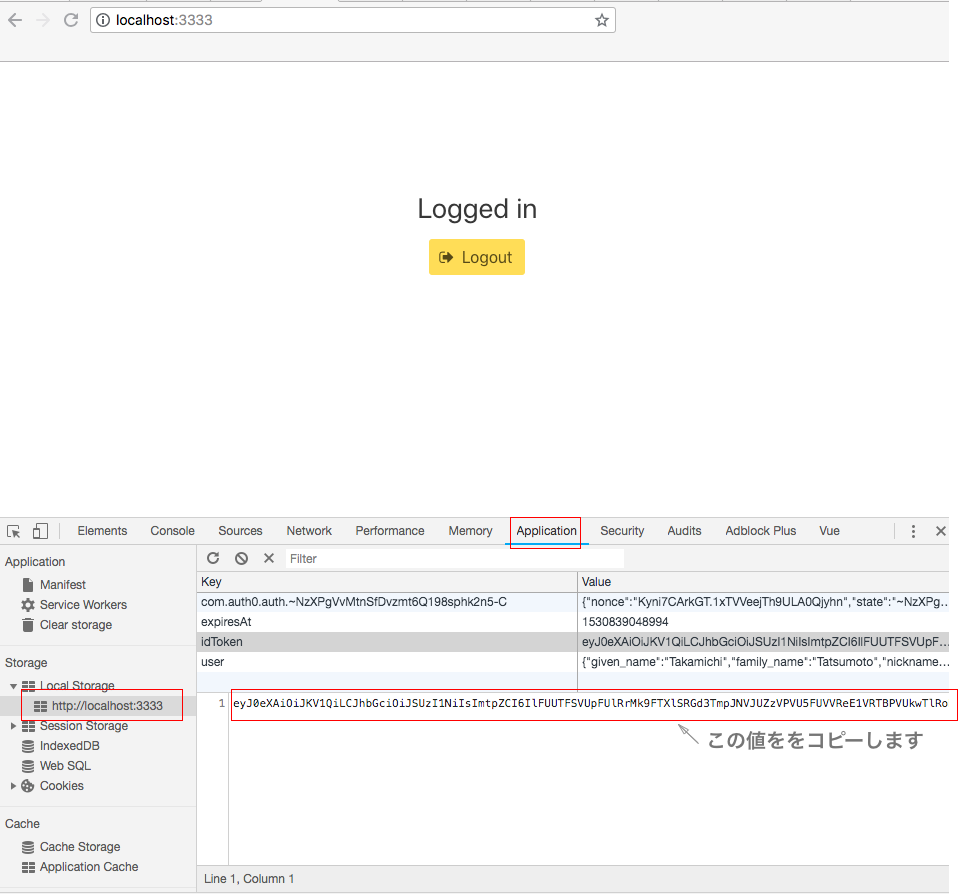
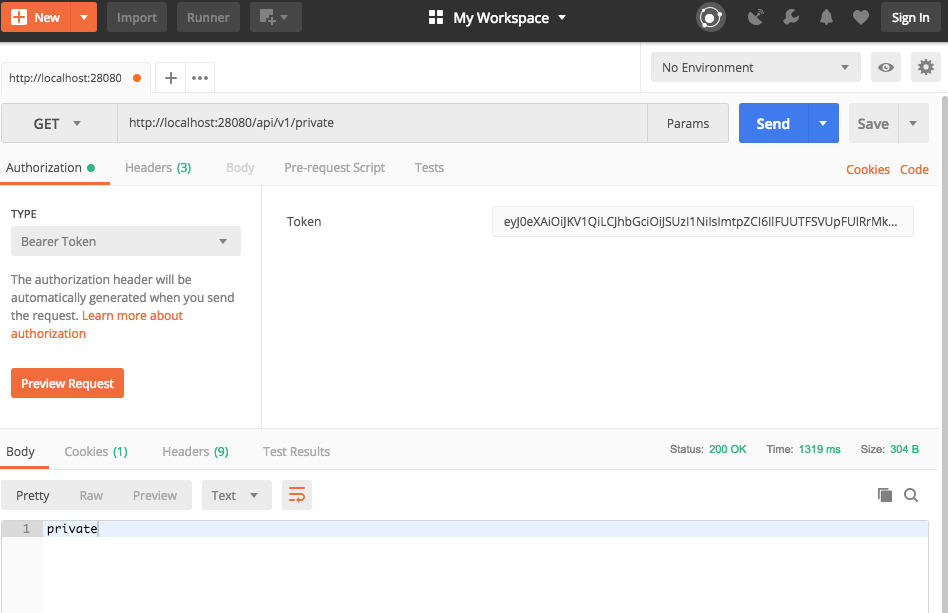
コピーできたらPostmanのAuthorizationタブに遷移し、TYPEにBearerTokenを選択して、コピーしてきたidTokenをToken フィールドにペーストします。
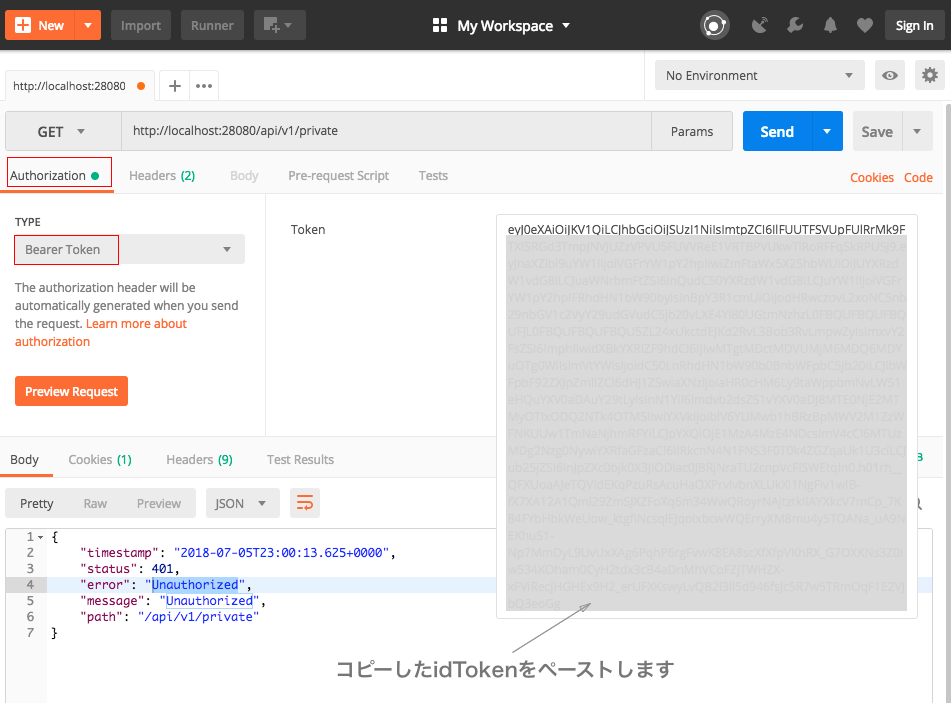
再度リクエストを試してみましょう。
今度は無事privateという文字列が返ってきました。成功です!
jwt.ioなどをつかって、先程のidTokenを書き換えてリクエストしてみると
401:Unauthorizedが返ってくることが確認できます。
Tokenの検証が行われていることをお手元でも実際に確認してみてください。
まとめ
非常にシンプルですが、これでサーバサイドは完了です。
実際にJwtの検証をjjwtなどを利用して作成されたことのある方は手順の少なさに驚かれたのではと思います。
次回はいよいよNuxtとSpringをつないでアプリケーションを完成させます。
参考
脚注
-
デフォルトの8080ポートを使用したい場合、この設定は不要です。 ↩
