おさらい
前回の記事でNuxtの準備ができました。続きを作っていきます。
Nuxtにauth0を組み込む
今回はauth0-Lockというライブラリを使用します。
実行コマンド
yarn add auth0-lock
実行結果
(node:4746) [DEP0005] DeprecationWarning: Buffer() is deprecated due to security and usability issues. Please use the Buffer.alloc(), Buffer.allocUnsafe(), or Buffer.from() methods instead.
[1/4] 🔍  Resolving packages...
[2/4] 🚚  Fetching packages...
[3/4] 🔗  Linking dependencies...
[4/4] 📃  Building fresh packages...
success Saved lockfile.
success Saved 28 new dependencies.
info Direct dependencies
└─ auth0-lock@11.7.2
info All dependencies
├─ asap@2.0.6
├─ ~~中略~~
└─ winchan@0.2.0
✨  Done in 32.76s.
auth0-Lockを利用する
auth0-Lockを利用するために
Nuxtプラグインとしてplugins/auth0.jsにAuth0Utilクラスを実装する必要があります。
その際にauth0で設定したDomainとClientIDが必要になります。
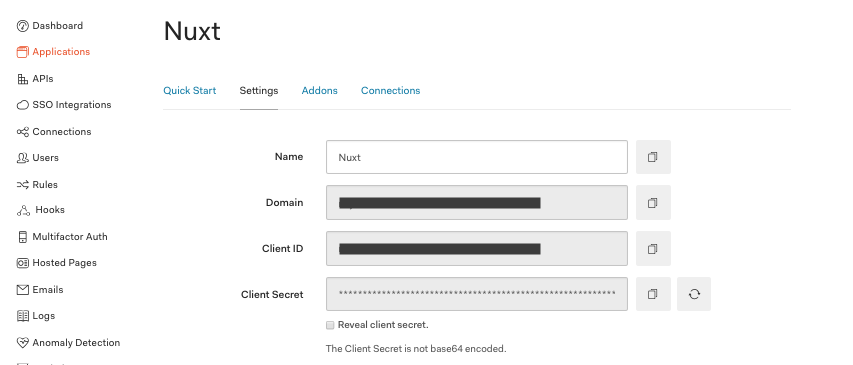
Domain及びClientIDは上記の画像のように
auth0のダッシュボード > Applications > Nuxt(作成したアプリケーション) > Settings
で確認できます。
plugins/auth0.jsを実装する前に
auth0.jsにclientID等をハードコードするのは避けたいので、環境変数から取得することします。
auth0Domainとauth0ClientIDという環境変数を登録する。
.bashrcに登録する場合
vi ~/.bashrc
# 以下二行を.bashrcに追加
export auth0ClientID=********************
export auth0Domain=**********************

# :wqで保存後、以下を実行するかターミナルを再起動させる。
source ~/.bashrc
環境変数を取得
nuxt.config.jsに以下を追加
  env: {
    auth0ClientID: process.env.auth0ClientID,
    auth0Domain: process.env.auth0Domain
  }
plugins/auth0.jsの実装
auth0.js
import Auth0Lock from 'auth0-lock'

//環境変数に登録したDomainとClinentIDをenvから取得
const config = {
  clientID: process.env.auth0ClientID,
  domain: process.env.auth0Domain
}

class Auth0Util {
  showLock(container) {
    const lock = new Auth0Lock(
      config.clientID,
      config.domain,
      {
        container,
        closable: false,
        auth: {
          responseType: 'token id_token',
          redirectUrl: this.getBaseUrl() + '/callback',
          params: {
            scope: 'openid profile email'
          }
        }
      })
    lock.show()
  }

  getBaseUrl() {
    return `${window.location.protocol}//${window.location.host}`
  }
}

export default (context, inject) => {
  inject('auth0', new Auth0Util);
}
nuxt.config.jsにpluginsを追加
nuxt.config.js
mode: 'spa',
plugins: ['~/plugins/auth0.js'] //追加
injectを利用することでVueコンポーネント内でthis.$auth0経由で呼び出しができるようになります。
Loginページを作成
login.vue
<template>
  <div id="show-auth"/>
</template>
<script>
  export default {
    mounted() {
      this.$auth0.showLock("show-auth");
    }
  };
</script>
<style scoped>
  #show-auth {
    margin-top: 20px;
  }
</style>
callbackページを作成
callback.vue
<template>
  <p>Signing in...</p>
</template>
callback URLを許可する
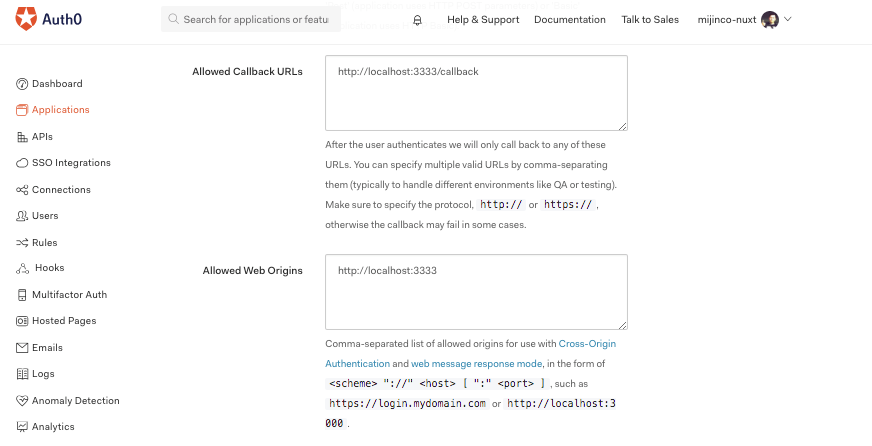
AllowedCallbackURLsに追加
http://localhost:3333/callback
AllowedWebOriginsに追加
http://localhost:3333
まとめ
ここまでauth0を利用してgoogleでユーザ認証ができるようになりました。
次回はSpringとauth0を使用してサーバサイドを構築します。