Cloud Pak for Data 内のDb2サービスへ接続できた4つの方法をご紹介しています。 使用頻度が高いと思われる順に記事を並べました。
ここでは CP4D (Cloud Pak for Data)で Db2 Pod に直接接続できたことをご紹介したいと思います。
どういうときに使うかというのは横においておいて ちょっとやってみませんか?
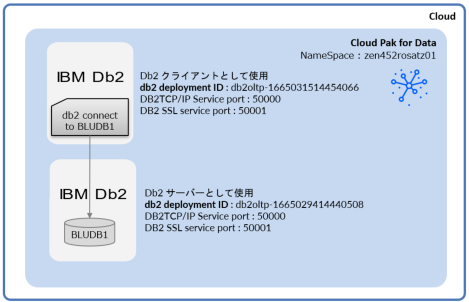
ROSA(Red Hat OpenShift Service on AWS) や ROKS (Red Hat OpenShift Kubernetes Service)に 2つ Db2 Deployment を作成し、1つを Db2 サーバー1つをクライアントとみなして、Db2 サーバー上のデータベースに接続します。
Db2 Pod に直接接続するときのポイントはPodが再起動するとIPアドレスが変更されるため Db2 サーバーの公開されているホスト名を取得することです。
情報収集
まず 必要となる次のような情報を集めます。
| Db2 Client | |
|---|---|
| deployment ID | db2oltp-1665031514454066 |
| Pod 名 | c-db2oltp-1665031514454066-db2u-0 |
Pod名はc-${db2_deployment_id}-db2u-0 といった形式になる。 |
|
| Db2 Server | |
| deployment ID | db2oltp-1665029414440508 |
| Pod 名 | c-db2oltp-1665029414440508-db2u-0 |
| データベース名 | BLUDB1 |
| サービスポート | 50000 |
| ホスト名 | c-db2oltp-1665029414440508-db2u-0.c-db2oltp-1665029414440508-db2u-internal.zen452rosatz01.svc.cluster.local |
ホスト名はc-${db2_deployment_id}-db2u-0.c-${db2_deployment_id}-db2u-internal.${project_name}.svc.cluster.local といった形式になる。 |
1. Deployment IDとデータベース名の取得
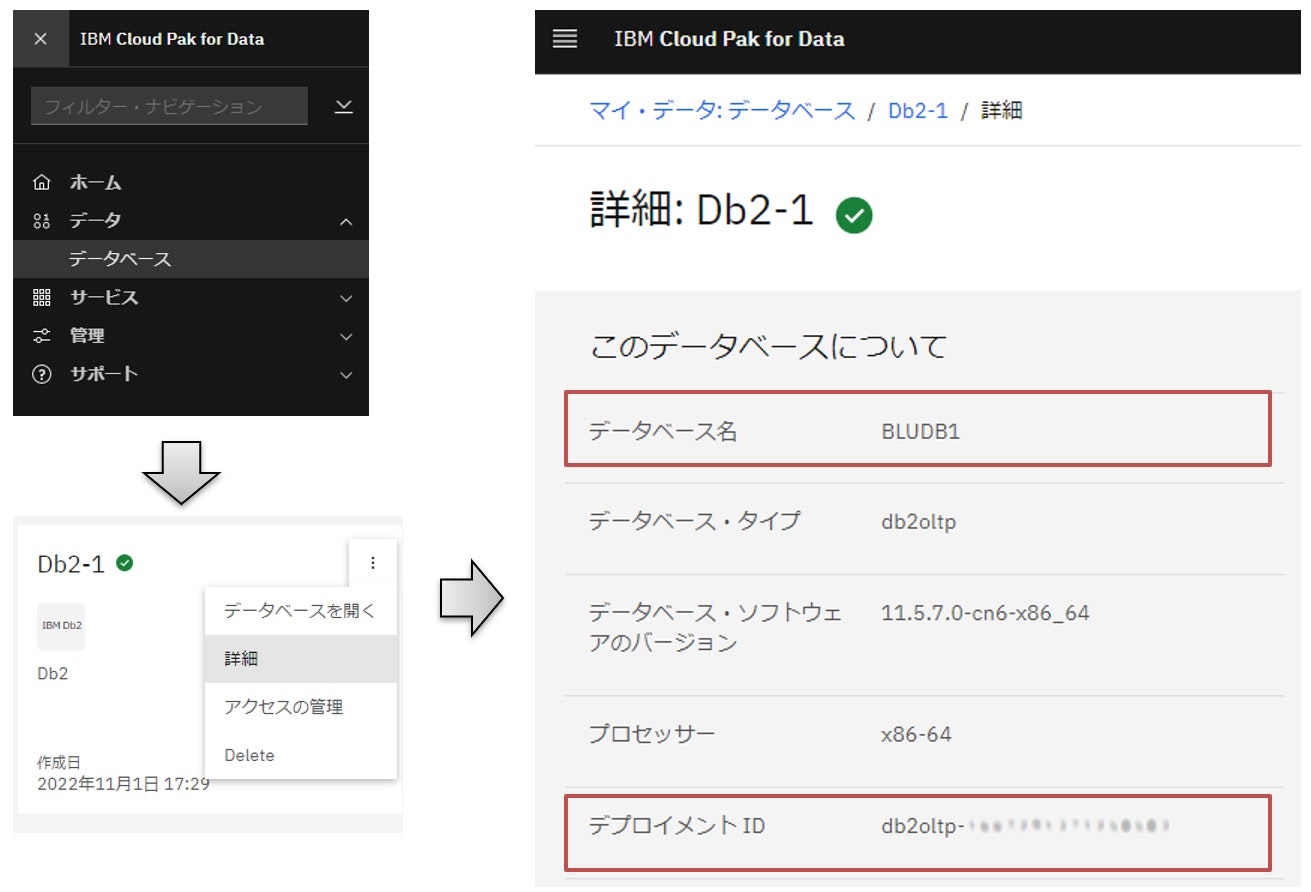
Db2 サーバーと Db2クライアントとなる Db2 Deployment の Deployment ID と Db2サーバー上の データベース名を確認します。
CP4Dコンソールのメニューから データ→ データベースを選択します。
Db2 サーバーとDb2クライアントとなるDb2 Deploymentそれぞれで詳細を開きます。 そこで データベース名と デプロイメント IDを確認します。
2. Db2 サーバーのIPアドレスの取得
Db2 サーバーとなるDb2 Deployment があるProject に変更し oc get pod -o wide を使用して Db2 DeploymentのIPアドレスを取得します。次の場合 サーバーとなるDb2 DeploymentのIPアドレスは10.128.2.42となります。
[test01@bastion7 ~]$ oc project zen452rosatz01
Now using project "zen452rosatz01" on server "https://api.tzrosa-say7efvb.c9og.p1.openshiftapps.com:6443".
[test01@bastion7 ~]$
[test01@bastion7 ~]$ oc get pod -o wide c-db2oltp-1665029414440508-db2u-0
NAME                                READY   STATUS    RESTARTS   AGE   IP             NODE                                         NOMINATED NODE  READINESS GATES
c-db2oltp-1665029414440508-db2u-0   1/1     Running   0          22d   10.128.2.42    ip-10-0-170-119.us-west-1.compute.internal   <none>           <none>
[test01@bastion ~]$
3. Db2 サーバーのサービスポート取得
Db2 ServerのPodに入り db2inst1にユーザーを切り替えます。
[test01@bastion7 ~]$ oc exec -it c-db2oltp-1665029414440508-db2u-0 -- bash
Defaulted container "db2u" out of: db2u, init-labels (init), init-kernel (init)
[db2uadm@c-db2oltp-1665029414440508-db2u-0  /]$ su - db2inst1
Last login: Fri Oct 28 07:49:57 UTC 2022
[db2inst1@c-db2oltp-1665029414440508-db2u-0 - Db2U db2inst1]$
Db2 LUWと同様に db2 get dbm cfg を実行し SVCENAMEを確認し /etc/services から Db2サービスポートを取得します。 この例では 50000であることがわかります。
[db2inst1@c-db2oltp-1665029414440508-db2u-0 - Db2U db2inst1]$ db2 get dbm cfg | grep SVCE
 TCP/IP Service name                          (SVCENAME) = db2c_db2inst1
 SSL service name                         (SSL_SVCENAME) = 50001
[db2inst1@c-db2oltp-1665029414440508-db2u-0 - Db2U db2inst1]$ grep db2c_db2inst1 /etc/services
db2c_db2inst1     50000/tcp             # DB2 service port
db2c_db2inst1_ssl 50001/tcp             # DB2 SSL service port
[db2inst1@c-db2oltp-1665029414440508-db2u-0 - Db2U db2inst1]$
4. Db2 クライアントとなるDb2 DeploymentのPodに入る。
[test01@bastion7 ~]$ oc exec -it c-db2oltp-1665031514454066-db2u-0 -- bash
Defaulted container "db2u" out of: db2u, init-labels (init), init-kernel (init)
[db2uadm@c-db2oltp-1665031514454066-db2u-0 /]$
5. Db2 サーバーの公開されているホスト名取得
(1) で取得したIPアドレスを使用して nslookup を実行し Db2 サーバーの公開されているホスト名を取得します。
[db2uadm@c-db2oltp-1665031514454066-db2u-0 /]$ nslookup 10.128.2.41
41.2.128.10.in-addr.arpa        name = 10-128-2-41.c-db2oltp-1665029414440508-db2u.zen452rosatz01.svc.cluster.local.
41.2.128.10.in-addr.arpa        name = c-db2oltp-1665029414440508-db2u-0.c-db2oltp-1665029414440508-db2u-internal.zen452rosatz01.svc.cluster.local.
41.2.128.10.in-addr.arpa        name = 10-128-2-41.c-db2oltp-1665029414440508-db2u-engn-svc.zen452rosatz01.svc.cluster.local.
41.2.128.10.in-addr.arpa        name = 10-128-2-41.c-db2oltp-1665029414440508-db2u-head-engn-svc.zen452rosatz01.svc.cluster.local.

[db2uadm@c-db2oltp-1665031514454066-db2u-0 /]$
この例では c-db2oltp-1665029414440508-db2u-0.c-db2oltp-1665029414440508-db2u-internal.zen452rosatz01.svc.cluster.localです。(最後のピリオド"."は不要)
Db2 Deployment の Pod は c-${db2_deployment_id}-db2u-0.c-${db2_deployment_id}-db2u-internal.${project_name}.svc.cluster.localといった名前で公開されています。
以上で 必要な情報がそろいました。
Db2 クライアントから Db2 サーバー上DBへの接続を構成する
では Db2のトラディショナルな接続方法で接続してみましょう。
1. Catalog TCP/IP Node
Db2 クライアントのPodに入り db2inst1にユーザーを切り替えます。
[db2uadm@c-db2oltp-1665031514454066-db2u-0 /]$ su - db2inst1
Last login: Fri Oct 28 08:49:57 UTC 2022
[db2inst1@c-db2oltp-1665031514454066-db2u-0 - Db2U db2inst1]$
Db2 クライアントに Db2 サーバーのノードをカタログします。
db2 catalog tcpip node ノード名 remote ホスト名 server サービスポート
[db2inst1@c-db2oltp-1665031514454066-db2u-0 - Db2U db2inst1]$ db2 catalog tcpip node DB1 remote c-db2oltp-1665029414440508-db2u-0.c-db2oltp-1665029414440508-db2u-internal.zen452rosatz01.svc.cluster.local server 50000
DB20000I  The CATALOG TCPIP NODE command completed successfully.
DB21056W  Directory changes may not be effective until the directory cache is
refreshed.

[db2inst1@c-db2oltp-1665031514454066-db2u-0 - Db2U db2inst1]$
2. Catalog database
1でカタログしたノードにデータベースをカタログします。
db2 catalog db データベース名 at node (1でカタログしたノード名)
[db2inst1@c-db2oltp-1665031514454066-db2u-0 - Db2U db2inst1]$ db2 catalog db bludb1 at node db1
DB20000I  The CATALOG DATABASE command completed successfully.
DB21056W  Directory changes may not be effective until the directory cache is
refreshed.
[db2inst1@c-db2oltp-1665031514454066-db2u-0 - Db2U db2inst1]$
ディレクトリーキャッシュをリフレッシュするために db2 terminateを実行します。
[db2inst1@c-db2oltp-1665031514454066-db2u-0 - Db2U db2inst1]$ db2 terminate
DB20000I  The TERMINATE command completed successfully.
[db2inst1@c-db2oltp-1665031514454066-db2u-0 - Db2U db2inst1]$
3. Db2 サーバー の データベースに接続します。
[db2inst1@c-db2oltp-1665031514454066-db2u-0 - Db2U db2inst1]$ db2 connect to bludb1 user db1user using xxxxxx

   Database Connection Information

 Database server        = DB2/LINUXX8664 11.5.7.0
 SQL authorization ID   = DB1USER
 Local database alias   = BLUDB1

[db2inst1@c-db2oltp-1665031514454066-db2u-0 - Db2U db2inst1]$
接続できました。
終わりに
Db2 Pod に直接接続するときのポイントはPodが再起動するとIPアドレスが変更されるため Db2 サーバーの公開されているホスト名を取得することです。
検証環境
本手順は 次の環境で検証しています。
- ROSA環境 OCP v4.10.32 , CP4D v4.5.2
- ROKS環境 OCP v4.10.32 , CP4D V4.5.3
参照文献
IBM Cloud Pak for Data : Working with integrated IBM Db2 databases
Db2 : CATALOG TCPIP/TCPIP4/TCPIP6 NODE コマンド
Db2 : CATALOG DATABASE コマンド

