始まる前に
- この設定は、次のページを参考にして作成しました。とても力になりました。
- RouterOSでフレッツのv6プラス(MAP-E)を利用する https://qiita.com/mooglejp/items/e15335842cbd12f4cd0b
- RouterOSv7でv6プラスでの接続が確立できない https://forum.rb-ug.jp/t/topic/127
- RouterOSv7においてv6プラス固定IP接続ができない https://forum.rb-ug.jp/t/topic/205
- [ROUTEROS] 日本のISPにおける一般的なIPV4/IPV6 DUAL STACK構築方法 https://blog.gaftnochec.net/infrastructure/routeros-ipv4-ipv6-dual-stack/
- NTT東が6月に提供を開始したSFPタイプのONU https://mum.mikrotik.com/presentations/JP15/presentation_2968_1444887529.pdf
環境
- CCR1009-7G-1C-PC
- フレッツ光ネクスト マンションタイプ
LAN配線方式(100Mbpsまでしか出ません。v6プラス意味あるのか)2022/08/22 : 光配線方式になりました!! - オープンサーキットのv6Neo契約
- 固定IPではない
- ひかり電話もない
- combo1がWAN, ether1~4がLAN
- LANのプライベートIPとして192.168.100.0/24を使用
- 最初成功したのはRouterOS 7.2(その後7.3.1でも成功)
内部ネットワークの設定
ひかり電話がないのでNGNから64Prefixが降りてきます。この状態だと、RouterOSとその下の端末でIPv6通信ができるようにするには、WANとLANをブリッジする方法しかありません...
だた、そうするとセキュリティ的にあれなので、先にセキュリティ設定をします。これで大丈夫な訳ではありませんが...
/ip service
set telnet disabled=yes
set ftp disabled=yes
set www disabled=yes
set ssh disabled=yes
set api disabled=yes
set winbox address=192.168.100.0/24
set api-ssl disabled=yes
次はブリッジ。
/interface bridge
add name=bridge-ngn protocol-mode=none
/interface bridge port
add bridge=bridge-ngn ingress-filtering=no interface=combo1
add bridge=bridge-ngn ingress-filtering=no interface=ether1
add bridge=bridge-ngn ingress-filtering=no interface=ether2
add bridge=bridge-ngn ingress-filtering=no interface=ether3
add bridge=bridge-ngn ingress-filtering=no interface=ether4
/interface bridge settings
set allow-fast-path=no
LANのプライベートIPを設定します。+DHCPも
/ip address
add address=192.168.100.1/24 comment=defconf interface=bridge-ngn network=192.168.100.0
/ip pool
add name=dhcp_pool0 ranges=192.168.100.2-192.168.100.254
/ip dhcp-server
add address-pool=dhcp_pool0 interface=bridge-ngn name=dhcp1
/ip dhcp-server network
add address=192.168.100.0/24 dns-server=8.8.8.8 gateway=192.168.100.1
/ip dns
set cache-size=50000KiB max-concurrent-queries=200 max-concurrent-tcp-sessions=40 servers=8.8.8.8,8.8.4.4,2001:4860:4860::8888,2001:4860:4860::8844
/system clock
set time-zone-name=Asia/Tokyo
/system ntp client
set enabled=yes
/system ntp client servers
add address=ntp.nict.jp
add address=jp.pool.ntp.org
時間関連の設定も忘れなく。
IPv6ネットワークの設定
http://ipv4.web.fc2.com/map-e.html
このツールが必要。
割当されたIPv6アドレスは次の方法で確認できる。
:put [/ipv6/address get [:pick [find dynamic global interface=bridge-ngn] 0
 ] address]
/interface ipipv6
add dscp=0 !keepalive local-address=<CEのIPv6アドレス> mtu=1460 name=ipipv6-v6plus remote-address=<BRのIPv6アドレス>
/ipv6 settings
set accept-router-advertisements=yes
/ipv6 address
add address=<CEのIPv6アドレス> advertise=no interface=bridge-ngn
BRのアドレスは、http://ipv4.web.fc2.com/map-e.htmlのoption peeraddrのアドレス。
またはhttps://note.com/computerlanglab/n/n840695144f6b にも記載されているので使用するプロバイダーに沿って設定すればok
この時点で、RouterBoard下の端末ではIPv6通信ができるはず。ただ、Routerboardからはv6ネットワークに通信できないケースがある。そのため次の設定が必要。
/ipv6 route
add comment="NGN" disabled=no dst-address=::/0 gateway=<割当されたIPv6 Prefix::fffe> routing-table=main
BRのv6アドレスにpingができたら成功。
v6プラス設定
実は上でもやりましたが...
/ip address
add address=<計算機ででたv4アドレス> interface=ipipv6-v6plus network=<計算機ででたv4アドレス>
/ipv6 firewall filter
add action=accept chain=input protocol=ipencap
add action=accept chain=output protocol=ipencap
次は、待望のMAP-E設定です。これは参考というか
https://qiita.com/mooglejp/items/e15335842cbd12f4cd0b
をほぼ丸コピペしたものです
:global addNatRules do={
  # Args: $PSID $v4Addr $outInterface
  :for i from=1 to=15 do={
    :local portStart ((i << 12) | ([:tonum $PSID] << 4))
    :local portEnd   ($portStart + 15)
    :local portRange "$portStart-$portEnd"
    /ip firewall nat add chain="srcnat" action=masquerade protocol=tcp nth="$(16 - $i),1" to-address=$v4Addr to-ports=$portRange out-interface=$outInterface comment=("MAPE_TCP_".$i)
    /ip firewall nat add chain="srcnat" action=masquerade protocol=udp nth="$(16 - $i),1" to-address=$v4Addr to-ports=$portRange out-interface=$outInterface comment=("MAPE_UDP_".$i)
  }
}
$addNatRules PSID=<固有値> v4Addr=<割り当てられたIPアドレス> outInterface=ipipv6-v6plus
/ip firewall mangle add action=change-mss chain=forward new-mss=clamp-to-pmtu passthrough=yes protocol=tcp tcp-flags=syn tcp-mss=1460-65535
違いとしては、routing-mark部分でエラーが出たので、削除しただけ。また、後で話す自動設定更新のためコメントを追加した。
/ip route
add disabled=no dst-address=0.0.0.0/0 gateway=ipipv6-v6plus routing-table=main suppress-hw-offload=no
上手くできたら、このコマンド打つのと同時じipipv6-v6plusが動き出すはずです。
何故できたの
実は、最近10日間これで苦労して、失敗したときの設定も今とそこまで差はありません...
何故できたの...
性能

ニチバンベンチ問題ありません。
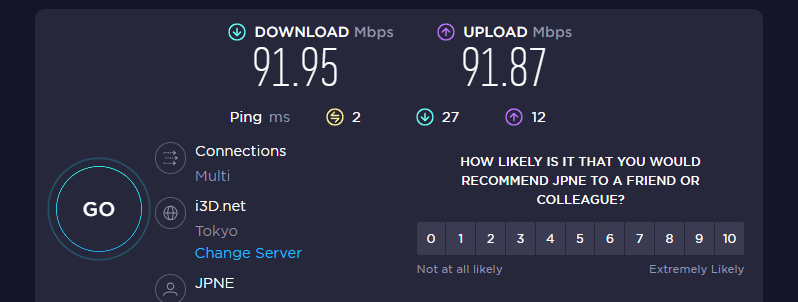
LAN方式としては頑張ってますね。(v6プラス意味あるのか)
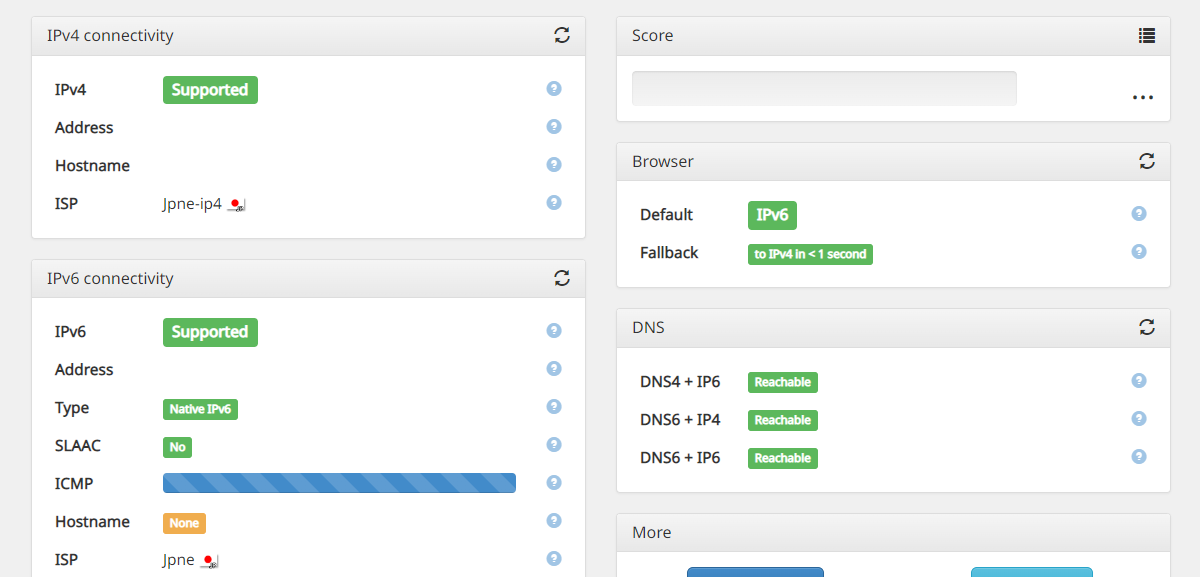
ちゃんとV6です。
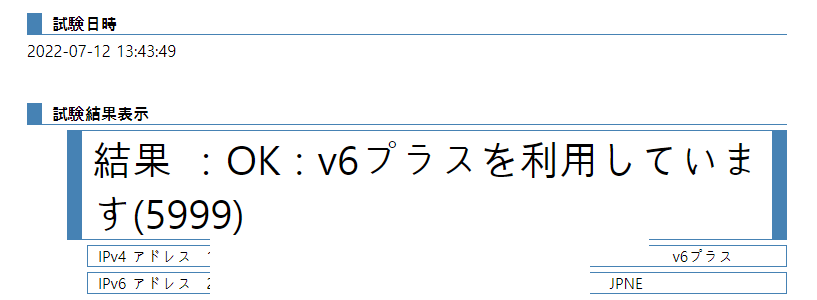
切り分けもOKです。
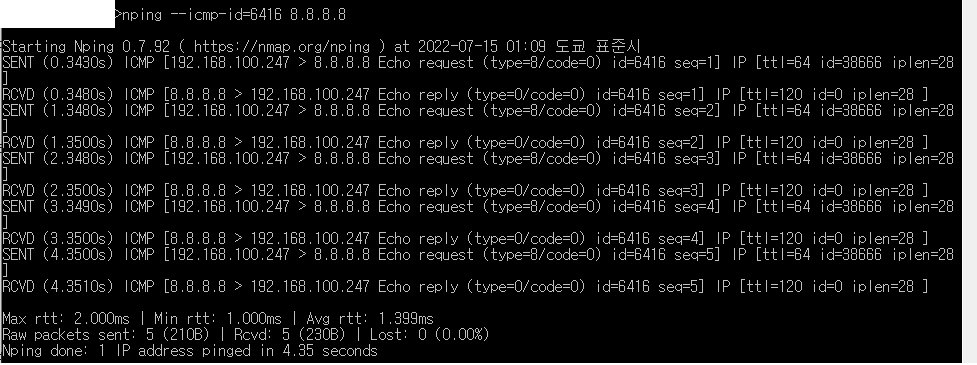
Pingができない??(7/15追記)
これで, TCPとUDP通信はできるはずですが、IPv4のアドレスにpingすると、帰ってきません。
結論から言うと、今のところルーター側の設定でこの問題を解決する方法はない。
MAP-Eの仕様(RFC 7597, https://datatracker.ietf.org/doc/html/rfc7597 )によると、ICMPにはポート番号がないので、ヘッダーのidentifierポート番号の代わりに使う。残念だけど今のところRouterOSのNAT設定にはそれ関連のオプションはない。( https://forum.mikrotik.com/viewtopic.php?t=141013 )
でも、pingする方法は、一応ある。
まず、
/ip firewall nat add action=masquerade chain=srcnat out-interface=ipipv6-v6plus protocol=icmp
を追加して、nmapをインストールする。
その後、
nping --icmp-id=<割り当てられたポート> <pingする相手>
を実行するとpingできる。
linuxのiptablesにはすでに実装された機能なのに、なぜRouterOSではできないのか、、
https://kusoneko.blogspot.com/2022/06/ping-to-ipoe-map-e-router-from-internet.html
を参考にしました。
少しセキュリティを考えました(7/15追記)
/interface bridge
add name=bridge-ngn protocol-mode=none
/interface ipipv6
add dscp=0 !keepalive local-address=<CEアドレス> mtu=1460 name=ipipv6-v6plus remote-address=<BRアドレス>
/interface list
add name=LAN
add name=WAN
/ip pool
add name=dhcp_pool0 ranges=192.168.100.2-192.168.100.254
/ip dhcp-server
add address-pool=dhcp_pool0 interface=bridge-ngn name=dhcp1
/interface bridge port
add bridge=bridge-ngn ingress-filtering=no interface=combo1
add bridge=bridge-ngn ingress-filtering=no interface=ether1
add bridge=bridge-ngn ingress-filtering=no interface=ether2
add bridge=bridge-ngn ingress-filtering=no interface=ether3
add bridge=bridge-ngn ingress-filtering=no interface=ether4
add bridge=bridge-ngn ingress-filtering=no interface=ether5
add bridge=bridge-ngn ingress-filtering=no interface=ether6
add bridge=bridge-ngn ingress-filtering=no interface=ether7
/interface bridge settings
set allow-fast-path=no use-ip-firewall=yes
/ipv6 settings
set accept-router-advertisements=yes
/interface list member
add interface=ether1 list=LAN
add interface=ether2 list=LAN
add interface=ether3 list=LAN
add interface=ether4 list=LAN
add interface=ether5 list=LAN
add interface=ether6 list=LAN
add interface=ether7 list=LAN
add interface=combo1 list=WAN
/ip address
add address=192.168.100.1/24 comment=defconf interface=bridge-ngn network=192.168.100.0
add address=<IPV4アドレス>interface=ipipv6-v6plus network=<IPV4アドレス>
/ip dhcp-server network
add address=192.168.100.0/24 dns-server=8.8.8.8 gateway=192.168.100.1
/ip dns
set cache-size=50000KiB max-concurrent-queries=200 max-concurrent-tcp-sessions=40 servers=8.8.8.8,8.8.4.4,2001:4860:4860::8888,2001:4860:4860::8844
/ipv6 route
add comment="NGN" disabled=no dst-address=::/0 gateway=<RAで降りたPrefix>::fffe routing-table=main
/ip service
set telnet disabled=yes
set ftp disabled=yes
set www disabled=yes
set ssh disabled=yes
set api disabled=yes
set winbox address=192.168.100.0/24
set api-ssl disabled=yes
/ipv6 address
add address=<CEアドレス> advertise=no interface=bridge-ngn
/ipv6 firewall address-list
add address=fe80::/16 list=allowed
add address=<RAで降りたPrefix>/64 list=allowed comment="ngnAllowedV6"
add address=ff02::/16 comment=multicast list=allowed
/ipv6 firewall filter
add action=accept chain=input comment="allow established and related" connection-state=established,related
add action=accept chain=input comment="accept ICMPv6" protocol=icmpv6
add action=accept chain=input comment="defconf:accept UDP traceroute" port=33434-33534 protocol=udp
add action=accept chain=input comment="accept DHCPv6-Client prefix delegation." dst-port=546 protocol=udp src-address=fe80::/16
add action=drop chain=input in-interface-list=WAN log=yes log-prefix=dropLL_from_public src-address=fe80::/16
add action=accept chain=input comment="allow allowed addresses" src-address-list=allowed
add action=drop chain=input
add action=accept chain=forward comment=established,related connection-state=established,related
add action=drop chain=forward comment=invalid connection-state=invalid log=yes log-prefix=ipv6,invalid
add action=accept chain=forward comment=icmpv6 protocol=icmpv6 src-address-list=allowed
add action=accept chain=forward comment="local network" in-bridge-port-list=!WAN
add action=drop chain=forward log-prefix=IPv6
add action=accept chain=input protocol=ipencap
add action=accept chain=output protocol=ipencap
/system clock
set time-zone-name=Asia/Tokyo
/system ntp client
set enabled=yes
/system ntp client servers
add address=ntp.nict.jp
add address=jp.pool.ntp.org
:global addNatRules do={
  # Args: $PSID $v4Addr $outInterface
  :for i from=1 to=15 do={
    :local portStart ((i << 12) | ([:tonum $PSID] << 4))
    :local portEnd   ($portStart + 15)
    :local portRange "$portStart-$portEnd"
    /ip firewall nat add chain="srcnat" action=masquerade protocol=tcp nth="$(16 - $i),1" to-address=$v4Addr to-ports=$portRange out-interface=$outInterface comment=("MAPE_TCP_".$i)
    /ip firewall nat add chain="srcnat" action=masquerade protocol=udp nth="$(16 - $i),1" to-address=$v4Addr to-ports=$portRange out-interface=$outInterface comment=("MAPE_UDP_".$i)
  }
}
$addNatRules PSID=<固有値> v4Addr=<割り当てられたIPアドレス> outInterface=ipipv6-v6plus

/ip firewall mangle add action=change-mss chain=forward new-mss=clamp-to-pmtu passthrough=yes protocol=tcp tcp-flags=syn tcp-mss=1460-65535
/ip route
add disabled=no dst-address=0.0.0.0/0 gateway=ipipv6-v6plus routing-table=main suppress-hw-offload=no
この設定でも行けます(https://blog.gaftnochec.net/infrastructure/routeros-ipv4-ipv6-dual-stack/ 参考)
セキュリティ的には少しはよくなったかもしれません。IPv4に関しては、https://help.mikrotik.com/docs/display/ROS/Building+Your+First+Firewall を参考にしても良いかも。
一部ゲーム(Starcraft 2韓国サーバ) の遅延時間がとんでもなく長い(7/15追記)
最初はMAP-E設定の問題だと思ったが、台湾サーバに接続するとこういう問題がなかったし、CPU使用率も高くなかったので、ルーティングの問題だと思って韓国VPN接続した上でゲーム起動してみたら大丈夫だった。
tracertやlookingglassで調べたところ、韓国LG U+(Battle.net韓国サーバ)とJPNEの間のルーティングテーブルに問題があるらしくて、何故かアメリカ経由のルートになっている。
多分この問題で影響ある人は私一人くらいなので皆様は大丈夫。
2023/08/29 : 光配線方式に変更したら、何故か治りました。なぜ、、、、
設定の自動アップデート (2026/3/18)
お久しぶりです
なんかv6Prefixが変わったので(変わらないと思ってました)色々設定変更してました
面倒くさいので自動でやってくれるスクリプトを作成しました
課題
- ICMPをなんとかしたい
- CGNAT関連設定を調べてみたら面白いもの出てくるかも?