OpenGLを使ってみたかったので、環境設定までのメモ。
ImGuiも使いたかったのでそれもメモ。
環境
Windows10(MacからBootCampしたもの)
Visual Studio2019
プロジェクトの作成
まずはVisual Studioで空のプロジェクトを作っておいてください。
ダウンロードするもの
・GLFW
OpenGLを動かすラッパーのようなものらしいです。
僕は最初はGLUTというものを使用してみましたが、
Loopの中身を変更できず、ImGuiを使えなそうだったのでこちらに移行しました。
公式サイトからダウンロードします。
https://www.glfw.org/download.html
自分は64ビットなので、64-bit Windows Binariesをダウンロードしました。
32ビットの人は、32-bit Windows Binariesをダウンロードします。
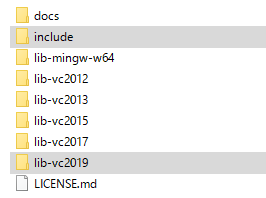
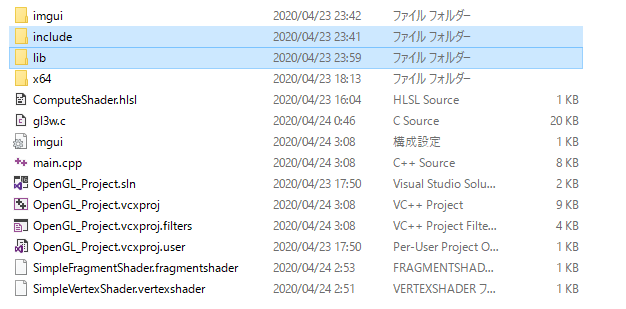
解凍して、includeとlib-vc2019(Visual Studioのバージョンと同じもの)をプロジェクトの階層にコピーします。
lib-vc2019はlibにリネームしています。
VisualStadio側で設定も必要です。
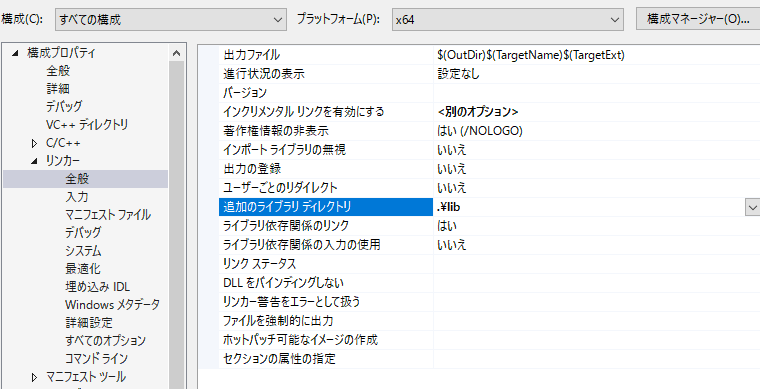
プロジェクトのプロパティから、以下のように設定します。
C/C++の全般から追加のインクルードディレクトリに.\includeを追加。
リンカーの全般から追加のライブラリディレクトリに.\libを追加。
また、リンカーの入力の追加の依存ファイルに、
opengl32.lib、glfw3.libも追加します。
・gl3w
GLFWだけではライブラリとしては不足しているようなので入れておきます。
GitHubからダウンロードします。
https://github.com/skaslev/gl3w
解凍して、gl3w_genを実行します。
Pythonの2系が必要とのことなので、なければインストールをします。
すると同フォルダにincludeフォルダができるので、GLFWの時にコピーしたinclude内に中身をコピーしておきます。
また、src/gl3w.cは別にプロジェクトに追加しておきます。
・ImGui
ImGuiはGUIツールで、マウスで直接値を動的にいじれるので便利です。
GitHubからダウンロードします。
https://github.com/ocornut/imgui
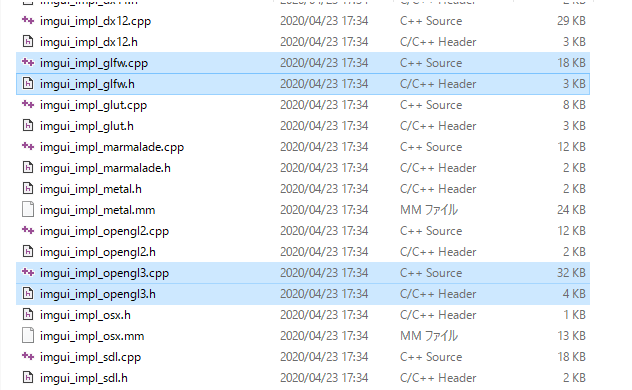
解凍したら直下のh、cppファイルと、
examplesフォルダ内の
imgui_impl_opengl3.h
imgui_impl_opengl3.cpp
imgui_impl_glfw.h
imgui_impl_glfw.cpp
をプロジェクトへ追加します。
普通に追加すると、imgui_impl_glfw.cppでエラーが出まくるので、
プロパティのC/C++のプリプロセッサからプリプロセッサの定義を選択し、IMGUI_IMPL_OPENGL_LOADER_GL3Wを追加します。
examples\example_glfw_opengl3にサンプルのプロジェクトがあるので参考にできます。
うまく設定できない場合は最初からこっちを使って組み込んでいけば間違いないと思います。
僕は環境構築を一からやってみたかったので別に作りました。
#ウィンドウを表示する
ImGuiなしでとりあえずできるか確認します。
#ImGuiを表示する
imguiをインクルードすると使えるようになります。
最終的にはこんな形になります。
#include <stdio.h>

#include <GL/gl3w.h>
#include <GLFW/glfw3.h>
#include "imgui\imgui.h"
#include "imgui\imgui_impl_glfw.h"
#include "imgui\imgui_impl_opengl3.h"


int main() {

    //------------------------------
    // 初期設定
    //------------------------------

    if (!glfwInit()) {
        return -1;
    }

    const char* glsl_version = "#version 130";
    glfwWindowHint(GLFW_CONTEXT_VERSION_MAJOR, 3);
    glfwWindowHint(GLFW_CONTEXT_VERSION_MINOR, 0);

    GLFWwindow* window = glfwCreateWindow(640, 480, "test", NULL, NULL);

    if (!window) {
        glfwTerminate();
        return -1;
    }

    glfwMakeContextCurrent(window);
    glfwSwapInterval(1);
    gl3wInit();


    // Setup Dear ImGui context
    IMGUI_CHECKVERSION();
    ImGui::CreateContext();
    ImGuiIO& io = ImGui::GetIO(); (void)io;


    // Setup Dear ImGui style
    ImGui::StyleColorsDark();
    //ImGui::StyleColorsClassic();

    // Setup Platform/Renderer bindings
    ImGui_ImplGlfw_InitForOpenGL(window, true);
    ImGui_ImplOpenGL3_Init(glsl_version);


    //-----------------------------------------------
    // 3D処理
    //-----------------------------------------------

    float x = 0.f, y= 0.f;


    while (!glfwWindowShouldClose(window)) {


        glfwPollEvents();

        // Start the Dear ImGui frame
        ImGui_ImplOpenGL3_NewFrame();
        ImGui_ImplGlfw_NewFrame();
        ImGui::NewFrame();


        ImGui::Begin("Hello, world!");

        ImGui::Text("This is some useful text.");
        ImGui::DragFloat("x", &x);
        ImGui::DragFloat("y", &y);

        ImGui::End();

         // Rendering
        ImGui::Render();
        int display_w, display_h;
        glfwGetFramebufferSize(window, &display_w, &display_h);
        glClearColor(0.8f, 0.8f, 0.8f, 0.0f);
        glClear(GL_COLOR_BUFFER_BIT | GL_DEPTH_BUFFER_BIT);
        glViewport(0, 0, display_w, display_h);


        ImGui_ImplOpenGL3_RenderDrawData(ImGui::GetDrawData());


        glfwSwapBuffers(window);
    }

    // Cleanup
    ImGui_ImplOpenGL3_Shutdown();
    ImGui_ImplGlfw_Shutdown();
    ImGui::DestroyContext();

    glfwDestroyWindow(window);
    glfwTerminate();
    return 0;
}
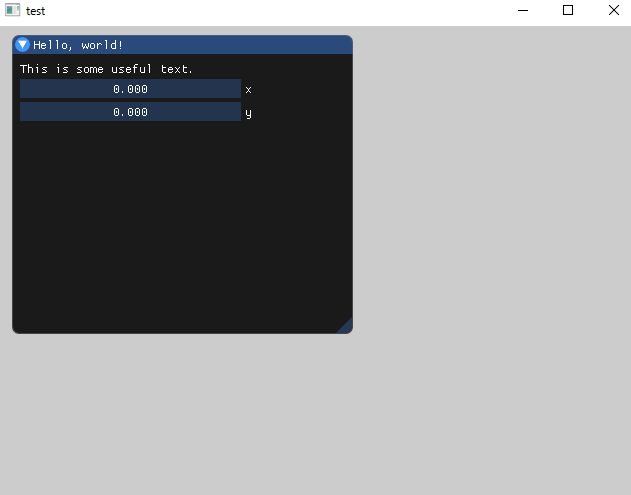
ビルドしてデバッグすると、こんな感じで出力されます。
あとは自分でいろいろOpenGLやImGuiの機能を試してみてください。
参考
・VisualStuidoでOpenGLする。https://qiita.com/babiron_i/items/57f3fd5e45bbdb01319f
・GLFWでOpenGLを始めるには in 2019 on Windows https://qiita.com/kcha4tsubuyaki/items/7d6388129714ca6c48ea
