VisualStudioでOpenGLを始めたい人向けのメモみたいなものです。
環境作成とウィンドウを表示をしてから簡単な図形を表示するところまでやっています。
Unity? 知らない子ですね
環境
Windows 10
Visual Stuido 2017
Python 2.7
プロジェクト作成
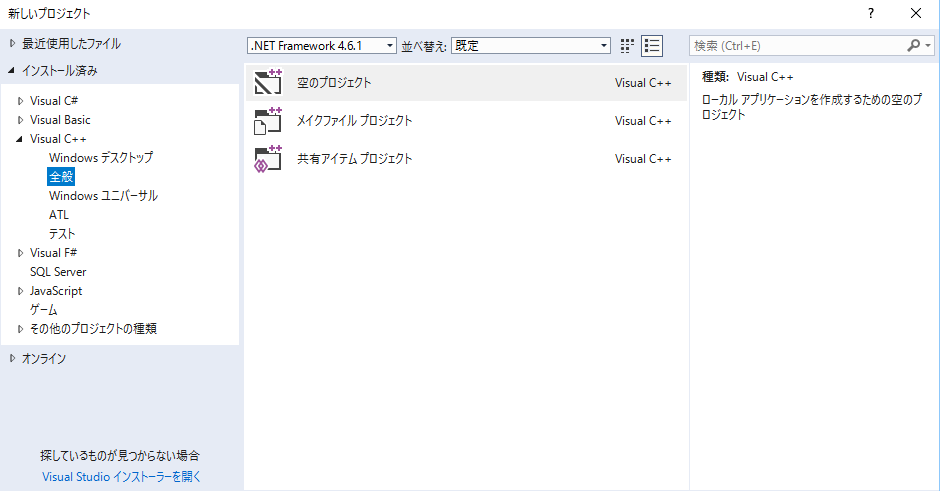
とりあえずまず、プロジェクトを作成しておきます。
VisualStudioでVC++の空のプロジェクトを作っておきましょう。
ファイルのダウンロード
NuGetを使おうと思ったんですが、なぜかGLFWをNuGetで追加しても参照が追加されなかったので普通にダウンロードしていきます。
・GLFWの追加
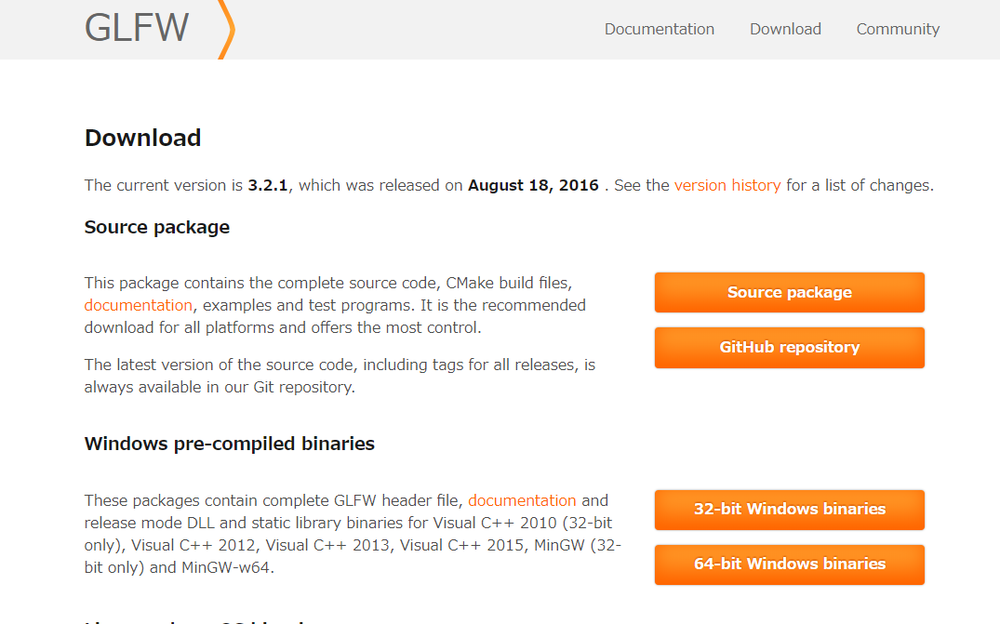
まず、GLFWのサイトから「32-bit Windows Binaries」をダウンロードします。
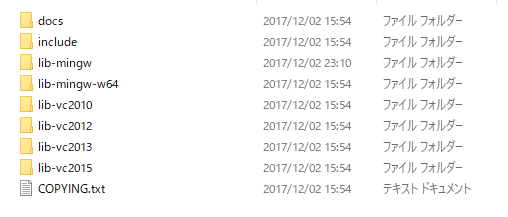
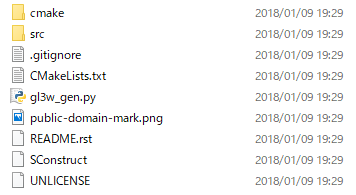
これを解凍すると
のようになるので、
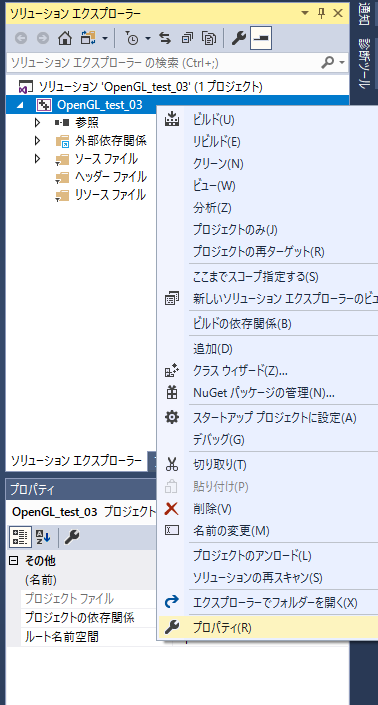
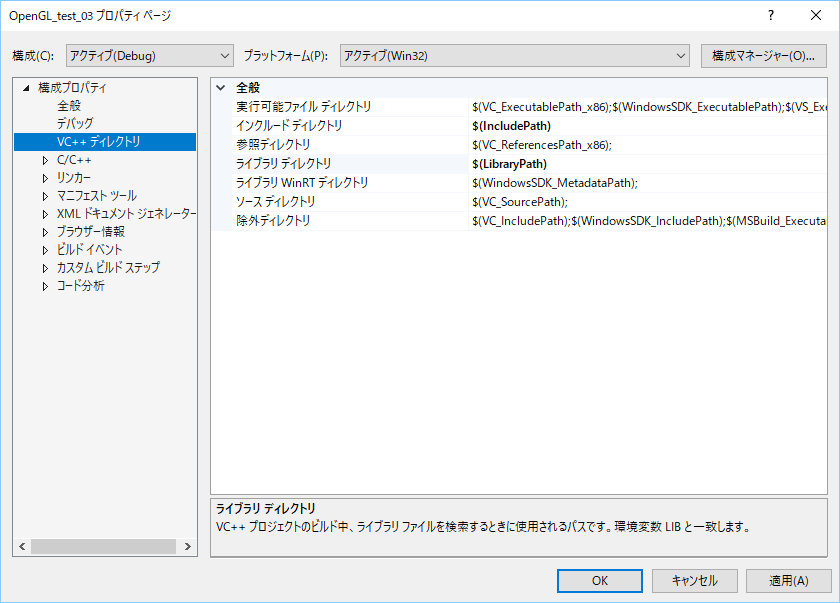
プロパティのVC++ディレクトリから
インクルードディレクトリに、解凍したフォルダのパス/include
ライブラリディレクトリに、解凍したフォルダのパス/lib-vc2015
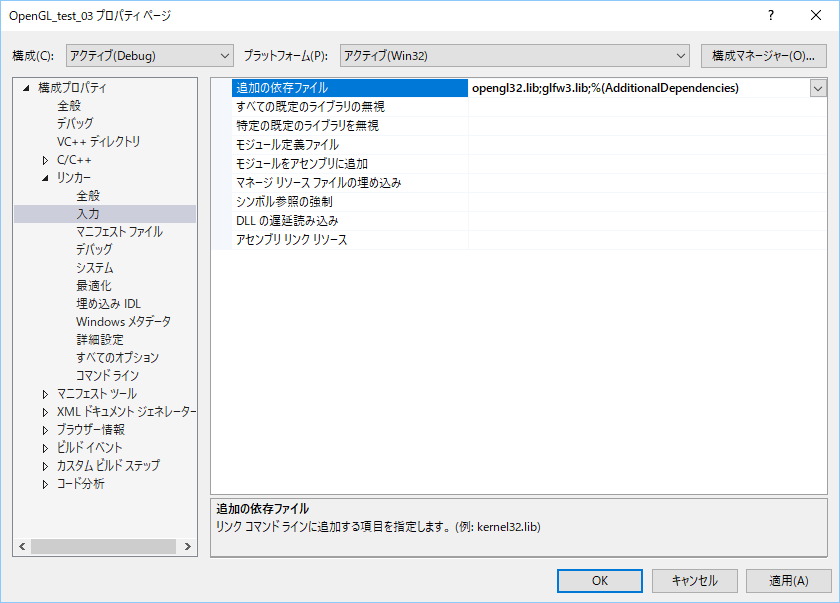
を、リンカーの入力から
追加の依存ファイルにopengl32.libとglfw3.libを追加しましょう。
・gl3wの追加
GLFWだけではライブラリとしては不十分なので、gl3wを入れます。
glewでもいいです。
gl3wをGitHubからダウンロードしましょう。
ダウンロードしたら、解凍しましょう
ここでPythonの2系が必要です。ない人はインストールしてください。
そうしたらgl3w_gen.pyを実行しましょう。
includeフォルダが生成されるのでプロパティから先ほどと同様にincludeに追加し、
src/gl3w.cをプログラムに組み込みましょう。
・glmの追加
OpenGLをやる上で便利な数学関数を追加するglmをダウンロードします。
glmをGitHubからダウンロードしましょう。
glmはincludeのみで使用できるので、インクルードパスを設定しておきましょう。
・.pngのテクスチャが使いたい場合
OpenGLでは画像をテクスチャに使用する場合、.pngの拡張子をサポートしていません。
ライブラリを追加で入れる必要があります。
いろいろ種類があるのですが、今回はDevILを紹介します。
少し怪しいサイトに見えますが、普通のサイトです。
DownloadからDevIL for 32-bit Windowsをクリックし、「DevIL Windows SDK」をダウンロードしましょう。
解凍すると、includeとlibがあるので、includeをインクルードディレクトリに追加し、lib/x86/Releaseをライブラリディレクトリに追加しておきましょう。
そして、追加の依存ファイルにDevIL.libとILU.libとILUT.libを追加しておきましょう。
軽く説明をしておきますと、DevILは初期化をすれば1行でテクスチャを読み込んでくれるすごいやつです。
# include <IL/il.h>
# include <IL/ilut.h>

//main内
//------- 初期化処理 --------

ilInit();
ilutRenderer(ILUT_OPENGL);

//---- テクスチャ読み込み ----

// 1行で読み込みができるという簡単仕様
GLuint texture = ilutGLLoadImage("images/hoge.png");

//--------------------------
ロード時の不要なメモリの解放もしてくれるそうなので、初心者も安心です。
パスの追加が面倒な点を除けば使いやすいので一応紹介しておきました。
ウィンドウを表示する
それではちゃちゃっとウィンドウを表示してみましょう。
プログラムを書く上での注意
・includeの順番について
includeする順番を間違えるとコンパイルがうまくいきません。
必ず、gl/gl3w.hを先にincludeしましょう
# include <GL/gl3w.h>
# include <GLFW/glfw3.h>
・初期化の順番について
また、初期化の順番も大事です。
必ず、gl3wInitはglfwMakeContextCurrentの後に実行してください
int main(){
	if (!glfwInit()) {
		return -1;
	}
	GLFWwindow* window = glfwCreateWindow(640, 480, "test", NULL, NULL);

	if (!window) {
		glfwTerminate();
		return -1;
	}
	glfwMakeContextCurrent(window); //この関数よりも後に
	gl3wInit(); //実行しなくてはいけない
	glfwSwapInterval(1);

	while (!glfwWindowShouldClose(window)) {
		glClearColor(0.8f, 0.8f, 0.8f, 0.0f);
		glClear(GL_COLOR_BUFFER_BIT | GL_DEPTH_BUFFER_BIT);


		glfwSwapBuffers(window);
		glfwPollEvents();
	}


	glfwTerminate();
	return 0;
}
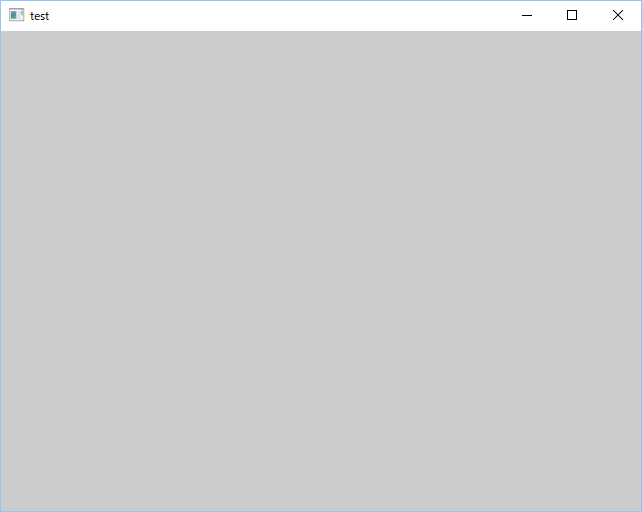
これを実行してみると、
このようなグレーの画面が出ると思います。
これがウィンドウ表示の基本形みたいなものです。
ウィンドウの表示ができたら、次に行ってみましょう。
図形を表示する
次は図形を表示したいのですが、ここからが中々面倒です。
というのも、現在のOpenGLではGLSLというシェーダー言語を使った表示のさせかたが一般的で、一昔前のglstartと書くような簡単なものではなくなっているからです。
ということでまず、
http://www.opengl-tutorial.org/jp/beginners-tutorials/tutorial-2-the-first-triangle/
にあるシェーダーのコンパイルプログラムを転用します。
ちなみに、そのままコピーするとvectorあたりでエラーが出ます
# include <iostream>
# include <fstream>
# include <sstream>
# include <vector>

# include <GL/gl3w.h>


GLuint LoadShaders(const char * vertex_file_path, const char * fragment_file_path) {

	// シェーダを作ります。
	GLuint VertexShaderID = glCreateShader(GL_VERTEX_SHADER);
	GLuint FragmentShaderID = glCreateShader(GL_FRAGMENT_SHADER);

	// ファイルから頂点シェーダのコードを読み込みます。
	std::string VertexShaderCode;
	std::ifstream VertexShaderStream(vertex_file_path, std::ios::in);
	if (VertexShaderStream.is_open())
	{
		std::string Line = "";
		while (getline(VertexShaderStream, Line))
			VertexShaderCode += "\n" + Line;
		VertexShaderStream.close();
	}

	// ファイルからフラグメントシェーダを読み込みます。
	std::string FragmentShaderCode;
	std::ifstream FragmentShaderStream(fragment_file_path, std::ios::in);
	if (FragmentShaderStream.is_open()) {
		std::string Line = "";
		while (getline(FragmentShaderStream, Line))
			FragmentShaderCode += "\n" + Line;
		FragmentShaderStream.close();
	}

	GLint Result = GL_FALSE;
	int InfoLogLength;

	// 頂点シェーダをコンパイルします。
	printf("Compiling shader : %s\n", vertex_file_path);
	char const * VertexSourcePointer = VertexShaderCode.c_str();
	glShaderSource(VertexShaderID, 1, &VertexSourcePointer, NULL);
	glCompileShader(VertexShaderID);

	// 頂点シェーダをチェックします。
	glGetShaderiv(VertexShaderID, GL_COMPILE_STATUS, &Result);
	glGetShaderiv(VertexShaderID, GL_INFO_LOG_LENGTH, &InfoLogLength);
	std::vector<GLchar> VertexShaderErrorMessage(InfoLogLength);
	glGetShaderInfoLog(VertexShaderID, InfoLogLength, NULL, VertexShaderErrorMessage.data());
	std::string s(begin(VertexShaderErrorMessage), end(VertexShaderErrorMessage));
	std::cout << s <<"\n";

	// フラグメントシェーダをコンパイルします。
	printf("Compiling shader : %s\n", fragment_file_path);
	char const * FragmentSourcePointer = FragmentShaderCode.c_str();
	glShaderSource(FragmentShaderID, 1, &FragmentSourcePointer, NULL);
	glCompileShader(FragmentShaderID);

	// フラグメントシェーダをチェックします。
	glGetShaderiv(FragmentShaderID, GL_COMPILE_STATUS, &Result);
	glGetShaderiv(FragmentShaderID, GL_INFO_LOG_LENGTH, &InfoLogLength);
	std::vector<GLchar> FragmentShaderErrorMessage(InfoLogLength);
	glGetShaderInfoLog(FragmentShaderID, InfoLogLength, NULL, FragmentShaderErrorMessage.data());
	std::string t(begin(FragmentShaderErrorMessage), end(FragmentShaderErrorMessage));
	std::cout << t << "\n";

	// プログラムをリンクします。
	fprintf(stdout, "Linking program\n");
	GLuint ProgramID = glCreateProgram();
	glAttachShader(ProgramID, VertexShaderID);
	glAttachShader(ProgramID, FragmentShaderID);
	glLinkProgram(ProgramID);

	// プログラムをチェックします。
	glGetProgramiv(ProgramID, GL_LINK_STATUS, &Result);
	glGetProgramiv(ProgramID, GL_INFO_LOG_LENGTH, &InfoLogLength);
	std::vector<GLchar> ProgramErrorMessage(max(InfoLogLength, int(1)));
	glGetProgramInfoLog(ProgramID, InfoLogLength, NULL, ProgramErrorMessage.data());
	std::string u(begin(ProgramErrorMessage), end(ProgramErrorMessage));
	std::cout << u << "\n";

	glDeleteShader(VertexShaderID);
	glDeleteShader(FragmentShaderID);

	return ProgramID;
}
これは、シェーダーをコンパイルするときに使います。
配布する場合はデバッグのメッセージは消しておきましょう。
そして、OpenGLで必須なGLSLのシェーダーを書きます
# version 400
layout (location = 0) in vec3 VertexPosition;
layout (location = 1) in vec3 VertexColor;

out vec3 col;

uniform mat4 MVP;

void main(){
	col = VertexColor;
	gl_Position = MVP * vec4(VertexPosition, 1);
}
# version 400

in vec3 col;

out vec4 color;

void main(){
	color = vec4(col, 1);
}
GLSLの詳しい説明や書き方は調べてると出てくると思うので、そちらを参考にしてください
次に、カメラ用の関数を書きます
# include <GL/gl3w.h>
# include <GLFW/glfw3.h>

# include <glm/glm.hpp>
# include <glm/gtc/matrix_transform.hpp>

void setCamera(GLuint MatrixID, float x, float y, float z) {
	glm::mat4 Projection = glm::perspective(glm::radians(45.0f), (float) 4/3, 0.1f, 100.0f);
	glm::mat4 View = glm::lookAt(
		glm::vec3(x, y, z),
		glm::vec3(0, 0, 0),
		glm::vec3(0, 1, 0)
	);
	glm::mat4 Model = glm::mat4(1.0f);
	glm::mat4 MVP = Projection * View *  Model;

	glUniformMatrix4fv(MatrixID, 1, GL_FALSE, &MVP[0][0]);
}
Quaternionを使わない簡単バージョンです。
y軸付近になると荒ぶるので、いろいろやりたい人はQuaternionと調べてみましょう。
最後に、mainを編集して終わりです
# include <GL/gl3w.h>
# include <GLFW/glfw3.h>

GLuint LoadShaders(const char *, const char *);
void setCamera(GLuint MatrixID, float x, float y, float z);

int main() {
	if (!glfwInit()) {
		return -1;
	}
	GLFWwindow* window = glfwCreateWindow(640, 480, "test", NULL, NULL);

	if (!window) {
		glfwTerminate();
		return -1;
	}
	glfwMakeContextCurrent(window);

	gl3wInit();
	glfwSwapInterval(1);

	GLfloat lines[] = {
		-3,  0,  0,   1, 0, 0,
		 3,  0,  0,   1, 0, 0,
		 0, -3,  0,   0, 1, 0,
		 0,  3,  0,   0, 1, 0,
		 0,  0, -3,   0, 0, 1,
		 0,  0,  3,   0, 0, 1,
	};

	GLuint buf;
	GLuint vao;
	glGenVertexArrays(1, &vao);
	glBindVertexArray(vao);

	glGenBuffers(1, &buf);
	glBindBuffer(GL_ARRAY_BUFFER, buf);
	glBufferData(GL_ARRAY_BUFFER, sizeof(lines), lines, GL_STATIC_DRAW);

	glEnableVertexAttribArray(0);
	glEnableVertexAttribArray(1);
	glVertexAttribPointer(0, 3, GL_FLOAT, GL_FALSE, 6 * sizeof(GLfloat), 0);
	glVertexAttribPointer(1, 3, GL_FLOAT, GL_FALSE, 6 * sizeof(GLfloat), (GLvoid*)(3 * sizeof(GLfloat)));

	GLuint line_shader = LoadShaders("line.vert", "line.frag");
	GLuint MatrixID = glGetUniformLocation(line_shader, "MVP");

	glEnable(GL_DEPTH_TEST);
	glDepthFunc(GL_LESS);


	while (!glfwWindowShouldClose(window)) {
		glClearColor(0.8f, 0.8f, 0.8f, 0.0f);
		glClear(GL_COLOR_BUFFER_BIT | GL_DEPTH_BUFFER_BIT);


		glUseProgram(line_shader);
		setCamera(MatrixID, 1, 0.5, 1);
		glBindVertexArray(vao);
		glDrawArrays(GL_LINES, 0, 6);


		glfwSwapBuffers(window);
		glfwPollEvents();
	}


	glfwTerminate();
	return 0;
}
VBOとVAOを使った今風の書き方です。
これも調べるとゴロゴロ出てくると思うので、そちらを参考にしてください。
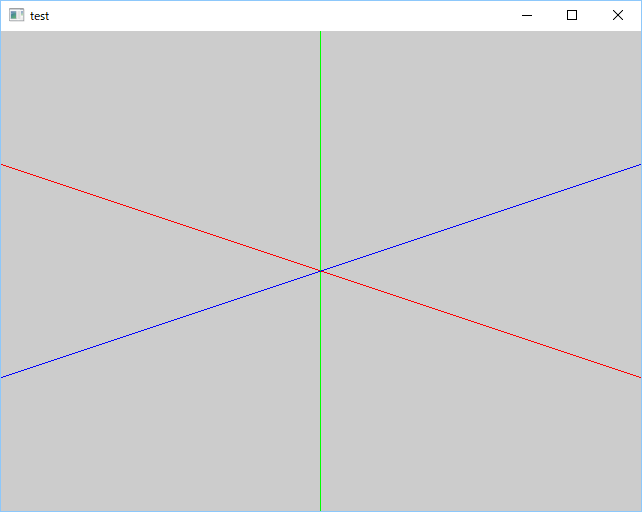
これを実行すると、
このようにxyz軸が表示されます。
一緒に表示されるコマンドラインを表示せずに実行したい場合は
/SUBSYSTEM:WINDOWS /ENTRY:mainCRTStartup
をリンカーの追加オプションに入れましょう
最後に
はい、ここまでやってきましたが、
これがスタートラインです。
Unityを起動したところです
心が折れた人は素直に高スペックPCを買ってUnityを入れましょう
