イケてる Blue Pill ボードのバリエーションとしての、RobotDyn STM32F103.
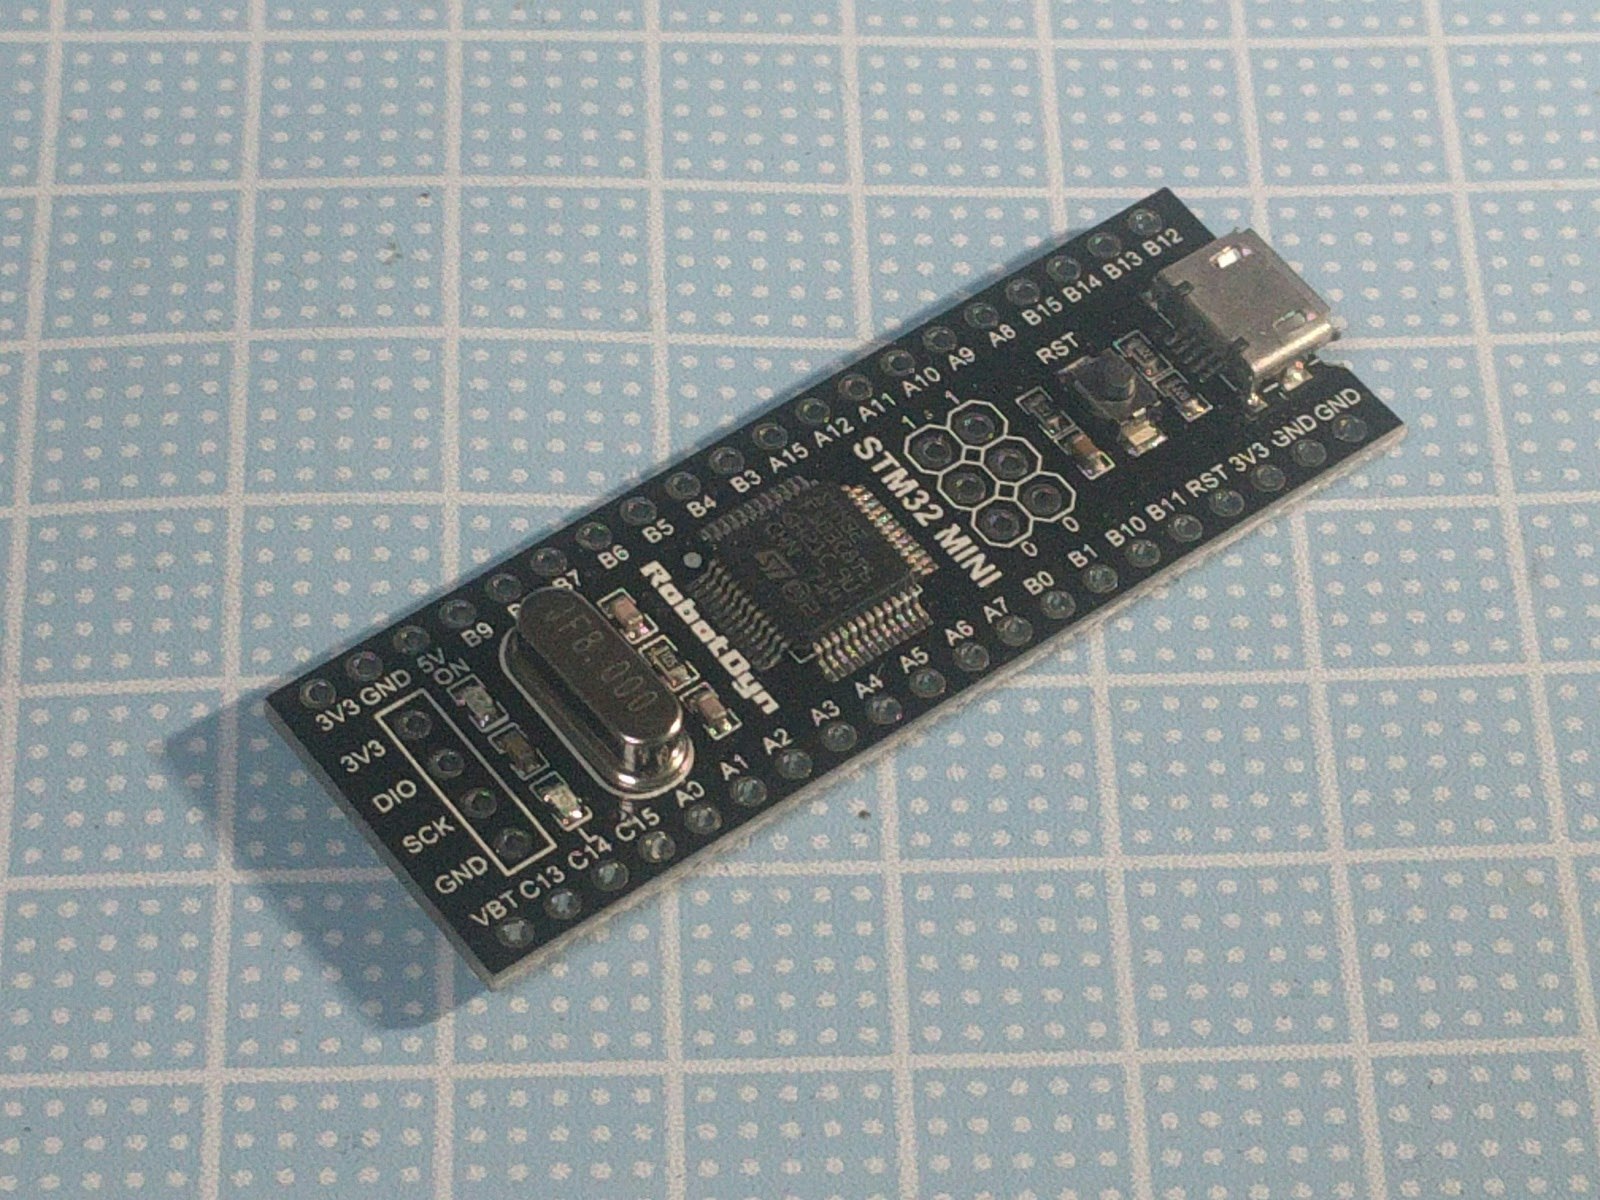
これに絞ったTips.
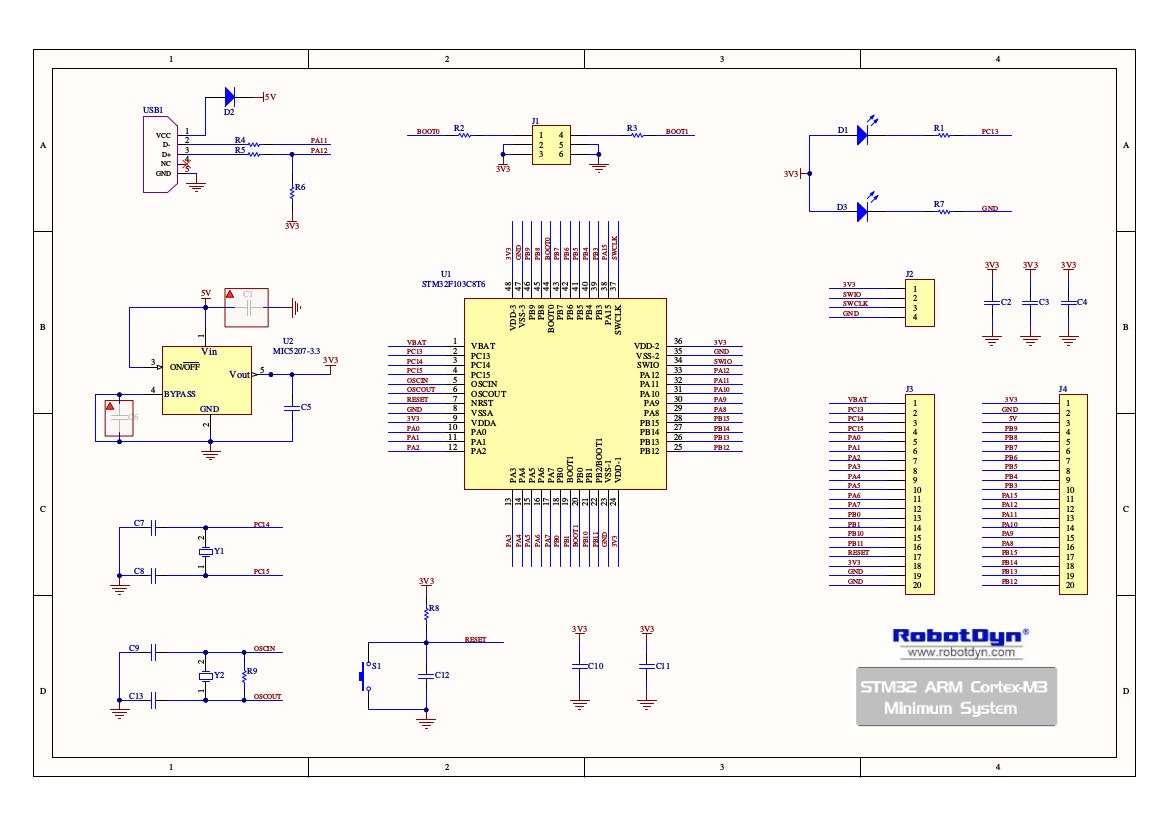
回路図
Arduio_STM32 環境構築
-
Arduino 開発環境をインストールします。
https://www.arduino.cc/ -
Arduino_STM32 をダウンロードし、展開します
https://github.com/rogerclarkmelbourne/Arduino_STM32 -
展開したものを、Arduinoフォルダ(後述)の中のhardwareに配置し直します。
(Arduinoフォルダ)/hardware/hardware/Arduino_STM32-master
と配置します。 -
更に、その中のexamplesにboards.txtという名前の空ファイルを作成します。
(これが無いと起動時に 「.....hardware/Arduino_STM32-master/examplesにboards.txtがありませんでした。1.5以前のものですか?」 というエラーが出る) -
Arduino IDEを起動して、<ツール>ー<ボード>ーボードマネージャで「Arduino SAM Boards(32-bits ARM Cortex-M3)」を追加します
Windows
Arduino フォルダ:「ドキュメント」フォルダの中のArduinoフォルダ
また、Windowsのみの作業として、drivers/win/install_drivers.bat を管理者で実行してください。
"install drivers for the Serial and DFU (upload devices)"
ということだそうです。
なお、ST-Linkを使う場合はST-Linkのドライバのインストールも必要となります。
http://www.st.com/ja/development-tools/stsw-link009.html
このページから STSW-LINK009 をダウンロード、インストールしてください。
Mac OSX
Arduino フォルダ:「書類」フォルダ中のArduinoフォルダ
Linux
Arduino フォルダ:/home/<ユーザ名>/Arduino
また、Linuxのみの作業として
http://stm32duino.com/download/file.php?id=1360
から
77-mm-usb-serport-blacklist.rules.tar.gz
ダウンロードして解凍、できた77-mm-usb-serport-blacklist.rulesを
/etc/udev/rules.dに配置する。
これは書込やリセットなどでモード遷移してUSBシリアルデバイスが消えたり現れたりするときに、Linux側の悪いmodemmanagerが悪いことをしてATコマンドを送ったりするのを防ぐもの。
(cf,http://stm32duino.com/viewtopic.php?f=22&t=1892#p25160)
これをしないと、シリアルモニタを開くときに port busy とか言われる。
これは本家のmodemmanagerに付属の77-mm-usb-serport-blacklist.rulesにSTM32の仮想ポートを加えたもの。ArduinoUnoなどの記述も増えているのでこれを使おう。
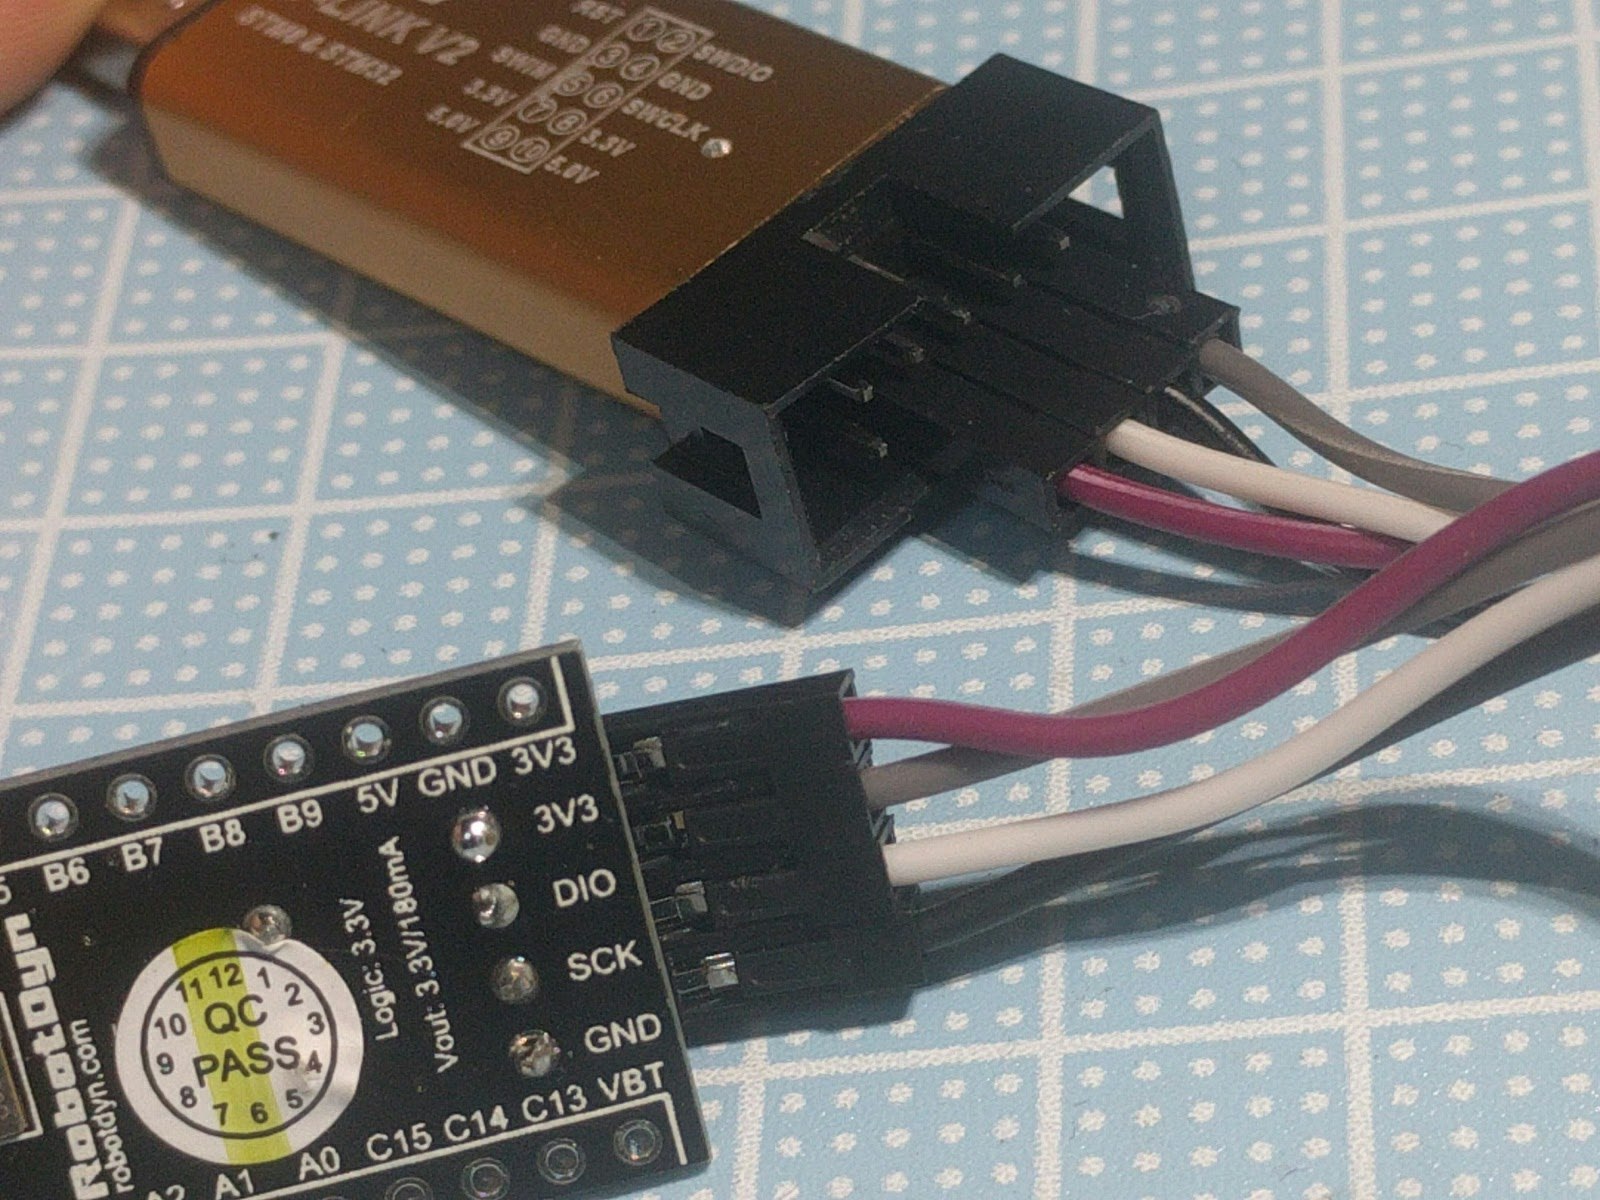
ST-Linkを使ってスケッチを書いてみる
接続は以下の通り
USBシリアルアダプタを使ってスケッチを書いてみる
注意
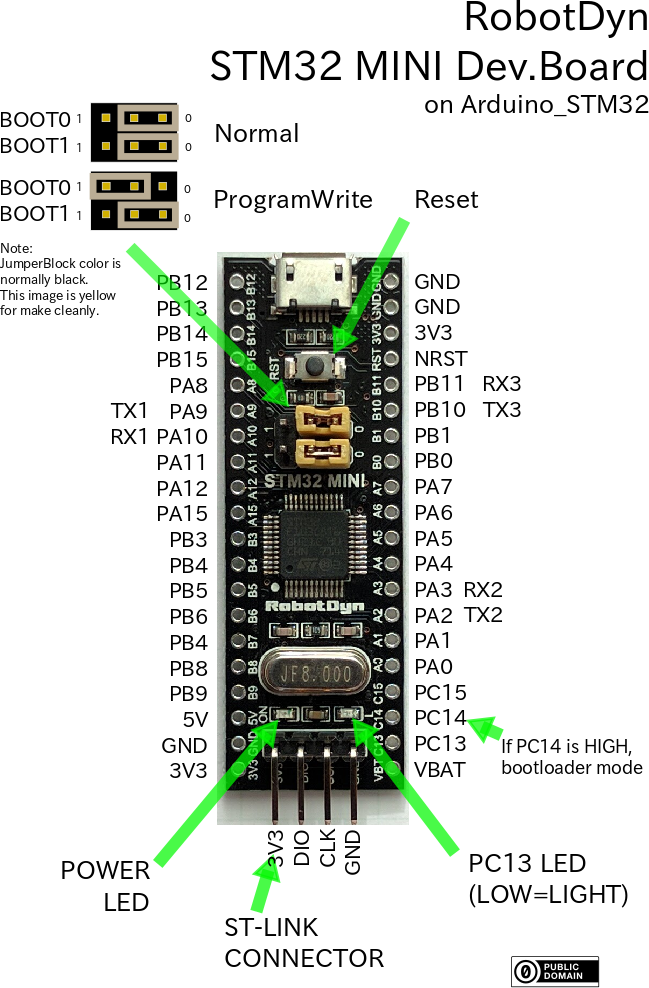
接続とジャンパーピン
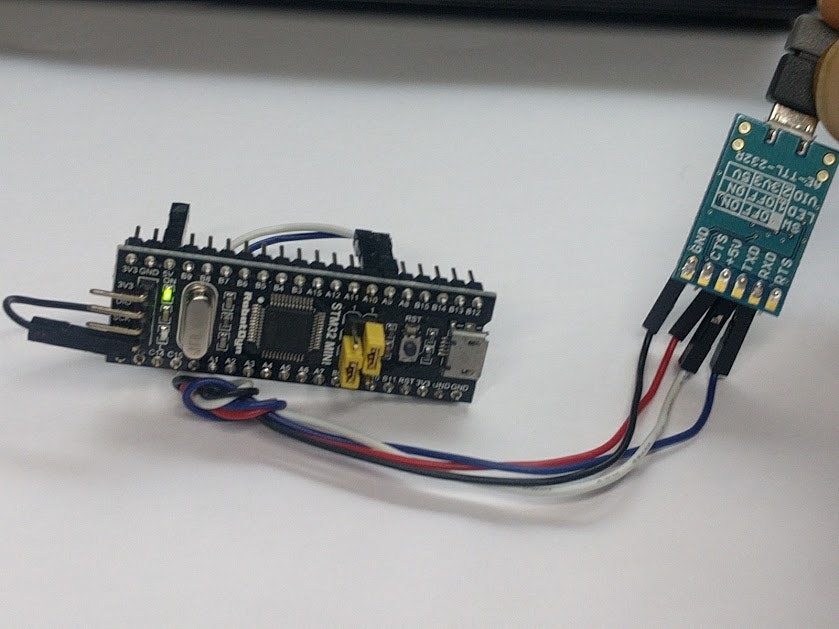
写真はわかりやすくするためにジャンパーを黄色のジャンパーにしています
オンボードのUSBコネクタを使ってスケッチを書いてみる
後述する「ブートローダー書込」が終わっていると、オンボードで書き込めるようになります。
ジャンパーは両方共0側にします。それだけでも書込みできますが、リセット後数秒しか書込を受け付けず、その後ユーザプログラムを実行します。タイミングをとって書くのが難しいので、永続ブートローダーモードを利用して任意のタイミングで書き込みできるようにするのが確実です。
PC14をプルアップすれば、永続ブートローダーモードになります。

写真はわかりやすくするためにジャンパーを黄色のジャンパーにしています
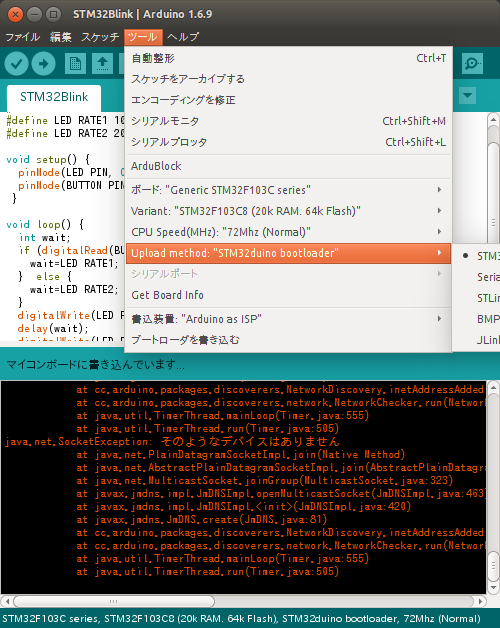
以下はWindowsで書いた例。設定は「STM32duino bootloader」を選ぶ。

ブートローダー書込
ブートローダーを書き込むと、オンボードのUSBコネクタからスケッチが書けるようになります。
https://github.com/rogerclarkmelbourne/STM32duino-bootloader/tree/master/binaries
こちらから
generic_boot20_pc13.bin をダウンロードします。
USBシリアルアダプタを使ってブートローダーを書く場合
接続とジャンパーピン
写真はわかりやすくするためにジャンパーを黄色のジャンパーにしています
Windows
コマンドプロンプトを使います。
Arduino開発環境のJAVAが使えるようにしておきます。
set JAVA_HOME="c:\Program Files (x86)\Arduino\java"
set path=%path%;%JAVA_HOME%\bin
そのうえで、Arduino_STM32 に入っているツールを使います。
C:\Users\Owner\Documents\Arduino\hardware\Arduino_STM32\tools\win>serial_upload.bat COM11 {upload.altID} {upload.usbID} C:\Users\Owner\Downloads\generic_boot20_pc13.bin
stm32flash 0.4

http://stm32flash.googlecode.com/

Using Parser : Raw BINARY
Interface serial_w32: 230400 8E1
Version      : 0x22
Option 1     : 0x00
Option 2     : 0x00
Device ID    : 0x0410 (Medium-density)
- RAM        : 20KiB  (512b reserved by bootloader)
- Flash      : 128KiB (sector size: 4x1024)
- Option RAM : 16b
- System RAM : 2KiB
Write to memory
Erasing memory
Wrote address 0x08005294 (100.00%) Done.

Starting execution at address 0x08000000... done.


C:\Users\Owner\Documents\Arduino\hardware\Arduino_STM32\tools\win>
Linux
書込ソフトとして、stm32flashツールを使います。ここでは、Arduino_STM32をインストールした時にインストールしたものを使いました。
$ cd Arduino
$ cd hardware/Arduino_STM32-master/tools/linux64/stm32flash/
$ ./stm32flash -w ~/Downloads/generic_boot20_pc13.bin -v -g 0x0 /dev/ttyUSB0
stm32flash Arduino_STM32_0.9

http://github.com/rogerclarkmelbourne/arduino_stm32

Using Parser : Raw BINARY
Interface serial_posix: 57600 8E1
Version      : 0x22
Option 1     : 0x00
Option 2     : 0x00
Device ID    : 0x0410 (Medium-density)
- RAM        : 20KiB  (512b reserved by bootloader)
- Flash      : 128KiB (sector size: 4x1024)
- Option RAM : 16b
- System RAM : 2KiB
Write to memory
Erasing memory
Wrote and verified address 0x08005294 (100.00%) Done.

Starting execution at address 0x08000000... done.

$
Mac OSX
Linuxと同様です。
パスが
$ cd Arduino
$ cd hardware/Arduino_STM32-master/tools/macosx/stm32flash/
となります。
また、USBデバイス名も異なります。
$ ./stm32flash -w ~/Downloads/STM32duino-bootloader/binaries/generic_boot20_pc13.bin -v -g 0x0 /dev/tty.SLAB_USBtoUART
stm32flash Arduino_STM32_0.9

http://github.com/rogerclarkmelbourne/arduino_stm32

Using Parser : Raw BINARY
Interface serial_posix: 57600 8E1
Version      : 0x22
Option 1     : 0x00
Option 2     : 0x00
Device ID    : 0x0410 (Medium-density)
- RAM        : 20KiB  (512b reserved by bootloader)
- Flash      : 128KiB (sector size: 4x1024)
- Option RAM : 16b
- System RAM : 2KiB
Write to memory
Erasing memory
Wrote and verified address 0x08005294 (100.00%) Done.

Starting execution at address 0x08000000... done.
tty.SLAB_USBtoUART は、 cu.usbserial-XXXXXX などになることもあります。Arduino開発環境の「ツール」-「シリアルポート」で確認してください。
ST-Linkを使ってブートローダーを書く場合
Linux の場合
st-util を使う方法(未成功)
こちらからダウンロード、Makeして st-util をインストールする
起動
st-util
ST-Linkつなげてないとこのようなエラー
$ st-util
st-util 1.3.0-9-g88c6162
2017-10-05T13:36:26 WARN /home/nanbuwks/Downloads/chibios-verifast-master/stlink/src/usb.c: Couldn't find any ST-Link/V2 devices
ST-Linkつなげてると以下のように待ち受けになる
$ st-util
st-util 1.3.0-9-g88c6162
2017-10-05T13:39:56 INFO /home/nanbuwks/Downloads/chibios-verifast-master/stlink/src/usb.c: -- exit_dfu_mode
2017-10-05T13:39:56 INFO /home/nanbuwks/Downloads/chibios-verifast-master/stlink/src/common.c: Loading device parameters....
2017-10-05T13:39:56 INFO /home/nanbuwks/Downloads/chibios-verifast-master/stlink/src/common.c: Device connected is: F1 Medium-density device, id 0x20036410
2017-10-05T13:39:56 INFO /home/nanbuwks/Downloads/chibios-verifast-master/stlink/src/common.c: SRAM size: 0x5000 bytes (20 KiB), Flash: 0x10000 bytes (64 KiB) in pages of 1024 bytes
2017-10-05T13:39:56 INFO /home/nanbuwks/Downloads/chibios-verifast-master/stlink/src/gdbserver/gdb-server.c: Chip ID is 00000410, Core ID is  1ba01477.
2017-10-05T13:39:56 INFO /home/nanbuwks/Downloads/chibios-verifast-master/stlink/src/gdbserver/gdb-server.c: Listening at *:4242...
別のターミナルでgdb起動
$ arm-none-eabi-gdb ~/Downloads/generic_boot20_pc13-20170809.bin
GNU gdb (7.10-1ubuntu3+9) 7.10
Copyright (C) 2015 Free Software Foundation, Inc.
License GPLv3+: GNU GPL version 3 or later <http://gnu.org/licenses/gpl.html>
This is free software: you are free to change and redistribute it.
There is NO WARRANTY, to the extent permitted by law.  Type "show copying"
and "show warranty" for details.
This GDB was configured as "--host=x86_64-linux-gnu --target=arm-none-eabi".
Type "show configuration" for configuration details.
For bug reporting instructions, please see:
<http://www.gnu.org/software/gdb/bugs/>.
Find the GDB manual and other documentation resources online at:
<http://www.gnu.org/software/gdb/documentation/>.
For help, type "help".
Type "apropos word" to search for commands related to "word"...
"/home/nanbuwks/Downloads/generic_boot20_pc13-20170809.bin": not in executable format: File format not recognized
(gdb) q
あら。
elf形式に直さないといけないので
$ arm-none-eabi-objcopy -I binary -O elf32-little ~/Downloads/generic_boot20_pc13-20170809.bin generic_boot20_pc13-20170809.elf
これでもう一度
$ ls
LICENSE  README.md  STM32Sleep.cpp  STM32Sleep.h  examples  generic_boot20_pc13-20170809.elf
nanbuwks@LATITUDE:~/Arduino/libraries/STM32sleep$ arm-none-eabi-gdb generic_boot20_pc13-20170809.elf
GNU gdb (7.10-1ubuntu3+9) 7.10
Copyright (C) 2015 Free Software Foundation, Inc.
License GPLv3+: GNU GPL version 3 or later <http://gnu.org/licenses/gpl.html>
This is free software: you are free to change and redistribute it.
There is NO WARRANTY, to the extent permitted by law.  Type "show copying"
and "show warranty" for details.
This GDB was configured as "--host=x86_64-linux-gnu --target=arm-none-eabi".
Type "show configuration" for configuration details.
For bug reporting instructions, please see:
<http://www.gnu.org/software/gdb/bugs/>.
Find the GDB manual and other documentation resources online at:
<http://www.gnu.org/software/gdb/documentation/>.
For help, type "help".
Type "apropos word" to search for commands related to "word"...
Reading symbols from generic_boot20_pc13-20170809.elf...(no debugging symbols found)...done.
(gdb)
(gdb) target extended-remote localhost:4242
Remote debugging using localhost:4242
0x08002af8 in ?? ()
(gdb) load
Loading section .data, size 0x5294 lma 0x0
Load failed
(gdb)
うーむ。エラー出た。この方法はまだレベルが足りない。
stlink_upload を使う方法編(成功)
Arduino開発環境でスケッチを書くのに内部で使っているシステムを使ってみたら書けた
./stlink_upload ttyACM0 {upload.altID} {upload.usbID} ~/Downloads/generic_boot20_pc13-20170809.bin
2017-11-03T00:40:08 INFO src/stlink-common.c: Loading device parameters....
2017-11-03T00:40:08 INFO src/stlink-common.c: Device connected is: F1 Medium-density device, id 0x20036410
2017-11-03T00:40:08 INFO src/stlink-common.c: SRAM size: 0x5000 bytes (20 KiB), Flash: 0x10000 bytes (64 KiB) in pages of 1024 bytes
2017-11-03T00:40:08 INFO src/stlink-common.c: Attempting to write 21140 (0x5294) bytes to stm32 address: 134217728 (0x8000000)
Flash page at addr: 0x08005000 erased
2017-11-03T00:40:09 INFO src/stlink-common.c: Finished erasing 21 pages of 1024 (0x400) bytes
2017-11-03T00:40:09 INFO src/stlink-common.c: Starting Flash write for VL/F0/F3 core id
2017-11-03T00:40:09 INFO src/stlink-common.c: Successfully loaded flash loader in sram
 20/20 pages written
2017-11-03T00:40:10 INFO src/stlink-common.c: Starting verification of write complete
2017-11-03T00:40:11 INFO src/stlink-common.c: Flash written and verified! jolly good!
Mac OSX
Linuxと同様にstlink_upload を使います
$ ./stlink_upload ttyACM0 {upload.altID} {upload.usbID} ~/Downloads/STM32duino-bootloader/binaries/generic_boot20_pc13.bin
2017-11-11T01:46:05 INFO src/usb.c: -- exit_dfu_mode
2017-11-11T01:46:06 INFO src/common.c: Loading device parameters....
2017-11-11T01:46:06 INFO src/common.c: Device connected is: F1 Medium-density device, id 0x20036410
2017-11-11T01:46:06 INFO src/common.c: SRAM size: 0x5000 bytes (20 KiB), Flash: 0x10000 bytes (64 KiB) in pages of 1024 bytes
2017-11-11T01:46:06 INFO src/common.c: Attempting to write 21140 (0x5294) bytes to stm32 address: 134217728 (0x8000000)
Flash page at addr: 0x08005000 erased
2017-11-11T01:46:06 INFO src/common.c: Finished erasing 21 pages of 1024 (0x400) bytes
2017-11-11T01:46:06 INFO src/common.c: Starting Flash write for VL/F0/F3 core id
2017-11-11T01:46:06 INFO src/flash_loader.c: Successfully loaded flash loader in sram
 20/20 pages written
2017-11-11T01:46:07 INFO src/common.c: Starting verification of write complete
2017-11-11T01:46:08 INFO src/common.c: Flash written and verified! jolly good!
ttyACM0というのはLinuxと同様のものがここに出てますが、ここの名前は特に正確でなくてもいいみたいです。
Windows の場合
コマンドプロンプトを使います。
Arduino開発環境のJAVAが使えるようにしておきます。
set JAVA_HOME="c:\Program Files (x86)\Arduino\java"
set path=%path%;%JAVA_HOME%\bin
C:\Users\Owner\Documents\Arduino\hardware\Arduino_STM32\tools\win>stlink_upload.bat COM18 {upload.altID} {upload.usbID} C:\Users\Owner\Downloads\generic_boot20_pc13.bin
STM32 ST-LINK CLI v2.1.0
STM32 ST-LINK Command Line Interface

ST-LINK SN : Old ST-LINK firmware/ST-LINK already used
ST-LINK Firmware version : V2J17S4 (Need Update)
Old ST-LINK firmware detected!
Please upgrade it from ST-LINK->'Firmware update' menu.
Connected via SWD.
Connection mode : Normal.
Device ID:0x410
Device flash Size : 64 Kbytes
Device family :STM32F10xx Medium-density

Loading file...
Flash Programming:
  File : C:\Users\Owner\Downloads\generic_boot20_pc13.bin
  Address : 0x08000000
Flash memory programming...
ロロロロロロロロロロロロロロロロロロロロロロロロロロロロロロロロロロロロロロロロロロロロロロロロロロ 100%
Flash memory programmed in 2s and 78ms.
Programming Complete.

MCU Reset.

Application started.


C:\Users\Owner\Documents\Arduino\hardware\Arduino_STM32\tools\win>
書けました
永続ブートローダーモードについて
PC14 をプルアップして、オンボードの microUSB コネクタに繋いだ時のdmesg
[125597.064475] usb 1-1.2: new full-speed USB device number 14 using ehci-pci
[125597.174720] usb 1-1.2: New USB device found, idVendor=1eaf, idProduct=0003
[125597.174725] usb 1-1.2: New USB device strings: Mfr=1, Product=2, SerialNumber=3
[125597.174728] usb 1-1.2: Product: Maple 003
[125597.174731] usb 1-1.2: Manufacturer: LeafLabs
[125597.174733] usb 1-1.2: SerialNumber: LLM 003
本来は、これで書けるはず。もし書けない場合は永続ブートローダーモードにしよう。
ジャンパーピンは両方0側でOK.もし、ジャンパーピンを1側にするとdmesgは以下のようになる。これはブートローダーが動いていない状態。
[128834.930025] usb 1-1.2: new full-speed USB device number 71 using ehci-pci
[128835.010014] usb 1-1.2: device descriptor read/64, error -32
[128835.198002] usb 1-1.2: device descriptor read/64, error -32
[128835.386001] usb 1-1.2: new full-speed USB device number 72 using ehci-pci
[128835.465961] usb 1-1.2: device descriptor read/64, error -32
[128835.653925] usb 1-1.2: device descriptor read/64, error -32
[128835.841950] usb 1-1.2: new full-speed USB device number 73 using ehci-pci
[128836.257931] usb 1-1.2: device not accepting address 73, error -32
[128836.337956] usb 1-1.2: new full-speed USB device number 74 using ehci-pci
[128836.757906] usb 1-1.2: device not accepting address 74, error -32
[128836.758074] usb 1-1-port2: unable to enumerate USB device
Tips
USBシリアルアダプタ
秋月電子「FT232RQ USBシリアル変換キット」
この例で使っているUSBシリアルアダプタです。
http://akizukidenshi.com/catalog/g/gK-09951/
キットに付いているピンヘッダは細くてジャンパーケーブルがうまく接続できないので、
「ピンヘッダ (L型)」
http://akizukidenshi.com/catalog/g/gC-05336/
をハンダ付けしています。
CH340を使った不具合
LinuxでCH340を使ったものは書き込みできませんでした。
https://sourceforge.net/p/stm32flash/wiki/Hints/
Linuxのドライバの問題らしく、Windowsなどでは問題ないようです。
コンパイルできない
Arduino:1.8.4 (Windows 10), ボード:"Generic STM32F103C series, STM32F103C8 (20k RAM. 64k Flash), STLink, 72Mhz (Normal), Smallest (default)"

exec: "/bin/arm-none-eabi-g++": file does not exist
ボードGeneric STM32F103C seriesに対するコンパイル時にエラーが発生しました。
ボードマネージャで「Arduino SAM Boards(32-bits ARM Cortex-M3)」を追加できていないのが原因。
ST-LINKで書き込めない ( unknown chip id )
最大65,536バイトのフラッシュメモリのうち、スケッチが14,564バイト(22%)を使っています。
グローバル変数は2,880バイトのRAMを使用しています。
/home/nanbuwks/Arduino/hardware/Arduino_STM32-master/tools/linux/stlink_upload ttyACM0 {upload.altID} {upload.usbID} /tmp/buildd22c0b3363d5fbf85d994121a387ce0c.tmp/STM32_sleep_wakeup.ino.bin
2017-10-01T14:37:41 INFO src/stlink-usb.c: -- exit_dfu_mode
2017-10-01T14:37:41 INFO src/stlink-common.c: Loading device parameters....
2017-10-01T14:37:41 WARN src/stlink-common.c: unknown chip id! 0xe0042000
ST-LINKをつないだ直後は動かない場合があるようです。その場合はボード上のリセットボタンを押したら動くようになりました。
ST-LINKで書き込めない ( permission dinied )
最大65536バイトのフラッシュメモリのうち、スケッチが32724バイト(49%)を使っています。
最大20480バイトのRAMのうち、グローバル変数が5656バイト(27%)を使っていて、ローカル変数で14824バイト使うことができます。
/home/nanbuwks/Downloads/ardublock/arduino/linux64/AKBONE/AKBONE2019/linux/arduino-1.8.10_AKBONE/hardware/Arduino_STM32-master/tools/linux/stlink_upload /tmp/arduino_build_942813/STM32_RFID_RC522_LCD1602_HIDkeyboard.ino.bin
2022-03-17T16:06:16 WARN src/stlink-usb.c: Error -3 (Permission denied) opening ST-Link/V2 device 003:035
Ubuntu Linux 20.04 で発生しました。
lsusb としてみると、以下のようになりました。
...
Bus 003 Device 035: ID 0483:3748 STMicroelectronics ST-LINK/V2
...
バス番号003,デバイス番号035を使いパーミッションを調べてみます。
$ ls -l /dev/bus/usb/003/035
crw-rw-r-- 1 root root 189, 290  3月 17 15:55 /dev/bus/usb/003/035
となっているので、これを自分の権限で開けるようにしないといけません。
udev設定で解決します。
$ find . -name 49-*
./hardware/Arduino_STM32-master/tools/linux/49-stlinkv2.rules
./hardware/Arduino_STM32-master/tools/linux/49-stlinkv1.rules
./hardware/Arduino_STM32-master/tools/linux/49-stlinkv2-1.rules
./hardware/Arduino_STM32-master/tools/linux64/49-stlinkv2.rules
./hardware/Arduino_STM32-master/tools/linux64/49-stlinkv1.rules
./hardware/Arduino_STM32-master/tools/linux64/49-stlinkv2-1.rules
これを使います。
$ sudo cp ./hardware/Arduino_STM32-master/tools/linux64/49-stlink* /etc/udev/rules.d
udevルールをリロードします。
$ sudo udevadm control --reload-rules
このあと、ST-Linkを指し直すと書けるようになります。
ST-LINKでブートローダーが書き込めない
既にブートローダーを書き込んでいるものに再度書き込もうとすると、以下のように unknown chip ip! と出た。
./stlink_upload ttyACM0 {upload.altID} {upload.usbID} ~/Downloads/generic_boot20_pc13-20170809.bin
2017-11-03T00:39:49 INFO src/stlink-common.c: Loading device parameters....
2017-11-03T00:39:49 WARN src/stlink-common.c: unknown chip id! 0xe0042000
BOOT0ジャンパーを1にしてリセットすると書き込めた。
./stlink_upload ttyACM0 {upload.altID} {upload.usbID} ~/Downloads/generic_boot20_pc13-20170809.bin
2017-11-03T00:40:08 INFO src/stlink-common.c: Loading device parameters....
2017-11-03T00:40:08 INFO src/stlink-common.c: Device connected is: F1 Medium-density device, id 0x20036410
2017-11-03T00:40:08 INFO src/stlink-common.c: SRAM size: 0x5000 bytes (20 KiB), Flash: 0x10000 bytes (64 KiB) in pages of 1024 bytes
2017-11-03T00:40:08 INFO src/stlink-common.c: Attempting to write 21140 (0x5294) bytes to stm32 address: 134217728 (0x8000000)
Flash page at addr: 0x08005000 erased
2017-11-03T00:40:09 INFO src/stlink-common.c: Finished erasing 21 pages of 1024 (0x400) bytes
2017-11-03T00:40:09 INFO src/stlink-common.c: Starting Flash write for VL/F0/F3 core id
2017-11-03T00:40:09 INFO src/stlink-common.c: Successfully loaded flash loader in sram
 20/20 pages written
2017-11-03T00:40:10 INFO src/stlink-common.c: Starting verification of write complete
2017-11-03T00:40:11 INFO src/stlink-common.c: Flash written and verified! jolly good!
attachInterruptができない
ST-Linkをつなげていると動きませんでした。
ST-Linkを電源として動かしていたので、SWDIOとSWCLKの線を外したら動くようになりました。