この記事では、Figma Plugin API(use_figma)を使ってLPワイヤーフレームをプログラマティックに構築する方法を解説します。MCP経由でFigmaに接続し、ヒアリングフォームの回答データをワイヤーフレームとして出力する実装パターンです。
コードスニペットはそのままuse_figmaのコマンドとして実行できる形式で書いています。
前提
- Figma MCP Server に接続済み(Claude Desktop、Cursor等のMCPクライアント経由)
-
use_figmaツールでFigma Plugin APIのコードを実行できる状態 - フォームの回答データは別のMCPサーバー(FORMLOVAなど)から取得済み
1. フォント読み込み -- すべての前提
Figma Plugin APIでテキストノードを操作するには、フォントの事前読み込みが必須です。読み込みなしにcharactersを設定するとエラーになります。
// 最初に必ず実行する
await figma.loadFontAsync({ family: "Inter", style: "Regular" });
await figma.loadFontAsync({ family: "Inter", style: "Medium" });
await figma.loadFontAsync({ family: "Inter", style: "Semi Bold" });
await figma.loadFontAsync({ family: "Inter", style: "Bold" });
await figma.loadFontAsync({ family: "Inter", style: "Light" });
日本語フォントを使う場合はNoto Sans JP等を追加で読み込みます。ただし、Figma環境にインストールされていないフォントは読み込みに失敗します。
// 日本語フォント(環境依存)
try {
  await figma.loadFontAsync({ family: "Noto Sans JP", style: "Regular" });
  await figma.loadFontAsync({ family: "Noto Sans JP", style: "Bold" });
} catch {
  // フォールバック: Interを使う
  console.log("Noto Sans JP not available, using Inter");
}
2. ヘルパー関数群
ワイヤーフレーム構築で何度も使う操作をヘルパー関数にまとめます。
色変換
function hexToRgb(hex: string): RGB {
  const r = parseInt(hex.slice(1, 3), 16) / 255;
  const g = parseInt(hex.slice(3, 5), 16) / 255;
  const b = parseInt(hex.slice(5, 7), 16) / 255;
  return { r, g, b };
}

// 使用例
const primary = hexToRgb("#2563EB");  // { r: 0.145, g: 0.388, b: 0.922 }
テキストノード生成
function createText(
  content: string,
  fontSize: number,
  style: string = "Regular",
  color: RGB = { r: 0.2, g: 0.2, b: 0.2 }
): TextNode {
  const text = figma.createText();
  text.fontName = { family: "Inter", style };
  text.characters = content;
  text.fontSize = fontSize;
  text.fills = [{ type: "SOLID", color }];
  text.lineHeight = { value: fontSize * 1.5, unit: "PIXELS" };
  return text;
}
画像プレースホルダー
サンドボックス制約で外部画像は挿入できないため、グレーのプレースホルダーフレームで代替します。
function createPlaceholder(
  label: string,
  width: number,
  height: number
): FrameNode {
  const frame = figma.createFrame();
  frame.name = label;
  frame.resize(width, height);
  frame.fills = [{ type: "SOLID", color: { r: 0.95, g: 0.95, b: 0.95 } }];
  frame.cornerRadius = 8;

  // ラベルを中央に配置
  frame.layoutMode = "VERTICAL";
  frame.counterAxisAlignItems = "CENTER";
  frame.primaryAxisAlignItems = "CENTER";

  const labelText = createText(label, 14, "Regular", { r: 0.63, g: 0.63, b: 0.63 });
  frame.appendChild(labelText);

  return frame;
}
カード生成
function createCard(
  name: string,
  borderRadius: number = 12,
  padding: number = 28
): FrameNode {
  const card = figma.createFrame();
  card.name = name;
  card.layoutMode = "VERTICAL";
  card.primaryAxisSizingMode = "AUTO";
  card.counterAxisSizingMode = "AUTO";
  card.cornerRadius = borderRadius;
  card.paddingTop = padding;
  card.paddingBottom = padding;
  card.paddingLeft = padding;
  card.paddingRight = padding;
  card.fills = [{ type: "SOLID", color: { r: 1, g: 1, b: 1 } }];
  card.effects = [{
    type: "DROP_SHADOW",
    color: { r: 0, g: 0, b: 0, a: 0.04 },
    offset: { x: 0, y: 2 },
    radius: 16,
    visible: true,
    blendMode: "NORMAL",
    spread: 0
  }];
  card.itemSpacing = 16;
  return card;
}
CTAボタン
function createButton(
  label: string,
  bgColor: RGB,
  textColor: RGB = { r: 1, g: 1, b: 1 },
  borderRadius: number = 8
): FrameNode {
  const btn = figma.createFrame();
  btn.name = "CTA Button";
  btn.layoutMode = "HORIZONTAL";
  btn.primaryAxisSizingMode = "AUTO";
  btn.counterAxisSizingMode = "AUTO";
  btn.paddingTop = 16;
  btn.paddingBottom = 16;
  btn.paddingLeft = 32;
  btn.paddingRight = 32;
  btn.cornerRadius = borderRadius;
  btn.fills = [{ type: "SOLID", color: bgColor }];
  btn.counterAxisAlignItems = "CENTER";

  const text = createText(label, 16, "Semi Bold", textColor);
  btn.appendChild(text);

  return btn;
}
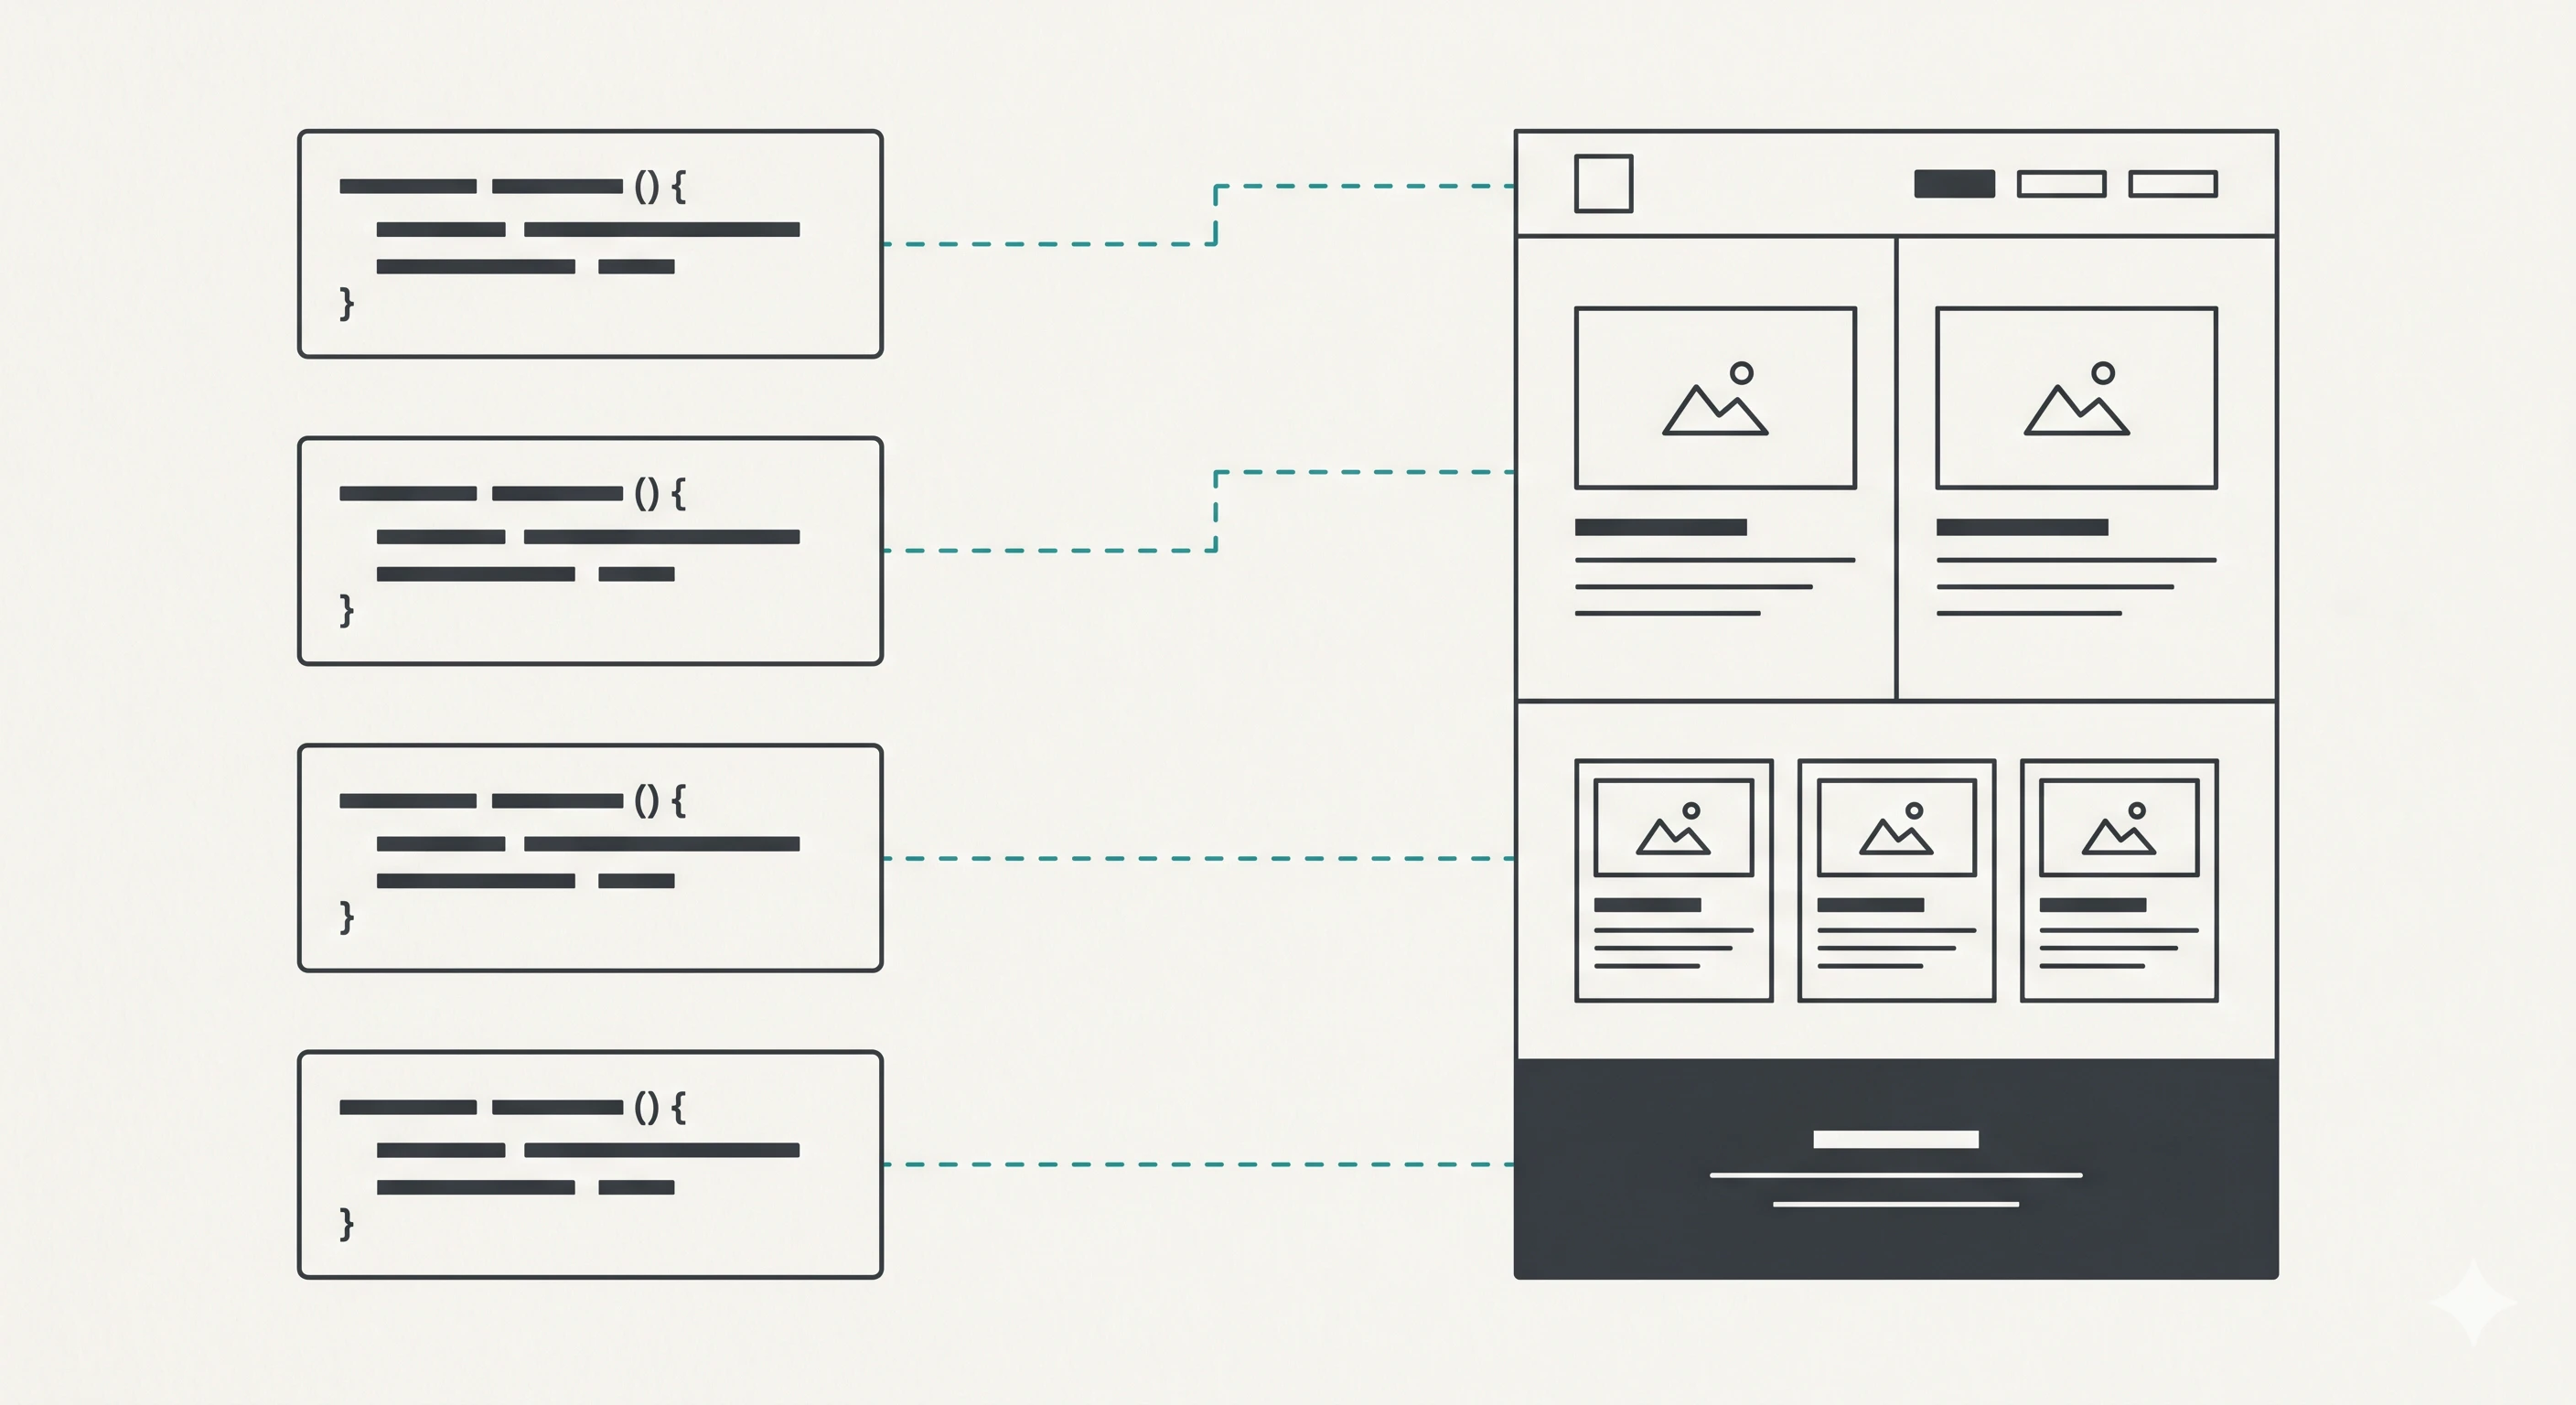
3. Main Frameの構築
LPワイヤーフレーム全体のコンテナを作ります。
const mainFrame = figma.createFrame();
mainFrame.name = "LP Wireframe";
mainFrame.resize(1440, 100);
mainFrame.layoutMode = "VERTICAL";
mainFrame.primaryAxisSizingMode = "AUTO";
mainFrame.counterAxisSizingMode = "FIXED";
mainFrame.itemSpacing = 0;
mainFrame.fills = [{ type: "SOLID", color: { r: 1, g: 1, b: 1 } }];

figma.currentPage.appendChild(mainFrame);
primaryAxisSizingMode: "AUTO" にすると、子フレームが追加されるたびに高さが自動で伸びます。
4. セクションフレームの基本パターン
すべてのセクションは同じ基本構造を持ちます。
function createSection(
  name: string,
  bgColor: RGB = { r: 1, g: 1, b: 1 },
  paddingY: number = 80,
  paddingX: number = 120
): FrameNode {
  const section = figma.createFrame();
  section.name = name;
  section.layoutMode = "VERTICAL";
  section.primaryAxisSizingMode = "AUTO";
  section.paddingTop = paddingY;
  section.paddingBottom = paddingY;
  section.paddingLeft = paddingX;
  section.paddingRight = paddingX;
  section.fills = [{ type: "SOLID", color: bgColor }];
  section.itemSpacing = 32;
  return section;
}
重要: appendChildの順序制約
layoutSizingHorizontal: "FILL" は、親のAuto Layoutに追加された後でないと機能しません。
// 正しい順序
const section = createSection("Hero");
mainFrame.appendChild(section);           // 先に親に追加
section.layoutSizingHorizontal = "FILL";  // その後でFILL

// 動かない順序
const section = createSection("Hero");
section.layoutSizingHorizontal = "FILL";  // 親がないのでFIXEDになる
mainFrame.appendChild(section);
テキストノードも同様です。
const title = createText("見出しテキスト", 40, "Bold");
section.appendChild(title);
title.layoutSizingHorizontal = "FILL";  // 親セクションの幅に追従
5. Heroセクションの実装
ヒアリングシートの「ファーストビューの構成」回答に応じてレイアウトを分岐させます。
スプリットレイアウト(左テキスト + 右画像)
function buildHeroSplit(
  headline: string,
  subheadline: string,
  ctaLabel: string,
  primaryColor: RGB
): FrameNode {
  const hero = createSection("Hero", { r: 1, g: 1, b: 1 }, 80, 120);
  hero.layoutMode = "HORIZONTAL";
  hero.counterAxisAlignItems = "CENTER";
  hero.itemSpacing = 48;

  // 左カラム: テキスト
  const textCol = figma.createFrame();
  textCol.name = "Hero Text";
  textCol.layoutMode = "VERTICAL";
  textCol.primaryAxisSizingMode = "AUTO";
  textCol.itemSpacing = 24;
  textCol.fills = [];

  const h1 = createText(headline, 48, "Bold");
  textCol.appendChild(h1);

  const sub = createText(subheadline, 18, "Regular", { r: 0.4, g: 0.4, b: 0.4 });
  textCol.appendChild(sub);

  const cta = createButton(ctaLabel, primaryColor);
  textCol.appendChild(cta);

  hero.appendChild(textCol);

  // 右カラム: 画像プレースホルダー
  const imageCol = createPlaceholder("Hero Image", 560, 400);
  hero.appendChild(imageCol);

  // FILL設定(appendChild後)
  textCol.layoutSizingHorizontal = "FILL";
  h1.layoutSizingHorizontal = "FILL";
  sub.layoutSizingHorizontal = "FILL";

  return hero;
}
テキスト中心レイアウト
function buildHeroCentered(
  headline: string,
  subheadline: string,
  ctaLabel: string,
  primaryColor: RGB
): FrameNode {
  const hero = createSection("Hero", { r: 1, g: 1, b: 1 }, 120, 200);
  hero.counterAxisAlignItems = "CENTER";
  hero.itemSpacing = 24;

  const h1 = createText(headline, 56, "Bold");
  h1.textAlignHorizontal = "CENTER";
  hero.appendChild(h1);
  h1.layoutSizingHorizontal = "FILL";

  const sub = createText(subheadline, 20, "Regular", { r: 0.4, g: 0.4, b: 0.4 });
  sub.textAlignHorizontal = "CENTER";
  hero.appendChild(sub);
  sub.layoutSizingHorizontal = "FILL";

  const cta = createButton(ctaLabel, primaryColor);
  hero.appendChild(cta);

  return hero;
}
6. カードグリッドの実装
Features、Problem、Pricingなど、カードを横並びにするセクションのパターンです。
function buildCardRow(
  cards: Array<{ title: string; description: string }>,
  accentColor: RGB
): FrameNode {
  const row = figma.createFrame();
  row.name = "Card Row";
  row.layoutMode = "HORIZONTAL";
  row.primaryAxisSizingMode = "AUTO";
  row.itemSpacing = 24;
  row.fills = [];

  for (const cardData of cards) {
    const card = createCard(cardData.title);

    // アクセントバー(上部に細い色帯)
    const accent = figma.createFrame();
    accent.name = "Accent";
    accent.resize(60, 4);
    accent.cornerRadius = 2;
    accent.fills = [{ type: "SOLID", color: accentColor }];
    card.appendChild(accent);

    const title = createText(cardData.title, 20, "Semi Bold");
    card.appendChild(title);

    const desc = createText(cardData.description, 14, "Regular",
      { r: 0.4, g: 0.4, b: 0.4 });
    card.appendChild(desc);
    desc.layoutSizingHorizontal = "FILL";

    row.appendChild(card);
    card.layoutSizingHorizontal = "FILL";
  }

  return row;
}
7. 実績・数字セクション(ダーク背景)
function buildNumbers(
  metrics: Array<{ value: string; label: string }>,
  darkBg: RGB = { r: 0.11, g: 0.11, b: 0.14 }
): FrameNode {
  const section = createSection("Numbers", darkBg);
  section.counterAxisAlignItems = "CENTER";

  const title = createText("実績", 32, "Bold", { r: 1, g: 1, b: 1 });
  section.appendChild(title);

  const row = figma.createFrame();
  row.name = "Metrics Row";
  row.layoutMode = "HORIZONTAL";
  row.primaryAxisSizingMode = "AUTO";
  row.itemSpacing = 64;
  row.fills = [];
  row.counterAxisAlignItems = "CENTER";

  for (const metric of metrics) {
    const col = figma.createFrame();
    col.name = metric.label;
    col.layoutMode = "VERTICAL";
    col.primaryAxisSizingMode = "AUTO";
    col.counterAxisAlignItems = "CENTER";
    col.itemSpacing = 8;
    col.fills = [];

    const value = createText(metric.value, 48, "Bold", { r: 1, g: 1, b: 1 });
    col.appendChild(value);

    const label = createText(metric.label, 14, "Regular",
      { r: 0.7, g: 0.7, b: 0.7 });
    col.appendChild(label);

    row.appendChild(col);
  }

  section.appendChild(row);
  row.layoutSizingHorizontal = "FILL";

  return section;
}
8. ナビゲーションバー
function buildNav(
  brandName: string,
  ctaLabel: string,
  primaryColor: RGB
): FrameNode {
  const nav = figma.createFrame();
  nav.name = "Navigation";
  nav.layoutMode = "HORIZONTAL";
  nav.primaryAxisSizingMode = "AUTO";
  nav.counterAxisAlignItems = "CENTER";
  nav.paddingTop = 16;
  nav.paddingBottom = 16;
  nav.paddingLeft = 120;
  nav.paddingRight = 120;
  nav.fills = [{ type: "SOLID", color: { r: 1, g: 1, b: 1 } }];
  nav.itemSpacing = 32;

  // ロゴ(テキスト)
  const logo = createText(brandName, 20, "Bold");
  nav.appendChild(logo);

  // スペーサー
  const spacer = figma.createFrame();
  spacer.name = "Spacer";
  spacer.resize(100, 1);
  spacer.fills = [];
  nav.appendChild(spacer);
  spacer.layoutSizingHorizontal = "FILL";

  // メニュー項目
  const menuItems = ["Features", "Pricing", "FAQ", "Contact"];
  for (const item of menuItems) {
    const menuText = createText(item, 14, "Medium",
      { r: 0.4, g: 0.4, b: 0.4 });
    nav.appendChild(menuText);
  }

  // CTAボタン
  const cta = createButton(ctaLabel, primaryColor);
  nav.appendChild(cta);

  return nav;
}
9. 全体の組み立て
ヒアリングの回答データに基づいて、セクションを動的に組み立てます。
// 回答データ(FORMLOVAから取得済み)
const response = {
  companyName: "Because AI",
  headline: "経理の未来を、AIで自動化する",
  subheadline: "請求書処理から経費精算まで、AIが代行します",
  ctaLabel: "無料で始める",
  mainColor: "#2563EB",
  subColor: "#10B981",
  firstView: "split",
  sections: ["hero", "problem", "solution", "features",
             "numbers", "pricing", "faq", "cta_bottom"],
  metrics: [
    { value: "500+", label: "導入企業" },
    { value: "98%", label: "継続率" },
    { value: "70%", label: "工数削減" },
  ],
  // ... 他のフィールド
};

const primary = hexToRgb(response.mainColor);
const secondary = hexToRgb(response.subColor);

// ナビゲーション(常に含める)
const nav = buildNav(response.companyName, response.ctaLabel, primary);
mainFrame.appendChild(nav);
nav.layoutSizingHorizontal = "FILL";

// 選択されたセクションだけを構築
for (const key of response.sections) {
  let section: FrameNode | null = null;

  switch (key) {
    case "hero":
      section = response.firstView === "split"
        ? buildHeroSplit(response.headline, response.subheadline,
                         response.ctaLabel, primary)
        : buildHeroCentered(response.headline, response.subheadline,
                            response.ctaLabel, primary);
      break;
    case "numbers":
      section = buildNumbers(response.metrics);
      break;
    // ... 他のセクションも同様
  }

  if (section) {
    mainFrame.appendChild(section);
    section.layoutSizingHorizontal = "FILL";
  }
}

// ビューポートを調整
figma.viewport.scrollAndZoomIntoView([mainFrame]);
MCP経由での実行フロー
実際にMCPクライアントから実行する場合のフローです。
1. FORMLOVA MCP: get_responses(form_id, limit=1)
   → ヒアリング回答のJSON

2. LLM: 回答データからFigma APIコールを組み立てる
   → 上記のコードスニペットを組み合わせる

3. Figma MCP: create_new_file("Because AI - LP Wireframe")
   → 空のFigmaファイル

4. Figma MCP: use_figma(commands)
   → フォント読み込み + 全セクション構築
プロンプトの全文はWorkflow Placeに公開しています。コピーしてそのまま使えます。
テスト結果
「Because AI」(AI経理自動化SaaS)のテストデータで実行した結果:
- 10セクション + ナビゲーション + フッター生成
- 所要時間: 約3分(Figma生成部分のみ)
- 生成Figmaファイル: Because AI - LP Wireframe
28項目中14項目がワイヤーフレームに直接反映されました。
ハマりどころまとめ
| 問題 | 原因 | 対策 |
|---|---|---|
| テキスト変更でエラー | フォント未読み込み |
loadFontAsyncを最初に実行 |
| FILL指定が効かない | appendChildの前にFILLを設定 | 親に追加してからFILLを設定 |
| 外部画像が挿入できない | サンドボックス制約 | プレースホルダーフレームで代替 |
| フォントが読み込めない | 環境にフォントがない | try-catchでフォールバック |
| セクション間にギャップ | itemSpacingのデフォルト |
itemSpacing = 0を明示 |
ヒアリングシートの設計と全プロンプトの詳細はこちら:
FORMLOVAは無料で始められます。フォーム数も回答数も無制限です。
関連する記事: