カスタマイズ描画について
※本記事は下記のZenn本にまとめました。
ちょっと複雑な絵の場合、Pathを使うと便利になります。ポリゴンや各種曲線など複雑な図形の描画はpathの利用をお勧めます。
pathの移動
Pathの移動について、下記の関数があります。
- moveTo(移動)
- relativeMoveTo(移動)
- lineTo(直線)
- relativeLineTo(直線)
- arcTo(アーク)
- arcToPoint(アーク)
- relativeArcToPoint(アーク)
- conicTo(円錐)
- relativeConicTo(円錐)
- quadraticBezierTo(ベジェ曲線)
- relativeQuadraticBezierTo(ベジェ曲線)
- cubicTo(3次ベジェ曲線)
- relativeCubicTo(3次ベジェ曲線)
moveToとlineTo
CanvasではCanvas(紙)の移動関数translate(double dx, double dy)があり、Pathには筆の移動関数moveTo(double dx, double dy)があります。
紙を移動して絵を描くより、筆を動かして絵を描くのは普通の考え方です。筆を指定した座標へ移動し、現在いる座標から指定した座標までlineTo関数で線を描く感じです。
Canvas節のcanvas.drawPointsで描けた折れ線グラフをPath方法同じグラフを描いてみましょう。
    // 描画スタートはCanvasの中心へ移動
    canvas.translate(size.width / 2, size.height / 2);
    Path path = Path();
    Paint paint = Paint()
      ..color = Colors.red
      ..strokeWidth = 3
      ..style = PaintingStyle.stroke
      ..strokeCap = StrokeCap.round;
    path
      ..moveTo(-120, -20) // ペンを(-120,-20)へ移動
      ..lineTo(-80, -80) // (-120,-20)から(-80, -80)線を描く
      ..lineTo(-40, -60) // (-80, -80)から(-40, -60)線を描く
      ..lineTo(0, 0)
      ..lineTo(40, -140)
      ..lineTo(80, 120)
      ..lineTo(120, -100);
    canvas.drawPath(path, paint);
relativeMoveToとrelativeLineTo(相対位置)
絶対位置(座標)分かる場合、上記のmoveToとlineToでも使えますが、絶対位置(座標)分からなくても、相対位置(座標)あれば、絵を描けます。
上記の例で同じ効果の場合、下記のソースコードとなります。
    Path path = Path();
    Paint paint = Paint()
      ..color = Colors.red
      ..strokeWidth = 3
      ..style = PaintingStyle.stroke
      ..strokeCap = StrokeCap.round;
    path
      ..relativeMoveTo(-120, -20)
      ..relativeLineTo(40, -60)
      ..relativeLineTo(40, 20)
      ..relativeLineTo(40, 60)
      ..relativeLineTo(40, -140)
      ..relativeLineTo(40, 260)
      ..relativeLineTo(40, -220);
    canvas.drawPath(path, paint);
arcTo(アーク)
/// The line segment added if `forceMoveTo` is false starts at the
/// current point and ends at the start of the arc.
void arcTo(
  Rect rect,
  double startAngle,// スタートラジアン
  double sweepAngle,// 跨る度数(2pi以下)
  bool forceMoveTo,
)
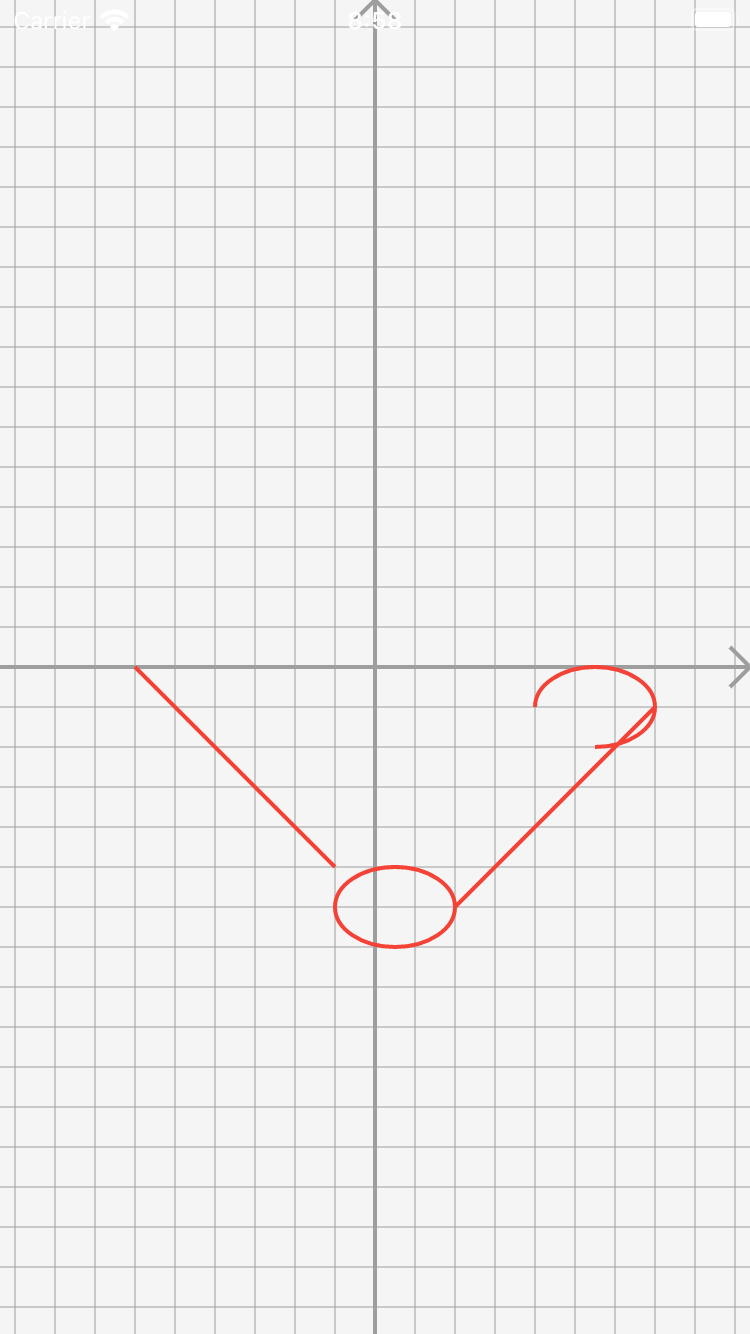
forceMoveTo が false の場合に追加される線分は、現在の点から始まり、円弧の始点で終わります。
   canvas.translate(-80, 0);

    Path path = Path();
    Paint paint = Paint()
      ..color = Colors.red
      ..strokeWidth = 2
      ..style = PaintingStyle.stroke;
    // trueの場合
    var rect = Rect.fromCenter(
      center: const Offset(0, 0),
      width: 100,
      height: 60,
    );

    path
      ..lineTo(15, 15)
      ..arcTo(rect, 0, pi * 1.5, true);

    canvas.drawPath(path, paint);

    path.reset();

    canvas.translate(160, 0);
    // falseの場合
    path
      ..lineTo(15, 15)
      ..arcTo(rect, 0, pi * 1.5, false);
    canvas.drawPath(path, paint);
arcToPointとrelativeArcToPoint(アーク)
arcEnd(アークの終了座標)を元にアークを描く
void arcToPoint(
  // アークの終了座標
  Offset arcEnd, {
  Radius radius = Radius.zero,// アーク半径
  double rotation = 0.0,
  bool largeArc = false,// true: 優弧,false: 劣弧
  bool clockwise = true,// 時計回り
})
    // 描画スタートはCanvasの中心へ移動
    canvas.translate(size.width / 2, size.height / 2);
    canvas.translate(0, -150);
    Path path = Path();
    Paint paint = Paint();
    drawPoints(canvas);

    paint
      ..color = Colors.red
      ..strokeWidth = 2
      ..style = PaintingStyle.stroke;
    path.lineTo(80, -40);
    // 終了座標(40,40)
    // 半径60
    // 劣弧

    path
      ..arcToPoint(
        const Offset(40, 40),
        radius: const Radius.circular(60),
        largeArc: false,
      )
      ..close();
    canvas.drawPath(path, paint);

    path.reset();
    canvas.translate(0, 150);
    // 終了座標(40,40)
    // 半径60
    // 優弧
    // 逆時計回り
    drawPoints(canvas);
    path.lineTo(80, -40);
    path
      ..arcToPoint(
        const Offset(40, 40),
        radius: const Radius.circular(60),
        largeArc: true,
        clockwise: false,
      )
      ..close();
    canvas.drawPath(path, paint);

    path.reset();
    canvas.translate(0, 150);
    // 終了座標(40,40)
    // 半径60
    // 優弧
    drawPoints(canvas);
    path.lineTo(80, -40);
    path
      ..arcToPoint(
        const Offset(40, 40),
        radius: const Radius.circular(60),
        largeArc: true,
      )
      ..close();
    canvas.drawPath(path, paint);
relativeArcToPointは相対位置でアークを描く関数です。使い方はrelativeLineToと同じです。
    path.lineTo(80, -40);
    path
      ..relativeArcToPoint(
        const Offset(-40, 80),// (80, -40)から相対位置
        radius: const Radius.circular(60),
        largeArc: true,
      )
      ..close();
上記と同じ効果にするため、lineTo(80, -40)の相対位置から終了位置を表すoffsetは(-40, 80)にします。
conicToとrelativeConicTo(円錐)
/// given point (x2,y2), using the control points (x1,y1) and the
/// weight w. If the weight is greater than 1, then the curve is a
/// hyperbola; if the weight equals 1, it's a parabola; and if it is
/// less than 1, it is an ellipse.
void conicTo(
  double x1,
  double y1,
  double x2,
  double y2,
  double w,
)
wが1より大きい場合、曲線は双曲線; wが1の場合は放物線です。もし1未満なら楕円です。
    canvas.translate(size.width / 2, size.height / 2);
    canvas.save();
    canvas.translate(-80, -120);
    const Offset p1 = Offset(80, -100);
    const Offset p2 = Offset(160, 0);

    Path path = Path();
    Paint paint = Paint()
      ..color = Colors.red
      ..strokeWidth = 2
      ..style = PaintingStyle.stroke;

    Paint paint1 = Paint()
      ..color = Colors.red
      ..strokeWidth = 8
      ..style = PaintingStyle.stroke;
    // 放物線
    path.conicTo(p1.dx, p1.dy, p2.dx, p2.dy, 1);
    canvas.drawPoints(PointMode.points, [p1], paint1);
    canvas.drawPath(path, paint);

    path.reset();
    canvas.restore();
    canvas.save();
    canvas.translate(-80, 0);
    // 楕円
    path.conicTo(p1.dx, p1.dy, p2.dx, p2.dy, 0.5);
    canvas.drawPoints(PointMode.points, [p1], paint1);
    canvas.drawPath(path, paint);

    path.reset();
    canvas.restore();
    canvas.translate(-80, 120);
    // 双曲線
    path.conicTo(p1.dx, p1.dy, p2.dx, p2.dy, 1.5);
    canvas.drawPoints(PointMode.points, [p1], paint1);
    canvas.drawPath(path, paint);
relativeConicToは相対位置で円錐を描く関数です。
quadraticBezierToとrelativeQuadraticBezierTo(ベジェ曲線)
2つの座標を元に曲線を描く
void quadraticBezierTo(
  double x1,
  double y1,
  double x2,
  double y2,
)
下記の例では分かりやすくように緑色の補助線を描きました。
    const Offset p1 = Offset(100, -100);
    const Offset p2 = Offset(160, 50);
    Path path = Path();
    Paint paint = Paint()
      ..color = Colors.green
      ..strokeWidth = 2
      ..style = PaintingStyle.stroke;
    // 補助線
    canvas.drawLine(const Offset(0, 0), p1, paint);
    canvas.drawLine(p1, p2, paint);
    // ベジェ曲線
    paint.color = Colors.red;
    path.quadraticBezierTo(p1.dx, p1.dy, p2.dx, p2.dy);
    canvas.drawPath(path, paint);

relativeQuadraticBezierToは相対位置で曲線を描く関数です。
cubicToとrelativeCubicTo(3次ベジェ曲線)
始点座標を含めて、3つの座標を元に3次ベジェ曲線を描く
下記の例では分かりやすくように緑色の補助線を描きました。
    // 描画スタートはCanvasの中心へ移動
    canvas.translate(size.width / 2, size.height / 2);
    const Offset p1 = Offset(100, -100);
    const Offset p2 = Offset(160, 150);
    const Offset p3 = Offset(200, 0);
    canvas.translate(-120, 0);
    Paint paint = Paint();
    paint
      ..color = Colors.green
      ..strokeWidth = 8
      ..style = PaintingStyle.stroke
      ..strokeCap = StrokeCap.round;
    // p1
    canvas.drawPoints(PointMode.points, [p1], paint);
    // p2
    canvas.drawPoints(PointMode.points, [p2], paint);
    // 補助線
    paint.strokeWidth = 2;
    canvas.drawLine(const Offset(0, 0), p1, paint);
    canvas.drawLine(p2, p3, paint);
    Path path = Path();
    paint
      ..color = Colors.red
      ..strokeWidth = 2;
    path.cubicTo(p1.dx, p1.dy, p2.dx, p2.dy, p3.dx, p3.dy);
    canvas.drawPath(path, paint);

relativeCubicToは相対位置で曲線を描く関数です
pathの追加
Pathの追加について、下記の関数があります。
- addRect(Rect rect)
- addRRect(RRect rrect)
- addOval(Rect oval)
- addArc(Rect oval, double startAngle, double sweepAngle)
- addPolygon(List points, bool close)
- addPath(Path path, Offset offset, {Float64List matrix4})
- extendWithPath(Path path, Offset offset, {Float64List matrix4})
addRectとaddRRect(矩形の追加)
既存のパス上矩形する意味です。
下記の例では線を描いた後、矩形を追加しました。
    canvas.translate(-120, 0);
    Path path = Path();
    Paint paint = Paint()
      ..color = Colors.red
      ..strokeWidth = 2
      ..style = PaintingStyle.stroke;

    Rect rect = Rect.fromPoints(
      const Offset(100, 100),
      const Offset(160, 160),
    );
    path
      ..lineTo(100, 100)
      ..addRect(rect)
      ..relativeLineTo(100, -100)
      ..addRRect(RRect.fromRectXY(rect.translate(100, -100), 10, 10));
    canvas.drawPath(path, paint);
addOvalとaddArc(楕円形とアークの追加)
既存のパス上楕円を追加する意味です。
下記の例では線を描いた後、楕円を追加しました。
canvas.translate(-120, 0);
    Path path = Path();
    Paint paint = Paint()
      ..color = Colors.red
      ..strokeWidth = 2
      ..style = PaintingStyle.stroke;

    Rect rect = Rect.fromPoints(
      const Offset(100, 100),
      const Offset(160, 140),
    );
    path
      ..lineTo(100, 100)
      ..addOval(rect)
      ..relativeLineTo(100, -100)
      ..addArc(rect.translate(100, -100), pi, pi * 3 / 2);
    canvas.drawPath(path, paint);
addPolygonとaddPath
    Path path = Path();
    Paint paint = Paint()
      ..color = Colors.red
      ..strokeWidth = 2
      ..style = PaintingStyle.stroke;
    const p0 = Offset(100, 100);
    Rect rect = Rect.fromPoints(
      const Offset(90, 70),
      const Offset(170, 150),
    );
    path
      ..lineTo(100, 100) // 線
      ..addPolygon([
        p0,
        p0.translate(20, -20),
        p0.translate(40, -20),
        p0.translate(60, 0),
        p0.translate(60, 20),
        p0.translate(40, 40),
        p0.translate(20, 40),
        p0.translate(0, 20),
      ], true) // ポリゴン
      ..addPath(
        Path()..addOval(rect), // 円形
        Offset.zero,
      );
    canvas.drawPath(path, paint);
pathの操作
Pathの操作について、下記の関数があります。
- void close()
- void reset()
- bool contains(Offset point)
- Path shift(Offset offset)
- Path transform(Float64List matrix4)
- Rect getBounds()
- set fillType(PathFillType value)
- static Path combine(PathOperation operation, Path path1, Path path2)
- PathMetrics computeMetrics({bool forceClosed = false})
close、reset、shift
- close
始点と終点を連結して、終了することです。 - reset
追加や操作したpathをリセット・クリアすることです。 - shift
下記の例で動作を確認しましょう。
    Path path = Path();
    Paint paint = Paint()
      ..color = Colors.red
      ..strokeWidth = 2
      ..style = PaintingStyle.stroke;
    // クローズ
    path
      ..lineTo(100, 100)
      ..relativeLineTo(0, -200)
      ..close();
    canvas.drawPath(path, paint);
    // シフト
    canvas.drawPath(path.shift(const Offset(-100, 0)), paint..color = Colors.blue);
    // リセット
    path.reset();

    path
      ..lineTo(0, 100)
      ..addPath(
          Path()
            ..addOval(Rect.fromPoints(
              const Offset(-100, 100),
              const Offset(100, 200),
            )),
          Offset.zero);
    canvas.drawPath(path, paint..color = Colors.purple);
containsとgetBounds
- contains
Offsetポイントがpath内にあるかどうかを判断できます
(下記例は緑ポイントが赤枠内にあるかどうかの判断) - getBounds
現在のpathが配置されている長方形の領域を取得できます
(下記例はブルー枠の領域取得)
    Path path = Path();
    Paint paint = Paint()
      ..color = Colors.red
      ..strokeWidth = 2
      ..style = PaintingStyle.stroke;
    path.lineTo(-50, 100);
    path
      ..relativeLineTo(50, -20)
      ..relativeLineTo(50, 20)
      ..close();
    canvas.drawPath(path, paint);

    // offset(0,50)とoffset(50,0)がpath内にあるかどうか
    Offset p1 = const Offset(0, 50);
    Offset p2 = const Offset(80, 0);
    paint
      ..color = Colors.green
      ..strokeWidth = 10
      ..strokeCap = StrokeCap.round;
    canvas.drawPoints(PointMode.points, [p1, p2], paint);
    print(path.contains(p1));
    print(path.contains(p2));
    // 領域を取得
    Rect rect = path.getBounds();
    paint
      ..color = Colors.blue
      ..strokeWidth = 2;
    canvas.drawRect(rect, paint);
transform
Canvasには同じ関数ありました。
ここはpathに対する移動、変換処理を行います。
    Path path = Path();
    Paint paint = Paint()
      ..color = Colors.red
      ..strokeWidth = 2
      ..style = PaintingStyle.stroke;
    Rect rect = Rect.fromCenter(
      center: const Offset(0, 0),
      width: 200,
      height: 200,
    );
    path.lineTo(100, 0);
    path.arcTo(rect, 0, pi / 8, false);
    path.close();
    for (int i = 1; i < 8; i++) {
      canvas.drawPath(path.transform(Matrix4.rotationZ(i * pi / 4).storage), paint);
    }
    canvas.drawPath(path, paint);
pathを45度ずつ8回回転することで下記の図になりました。

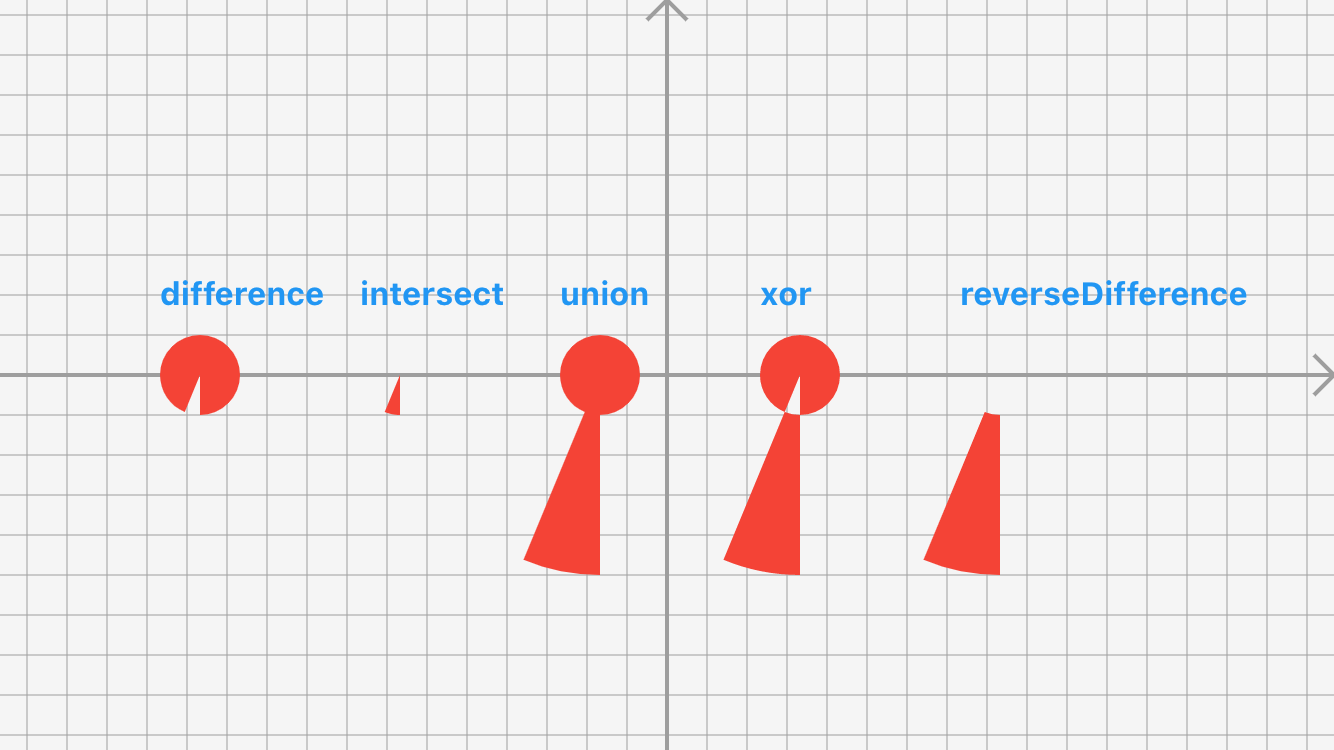
combine
path.combineはpathの結合です。
二つのpathを結合して、新たなpathを生成します。
enum PathOperation {
  difference,
  intersect,
  union,
  xor,
  reverseDifference,
}
   Paint paint = Paint()
      ..color = Colors.red
      ..strokeWidth = 2
      ..style = PaintingStyle.fill;
    // path1
    Path path1 = Path();
    path1.addOval(Rect.fromCircle(center: Offset.zero, radius: 20));
    // path2
    Path path2 = Path();
    Rect rect = Rect.fromCenter(
      center: const Offset(0, 0),
      width: 200,
      height: 200,
    );
    path2.lineTo(0, 100);
    path2.arcTo(rect, pi / 2, pi / 8, false);
    path2.close();

    PathOperation.values.map((e) {
      canvas.drawPath(
        Path.combine(
          e,
          path1.transform(Matrix4.translationValues(e.index * 100, 0, 0).storage),
          path2.transform(Matrix4.translationValues(e.index * 100, 0, 0).storage),
        ),
        paint,
      );
    }).toList();
computeMetrics
computeMetricsはPathの輪郭に関するさまざまなプロパティを取得できます(位置、長さ、角度など)。
    // 描画スタートはCanvasの中心へ移動
    canvas.translate(size.width / 2, size.height / 2);
    Paint paint = Paint()
      ..color = Colors.red
      ..strokeWidth = 2
      ..style = PaintingStyle.stroke;

    Path path = Path();
    // 円
    path.addOval(Rect.fromCenter(center: Offset.zero, width: 50, height: 50));
    path.addOval(Rect.fromCenter(center: Offset.zero, width: 100, height: 100));
    canvas.drawPath(path, paint);
    PathMetrics pms = path.computeMetrics();
    for (PathMetric pm in pms) {
      Tangent? tangent = pm.getTangentForOffset(pm.length * 0.25);
      if (tangent == null) return;
      print("---position:-${tangent.position}");
      print("----angle:-${tangent.angle}");
      print("----vector:-${tangent.vector}----");
      canvas.drawCircle(tangent.position, 5, Paint()..color = Colors.blue);
    }
出力結果
flutter: ---position:-Offset(-0.0, 25.0)
flutter: ----angle:-3.1415925096253225
flutter: ----vector:-Offset(-1.0, -0.0)----
flutter: ---position:-Offset(0.0, 50.0)
flutter: ----angle:--3.1415925456938503
flutter: ----vector:-Offset(-1.0, 0.0)----


