環境
- ubuntu:22.0.4.1 LTS
- kubernetes:1.28.2
- calico 3.26
- Arista vEOS: 4.30.3M
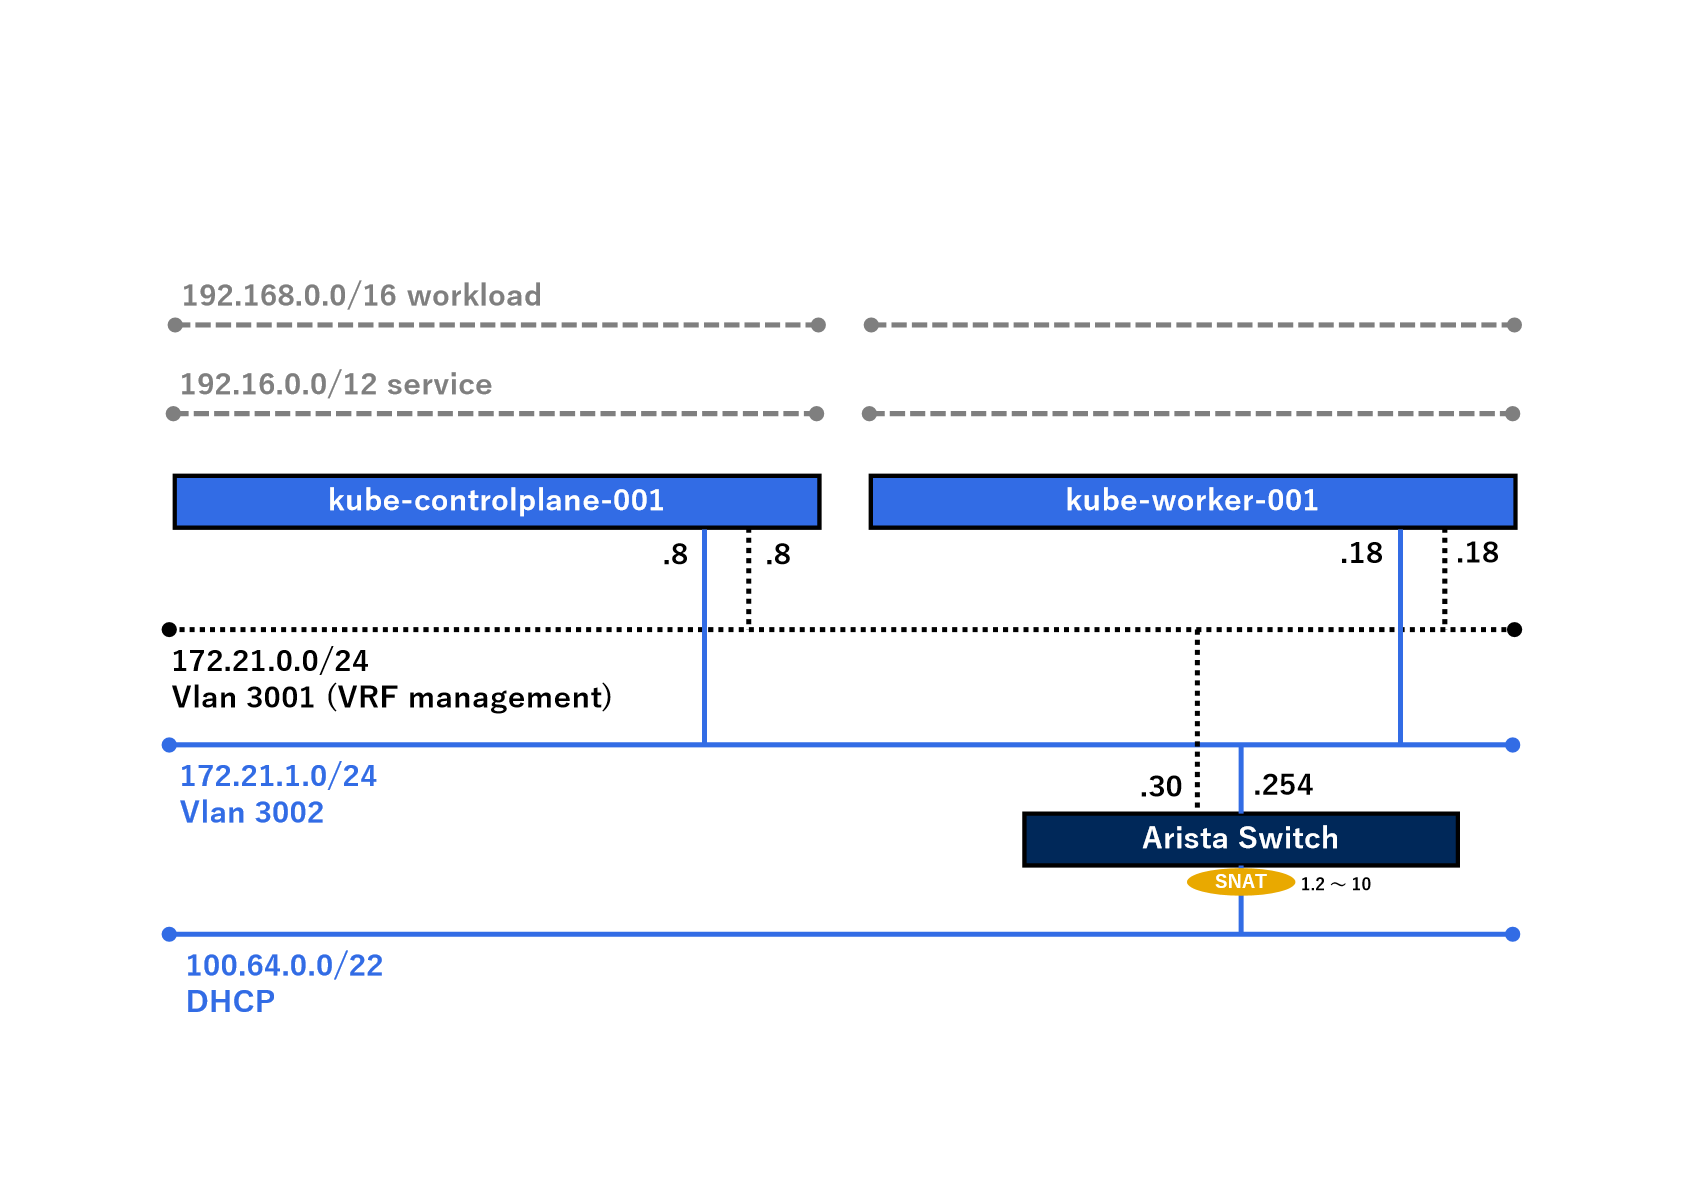
現状こんな感じです。
※172.21.0.0/24は管理系ネットワーク、172.21.1.0/24はサービス系ネットワークを想定してます。
BGPの構成 - kubernetes
BGPConfigurationの作成
まずはkubernetesクラスターのBGPの設定をしていきます。
ここでおさらいです。
kubeadm実行時にPodSubnetとserviceSubnetは以下の通り設定しました。
- podSubnet: 192.168.0.0/16
- serviceSubnet: 192.16.0.0/12
この辺の情報を忘れてしまった場合は、以下のコマンドで確認できます。
kubectl -n kube-system get cm kubeadm-config -o yaml
出力例
networking:
      dnsDomain: example.local
      podSubnet: 192.168.0.0/16
      serviceSubnet: 192.16.0.0/12
それでは上記の情報を基に、BGPConfigurationファイルを作成していきます。
apiVersion: projectcalico.org/v3
kind: BGPConfiguration
metadata:
  name: default
spec:
  logSeverityScreen: Info
  nodeToNodeMeshEnabled: true
  nodeMeshMaxRestartTime: 120s
  asNumber: 65535
  serviceClusterIPs:
    - cidr: 192.16.0.0/12
  listenPort: 178
  bindMode: None
  communities:
    - name: bgp-large-community
      value: 65535:300:100
  prefixAdvertisements:
    - cidr: 192.168.0.0/16
      communities:
        - bgp-large-community
        - 65535:120
これでBGPConfigurationが作成できました。それでは'apply`していきますが、その前にBGPのステータスについて確認してみます。
BGP status
この時点でのBGPのステータスを確認してみます。前回導入したcalicoctlを使用します。
# sudo kubectl calico node status
Calico process is running.

IPv4 BGP status
+--------------+-------------------+-------+----------+-------------+
| PEER ADDRESS |     PEER TYPE     | STATE |  SINCE   |    INFO     |
+--------------+-------------------+-------+----------+-------------+
| 172.21.0.18  | node-to-node mesh | up    | 09:06:42 | Established |
+--------------+-------------------+-------+----------+-------------+

IPv6 BGP status
No IPv6 peers found.
# sudo kubectl calico node status
Calico process is running.

IPv4 BGP status
+--------------+-------------------+-------+----------+-------------+
| PEER ADDRESS |     PEER TYPE     | STATE |  SINCE   |    INFO     |
+--------------+-------------------+-------+----------+-------------+
| 172.21.0.8   | node-to-node mesh | up    | 11:13:34 | Established |
+--------------+-------------------+-------+----------+-------------+

IPv6 BGP status
No IPv6 peers found.
この時点で、コントロールプレーンノードよワーカーノードはBGPネイバーを確立してます。
BGPConfigurationの作成
それではBGPConfigurationを作成していきます。
# kubectl apply -f bgpconfig.yaml
bgpconfiguration.projectcalico.org/default created
確認 - BGPConfiguration
# kubectl describe BGPConfiguration default
Name:         default
Namespace:
Labels:       <none>
Annotations:  <none>
API Version:  projectcalico.org/v3
Kind:         BGPConfiguration
Metadata:
  Creation Timestamp:  2023-11-12T07:26:50Z
  Resource Version:    197599
  UID:                 68535937-a7b9-4fea-8bf9-888d027706ea
Spec:
  As Number:  65535
  Bind Mode:  None
  Communities:
    Name:                      bgp-large-community
    Value:                     65535:300:100
  Listen Port:                 178
  Log Severity Screen:         Info
  Node Mesh Max Restart Time:  2m0s
  Node To Node Mesh Enabled:   true
  Prefix Advertisements:
    Cidr:  192.168.0.0/16
    Communities:
      bgp-large-community
      65535:120
  Service Cluster I Ps:
    Cidr:  192.16.0.0/12
Events:    <none>
グローバルBGPPeer
クラスター内のすべてのノードに適用する場合、グローバルBGPPeerを作成します。今回は、以下のBGPPeerを作成します。
apiVersion: projectcalico.org/v3
kind: BGPPeer
metadata:
  name: global-peer
spec:
  peerIP: 172.21.1.254
  asNumber: 65535
これでBGPPeerが作成できました。それでは'apply'してみます。
# kubectl apply -f peer/bgppeer-global.yaml
bgppeer.projectcalico.org/global-peer created
確認 - BGPPeer
# kubectl describe BGPPeer global-peer
Name:         global-peer
Namespace:
Labels:       <none>
Annotations:  <none>
API Version:  projectcalico.org/v3
Kind:         BGPPeer
Metadata:
  Creation Timestamp:  2023-11-12T07:33:08Z
  Resource Version:    198408
  UID:                 ea783cb6-5bdb-4b42-9022-835b719a7262
Spec:
  As Number:  65535
  Peer IP:    172.21.1.254
Events:       <none>
BGPの構成 - Arista SW
ハードウェアスイッチの設定
今回は、物理ではなく仮想上にArista SWをデプロイしてBGPをしゃべらせてみます。
Arista側の設定(抜粋)は以下の通りです。
# show running-config
vlan 3002
!
vrf instance management
   rd 10:1
!
interface Ethernet1
   switchport access vlan 3002
!
interface Loopback0
   ip address 1.1.1.1/32
!
interface Loopback1
   vrf management
   ip address 2.2.2.2/32
!
interface Management1
   vrf management
   ip address 172.21.0.30/24
!
interface Vlan3002
   ip address 172.21.1.254/24
!
ip routing
ip routing vrf management
!
ip route vrf management 0.0.0.0/0 172.21.0.254
!
router bgp 65535
   neighbor 172.21.1.8 remote-as 65535
   neighbor 172.21.1.18 remote-as 65535
   address-family ipv4
      neighbor 172.21.1.8 activate
      neighbor 172.21.1.18 activate
   !
BGP確認
ノードステータス
まずはコントロールプレーンノードとワーカーノードでステータスを確認してみます。
# sudo kubectl calico node status
Calico process is running.

IPv4 BGP status
+--------------+-------------------+-------+----------+-------------+
| PEER ADDRESS |     PEER TYPE     | STATE |  SINCE   |    INFO     |
+--------------+-------------------+-------+----------+-------------+
| 172.21.0.18  | node-to-node mesh | up    | 07:27:41 | Established |
| 172.21.1.254 | global            | up    | 07:33:10 | Established |
+--------------+-------------------+-------+----------+-------------+

IPv6 BGP status
No IPv6 peers found.
sudo kubectl calico node status
Calico process is running.

IPv4 BGP status
+--------------+-------------------+-------+----------+-------------+
| PEER ADDRESS |     PEER TYPE     | STATE |  SINCE   |    INFO     |
+--------------+-------------------+-------+----------+-------------+
| 172.21.0.8   | node-to-node mesh | up    | 07:27:41 | Established |
| 172.21.1.254 | global            | up    | 07:33:10 | Established |
+--------------+-------------------+-------+----------+-------------+

IPv6 BGP status
No IPv6 peers found.
どうやらハードウェアスイッチとネイバーを確立できてそうです。
それではハードウェアスイッチ側でステータスを確認してみます。
スイッチステータス
# show ip bgp summary
BGP summary information for VRF default
Router identifier 1.1.1.1, local AS number 65535
Neighbor Status Codes: m - Under maintenance
  Neighbor    V AS           MsgRcvd   MsgSent  InQ OutQ  Up/Down State   PfxRcd PfxAcc
  172.21.1.8  4 65535             16        15    0    0 00:09:28 Estab   3      3
  172.21.1.18 4 65535             16        15    0    0 00:09:26 Estab   3      3
#
# show ip route

VRF: default
Codes: C - connected, S - static, K - kernel,
       O - OSPF, IA - OSPF inter area, E1 - OSPF external type 1,
       E2 - OSPF external type 2, N1 - OSPF NSSA external type 1,
       N2 - OSPF NSSA external type2, B - Other BGP Routes,
       B I - iBGP, B E - eBGP, R - RIP, I L1 - IS-IS level 1,
       I L2 - IS-IS level 2, O3 - OSPFv3, A B - BGP Aggregate,
       A O - OSPF Summary, NG - Nexthop Group Static Route,
       V - VXLAN Control Service, M - Martian,
       DH - DHCP client installed default route,
       DP - Dynamic Policy Route, L - VRF Leaked,
       G  - gRIBI, RC - Route Cache Route,
       CL - CBF Leaked Route

Gateway of last resort:
 S        0.0.0.0/0 [1/0] via 100.64.1.1, Ethernet2

 C        1.1.1.1/32 is directly connected, Loopback0
 C        100.64.0.0/22 is directly connected, Ethernet2
 C        172.21.1.0/24 is directly connected, Vlan3002
 B I      192.16.0.0/12 [200/0] via 172.21.1.8, Vlan3002
 B I      192.168.170.0/24 [200/0] via 172.21.1.8, Vlan3002
 B I      192.168.181.0/24 [200/0] via 172.21.1.18, Vlan3002
 B I      192.168.255.224/27 [200/0] via 100.64.1.1, Ethernet2
いろいろBGPでルート情報がもらえてそうです。
Pod/Service情報
最後にPodとServiceのアドレスを改めて確認してみます。
# kubectl get pods -owide -A | grep kube-worker-001
calico-apiserver   calico-apiserver-677cc474fc-56fbw               1/1     Running   0                131m    192.168.181.2   kube-worker-001         <none>           <none>
calico-apiserver   calico-apiserver-677cc474fc-njhjh               1/1     Running   0                131m    192.168.181.4   kube-worker-001         <none>           <none>
calico-system      calico-kube-controllers-7b49bd7c6f-6swpt        1/1     Running   0                131m    192.168.181.3   kube-worker-001         <none>           <none>
calico-system      calico-node-4gfsc                               1/1     Running   0                22m     172.21.0.18     kube-worker-001         <none>           <none>
calico-system      calico-typha-97ddcffd7-j9t6d                    1/1     Running   0                131m    172.21.0.18     kube-worker-001         <none>           <none>
calico-system      csi-node-driver-clm6k                           2/2     Running   0                131m    192.168.181.5   kube-worker-001         <none>           <none>
kube-system        coredns-5dd5756b68-7v6jr                        1/1     Running   0                28h     192.168.45.65   kube-worker-001         <none>           <none>
kube-system        coredns-5dd5756b68-rmnk2                        1/1     Running   0                28h     192.168.45.66   kube-worker-001         <none>           <none>
kube-system        kube-proxy-ps64z                                1/1     Running   1                28h     172.21.0.18     kube-worker-001         <none>           <none>
tigera-operator    tigera-operator-597bf4ddf6-ndr6p                1/1     Running   14 (3h26m ago)   5h13m   172.21.0.18     kube-worker-001         <none>           <none>
# kubectl get pods -owide -A | grep kube-controlplane-001
calico-system      calico-node-t8877                               1/1     Running   0                23m     172.21.0.8      kube-controlplane-001   <none>           <none>
calico-system      csi-node-driver-b7bp8                           2/2     Running   0                131m    192.168.170.3   kube-controlplane-001   <none>           <none>
kube-system        etcd-kube-controlplane-001                      1/1     Running   8                28h     172.21.0.8      kube-controlplane-001   <none>           <none>
kube-system        kube-apiserver-kube-controlplane-001            1/1     Running   8                28h     172.21.0.8      kube-controlplane-001   <none>           <none>
kube-system        kube-controller-manager-kube-controlplane-001   1/1     Running   8                28h     172.21.0.8      kube-controlplane-001   <none>           <none>
kube-system        kube-proxy-smd86                                1/1     Running   0                28h     172.21.0.8      kube-controlplane-001   <none>           <none>
kube-system        kube-scheduler-kube-controlplane-001            1/1     Running   9                28h     172.21.0.8      kube-controlplane-001   <none>           <none>
# kubectl get svc -A -owide
NAMESPACE          NAME                              TYPE        CLUSTER-IP      EXTERNAL-IP   PORT(S)                  AGE    SELECTOR
calico-apiserver   calico-api                        ClusterIP   192.21.101.85   <none>        443/TCP                  135m   apiserver=true
calico-system      calico-kube-controllers-metrics   ClusterIP   None            <none>        9094/TCP                 135m   k8s-app=calico-kube-controllers
calico-system      calico-typha                      ClusterIP   192.19.24.252   <none>        5473/TCP                 135m   k8s-app=calico-typha
default            kubernetes                        ClusterIP   192.16.0.1      <none>        443/TCP                  28h    <none>
kube-system        kube-dns                          ClusterIP   192.16.0.10     <none>        53/UDP,53/TCP,9153/TCP   28h    k8s-app=kube-dns
core-dnsだけ/32でルート情報をもらってます。
おそらくCalicoを導入する前からあるPodは/32でルートが伝わってくるっぽいです。ここでcorednsを削除してみます。
# kubectl delete pods -n kube-system coredns-5dd5756b68-7v6jr
pod "coredns-5dd5756b68-7v6jr" deleted
# kubectl delete pods -n kube-system coredns-5dd5756b68-rmnk2
pod "coredns-5dd5756b68-rmnk2" deleted
# kubectl get pods -n kube-system -owide | grep coredns
coredns-5dd5756b68-cdtfh                        1/1     Running   0          116s    192.168.181.6   kube-worker-001         <none>           <none>
coredns-5dd5756b68-w448v                        1/1     Running   0          2m56s   192.168.170.4   kube-controlplane-001   <none>           <none>
アドレス帯もそれっぽいアドレスになりました。
もう一度Arista SWでルーティングテーブルを確認してみます。
show ip route vrf management

VRF: management
Codes: C - connected, S - static, K - kernel,
       O - OSPF, IA - OSPF inter area, E1 - OSPF external type 1,
       E2 - OSPF external type 2, N1 - OSPF NSSA external type 1,
       N2 - OSPF NSSA external type2, B - Other BGP Routes,
       B I - iBGP, B E - eBGP, R - RIP, I L1 - IS-IS level 1,
       I L2 - IS-IS level 2, O3 - OSPFv3, A B - BGP Aggregate,
       A O - OSPF Summary, NG - Nexthop Group Static Route,
       V - VXLAN Control Service, M - Martian,
       DH - DHCP client installed default route,
       DP - Dynamic Policy Route, L - VRF Leaked,
       G  - gRIBI, RC - Route Cache Route,
       CL - CBF Leaked Route

Gateway of last resort:
 S        0.0.0.0/0 [1/0] via 172.21.0.254, Management1

 C        2.2.2.2/32 is directly connected, Loopback1
 C        172.21.0.0/24 is directly connected, Management1
 B I      192.16.0.0/12 [200/0] via 172.21.0.8, Management1
 B I      192.168.170.0/24 [200/0] via 172.21.0.8, Management1
 B I      192.168.181.0/24 [200/0] via 172.21.0.18, Management1
これできれいになりました。
Podの作成
最後にそれぞれのノードにPodをデプロイしてみます。
その前に、コントロールプレーンノードにもPodをデプロイできるように、'Taints'を削除しておきます。
# kubectl taint nodes kube-controlplane-001 node-role.kubernetes.io/control-plane:NoSchedule-
node/kube-controlplane-001 untainted
# kubectl describe node kube-controlplane-001 | grep Taints
Taints:             <none>
それでは、Affinityを使用して、コントロールプレーンノード、ワーカーノードにそれぞれPodをデプロイします。サンプルのyamlファイルです。
apiVersion: v1
kind: Pod
metadata:
  name: test-1
spec:
  affinity:
    nodeAffinity:
      requiredDuringSchedulingIgnoredDuringExecution:
        nodeSelectorTerms:
        - matchExpressions:
          - key: kubernetes.io/hostname
            operator: In
            values:
            - kube-controlplane-001
  containers:
  - name: test-1
    image: busybox
    imagePullPolicy: IfNotPresent
    args:
    - sleep
    - "10000"
ワーカーノードにデプロイするには、「matchExpressions」内のvaluesの値をワーカーノードの名前にする。
デプロイ結果は以下の通り。(ワーカーノードには2つPodを作成してます。)
# kubectl get pods -owide
NAME       READY   STATUS    RESTARTS   AGE   IP              NODE                    NOMINATED NODE   READINESS GATES
test-1     1/1     Running   0          8s    192.168.170.5   kube-controlplane-001   <none>           <none>
test-2-1   1/1     Running   0          8s    192.168.181.7   kube-worker-001         <none>           <none>
test-2-2   1/1     Running   0          7s    192.168.181.8   kube-worker-001         <none>           <none>
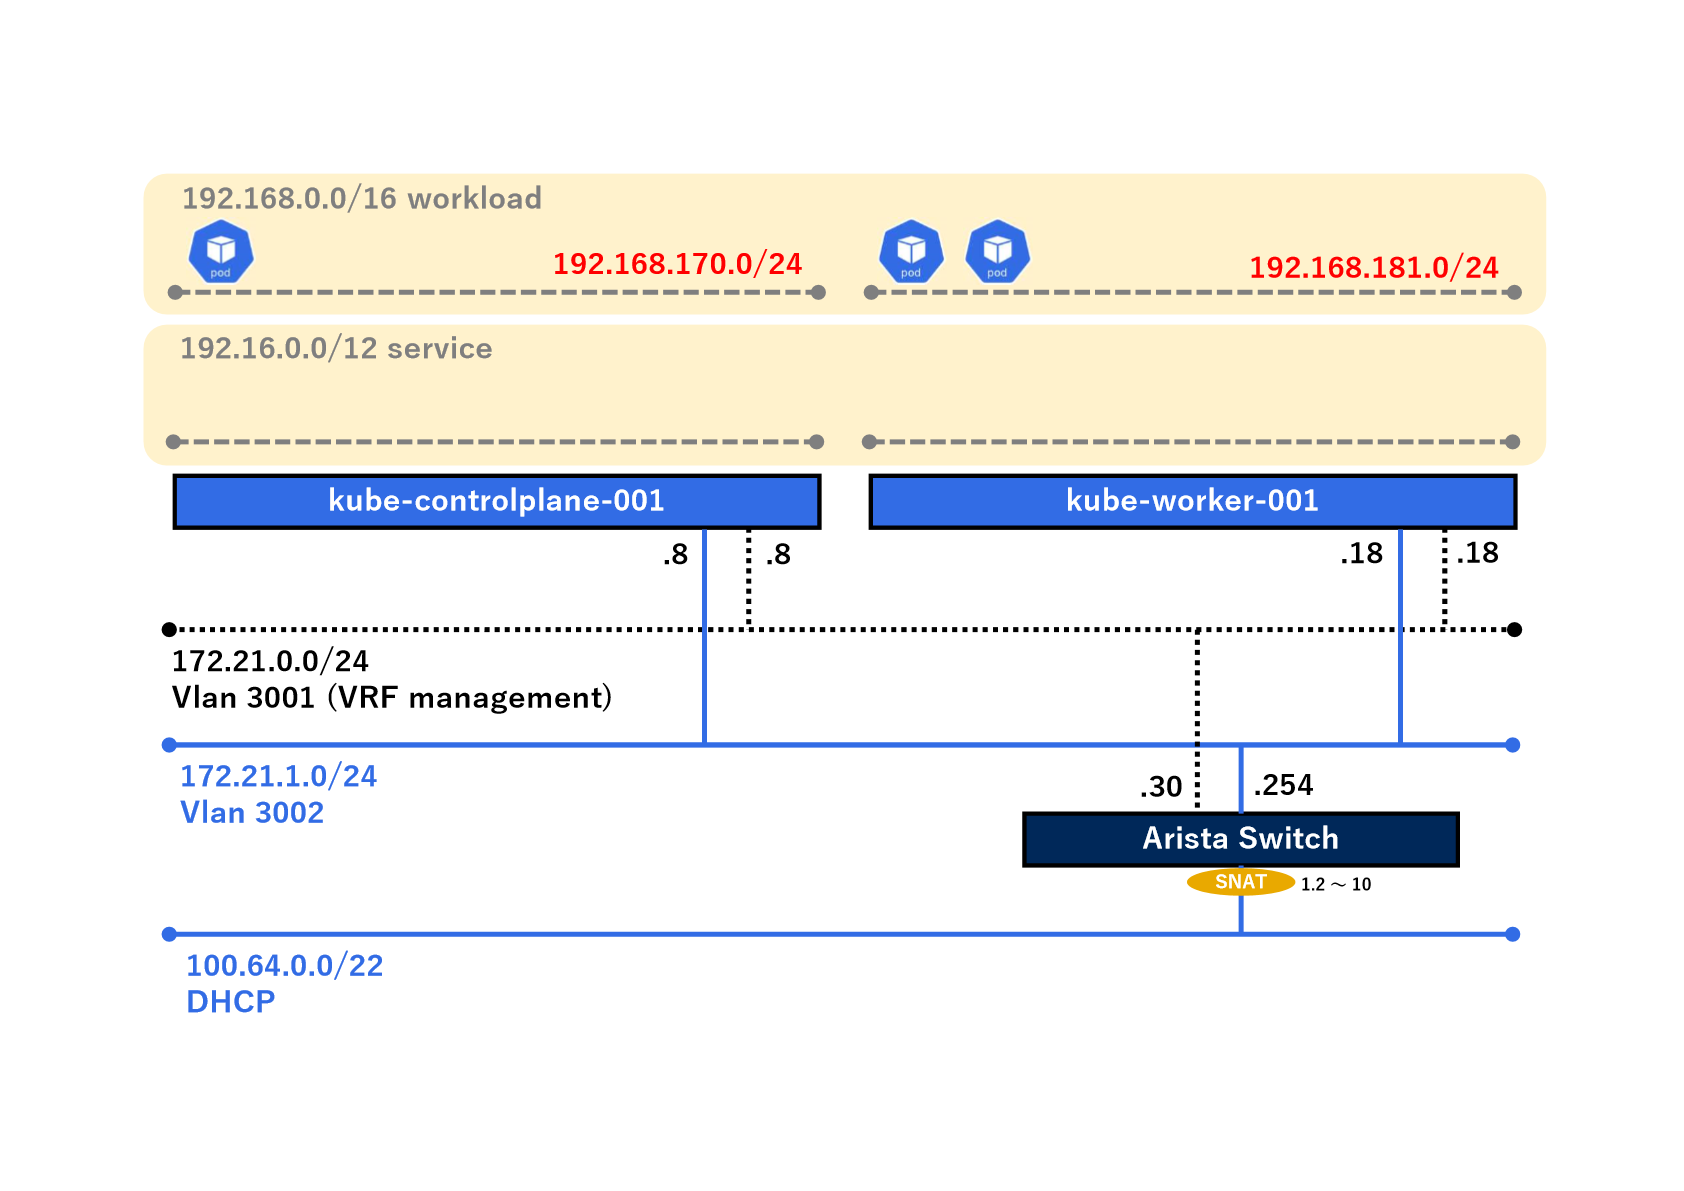
おそらく192.168.170.0/24がコントロールプレーンノード、192.168.181.0/24がワーカーノードのPodネットワークってことですね。つまり、図示するとこんな感じ。
なんとなーくわかってきました。
今回は以上です。
今度Service周りについて確認しようと思ます。

