はじめに
先日、リリースされた機械学習ライブラリーPyCaretを使ってみました。
データの特徴量分析や複数のモデルとの性能比較作業が自動化され、これまでのデータサイエンティストの作業時間がだいぶ減ると思います。
今回は、Mice Protein Expression Data Set 2015を利用して、クラスタリングを行い、その結果を見てみます。
データの概要
Expression levels of 77 proteins measured in the cerebral cortex of 8 classes of control and Down syndrome mice exposed to context fear conditioning, a task used to assess associative learning.
1. PyCaretのインストール
下記のコードを実行しインストールします。
Anacondaを使っていますが、PyCaret専用の仮想環境を立ち上げてインストールしました。
既存のCondaで管理されてる仮想環境では、エラーが発生する場合があります。(恐らくpipとcondaとの衝突が原因)
pip install pycaret
2.データの取得
from pycaret.datasets import get_data
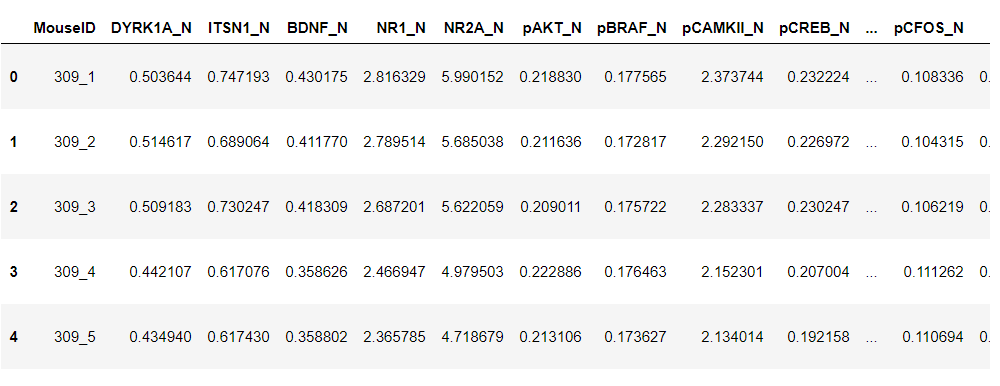
dataset = get_data('mice')
結果
Pandasのprofile_report()を使い、データの中身を見てみます。
import pandas_profiling
dataset.profile_report()
結果

そして、95%を訓練データ、5%をテストデータ(Unseen Dataと呼ぶ)に分けます。
data = dataset.sample(frac=0.95, random_state=786).reset_index(drop=True)
data_unseen = dataset.drop(data.index).reset_index(drop=True)

print('Data for Modeling: ' + str(data.shape))
print('Unseen Data For Predictions: ' + str(data_unseen.shape))
結果
Data for Modeling: (1026, 82)
Unseen Data For Predictions: (54, 82)
3.データの前処理
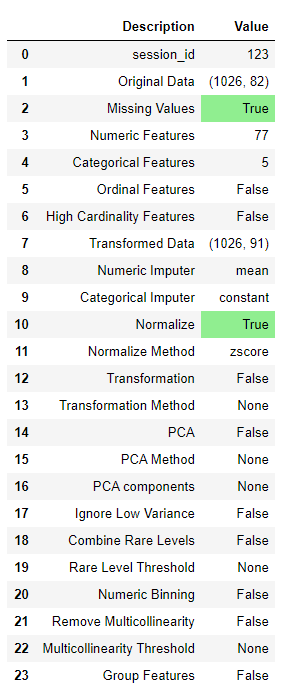
setup()でデータの前処理を行います。
from pycaret.clustering import *
data_clust = setup(data, normalize = True,
                   ignore_features = ['MouseID'],
                   session_id = 123)
NumericalデータのNormalizationを実施します。'Mouse ID'Featureは無視します。そして、Random seed固定としてsession_id=123を指定します。
結果
4.分析モデルの生成
クラスタリングモデルを選択して、モデリングを行います。create_model()を使います。
今回は、kmeansモデルを利用します。
kmeans = create_model('kmeans',num_clusters = 5 )
print(kmeans)
クラスタ数は5にします。Defaultは4です。
結果
KMeans(algorithm='auto', copy_x=True, init='k-means++', max_iter=300,
n_clusters=5, n_init=10, n_jobs=None, precompute_distances='auto',
random_state=123, tol=0.0001, verbose=0)
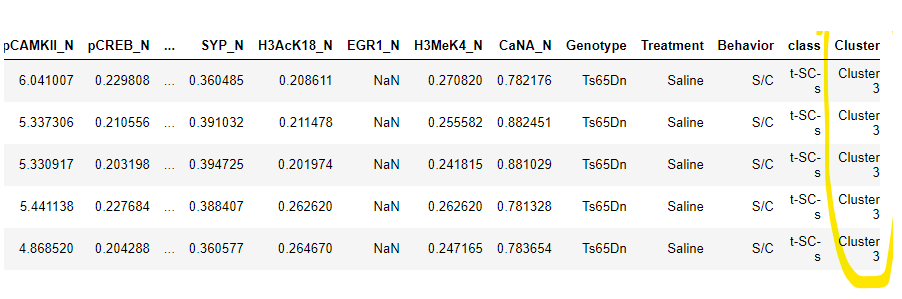
5.モデルのAssign
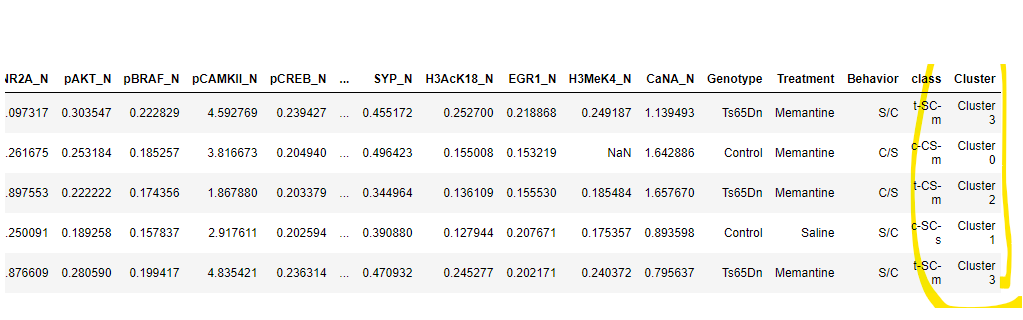
assign_model()を用いて、データセット(1080サンプル)にクラスタラベルをAssignします。
kmean_results = assign_model(kmeans)
kmean_results.head()
結果
6.モデルの可視化
plot_modelを用いて、クラスタリング結果を可視化します。
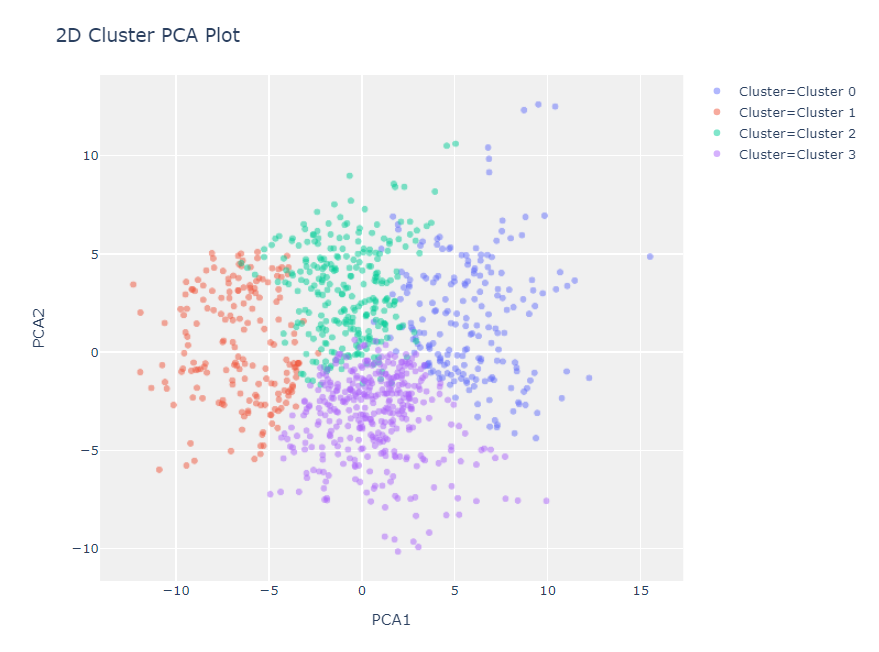
6.1. PCA Plot
plot_model(kmeans)
結果
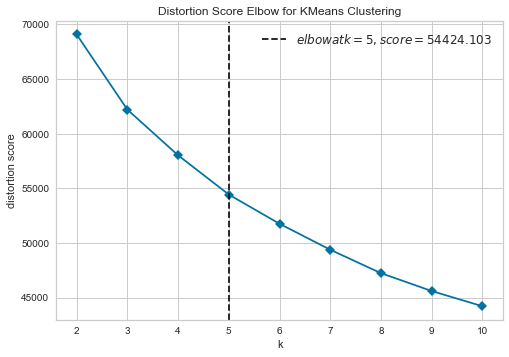
6.2. Elbow Plot
plot_model(kmeans, plot = 'elbow')
Elbow Plotは、推奨クラスタ数を教えてくれます。この事例では、クラスタの最適数は5と指定されています。
結果
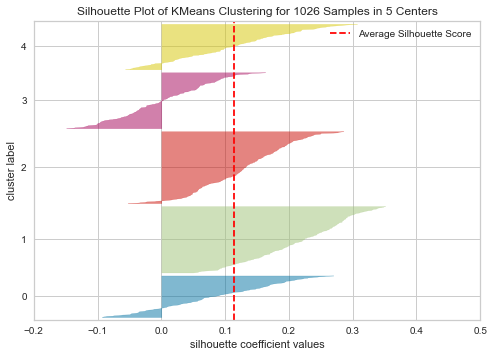
6.3. Silhouette Plot
plot_model(kmeans, plot = 'silhouette')
結果
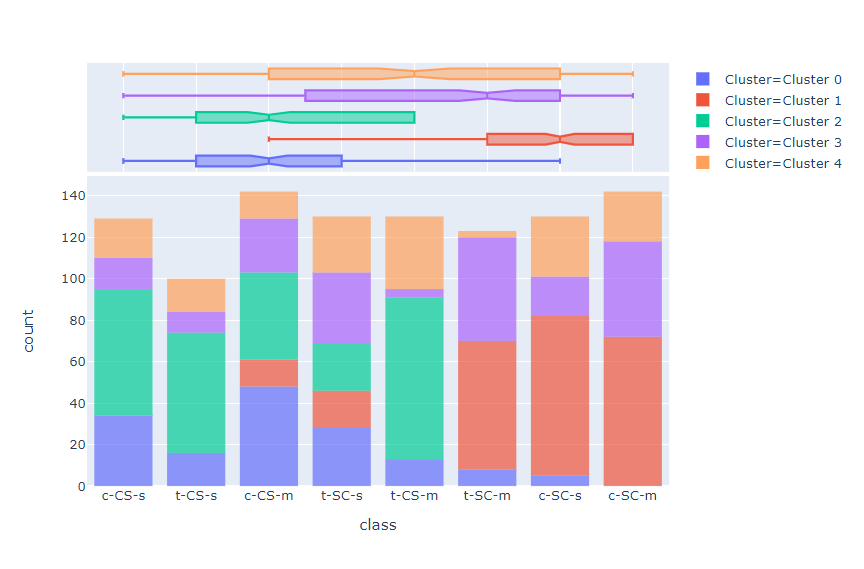
6.4. Distribution Plot
plot_model(kmeans, plot = 'distribution', feature = 'class')
結果
7.予測
unseen_predictions = predict_model(kmeans, data=data_unseen)
unseen_predictions.head()
Label列は、予測の結果を意味します。
結果
8.まとめ
- PyCaretで非教師学習であるクラスタリングを実施してみました。
8.1 クラスタリングに使用したPycaret関数一覧
- データの前処理: setup()
- 分析モデルの生成: create_model()
- クラスタラベルのAssign: assign_model()
- 可視化: plot_model()
- 予測: predict_model()
9.参考資料
1.PyCaret Home Page , http://www.pycaret.org/
2.PyCaret Classification, https://pycaret.org/classification/
3. 最速でPyCaretを使ってみた, https://qiita.com/s_fukuzawa/items/5dd40a008dac76595eea
4.PyCaretでワインの品質を分類してみた. https://qiita.com/kotai2003/items/c8fa7e55230d0fa0cc8e
5.PyCaretでタイタニック生存予想をしてみたhttps://qiita.com/kotai2003/items/a377f45ddee9829ed2c5
6.PyCaretでをボストン不動産価格を予測してみた (回帰)
https://qiita.com/kotai2003/items/bf4e8a278e43c58cab06