PWAとは
「Progressive Web Apps」の略称で、モバイル向けWebサイトをスマートフォン向けアプリのように使える仕組みのことです。
スマホのブラウザからホーム画面に追加する事で、あたかもスマホアプリのように使う事ができます。
ServiceWorkerとは
ブラウザがWebページとは別にバックグラウンドで実行するスクリプトです。
ServiceWorkerでファイルをキャッシュする事でオフラインでもアプリを使えるようにします。
これが無いとアプリをオフラインで起動させる事ができません。
indexedDBとは
データをブラウザのローカルデータベースに保持するAPI。
mysql等のデータベースを使わなくても、簡単にデータを保持する事ができます。
今回は、ServiceWokerと連携して、オフラインでもデータを保持して更新していきます。
作ったアプリ
実際にオフラインで動くカウンターアプリを作って見ました。
スマホのブラウザからホームに追加して見てください。
アプリみたいにURLも出ないし、それ単体で機能します。
動作確認環境
iOS 12.1
iPhone X
モバイル Safari
Android 6.0
モバイル Chrome
PWAの実装
最初にPWAの実装を行っていきます。
まずはmanifest.jsonの設定です。
{
    "short_name": "PWAサンプル",
    "name": "PWAサンプルアプリ",
    "display": "standalone",
    "start_url": "index.html",
    "icons": [
        {
            "src": "images/icon.jpg",
            "sizes": "192x192",
            "type": "image/jpg"
        }
    ],
    "background_color": "#AB060F"
}
short_name:ホーム画面に追加された時にアイコンの下に表示される名前
name:アプリの名前
display:PWAに対応したいならstandalone
start_url:アプリを起動した時に最初に表示するページ
icons:ホーム画面に追加した時に表示されるアイコン。設定しないと画面のスクショがアイコンになる。iOSは未対応。
background_color:アプリ起動時のスプラシュ画面の背景色。iOSは未対応。
manifest.jsonが書けたら、それを読み込む。
<!DOCTYPE html>
<html lang="ja">
<head>
    <meta charset="UTF-8">
    <meta name="viewport" content="width=device-width, initial-scale=1.0">
    <meta http-equiv="X-UA-Compatible" content="ie=edge">
    <title>Document</title>

    <!-- iosのアイコン設定 -->
    <link rel="apple-touch-icon" href="images/icon.jpg" sizes="192x192"/>

    <!-- PWAのmanifest.json -->
    <link rel="manifest" href="manifest.json">
</head>
「rel="apple-touch-icon"」で、iOSのアイコンを設定して上げます。
アイコンは自分で作成するか、私が使ったものを使用して見てください。

また、「rel="manifest"」でmanifest.jsonを読み込みます。
私は、ここを「rel="stylesheet"」で読み込んでいて、数十分悩みました笑
はい、これだけでPWA化の準備は整いました。
ServiceWorkerの実装
続いてServiceWorkerの実装なのですが、よく分からなかったのでほぼ参考サイトのコピペです。
var CACHE_NAME = 'pwa-sample-cache-v2';
var urlsToCache = [
    '/',
    '/manifest.json',
    '/css/style.css',
    '/js/serviceworker.js',
    '/js/count.js',
];

// インストール処理
self.addEventListener('install', function(event) {
    event.waitUntil(
        caches
            .open(CACHE_NAME)
            .then(function(cache) {
                return cache.addAll(urlsToCache);
            })
    );
});

// リソースフェッチ時のキャッシュロード処理
self.addEventListener('fetch', function(event) {
    event.respondWith(
        caches
            .match(event.request)
            .then(function(response) {
                return response ? response : fetch(event.request);
            })
    );
});
CACHE_NAMEはブラウザにキャッシュする名前を指定しています。
urlsToCacheはブラウザにキャッシュしたいファイルを指定します。
配列で複数指定する事ができます。
addEventListener('install')は、アプリをインストールした時に指定した名前で、指定したファイルをキャッシュに保存します。
addEventListener('fetch')は、何かリクエストがあると発火します。
発火時に、キャッシュにリソースがあるとそこから読み込んでくれます。
後はこのserviceworker.jsファイルを使ってServiceWorkerを動かします。
    <script>
    if ('serviceWorker' in navigator) {
        navigator.serviceWorker.register('js/serviceworker.js').then(function(registration) {
            console.log('ServiceWorker registration successful with scope: ', registration.scope);
        }).catch(function(err) {
            console.log('ServiceWorker registration failed: ', err);
        });
    }
    </script>
</body>
</html>
indexedDBの実装
続いてindexedDBの実装です。
var dbName = 'sampleDB';
var dbVersion = '1';
var storeName  = 'counts';
var count = 0;
// DB名を指定して接続
var openReq  = indexedDB.open(dbName, dbVersion);
// 接続に失敗
openReq.onerror = function (event) {
    console.log('接続失敗');
}

//DBのバージョン更新(DBの新規作成も含む)時のみ実行
openReq.onupgradeneeded = function (event) {
    var db = event.target.result;
    const objectStore = db.createObjectStore(storeName, {keyPath : 'id'})
    objectStore.createIndex("id", "id", { unique: true });
    objectStore.createIndex("cnt", "cnt", { unique: false });

    console.log('DB更新');
}

//onupgradeneededの後に実行。更新がない場合はこれだけ実行
openReq.onsuccess = function (event) {

    var db = event.target.result;
    var trans_g = db.transaction(storeName, 'readonly');
    var store_g = trans_g.objectStore(storeName);
    var getReq_g = store_g.get(1);

    getReq_g.onsuccess = function (event) {
        // 取得したデータがundefinedだったら0をセット
        // でーたがあれば++
        if (typeof event.target.result === 'undefined') {
            count = 0;
        } else {
            count = event.target.result.cnt;
            alert(count);
            count++;
        }

        var trans = db.transaction(storeName, "readwrite");
        var store = trans.objectStore(storeName);
        var putReq = store.put({
            id: 1,
            cnt: count
        });

        putReq.onsuccess = function (event) {
            console.log('更新成功');
        }
    }
}
今回は、数のカウントを取りたいので、countsのオブジェクトストア(テーブル)を作ります。
createObjectStore(storeName, {keyPath : 'id'}) で作りたい名前でオブジェクトストアを作成します。
createIndex("id", "id", { unique: true }) でカラムを作っていきます。
データの取得は、_get()_メソッドを使用し、 _keyPath_を指定して取得できます。
また、登録や更新は_put()_メソッドを使用します。
count.jsがかけたらhtmlに読み込みます。
    <script src="js/count.js"></script>
</body>
</html>
これで、WEBを読み込む(PWAアプリを起動する)度にカウントが増えるアプリの完成です(クソアプリとか言わないのっ!てか言わせなーい♪)
早速確認してみよう
という事で、実装した内容を早速確認してみようと思うのですが、PWAはhttpsの環境でしか動きません。
ですので、今回はgithub pagesを使用しました。
詳しいやり方はここら辺を参考にしました。
https://www.tam-tam.co.jp/tipsnote/html_css/post11245.html
https://qiita.com/sota_mikami/items/c6038cf13fd84b519a61
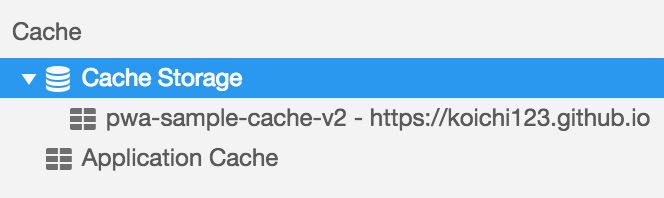
キャッシュの確認は、開発者ツール→Applicationでキャッシュされていることを確認する事ができます。
登録したデータは、開発者ツール→IndexedDBで作成したオブジェクトストアを確認する事ができます。

応用
ServiceWorkerとindexedDBを使ってPWA対応のアプリの基盤ができたところで、カウンターアプリを作って見ました。
ソースはgithubにもあるので、ここではHTMLとJSだけ載せようと思います。
<!DOCTYPE html>
<html lang="ja">
<head>
    <meta charset="UTF-8">
    <meta name="viewport" content="width=device-width, initial-scale=1.0">
    <meta http-equiv="X-UA-Compatible" content="ie=edge">
    <title>Document</title>
    <!-- iosのアイコン設定 -->
    <link rel="apple-touch-icon" href="images/icon.jpg" sizes="192x192"/>

    <!-- iosのスプラッシュ画面設定 -->
    <link rel="apple-touch-startup-image" href="images/launch-640x1136.jpg" media="(device-width: 320px) and (device-height: 568px) and (-webkit-device-pixel-ratio: 2) and (orientation: portrait)">
    <link rel="apple-touch-startup-image" href="images/launch-750x1334.jpg" media="(device-width: 375px) and (device-height: 667px) and (-webkit-device-pixel-ratio: 2) and (orientation: portrait)">
    <link rel="apple-touch-startup-image" href="images/launch-1242x2208.jpg" media="(device-width: 414x) and (device-height: 736x) and (-webkit-device-pixel-ratio: 3) and (orientation: portrait)">
    <link rel="apple-touch-startup-image" href="images/launch-1125x2436.png" media="(device-width: 375px) and (device-height: 812px) and (-webkit-device-pixel-ratio: 3) and (orientation: portrait)">
    <link rel="apple-touch-startup-image" href="images/launch-828x1792.jpg" media="(device-width: 414px) and (device-height: 896px) and (-webkit-device-pixel-ratio: 2) and (orientation: portrait)">
    <link rel="apple-touch-startup-image" href="images/launch-1242x2688.jpg" media="(device-width: 414px) and (device-height: 896px) and (-webkit-device-pixel-ratio: 3) and (orientation: portrait)">

    <!-- PWAのmanifest.json -->
    <link rel="manifest" href="manifest.json">

    <link rel="stylesheet" href="css/style.css">
</head>
<body>
    <div class="wrapper">
        <div id="countDisplay" class="count-display">0</div>
        <div class="btns">
            <button id="countDown" class="btn">減らす</button>
            <button id="countUp" class="btn">増やす</button>
        </div>
        <button id="countReset"  class="reset">リセット</button>
    </div>

    <script>
    if ('serviceWorker' in navigator) {
        navigator.serviceWorker.register('js/serviceworker.js').then(function(registration) {
            console.log('ServiceWorker registration successful with scope: ', registration.scope);
        }).catch(function(err) {
            console.log('ServiceWorker registration failed: ', err);
        });
    }
    </script>
    <script src="js/count.js"></script>
</body>
</html>
var dbName = 'sampleDB';
var dbVersion = '1';
var storeName  = 'counts';
var count = 0;
// DB名を指定して接続
var openReq  = indexedDB.open(dbName, dbVersion);

// エラー時
openReq.onerror = function (event) {
    // 接続に失敗
    console.log('db open error');
}

//DBのバージョン更新(DBの新規作成も含む)時のみ実行
openReq.onupgradeneeded = function (event) {
    var db = event.target.result;
    const objectStore = db.createObjectStore(storeName, {keyPath : 'id'})
    objectStore.createIndex("id", "id", { unique: true });
    objectStore.createIndex("cnt", "cnt", { unique: false });

    console.log('db upgrade');
}

//onupgradeneededの後に実行。更新がない場合はこれだけ実行
openReq.onsuccess = function (event) {
    var db = event.target.result;
    var trans = db.transaction(storeName, 'readonly');
    var store = trans.objectStore(storeName);
    var getReq = store.get(1);

    getReq.onerror = function (event) {
        count = 0;
        console.log('取得失敗');
    }
    getReq.onsuccess = function (event) {
        console.log('取得成功');
        if (typeof event.target.result === 'undefined') {
            count = 0;
        } else {
            count = event.target.result.cnt;
            console.log(count);
        }
        document.getElementById('countDisplay').innerHTML = count;
    }


    document.getElementById('countUp').addEventListener('click', function () {
        count++;
        var putReq = updateDb(db, storeName, count);

        putReq.onsuccess = function (event) {
            console.log('更新成功');
            document.getElementById('countDisplay').innerHTML = count;
        }
        putReq.onerror = function (event) {
            console.log('更新失敗');
        }
    });

    document.getElementById('countDown').addEventListener('click', function () {
        count--;
        var putReq = updateDb(db, storeName, count);

        putReq.onsuccess = function (event) {
            console.log('更新成功');
            document.getElementById('countDisplay').innerHTML = count;
        }
        putReq.onerror = function (event) {
            console.log('更新失敗');
        }
    });

    document.getElementById('countReset').addEventListener('click', function () {
        count = 0;
        var putReq = updateDb(db, storeName, count);

        putReq.onsuccess = function (event) {
            console.log('更新成功');
            document.getElementById('countDisplay').innerHTML = count;
        }
        putReq.onerror = function (event) {
            console.log('更新失敗');
        }
    });
}

function updateDb (db, store_name, cnt) {
    var trans = db.transaction(store_name, "readwrite");
    var store = trans.objectStore(store_name);
    return store.put({
        id: 1,
        cnt: cnt
    });
}
悩んだところ
iOSのスプラッシュ画面がどうしてもうまくいきませんでした...
実装はして見たのですが、なぜかうまくいかず...
わかる方教えてください!!
まとめ
WEBの技術でもスマホアプリ作れるじゃん!!!
WEB最高!!
参考記事