はじめに
Azure AutoMLのトレーニングから推論に関わる
- トレーニング送信したジョブのstatus
- ベストモデル名
- デプロイ状況
- RESTエンドポイントやAPIキー
これらをPythonから取得する方法について紹介します。
開発環境
- OS Windows 10(NVIDIA GTX 1650Ti,16GB RAM, i5-10300H CPU)
- Visual Studio Code 1.73.1
- Python 3.8
ジョブIDからStatusとベストモデル名を取得する方法
PythonからAutoMLのトレーニングを送信した後、それが終わったのかどうか知るためにはstatusが必要です。また、トレーニングしたモデルを登録する場合、ベストモデルの名前が必要です。(登録時はそのモデルがあるパスも必要ですが、モデルの名前さえあればパス名もわかります。)
このstatusとモデル名は、どちらもジョブIDから一気に取得できます。
ということで、まずはそのジョブIDを取ってきましょう。
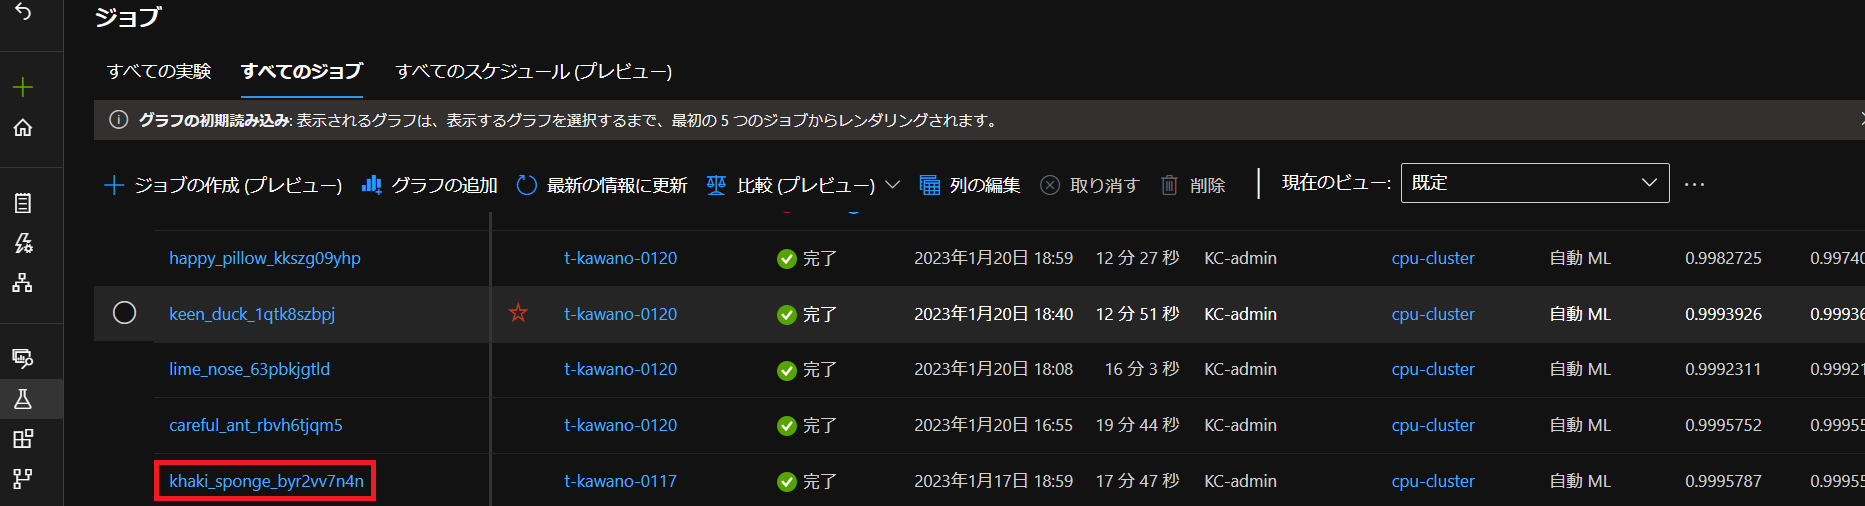
ジョブIDの取得方法その①
1つ目の方法はStudioからの取得です(下記画像の赤線部分)。
ジョブIDの取得方法その②
もしくはトレーニング送信時に、ジョブを表示させるようにしていたらそこからジョブIDを取得することもできます。参考:AutoMLのPythonからトレーニングの記事
トレーニング送信時
returned_job = ml_client.jobs.create_or_update(classification_job)#ジョブ作成

print(f"Created job: {returned_job}")#送信したジョブを表示
これで送信時にジョブの内容が返ってきます。
Created job: ClassificationJob({'log_verbosity': <LogVerbosity.INFO: 'Info'>, 'target_column_name': 'Class', 'weight_column_name': None, 'validation_data_size': None, 'cv_split_column_names': None, 'n_cross_validations': 2, 'test_data_size': None, 'task_type': <TaskType.CLASSIFICATION: 'Classification'>, 'training_data': {'type': 'mltable', 'path': 'azureml://datastores/XXX'}, 'validation_data': {'type': 'mltable'}, 'test_data': None, 'environment_id': None, 'environment_variables': None, 'outputs': {}, 'type': 'automl', 'status': 'NotStarted', 'log_files': None, 'name': 'khaki_sponge_byr2vv7n4n', 'description': None, 'tags': {}, 'properties': {}, 'id': '/subscriptions/XXX', 'Resource__source_path': None, 'base_path': 'C:\\Users\\XXX', 'creation_context': <azure.ai.ml._restclient.v2022_10_01_preview.models._models_py3.SystemData object at >, 'serialize': <msrest.serialization.Serializer object at >, 'inputs': {}, 'display_name': 'khaki_sponge_byr2vv7n4n', 'experiment_name': 't-kawano-1216', 'compute': 'cpu-cluster', 'services': {'Tracking': <azure.ai.ml._restclient.v2022_10_01_preview.models._models_py3.JobService object at >, 'Studio': <azure.ai.ml._restclient.v2022_10_01_preview.models._models_py3.JobService object at >}, 'resources': <azure.ai.ml._restclient.v2022_10_01_preview.models._models_py3.JobResourceConfiguration object at 0>, 'identity': None, 'featurization': None, 'limits': <azure.ai.ml.entities._job.automl.tabular.limit_settings.TabularLimitSettings object at >, 'training': <azure.ai.ml.entities._job.automl.training_settings.ClassificationTrainingSettings object at >, 'primary_metric': <ClassificationPrimaryMetrics.AUC_WEIGHTED: 'AUCWeighted'>, 'positive_label': None})
nameにジョブIDがのってます。
'name': 'khaki_sponge_byr2vv7n4n'
これでジョブiDがわかったので、これを使ってジョブのstatusとベストモデル名を取得します。
statusとモデル名の取得
下記コードのようにMLClientクラスを使って実行すればOKです。
from azure.ai.ml.entities import Job
from azure.identity import DefaultAzureCredential
from azure.ai.ml import MLClient

credential = DefaultAzureCredential()
#ワークスペースへ接続
subscription_id="<サブスクリプションID>"
resource_group="<リソース名>"
workspace_name="<ワークスペース名>"

ml_client = MLClient(credential, subscription_id, resource_group, workspace_name)

returned_job = ml_client.jobs.get(name="<ジョブ名>")
print(returned_job)
ワークスペースへ接続するためのサブスクリプションIDやリソース名、ワークスペース名の取得方法は過去の記事をご覧ください。
get()のnameに取得したいモデルが入っているジョブ名を入れます。
returned_job = ml_client.jobs.get(name="khaki_sponge_byr2vv7n4n")
実行したら次の結果が返ってきます。
ClassificationJob({'log_verbosity': <LogVerbosity.INFO: 'Info'>, 'target_column_name': 'Class', 'weight_column_name': None, 'validation_data_size': None, 'cv_split_column_names': None, 'n_cross_validations': 5, 'test_data_size': None, 'task_type': <TaskType.CLASSIFICATION: 'Classification'>, 'training_data': {'type': 'mltable', 'path': 'azureml://datastores/workspaceblobstore/paths/XXX'}, 'validation_data': {'type': 'mltable'}, 'test_data': None, 'environment_id': None, 'environment_variables': None, 'outputs': {}, 'type': 'automl', 'status': 'Completed', 'log_files': None, 'name': 'khaki_sponge_byr2vv7n4n', 'description': None, 'tags': {'_aml_system_automl_mltable_data_json': '{"Type":"MLTable","TrainData":{"Uri":"azureml://datastores/workspaceblobstore/paths/XXX","ResolvedUri":null,"AssetId":null},"TestData":null,"ValidData":null}', 'model_explain_run': 'best_run', '_aml_system_automl_run_workspace_id': 'XXX', '_aml_system_azureml.automlComponent': 'AutoML', '_azureml.ComputeTargetType': 'STANDARD_D2_V2', 'pipeline_id': '', 'score': '', 'predicted_cost': '', 'fit_time': '', 'training_percent': '', 'iteration': '', 'run_preprocessor': '', 'run_algorithm': '', 'automl_best_child_run_id': 'khaki_sponge_byr2vv7n4n_3', 'model_explain_best_run_child_id': 'khaki_sponge_byr2vv7n4n_3'}, 'properties': {'num_iterations': '5', 'training_type': 'TrainFull', 'acquisition_function': 'EI', 'primary_metric': 'accuracy', 'train_split': '0', 'acquisition_parameter': '0', 'num_cross_validation': '5', 'target': 'cpu-cluster', 'AMLSettingsJsonString': '{"path":"./sample_projects/","subscription_id":"XXX","resource_group":"t-kawano","workspace_name":"t-kawano-test","compute_target":"cpu-cluster","iterations":5,"primary_metric":"accuracy","task_type":"classification","IsImageTask":false,"IsTextDNNTask":false,"n_cross_validations":5,"preprocess":true,"is_timeseries":false,"time_column_name":null,"grain_column_names":null,"max_cores_per_iteration":-1,"max_concurrent_iterations":1,"iteration_timeout_minutes":20,"enforce_time_on_windows":false,"experiment_timeout_minutes":600,"exit_score":"NaN","experiment_exit_score":"NaN","auto_blacklist":false,"blacklist_samples_reached":false,"exclude_nan_labels":false,"verbosity":20,"model_explainability":true,"enable_onnx_compatible_models":true,"enable_feature_sweeping":false,"send_telemetry":true,"enable_early_stopping":true,"early_stopping_n_iters":20,"distributed_dnn_max_node_check":false,"enable_distributed_featurization":false,"enable_distributed_dnn_training":true,"enable_distributed_dnn_training_ort_ds":false,"ensemble_iterations":5,"enable_tf":false,"enable_cache":false,"enable_subsampling":false,"metric_operation":"maximize","enable_streaming":false,"use_incremental_learning_override":false,"force_streaming":false,"enable_dnn":false,"is_gpu_tmp":false,"enable_run_restructure":false,"featurization":"auto","label_column_name":"Class","weight_column_name":null,"miro_flight":"default","many_models":false,"many_models_process_count_per_node":0,"automl_many_models_scenario":null,"enable_batch_run":true,"save_mlflow":true,"track_child_runs":true,"start_auxiliary_runs_before_parent_complete":false,"test_include_predictions_only":false,"enable_mltable_quick_profile":"True","has_multiple_series":false,"enable_ensembling":true,"enable_stack_ensembling":true,"ensemble_download_models_timeout_sec":300.0,"stack_meta_learner_train_percentage":0.2,"blacklist_algos":["TensorFlowLinearClassifier","TensorFlowDNN"]}', 'DataPrepJsonString': None, 'EnableSubsampling': 'False', 'runTemplate': 'AutoML', 'azureml.runsource': 'automl', 'ClientType': 'Mfe', '_aml_system_scenario_identification': 'Remote.Parent', 'environment_cpu_name': 'AzureML-AutoML', 'environment_cpu_label': 'prod', 'environment_gpu_name': 'AzureML-AutoML-GPU', 'environment_gpu_label': 'prod', 'root_attribution': 'automl', 'attribution': 'AutoML', 'Orchestrator': 'AutoML', 'CancelUri': 'https://XXX', 'mltable_data_json': '{"Type":"MLTable","TrainData":{"Uri":"azureml://datastores/workspaceblobstore/paths/XXX","ResolvedUri":"azureml://subscriptions/XXX","AssetId":"azureml://locations/XXX"},"TestData":null,"ValidData":null}', 'ClientSdkVersion': '1.48.0', 'snapshotId': '00000000-0000-0000-0000-000000000000', 'SetupRunId': 'khaki_sponge_byr2vv7n4n_setup', 'SetupRunContainerId': 'dcid.khaki_sponge_byr2vv7n4n_setup', 'ProblemInfoJsonString': '{"dataset_num_categorical": 0, "is_sparse": false, "subsampling": false, "has_extra_col": true, "dataset_classes": 2, "dataset_features": 30, "dataset_samples": 284807, "single_frequency_class_detected": false}', 'FeaturizationRunJsonPath': 'featurizer_container.json', 'FeaturizationRunId': 'khaki_sponge_byr2vv7n4n_featurize', 'ModelExplainRunId': 'khaki_sponge_byr2vv7n4n_ModelExplain'}, 'id': '/subscriptions/XXX', 'Resource__source_path': None, 'base_path': 'C:\\Users\\admin\\Documents\\t-kawano\\PythonProjects\\AzureML\\AutoML\\v2', 'creation_context': <azure.ai.ml._restclient.v2022_10_01_preview.models._models_py3.SystemData object at 0x00000195AFAA8FA0>, 'serialize': <msrest.serialization.Serializer object at 0x00000195AFB30940>, 'inputs': {}, 'display_name': 'khaki_sponge_byr2vv7n4n', 'experiment_name': 't-kawano-0117', 'compute': '/subscriptions/XXX', 'services': {'Tracking': <azure.ai.ml._XXX>, 'Studio': <azure.ai.ml._XXX}, 'resources': <azure.ai.ml._XXX>, 'identity': None, 'featurization': None, 'limits': <azure.ai.ml.entities._XXX>, 'training': <azure.ai.ml.entities._XXX>, 'primary_metric': <ClassificationPrimaryMetrics.ACCURACY: 'Accuracy'>, 'positive_label': None})
statusとベストモデルの名前はそれぞれ次のところを確認。
#ジョブのステータス
'status': 'Completed'
Completedのほかに
実行中→Running、実行失敗→Failed、停止中→Stoppedなどがあります。
#ベストモデルの名前
'automl_best_child_run_id': 'khaki_sponge_byr2vv7n4n_3'
ベストモデルの名前はよく見るとジョブIDの後ろに「_〇(数字)」がついています。
この数字の意味は、トレーニングで作成されたモデルの順番を表しています。
取ってきたベストモデルの名前を使ってPythonからモデル登録をする方法はこちらの記事を参照ください!
モデル登録したら、今度はエンドポイントを作成してモデルをデプロイになります。
ということで次はデプロイのステータスを確認してみましょう。
デプロイ状況を確認する方法
Pythonからデプロイが完了したかどうかの確認もMLClientクラスを使えばいけます。
ジョブ確認時はjobsメソッドを使いましたが、デプロイに関してはonline_depolymentsメソッドを使います。
from azure.ai.ml.entities import OnlineEndpoint
from azure.identity import DefaultAzureCredential
from azure.ai.ml import MLClient

credential = DefaultAzureCredential()

subscription_id="<サブスクリプションID>"
resource_group="<リソースグループ名>"
workspace_name="<ワークスペース名>"

ml_client = MLClient(credential, subscription_id, resource_group, workspace_name)

deployment = ml_client.online_deployments.get(name="<デプロイ名>",endpoint_name="<エンドポイント名>")
print(deployment)
nameにはデプロイ名を、endpoint_nameにはエンドポイント名を入れます。
上記を実行した結果がコチラ↓
ManagedOnlineDeployment({'private_network_connection': False, 'data_collector': None, 'provisioning_state': 'Succeeded', 'endpoint_name': 'khaki-sponge-byr2vv7n4n-3', 'type': 'Managed', 'name': 'khaki-sponge-byr2vv7n4n-3', 'description': None, 'tags': {}, 'properties': {'AzureAsyncOperationUri': 'https://management.XXX'}, 'id': '/subscriptions/XXX', 'Resource__source_path': None, 'base_path': 'C:\\Users\\admin\\Documents\\t-kawano\\PythonProjects\\AzureML\\AutoML\\v2', 'creation_context': None, 'serialize': <msrest.serialization.Serializer object XXX>, 'model': '/subscriptions/XXX', 'code_configuration': {'code': '/subscriptions/XXX'}, 'environment': '/subscriptions/XXX', 'environment_variables': {}, 'app_insights_enabled': False, 'scale_settings': <azure.ai.ml.entities._deployment.scale_settings.DefaultScaleSettings object at XXX>, 'request_settings': <azure.ai.ml.entities._deployment.deployment_settings.OnlineRequestSettings object at XXX>, 'liveness_probe': <azure.ai.ml.entities._deployment.deployment_settings.ProbeSettings object at XXX>, 'readiness_probe': <azure.ai.ml.entities._deployment.deployment_settings.ProbeSettings object at XXX>, 'instance_count': 1, 'arm_type': 'online_deployment', 'model_mount_path': None, 'instance_type': 'Standard_DS2_v2', 'egress_public_network_access': 'Enabled'})
デプロイ状況はprovisioning_stateで確認できます。
'provisioning_state': 'Succeeded'
デプロイ完了を確認したら今度は推論です。
推論するときはRESTエンドポイントとAPIキーが必要なので、これをPythonから取ってきましょう。
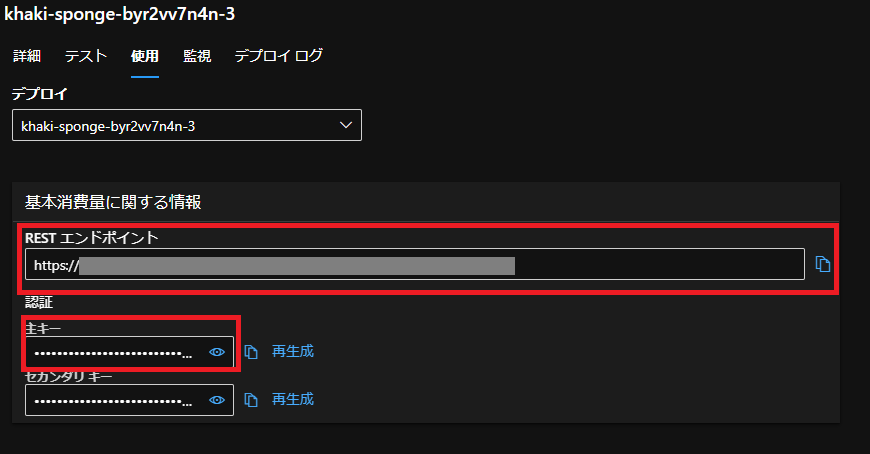
RESTエンドポイント・APIキーの取得方法
Studioからとってくる場合は画像の赤線のところから取得できます。
この2つをPythonから取ってみましょう。
エンドポイント名を使えばどちらも簡単に取得できます。
RESTエンドポイント
online_endpointsのgetメソッドを使います。
from azure.ai.ml.entities import OnlineEndpoint
from azure.identity import DefaultAzureCredential
from azure.ai.ml import MLClient

credential = DefaultAzureCredential()

subscription_id="<サブスクリプションID>"
resource_group="<リソースグループ名>"
workspace_name="<ワークスペース名>"

ml_client = MLClient(credential, subscription_id, resource_group, workspace_name)

rest_endpoint = ml_client.online_endpoints.get(name="<エンドポイント名>")
print(rest_endpoint)
ここのnameのところには、デプロイ時に指定したエンドポイント名を入れましょう。
返ってくる結果がコチラ
ManagedOnlineEndpoint({'public_network_access': 'Enabled', 'provisioning_state': 'Succeeded', 'scoring_uri': 'https://XXX', 'openapi_uri': 'https://XXX', 'name': 'khaki-sponge-byr2vv7n4n-3', 'description': 'this is a sample local endpoint', 'tags': {}, 'properties': {'azureml.onlineendpointid': '/subscriptions/XXX', 'AzureAsyncOperationUri': 'https://management.azure.com/subscriptions/XXX'}, 'id': '/subscriptions/XXX', 'Resource__source_path': None, 'base_path': 'C:\\Users\\admin\\Documents\\XXX', 'creation_context': None, 'serialize': <msrest.serialization.Serializer object at XXX>, 'auth_mode': 'key', 'location': 'japaneast', 'identity': <azure.ai.ml.entities._credentials.IdentityConfiguration object at XXX>, 'traffic': {'khaki-sponge-byr2vv7n4n-3': 0}, 'mirror_traffic': {}, 'kind': 'Managed'})
scoring_uriの部分がRESTエンドポイントです。他にもopenapi_uriにはswagger URIがあります。
APIキー
同じくonline_endpointsのget_keysメソッドを使えば取得できます。
from azure.ai.ml.entities import OnlineEndpoint
from azure.identity import DefaultAzureCredential
from azure.ai.ml import MLClient

credential = DefaultAzureCredential()

subscription_id="<サブスクリプションID>"
resource_group="<リソースグループ名>"
workspace_name="<ワークスペース名>"

ml_client = MLClient(credential, subscription_id, resource_group, workspace_name)

endpoint_cred = ml_client.online_endpoints.get_keys(name="khaki-sponge-byr2vv7n4n-3").primary_key
print(endpoint_cred)
実行したらAPIキーが返ってきます。
RESTエンドポイントとAPIキーを使ってPythonから推論する方法についてはこちらの記事をご覧ください!
まとめ
今回はAzure AutoMLでトレーニング~推論まで行うときに必要なものをPythonから取得する方法を紹介しました。何か必要になったらとりあえずMLClientを、って感じですね。
MLCLientクラスの公式ドキュメント