はじめに
Python SDK v2 を用いてAuto MLのトレーニングをしてみます。
v1は2025年9月をもって終了するとのことなので、それまでには移行した方が良さそうです。
前回までのAzure MLの記事ではv1を用いて行っていましたが、v2を使用してみたところ変わった部分が結構多かったのでご紹介します。
Azure CLI v2のインストールは公式に書かれている通りにインストールを行います。
az version
でCLIのバージョンを確認できます。
{
  "azure-cli": "2.43.0",
  "azure-cli-core": "2.43.0",
  "azure-cli-telemetry": "1.0.8",
  "extensions": {
    "ml": "2.12.0"
  }
}
SDK v2のインストールは公式に書いてあるように、pipインストールを行います。
pip install azure-ai-ml
開発環境
- OS Windows 10(NVIDIA GTX 1650Ti,16GB RAM, i5-10300H CPU)
- Visual Studio Code 1.73.1
- Python 3.9
Pythonから学習
今回はKaggleのcredit cardのデータセットを使います。
データはこちらからダウンロードできます。
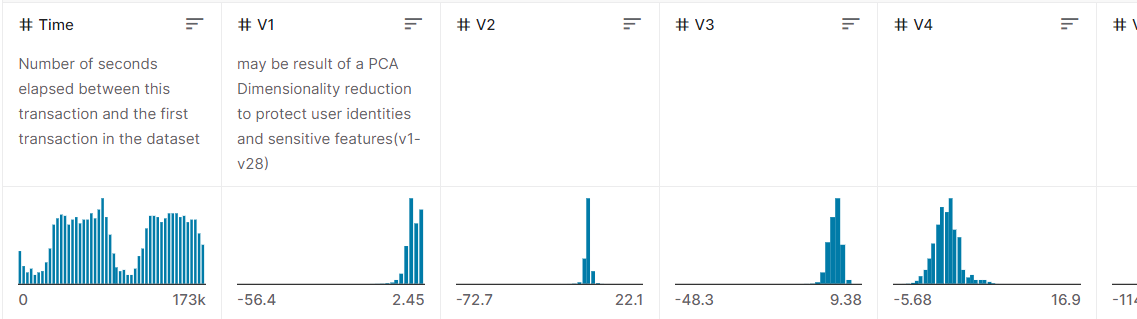
中身はこんな感じです。
予測対象列としてClass列を使ってトレーニングしていきます。
ワークスペースへの接続~トレーニングまで
公式の流れ通りにまずはトレーニングを行います。
from azure.identity import DefaultAzureCredential
from azure.ai.ml import MLClient, Input, automl
from azure.ai.ml.constants import AssetTypes
from azure.ai.ml.entities import AmlCompute

#ワークスペースへの接続
credential = DefaultAzureCredential()

subscription_id="<サブスクリプションID>"
resource_group="<リソースグループ名>"
workspace_name="<ワークスペース名>"

ml_client = MLClient(credential, subscription_id, resource_group, workspace_name)

#MLTableにデータを読み込む
my_training_data_input = Input(
    type=AssetTypes.MLTABLE, path="training-mltable-folder"
)

#コンピューティングクラスターの作成
cpu_compute_target = "cpu-cluster"

try:
    ml_client.compute.get(cpu_compute_target)
except Exception:
    print("Creating a new cpu compute target...")
    compute = AmlCompute(
        name=cpu_compute_target, size="STANDARD_D2_V2",min_instances=0, max_instances=1
    )
    ml_client.compute.begin_create_or_update(compute).result()

#トレーニングの設定
classification_job = automl.classification(
    compute=cpu_compute_target,
    experiment_name="t-kawano-1214",
    training_data=my_training_data_input,
    target_column_name="Class",
    primary_metric="AUC_weighted",
    n_cross_validations=2,
    enable_model_explainability=True,
)

#ジョブ完了前に実験を終了
classification_job.set_limits(
    timeout_minutes=600,
    trial_timeout_minutes=20,
    max_trials=5,
    enable_early_termination=True
)

classification_job.set_training(
    blocked_training_algorithms=['XGBoostClassifier'],
    enable_onnx_compatible_models=True
)

#ジョブの送信
returned_job = ml_client.jobs.create_or_update(classification_job)

print(f"Created job: {returned_job}")

#ジョブステータスのURLを取得
returned_job.services["Studio"].endpoint
ワークスペースへの接続
サブスクリプションID、リソースグループ名、そしてワークスペース名をMLClientクラスを使って接続します。
credential = DefaultAzureCredential()

subscription_id="<サブスクリプションID>"
resource_group="<リソースグループ名>"
workspace_name="<ワークスペース名>"

ml_client = MLClient(credential, subscription_id, resource_group, workspace_name)
データの準備(MLTable)
次に、SDK v2で表形式の学習データを使う場合MLTableを用いる必要があります。
training-mltable-folderに次の「MLTable」という名前のyamlファイルと先ほどダウンロードした「creditcard.csv」を保存します。
paths:
  - file: creditcard.csv
transformations:
  - read_delimited:
        delimiter: ','
        encoding: 'ascii'
最初、「MLTable.yml」と保存していたら実行時に
ExecutionError(StreamError(NotFound)); Not able to find MLTable file
このように言われたので、必ず「MLTable」という名前にしないといけないようです。
コンピューティングクラスターの設定
クラスターの名前を決め、コンピューティングのサイズなどを次のように設定します。
cpu_compute_target = "<クラスターの名前>"

try:
    ml_client.compute.get(cpu_compute_target)
except Exception:
    print("Creating a new cpu compute target...")
    compute = AmlCompute(
        name=cpu_compute_target, size="STANDARD_D2_V2",min_instances=0, max_instances=4
    )
    ml_client.compute.begin_create_or_update(compute).result()
トレーニング
classification_job = automl.classification(
    compute=cpu_compute_target,
    experiment_name="<実験名>",
    training_data=my_training_data_input,
    target_column_name="Class",
    primary_metric="AUC_weighted",
    n_cross_validations=2,
    enable_model_explainability=True,
)

#ジョブ完了前に実験を終了
classification_job.set_limits(
    timeout_minutes=600,
    trial_timeout_minutes=20,
    max_trials=5,
    enable_early_termination=True
)


classification_job.set_training(
    blocked_training_algorithms=['XGBoostClassifier'],
    enable_onnx_compatible_models=True
)
computeには作成したコンピューティングクラスターを設定します。
experiment_nameには実験名を入力。
training_dataにはMLTableを使った入力データを使用します。
target_column_nameには予測対象の列名(今回の場合はClass)を入力します。
primary_metricでは最適化モデルの指標となるものを選びます。
次に、実験の終了するタイミングなどを決めます。
set_limits()を使えばいろいろ設定できるみたいです。
timeout_minutesは実験(セットアップから特徴量の選択~トレーニングまで)を最大何分まで続行できるかを決められます。設定しない場合は最大6日がデフォルトのようです。
trial_timeout_minutesは1回の試行(子ジョブ)で何分まで行えるかの設定です。デフォルトは1か月です。
max_trialsはアルゴリズムとパラメータの組み合わせを最大何回まで試すか設定します。デフォルトは1000回でenable_early_terminationを使うと試行回数を減らせます。
また、set_training関数を用いると、さらにアルゴリズムの設定を行えます。
blocked_training_algorithmsでは使わないアルゴリズムを選択でき、allowed_training_algorithmsで使うモデルを設定できます。
実行
最後はジョブを送信し、ステータスの状況を取得してみます。
returned_job = ml_client.jobs.create_or_update(classification_job)

print(f"Created job: {returned_job}")

#ジョブステータスのURLを取得
returned_job.services["Studio"].endpoint
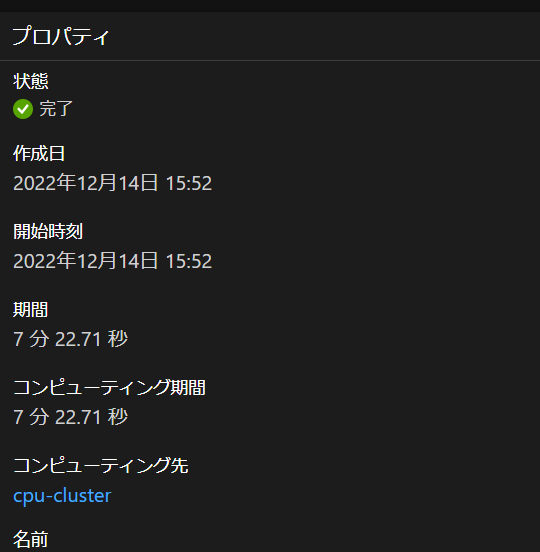
トレーニング完了後
Pythonから送信したジョブは無事実行され、時間を置いて待つと完了です。
作成したモデル一覧を見ると
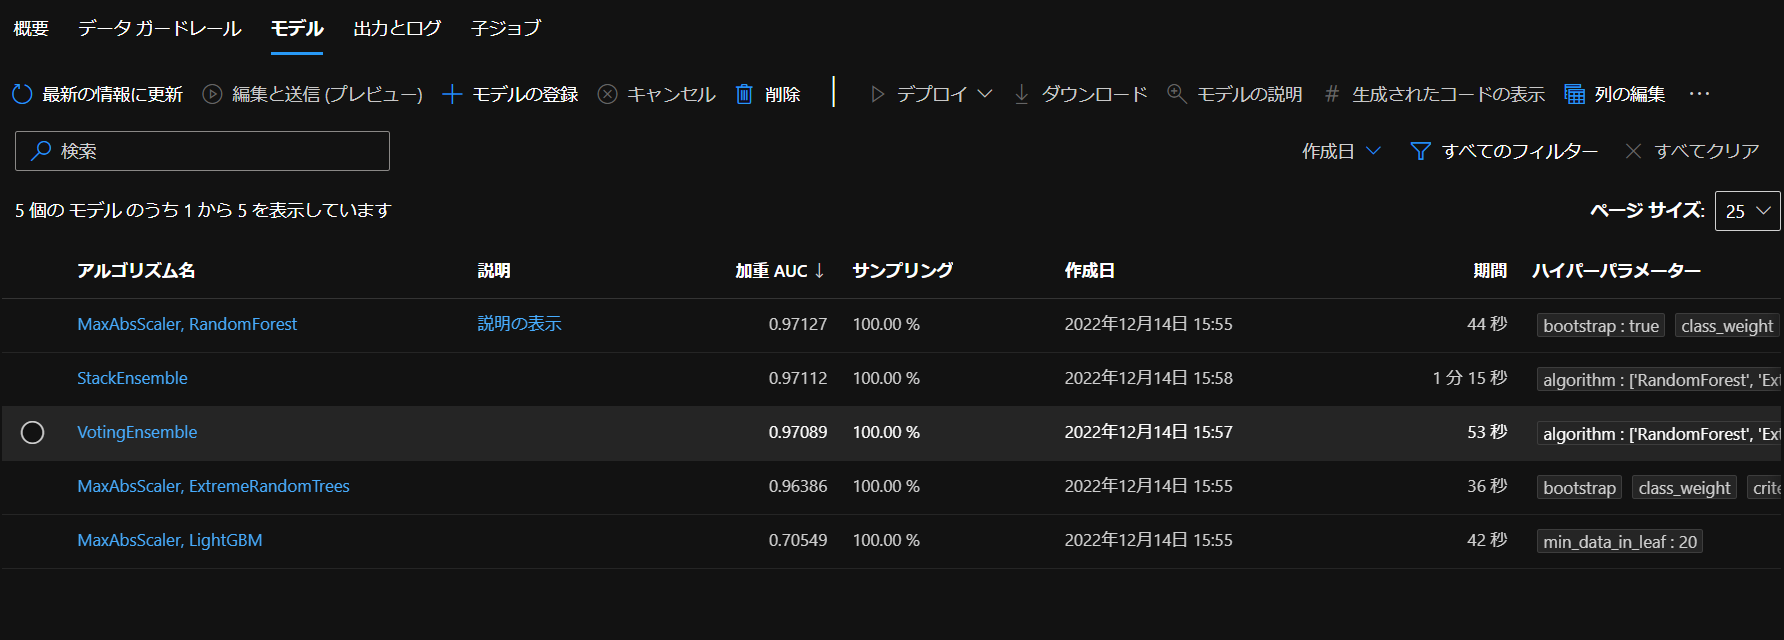
ジョブの終了条件で記載した通り、モデルが5個生成されています。
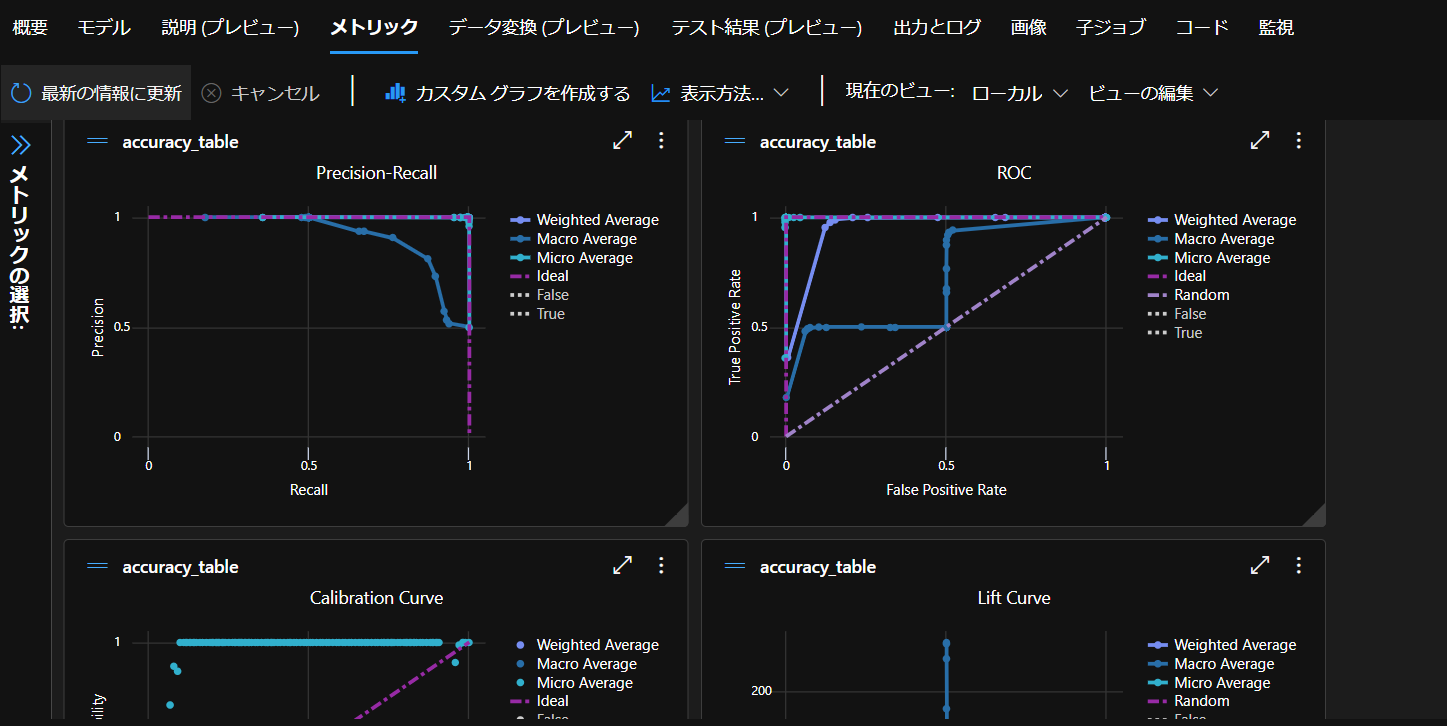
一番精度が良かったものは「説明の表示」で詳細を確認できます。
次回はモデルのデプロイを行ってみます。