はじめに
ローカルで作った簡易的なブログサービス(こちらの記事を参照)をDocker化してみました。正直この規模だと単一コンテナで十分だと思いますが、折角dockerをお勉強する機会なので、nginx(Webサーバ)とgunicorn+flask(APサーバ)とpostgre(DBサーバ)でコンテナを分けて、docker-composeで全コンテナの統合管理をします。
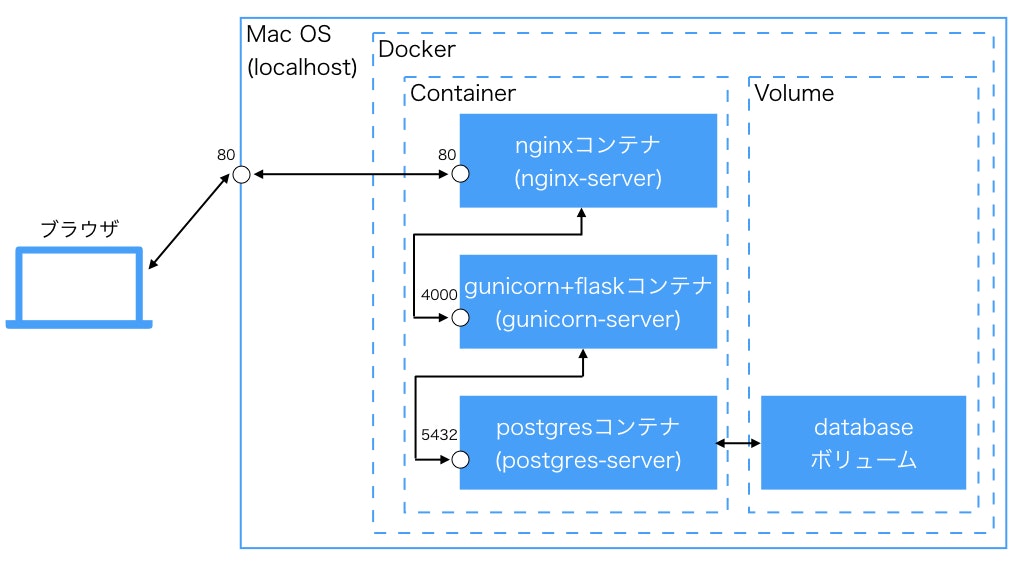
docker構成
ディレクトリ構成
ローカルの任意の場所にこの構成で作ります。
TutorialBlog
 ├docker-compose.yml
 ├nignx/
 │ ├nginx.conf
 │ └Dockerfile
 ├app/
 │ ├templates/
 │ │ └(略)
 │ ├static/
 │ │ └(略)
 │ ├app.py
 │ ├models.py
 │ └Dockerfile
 ├postgres/
 │ ├initdb
 │ │ └createdb.sql
 │ └Dockerfile
 ├Pipfile
 ├Pipfile.lock
 └run.py
ブラウザ⇆localhost:80⇆nginx:80
ブラウザからのリクエストをlocalhostの80番ポートで受けてnginxコンテナ(nginx-server)の80番ポートに流す設定はdocker-compose.ymlに書きます。
services:
  nginx-server:
    ports:
     - 80:80  #[localhost側のポート]:[nginx-server側のポート]
nignx:80⇆gunicorn:4000
nginxコンテナの80番ポートに流れてきたリクエストをgunicornコンテナの4000番ポートに流すためには何段階か設定が必要です。
なお、スペースの都合上、関係のある箇所だけ抜き出して書いています。最終形は一番最後にまとめて記載するので、解説に興味ない方は読み飛ばしてください。
docker-compose.yml
gunicornコンテナ(gunicorn-server)を定義して、4000番ポートを解放します。localhostと接続したいわけではないので、portsではなくexposeで指定しています。
※参照 Docker-docs-ja expose
services:
  nginx-server:
    #(略)
  gunicorn-server:
    expose:
     - "4000"
nginx.conf
upstreamブロック内でnginxからリクエストを受け流す先のサーバーを定義します。gunicorn-serverの4000番ポートを解放するよう設定したので、server gunicorn-server:4000;と書きます。
serverブロック内で、nginxの80番ポートで受けたリクエストを、upstreamで定義したサーバーに流すよう設定しています。
(ここのlocation部分を色々いじると、リクエストURLに応じて受け流す先のサーバーを制御できるようになるっぽいです。詳細は「nginx連載5回目: nginxの設定、その3 - locationディレクティブ」を参照。)
http {
    upstream application {
        server gunicorn-server:4000;
    }
    server {
        listen 80;
        location / {
            proxy_pass http://application/;
        }
    }
}
run.py
flaskのデフォルトポートは5000番になっているので、4000番で受けるよう変更します。(※4000番にした意図は特にありません。適当です。デフォルトの5000番のままでいいと思います。)
あと、gunicornを介してリクエストを受け取るために、host="0.0.0.0"を指定します。
※参考 docker-composeでgunicorn+nginx+flaskを動かしてみた話 - ハマったポイント①:Flaskのサーバーはデフォルトだと公開されてない
from app.app import app

if __name__ == "__main__":
    app.run(host="0.0.0.0",port=4000)
gunicorn⇆postgres:5432
gunicorn(flask)とpostgresの通信にも何段階か設定が必要です。
docker-compose.yml
postgersコンテナ(postgres-server)を定義して、5432番ポートを解放します。localhostと接続したいわけではないので、portsではなくexposeで指定しています。
また、postgresに接続するためのユーザ名とパスワードをenvironmentで定義します。(認証情報なので、ハードコーディングしないで、別の場所に格納した方がベターかもしれません。)
services:
  nginx-server:
    #(略)
  gunicorn-server:
    #(略)
  postgres-server:
    expose:
     - "5432"
    environment:
     - POSTGRES_USER=[ユーザ名]
     - POSTGRES_PASSWORD=[パスワード]
models.py
先ほど定義した[ユーザ名][パスワード]を使用して、app.config['SQLALCHEMY_DATABASE_URI']にpostgresへの接続情報を記載します。
末尾の/tutorial_blogは、tutorial_blog DBへの接続を定義しています。tutorial_blog DBをPostgres内に作成する部分については後述します。
from flask_sqlalchemy import SQLAlchemy
from app.app import app

app.config['SQLALCHEMY_DATABASE_URI'] = 'postgresql://[ユーザ名]:[パスワード]@postgres-server:5432/tutorial_blog'
db = SQLAlchemy(app)
postgres⇆databaseボリューム
postgresコンテナだけだと、コンテナを削除した際にデータが消滅してしまうので、コンテナ外の「ボリューム」と呼ばれる領域にデータを格納する必要があります。一番下のvolumes:でdatabaseボリュームを使用することを宣言し、postgres-server:内のvolumes:で、databaseボリュームと、postgresのデータ格納領域である/var/lib/postgresql/dataを繋げています。
※参考 Docker、ボリューム(Volume)について真面目に調べた
services:
  nginx-server:
    #(略)
  gunicorn-server:
    #(略)
  postgres-server:
    #(略)
    volumes:
      - database:/var/lib/postgresql/data
volumes:
  database:
    driver: local
postgresコンテナの設定
Postgres起動時処理
Postgresを起動時に、コンテナ内の/docker-entrypoint-initdb.d以下に置かれているファイルが実行されます。そこにローカルの/postgres/initdbをマウントしておいて、initdb以下に実行させたい処理を書きます。
※参考 dockerでPostgreSQLのコンテナ作成と初期化
services:
  nginx-server:
    #(略)
  gunicorn-server:
    #(略)
  postgres-server:
    #(略)
    volumes:
      - ./postgres/initdb:/docker-entrypoint-initdb.d
      - #(略)
今回はtutorial_blog DBをPostgresに(無ければ)作る、という処理を初期化処理として組み込みたいため、createdb.sqlに、そのSQL文を記載して、initdb下に格納しておきます。
create database tutorial_blog
Dockerfile
postgres/Dockerfileに、Dockerイメージ作成のためのコマンドを書いていきます。
Postgresコンテナはデフォルトのまま利用するので、参照元のイメージ指定だけ行います。
FROM postgres
また、docker-compose.yml側で、どのDockerfileを利用してイメージのビルドを行うか定義します。
services:
  nginx-server:
    #(略)
  gunicorn-server:
    #(略)
  postgres-server:
    build: ./postgres
    #(略)
gunicornコンテナの設定
flaskアプリファイルのマウント
ローカルでの開発物をgunicorn-serverにマウントして、コンテナ内でも使えるようにします。
今回のflaskアプリでは、依存パッケージを記載しているPipfile、Pipfile.lock、アプリ本体であるapp/以下全てのファイル、アプリ起動用のrun.pyをコンテナ側でも使いたいので、この4つをコンテナ側の/var/www/以下にマウントしていきます。
services:
  nginx-server:
    #(略)
  gunicorn-server:
    #(略)
    volumes:
     - ./Pipfile:/var/www/Pipfile
     - ./Pipfile.lock:/var/www/Pipfile.lock
     - ./app:/var/www/app/
     - ./run.py:/var/www/run.py
  postgres-server:
    #(略)
Dockerfile
app/Dockerfileに、Dockerイメージ作成とコンテナ起動時処理のためのコマンドを書いていきます。
# 参照元イメージの指定
FROM python:3.7
# ワーキングディレクトリの指定
WORKDIR /var/www
# コンテナ起動時の実行コマンド
CMD ["bash","-c","pip install pipenv && pipenv install --system && gunicorn run:app -b 0.0.0.0:4000"]
CMDにコンテナ起動時の実行コマンドを記載しています。
(※本当はCMDとENTRYPOINTの違いを理解しなきゃなんだろうけど、一旦これで動いたので。詳細はこちら「DockerfileのCMDとENTRYPOINTを改めて解説する」を参照。)
コンテナ起動後にやりたいことは、
- pipenvのインストール
- 依存パッケージのインストール
- gunicornを介してのアプリ起動
なので、それらを順次行えるようにコマンドを記載しています。コンテナの中で以下のコマンドを実行するイメージですね。
$ pip install pipenv
$ pipenv install --system
$ gunicorn run:app -b 0.0.0.0:4000
pipenv install --systemでは、Pipfile、Pipfile.lockから、依存パッケージのインストールを行なっています。コンテナ内でわざわざpython仮想環境を立てる必要はないので、--systemをつけて、コンテナ内に直接パッケージのインストールを行なっています。
gunicorn run:appで、run.pyのapp変数を渡してgunicornを介してのflaskアプリ起動を行なっています。その際の-b 0.0.0.0:4000オプションで、gunicornで受け入れるポートを指定しています。
※参考 Running Gunicorn
※参考 docker-composeでgunicorn+nginx+flaskを動かしてみた話 - ハマったポイント②:gunicorn起動にbindすべし
また、docker-compose.yml側で、どのDockerfileを利用してイメージのビルドを行うか定義します。
services:
  nginx-server:
    #(略)
  gunicorn-server:
    build: ./app
    #(略)
  postgres-server:
    #(略)
db.create_all()
models.pyで定義されたテーブル/カラム情報をもとに、SQLAlchemyのcreate_all()を走らせることで、postgresのtutorial_blog DBにテーブル/カラムの初期設定を行います。
gunicorn run:appで、app.pyが実行されるので、その中にcreate_all()を仕込んでおきます。
from flask_sqlalchemy import SQLAlchemy
from app.app import app
db = SQLAlchemy(app)
from flask import Flask
app = Flask(__name__)
from app.models import db
db.create_all()
db.session.commit()
nginxコンテナの設定
nginx.confのマウント
ローカルのnginx/nginx.confに格納しているnginx設定ファイルをコンテナ内でも使えるようにするため、マウント設定を行います。
services:
  nginx-server:
    #(略)
    volumes:
     - ./nginx/nginx.conf:/etc/nginx/nginx.conf
  gunicorn-server:
    #(略)
  postgres-server:
    #(略)
Dockerfile
nginx/Dockerfileに、Dockerイメージ作成とコンテナ起動時処理のためのコマンドを書いていきます。
# 参照元イメージの指定
FROM nginx
# コンテナ起動時の実行コマンド
CMD ["nginx", "-g", "daemon off;","-c","/etc/nginx/nginx.conf"]
コンテナ起動後に以下のコマンドを実行しています。
$ nignx -g daemon off; -c /etc/nginx/nginx.conf
nginxをバックグラウンド実行するとコンテナが停止してしまうようなので、-g daemon off;で、フォアグラウンド実行を指定しています。
※参考 Docker 事始め - dockerハマりポイント
また、-c /pass/to/configfileで、nginx設定ファイルの指定を行なっています。
※参考 CommandLine | NGINX
さらに、docker-compose.yml側で、どのDockerfileを利用してイメージのビルドを行うか定義します。
services:
  nginx-server:
    build: ./nginx
    #(略)
  gunicorn-server:
    #(略)
  postgres-server:
    #(略)
コンテナ起動順序の指定
postgresコンテナ→gunicornコンテナ→nginxコンテナの順に起動したいので(nginxコンテナよりgunicornコンテナが先にたってないとupstream指定ができない、gunicornコンテナよりpostgresコンテナが先に立ってないとpostgres接続ができない)、docker-compose.ymlに起動順序を記載していきます。
depends_onを記載すると、指定されたコンテナが起動してから自分のコンテナを起動する、という制御をかけることができます。
services:
  nginx-server:
    #(略)
    depends_on:
     - gunicorn-server
  gunicorn-server:
    #(略)
    depends_on:
     - postgres-server
  postgres-server:
    #(略)
コンテナの起動・動作確認・停止・削除
本当は公式ドキュメント読み込まないといけないところなんですけど、時間がなかったので日本語でまとまっているこちら「docker-compose コマンドまとめ」を参考にさせていただきました。
dockerイメージのビルド
$ docker-compose build
コンテナの起動
$ docker-compose up -d
ブラウザ表示確認
ブラウザでlocalhostにアクセスすると、メインページが表示されるはずです。

コンテナの停止とdockerイメージ削除
$ docker-compose down --rmi all
dockerイメージ一覧の確認
$ docker images
コンテナ一覧の確認
$ docker ps -a
ボリューム一覧の確認
$ docker volume ls
各コンテナのログ取得
$ docker logs [コンテナ名]
最終的なファイル内容
docker-compose.yml
version: "3"
services:
  nginx-server:
    build: ./nginx
    volumes:
     - ./nginx/nginx.conf:/etc/nginx/nginx.conf
    ports:
     - 80:80
    depends_on:
     - gunicorn-server
  gunicorn-server:
    build: ./app
    volumes:
     - ./Pipfile:/var/www/Pipfile
     - ./Pipfile.lock:/var/www/Pipfile.lock
     - ./app:/var/www/app/
     - ./run.py:/var/www/run.py
    expose:
     - "4000"
    depends_on:
     - postgres-server
  postgres-server:
    build: ./postgres
    expose:
     - "5432"
    environment:
     - POSTGRES_USER=user
     - POSTGRES_PASSWORD=password
    volumes:
      - ./postgres/initdb:/docker-entrypoint-initdb.d
      - database:/var/lib/postgresql/data
volumes:
  database:
    driver: local
nginx/Dockerfile
FROM nginx
CMD ["nginx", "-g", "daemon off;","-c","/etc/nginx/nginx.conf"]
app/Dockerfile
FROM python:3.7
WORKDIR /var/www
CMD ["bash","-c","pip install pipenv && pipenv install --system && gunicorn run:app -b 0.0.0.0:4000"]
postgres/Dockerfile
FROM postgres
nginx.conf
解説した部分以外はこちら「Flask+uwsgi+nginxの環境が作りたい?それ、Dockerなら1コマンドで出来るよ。」をかなり参考にしました。
user  nginx;
worker_processes  1;
error_log  /var/log/nginx/error.log warn;
pid        /var/run/nginx.pid;
events {
    worker_connections  1024;
}
http {
    include /etc/nginx/mime.types;
    default_type  application/octet-stream;
    log_format  main  '$remote_addr - $remote_user [$time_local] "$request" '
                  '$status $body_bytes_sent "$http_referer" '
                  '"$http_user_agent" "$http_x_forwarded_for"';
    access_log  /var/log/nginx/access.log  main;
    upstream application {
        server gunicorn-server:4000;
    }
    server {
        listen 80;
        charset utf-8;
        location / {
            proxy_pass http://application/;
        }
    }
}
おわりに
元となるdockerイメージがあるとはいえ結構自前で設定しなきゃいけない部分が多かったので、今までherokuさんがよしなにやってくれていたWebサーバ(nginx)やDBサーバ(postgres)、wsgi(gunicorn)周りがどう動いているのかちょっとだけ理解できました。
今後の方向性としては
- 他のDockerミドルウェア/アプリと繋ぐ(とりあえずElasticSearchを使ってみたい)
- クラウドサーバにデプロイしてサービス公開(EC2に乗せてみたい)
- コンテナオーケストレーション(kubernetes使ってみたい)
という感じで進めたいと思います!
参考まとめ
Docker-docs-ja expose
nginx連載5回目: nginxの設定、その3 - locationディレクティブ
docker-composeでgunicorn+nginx+flaskを動かしてみた話
Docker、ボリューム(Volume)について真面目に調べた
DockerfileのCMDとENTRYPOINTを改めて解説する
dockerでPostgreSQLのコンテナ作成と初期化
Running Gunicorn
Docker 事始め
CommandLine | NGINX
docker-compose コマンドまとめ
Flask+uwsgi+nginxの環境が作りたい?それ、Dockerなら1コマンドで出来るよ。
