更新: TensorFlow 2.5 に向けて書き直した。
他人の褌で相撲をとり 神速でTensorFlowとKerasをインストールする手順です。(32-bit版はnumpyのビルドでコケる)
- Raspberry Pi OS Buster (32-bit ならびに 64-bit)
- Debian Buster (32-bit ならびに 64-bitのみ)
- Raspberry Pi OS Bullseye (64-bitのみ)
- Debian Bullseye (64-bitのみ)
- Ubuntu 21.04 Hirsute (64-bitのみ)
- Ubuntu 20.04 Focal もできた。
は ここに書いてある経緯 により今の所うまく行っていない
のどれかをインストールして最低限のネットワークなどの設定をしたことを仮定します。sudo bash などで root のプロンプトを出して以下の作業を行って下さい。
https://github.com/PINTO0309/Tensorflow-bin からARM用TensorFlow 2.5をダウンロードする
- 32-bit OSの場合
armv7lを含むファイルをダウンロードする - 64-bit OSの場合
aarch64を含むファイルをダウンロードする -
cp??の部分はpython3 --versionの出力結果に合わせて選ぶ -
numpy 1.19用のファイルを選ぶ
インストールするためのコマンド
-
/etc/apt/sources.listの# deb-srcの行の先頭の#をすべて削除する -
apt-get update;apt-get dist-upgradeで古いパッケージを更新する apt-get -y install curl python3-protobuf python3-termcolor python3-yaml python3-pydot python3-pyasn1 python3-pyasn1-modules python3-rsa python3-markdown python3-cachetools python3-future python3-dill python3-tqdm python3-pil python3-pip python3-wheel python3-setuptools python3-matplotlib python3-h5py python3-scipy python3-grpcio python3-requests-oauthlib python3-werkzeug python3-wraptapt-get build-dep h5py grpc python-wrapt-
(32-bit のみ)
apt-get build-dep numpy || apt-get build-dep python-numpy pip3 install numpy==1.19.5 && (CC=mpicc CXX=mpic++ pip3 install h5py==3.1.0) || pip3 install h5py==3.1.0-
(Busterのみ)
apt-get purge python3-wrapt(なぜかpipではうまく更新されないので削除しておく) -
(Busterのみ)
pip3 install -I pip(pipが古いと新し目のTensorFlowを入れられないため) -
(Busterのみ)
python3 -m pip install tensorflow-hub tensorflow-datasets ダウンロードしたファイル.whl(TensorFlowのインストール, コンパイルするのでメチャクチャ時間かかる) - (Buster 以外)
python3 -m pipの代わりにpip3を用いる - Kerasは最近のTensorFlowに含まれるため以下不要
最新のKerasを入れたい場合のみpython3 -m pip install keras(Kerasのインストール)
古いラズパイでの変更点(Raspberry Pi OS Buster)
- ラズパイ0やラズパイ1などのARMv6 CPUなら9番目の手順を
python3 -m pip install tensorflow-hub tensorflow-datasets https://github.com/lhelontra/tensorflow-on-arm/releases/download/v2.4.0/tensorflow-2.4.0-cp37-none-linux_armv6l.whlのようにarmv7lをarmv6lに変える
物体検出のテスト
USBカメラまたはラズパイ専用カメラの映像から検出するには ラズパイとUSBカメラとTensorFlowで物体検出 をご覧下さい
https://keras.io/examples/vision/retinanet/ の例
そこに紹介されている物体識別の例を実行してみる。以下はpi などの非rootユーザーで実行する
git clone https://github.com/keras-team/keras-io.gitcd keras-io/examples/visionpython3 retinanet.py
この例の実行には仮想メモリが10ギガバイトくらい必要だが、次の例はギリギリ3ギガバイト程度で動作する。
https://www.tensorflow.org/hub/tutorials/object_detection の例
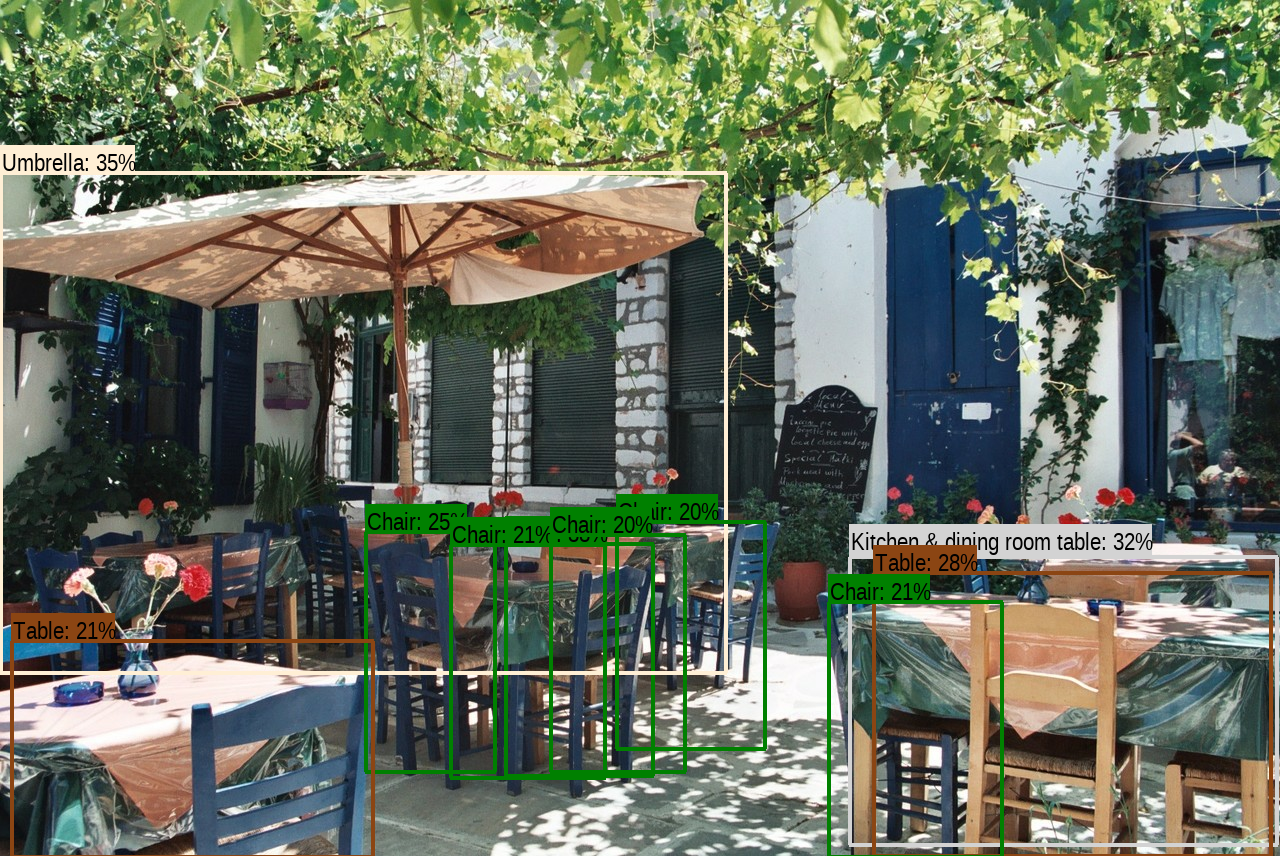
サンプルプログラムを末尾のように少し改変して実行すると以下のような結果を得られる
# from https://github.com/tensorflow/hub/blob/master/examples/colab/object_detection.ipynb

# @title Imports and function definitions

# For running inference on the TF-Hub module.
import tensorflow as tf

import tensorflow_hub as hub

# For downloading the image.
import matplotlib.pyplot as plt
import tempfile
from six.moves.urllib.request import urlopen
from six import BytesIO

# For drawing onto the image.
import numpy as np
from PIL import Image
from PIL import ImageColor
from PIL import ImageDraw
from PIL import ImageFont
from PIL import ImageOps

# For measuring the inference time.
import time

# Print Tensorflow version
print(tf.__version__)

# Check available GPU devices.
print("The following GPU devices are available: %s" % tf.test.gpu_device_name())

def display_image(image):
#  fig = plt.figure(figsize=(20, 15))
#  plt.grid(False)
#  plt.imshow(image)
  image.show()


def download_and_resize_image(url, new_width=256, new_height=256,
                              display=False):
  _, filename = tempfile.mkstemp(suffix=".jpg")
  response = urlopen(url)
  image_data = response.read()
  image_data = BytesIO(image_data)
  pil_image = Image.open(image_data)
  pil_image = ImageOps.fit(pil_image, (new_width, new_height), Image.ANTIALIAS)
  pil_image_rgb = pil_image.convert("RGB")
  pil_image_rgb.save(filename, format="JPEG", quality=90)
  print("Image downloaded to %s." % filename)
#  if display:
#  display_image(pil_image)
  return filename


def draw_bounding_box_on_image(image,
                               ymin,
                               xmin,
                               ymax,
                               xmax,
                               color,
                               font,
                               thickness=4,
                               display_str_list=()):
  """Adds a bounding box to an image."""
  draw = ImageDraw.Draw(image)
  im_width, im_height = image.size
  (left, right, top, bottom) = (xmin * im_width, xmax * im_width,
                                ymin * im_height, ymax * im_height)
  draw.line([(left, top), (left, bottom), (right, bottom), (right, top),
             (left, top)],
            width=thickness,
            fill=color)

  # If the total height of the display strings added to the top of the bounding
  # box exceeds the top of the image, stack the strings below the bounding box
  # instead of above.
  display_str_heights = [font.getsize(ds)[1] for ds in display_str_list]
  # Each display_str has a top and bottom margin of 0.05x.
  total_display_str_height = (1 + 2 * 0.05) * sum(display_str_heights)

  if top > total_display_str_height:
    text_bottom = top
  else:
    text_bottom = top + total_display_str_height
  # Reverse list and print from bottom to top.
  for display_str in display_str_list[::-1]:
    text_width, text_height = font.getsize(display_str)
    margin = np.ceil(0.05 * text_height)
    draw.rectangle([(left, text_bottom - text_height - 2 * margin),
                    (left + text_width, text_bottom)],
                   fill=color)
    draw.text((left + margin, text_bottom - text_height - margin),
              display_str,
              fill="black",
              font=font)
    text_bottom -= text_height - 2 * margin


def draw_boxes(image, boxes, class_names, scores, max_boxes=10, min_score=0.1):
  """Overlay labeled boxes on an image with formatted scores and label names."""
  colors = list(ImageColor.colormap.values())

  try:
    font = ImageFont.truetype("/usr/share/fonts/truetype/liberation/LiberationSansNarrow-Regular.ttf",
                              25)
  except IOError:
    print("Font not found, using default font.")
    font = ImageFont.load_default()

  for i in range(min(boxes.shape[0], max_boxes)):
    if scores[i] >= min_score:
      ymin, xmin, ymax, xmax = tuple(boxes[i])
      display_str = "{}: {}%".format(class_names[i].decode("ascii"),
                                     int(100 * scores[i]))
      color = colors[hash(class_names[i]) % len(colors)]
      image_pil = Image.fromarray(np.uint8(image)).convert("RGB")
      draw_bounding_box_on_image(
          image_pil,
          ymin,
          xmin,
          ymax,
          xmax,
          color,
          font,
          display_str_list=[display_str])
      np.copyto(image, np.array(image_pil))
  return image

# By Heiko Gorski, Source: https://commons.wikimedia.org/wiki/File:Naxos_Taverna.jpg
image_url = "https://upload.wikimedia.org/wikipedia/commons/6/60/Naxos_Taverna.jpg"  #@param
downloaded_image_path = download_and_resize_image(image_url, 1280, 856, True)

module_handle = "https://tfhub.dev/google/openimages_v4/ssd/mobilenet_v2/1" #@param ["https://tfhub.dev/google/openimages_v4/ssd/mobilenet_v2/1", "https://tfhub.dev/google/faster_rcnn/openimages_v4/inception_resnet_v2/1"]

detector = hub.load(module_handle).signatures['default']

def load_img(path):
  img = tf.io.read_file(path)
  img = tf.image.decode_jpeg(img, channels=3)
  return img

def run_detector(detector, path):
  img = load_img(path)

  converted_img  = tf.image.convert_image_dtype(img, tf.float32)[tf.newaxis, ...]
  start_time = time.time()
  result = detector(converted_img)
  end_time = time.time()

  result = {key:value.numpy() for key,value in result.items()}

  print("Found %d objects." % len(result["detection_scores"]))
  print("Inference time: ", end_time-start_time)

  image_with_boxes = draw_boxes(
      img.numpy(), result["detection_boxes"],
      result["detection_class_entities"], result["detection_scores"])

  display_image(Image.fromarray(image_with_boxes))


run_detector(detector, downloaded_image_path)
