Windowsの設定
Windows homeならBIOSを開いて、仮想化支援機構を有効化し、Hyper-Vを無効化する。
BIOS
基本的というか大体のPCでは下記の手順でBIOSにアクセスできる。
BIOSにアクセスできなかったら、各メーカーやPCの製品名のBIOSへアクセスする手順を調べる。
1. Shiftキーを押しながらシャットダウン。
2. F2キーを押しながら起動
3. AdvancedタブのCPU Configuration欄にあるIntel(R) VirtualizationTechnologyをEnabledにする
3はメーカーやBIOSによって名前などが異なることがあるので、記載されてなかったら調べる。
Hyper-Vの無効化
1. 管理者権限でをコマンドプロントを開いて、下記のコードを実行する。
コードはWin10にVirtualBox+Vagrantを用いた環境構築する為の下準備から。
> bcdedit /copy {current} /d "Disable Hyper-V"
エントリは {文字列X} に正常にコピーされました。

>bcdedit /set {文字列X} hypervisorlaunchtype off
2. Shiftを押しながら電源を再起動
3. 再起動するとWindows 10 homeとDisable Hyper-Vを選択できる画面が表示されるので、Disable Hyper-Vを選択。
VirtualBox + Vagrant + CentOS
VirtualBox: windowsといったPCに搭載されているホストOSの上で実行できるゲストOSを実行できるソフトウェア
Vagrant: VirtualBoxといったゲストOSでの仮想環境を実用的なものにするためのソフトウェア
以上を参考に、導入していく。
1. VirturalBoxとVagrantのインストール
VirtualBoxとVagrantからWindows用の実行パッケージをインストールして実行。
~.exeを起動しても特に注意すべき点などはないので各自の作業環境に合わせて導入。
2. VirtualBoxにCentOSを登録する
Vagrantbox.esから導入したいCentOSのBOXのURLをコピーし、$ vagrant box addを実行。
今回はCentOS6を導入したいので、CentOS 6.6 x64 (Minimal, VirtualBox Guest Additions, Puppet 3.7.5 - see here for more infos)を選ぶ。
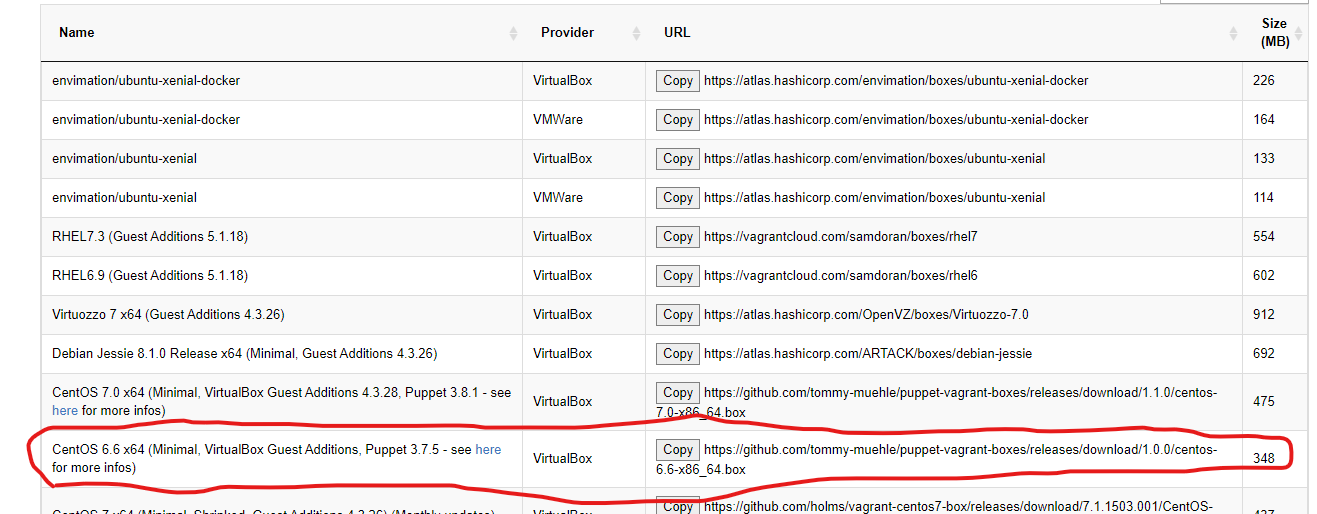
コマンドの意味はvagrant box {付けたい名前} {boxのURL}。
$ vagrant box add CentOS6.6 https://github.com/tommy-muehle/puppet-vagrant-boxes/releases/download/1.0.0/centos-6.6-x86_64.box
==> box: Box file was not detected as metadata. Adding it directly...
==> box: Adding box 'CentOS6.6' (v0) for provider:
    box: Downloading: https://github.com/tommy-muehle/puppet-vagrant-boxes/releases/download/1.0.0/centos-6.6-x86_64.box
    box:
==> box: Successfully added box 'CentOS6.6' (v0) for 'virtualbox'!
3. Vagrant用のディレクトリを作成する
BOXの追加に成功したら、仮想環境用のディレクトリを作成
C:\>mkdir CentOS6.6
C:\>cd CentOS6.6
4. 仮想環境を定義する.Vagrantfileなどの初期化を行う
C:\CentOS6.6>vagrant init CentOS6.6
A `Vagrantfile` has been placed in this directory. You are now
ready to `vagrant up` your first virtual environment! Please read
the comments in the Vagrantfile as well as documentation on
`vagrantup.com` for more information on using Vagrant.
5. 初期化が完了したら、CentOSを起動する
C:\CentOS6.6>vagrant up
Bringing machine 'default' up with 'virtualbox' provider...
==> default: Importing base box 'CentOS6.6'...
==> default: Matching MAC address for NAT networking...
==> default: Setting the name of the VM: CentOS66_default_1589977223313_63395
==> default: Clearing any previously set forwarded ports...
==> default: Clearing any previously set network interfaces...
==> default: Preparing network interfaces based on configuration...
    default: Adapter 1: nat
==> default: Forwarding ports...
    default: 22 (guest) => 2222 (host) (adapter 1)

  (中略)

==> default: Mounting shared folders...
    default: /vagrant => C:/CentOS6.6
6. ssh接続を行う
sshクライアントがないようだったら、Tera TermやCygwinを用意する。
ターミナルからの接続だと、ログインするときにパスワードを聞かれることがある。
パスワードはvagrantで大丈夫(なはず)。
C:\CentOS6.6>vagrant ssh
その後、現在のディレクトリを確認。
今後の導入作業でディレクトリを転々とすることが多いので、最初はどこに居たのか覚えておく。
[vagrant@localhost ~]$ pwd
/home/vagrant
8. localeの変更
localeは言語や日時などの設定。
今回導入したCentOSは初期設定だとドイツ語だったので、作業しやすいように日本語に変更する。
locale変更方法(CentOS6.5) - Qiitaを参考に実行していく。
$ localeで現在の設定を確認。
[vagrant@localhost ~]$ locale
LANG=de_DE.UTF-8
LC_CTYPE="de_DE.UTF-8"
LC_NUMERIC="de_DE.UTF-8"
LC_TIME="de_DE.UTF-8"
LC_COLLATE="de_DE.UTF-8"
LC_MONETARY="de_DE.UTF-8"
LC_MESSAGES="de_DE.UTF-8"
LC_PAPER="de_DE.UTF-8"
LC_NAME="de_DE.UTF-8"
LC_ADDRESS="de_DE.UTF-8"
LC_TELEPHONE="de_DE.UTF-8"
LC_MEASUREMENT="de_DE.UTF-8"
LC_IDENTIFICATION="de_DE.UTF-8"
LC_ALL=
$ locale -aで設定できるlocale一覧を表示。
一覧の中にja_JP.utf8があるのを確認する。
[vagrant@localhost ~]$ locale -a
[vagrant@localhost ~]$ sudo vim /etc/sysconfig/i18n
LANG="ja_JP.UTF-8"にする。
LANG="ja_JP.UTF-8"
SYSFONT="latarcyrheb-sun16"
. {ファイル}で{ファイル}を読み込む。
最後に$ localeを入力して、ja_JP.UTF-8になっているかを確認。
[vagrant@localhost ~]$ . /etc/sysconfig/i18n
[vagrant@localhost ~]$ locale
LANG=ja_JP.UTF-8
LC_CTYPE="ja_JP.UTF-8"
LC_NUMERIC="ja_JP.UTF-8"
LC_TIME="ja_JP.UTF-8"
LC_COLLATE="ja_JP.UTF-8"
LC_MONETARY="ja_JP.UTF-8"
LC_MESSAGES="ja_JP.UTF-8"
LC_PAPER="ja_JP.UTF-8"
LC_NAME="ja_JP.UTF-8"
LC_ADDRESS="ja_JP.UTF-8"
LC_TELEPHONE="ja_JP.UTF-8"
LC_MEASUREMENT="ja_JP.UTF-8"
LC_IDENTIFICATION="ja_JP.UTF-8"
LC_ALL=
9. 既存パッケージのアップグレード
CentOsではyumというパッケージマネージャーが使用されている。
これから色んなソフトをインストールしていくのに備えて、yumで管理されているパッケージのアップグレードを行う。
[vagrant@localhost ~]$ sudo yum -y upgrade
Apache2.4
Apache: 世界中で利用されているWebサーバーツール。
以下の記事を参考にApacheを導入していく。
基本は、
エラーの対応に使ったのは、
1. ディレクトリの移動
[vagrant@localhost /]$ cd /usr/local/src
2. Apacheの導入に必要なyumパッケージのインストール
[vagrant@localhost src]$ sudo yum install -y wget apr-devel apr-util-devel gcc pcre pcre-devel perl perl-devel libtool libtool-devel systemd-devel
3. Apacheの構築に必要なアプリをインストール
makeはyumなどとは違う方法でアプリをインストールする方法。
Index of /apache/aprから最新のapr-{バージョン},apr-util-{バージョン}を確認。下記は実行当時の物。
pcreはPCRE - Browse /pcre/8.44 at SourceForge.netから最新のバージョンを確認し、pcre-{バージョン}.tar.gzを入力。
[vagrant@localhost src]$ sudo wget http://mirrors.ocf.berkeley.edu/apache//apr/apr-1.7.0.tar.gz
[vagrant@localhost src]$ tar xzf apr-1.5.2.tar.gz
[vagrant@localhost src]$ cd apr-1.7.0
[vagrant@localhost apr-1.7.0]$ ./configure
[vagrant@localhost apr-1.7.0]$ make
[vagrant@localhost apr-1.7.0]$ make install

[vagrant@localhost apr-1.7.0]$ cd ..
[vagrant@localhost src]$ sudo wget http://mirrors.ocf.berkeley.edu/apache//apr/apr-util-1.6.1.tar.gz
[vagrant@localhost src]$ sudo tar xzf apr-util-1.6.1.tar.gz
[vagrant@localhost src]$ cd apr-util-1.6.1
[vagrant@localhost apr-util-1.6.1]$ sudo ./configure --with-apr=/usr/local/src/apr-1.7.0
[vagrant@localhost apr-util-1.6.1]$ sudo make
[vagrant@localhost apr-util-1.6.1]$ sudo make install

[vagrant@localhost apr-util-1.6.1]$ cd ..
[vagrant@localhost src]$ sudo wget https://sourceforge.net/projects/pcre/files/pcre/8.44/pcre-8.44.tar.gz
[vagrant@localhost src]$ sudo tar xzf pcre-8.44.tar.gz
[vagrant@localhost src]$ cd pcre-8.44
[vagrant@localhost pcre-8.44]$ sudo ./configure
[vagrant@localhost pcre-8.44]$ sudo make
[vagrant@localhost pcre-8.44]$ sudo make install
4. Apacheのインストール
httpd: CentOSなどのサーバーに在住してるHTTPSの処理を行うデーモン
Index of /software/apache/httpdからhttpd-{バージョン}.tar.gzを確認。下記は実行当時の物。
[vagrant@localhost pcre-8.44]$ cd ..
[vagrant@localhost src]$ sudo wget http://ftp.tsukuba.wide.ad.jp/software/apache//httpd/httpd-2.4.43.tar.gz
[vagrant@localhost src]$ sudo tar xzf httpd-2.4.43.tar.gz
[vagrant@localhost src]$ sudo cp -Rp /usr/local/src/apr-1.7.0 /usr/local/src/httpd-2.4.43/srclib/apr
[vagrant@localhost src]$ sudo cp -Rp /usr/local/src/apr-util-1.6.1 /usr/local/src/httpd-2.4.43/srclib/apr-util
[vagrant@localhost src]$ cd httpd-2.4.43
[vagrant@localhost httpd-2.4.43]$ ./configure --with-pcre=/usr/local/src/pcre-8.44/pcre-config --enable-rewrite --with-icluded-apr

Server Version: 2.4.43
    Install prefix: /usr/local/apache2
    C compiler:     gcc -std=gnu99
    CFLAGS:          -g -O2 -pthread
    CPPFLAGS:        -DLINUX -D_REENTRANT -D_GNU_SOURCE
    LDFLAGS:
    LIBS:
    C preprocessor: gcc -E

[vagrant@localhost httpd-2.4.43]$ sudo make
[vagrant@localhost httpd-2.4.43]$ sudo make install
5. Apache起動スクリプトの作成
[vagrant@localhost httpd-2.4.43]$ cd /home/vagrant
[vagrant@localhost ~]$ sudo cp -ip /usr/local/src/httpd-2.4.43/build/rpm/httpd.init /etc/init.d/httpd
[vagrant@localhost ~]$ sudo vim /etc/init.d/httpd
# 60行目あたり
httpd=${HTTPD-/usr/local/apache2/bin/httpd}
pidfile=${PIDFILE-/usr/local/apache2/logs/httpd.pid}
# 追記
CONFFILE=/usr/local/apache2/conf/httpd.conf
yumなどを使ってパッケージインストールからApacheを導入したようにhttpdを使えるようにする。
[vagrant@localhost ~]$ sudo vim /usr/local/apache2/conf/httpd.conf
# 164行目あたり
User apache
Group apache
[vagrant@localhost ~]$ sudo groupadd -g 48 apache
[vagrant@localhost ~]$ sudo useradd -g apache -u 48 apache
6. Apacheの起動
[vagrant@localhost ~]$ sudo chkconfig --add httpd
[vagrant@localhost ~]$ sudo chkconfig httpd on
一旦、仮想環境をシャットダウン。
[vagrant@localhost ~]$ sudo shutdown -h now
7. .Vagrantfileの編集
windowsのエディターとかから、仮想環境用のディレクトリにある.Vagrantfileを編集する。
この編集によって、windowsのブラウザからCentOSで操作したファイルを共有したり、ブラウザで確認できるようになる。
以下のように編集する。
 (中略)

  # Create a private network, which allows host-only access to the machine
  # using a specific IP.
  config.vm.network "private_network", ip: "192.168.33.10"

  (中略)

  # Provider-specific configuration so you can fine-tune various
  # backing providers for Vagrant. These expose provider-specific options.
  # Example for VirtualBox:
  #
  config.vm.provider "virtualbox" do |vb|
  	vb.customize ["modifyvm", :id, "--memory", "1024"]
  end
  #   # Display the VirtualBox GUI when booting the machine
  #   vb.gui = true
  #
  #   # Customize the amount of memory on the VM:
  #   vb.memory = "1024"
  # end
  #
  # View the documentation for the provider you are using for more
  # information on available options.

  # Enable provisioning with a shell script. Additional provisioners such as
  # Ansible, Chef, Docker, Puppet and Salt are also available. Please see the
  # documentation for more information about their specific syntax and use.
  # config.vm.provision "shell", inline: <<-SHELL
  #   apt-get update
  #   apt-get install -y apache2
  # SHELL
   config.vm.synced_folder "../VB_share", "/usr/local/apache2/htdocs", mount_options:['dmode=777','fmode=777']
end
仮想環境用のディレクトリを作成した所にVB_shareを作成。
その中に下記ファイルを追加。
<h1>Helo,World!!</h1>
8. Apacheが稼働しているか確認
C:\CentOS6.6>vagrant reload
==> default: Clearing any previously set forwarded ports...
==> default: Clearing any previously set network interfaces...
==> default: Preparing network interfaces based on configuration...
    default: Adapter 1: nat
    default: Adapter 2: hostonly
==> default: Forwarding ports...
    default: 22 (guest) => 2222 (host) (adapter 1)

  (中略)

==> default: Mounting shared folders...
    default: /vagrant => C:/CentOS6.6
    default: /var/www/html => C:/VB_share
==> default: Machine already provisioned. Run `vagrant provision` or use the `--provision`
==> default: flag to force provisioning. Provisioners marked to run always will still run.

C:\CentOS6.6>vagrant ssh
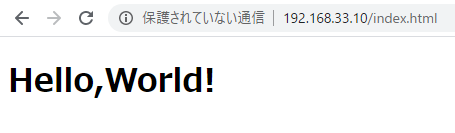
以下のURLをクリックして、その下の画像のような表示がされたらApacheは無事起動している。
http://192.168.33.10/index.html
PHP5.3
atton.blog: php 5.x + apache httpd 2.4.x を make するを参考に進めていく。
1. PHPのインストール
PHP: Releasesから欲しいPHPのバージョンを確認。
今回は5.3系の中で一番新しい5.3.29を。
./configure --with-apxs2=/usr/local/apache2/bin/apxsはApacheにPHP5系を認識してもらうlibphp5.soを作るためのもの。
これを書いておくとhttpd.confでLoadModuleできる場所にlibphp5.soが自動で作成される。
[vagrant@localhost /]$ cd /usr/local/src
[vagrant@localhost src]$ sudo yum install -y libxml2 libxml2-devel
[vagrant@localhost src]$ sudo wget http://jp2.php.net/get/php-5.3.29.tar.gz/from/this/mirror -O php-5.3.29.tar.gz
[vagrant@localhost src]$ sudo tar xzf php-5.3.29.tar.gz
[vagrant@localhost src]$ cd php-5.3.29
[vagrant@localhost php-5.3.29]$ sudo ./configure --with-apxs2=/usr/local/apache2/bin/apxs

+--------------------------------------------------------------------+
| License:                                                           |
| This software is subject to the PHP License, available in this     |
| distribution in the file LICENSE.  By continuing this installation |
| process, you are bound by the terms of this license agreement.     |
| If you do not agree with the terms of this license, you must abort |
| the installation process at this point.                            |
+--------------------------------------------------------------------+

Thank you for using PHP.

[vagrant@localhost php-5.3.29]$ sudo make
[vagrant@localhost php-5.3.29]$ sudo make test
[vagrant@localhost php-5.3.29]$ sudo make install
[vagrant@localhost php-5.3.29]$ php -v
PHP 5.3.29 (cli) (built: May 21 2020 04:19:38)
Copyright (c) 1997-2014 The PHP Group
Zend Engine v2.3.0, Copyright (c) 1998-2014 Zend Technologies
2. httpd.conf`の編集
ApacheにPHP5.3を認識してもらえるように/usr/local/apache2/conf/httpd.confを編集する。
[vagrant@localhost php-5.3.29]$ sudo vim /usr/local/apache2/conf/httpd.conf
# あるか確認。なかったら追加。
LoadModule php5_module modules/libphp5.so

# 一番下に追記。
<FilesMatch \.php$>
    SetHandler application/x-httpd-php
</FilesMatch>
3. ApacheがPHP5.3を認識しているか確認
先程index.htmlを作成したVB_shareに下記ファイルを追加。
<?php phpinfo(); ?>
index.htmlの時と同様、下のURLをクリックして、その下の画像が表示されているか確認。

+a php.iniを編集
Apache2 PHP5 インストール | CentOSサーバー構築マニュアル.comを参考に、PHPの設定を行う。
[vagrant@localhost /]$ cd /usr/local/src/php-5.3.29
[vagrant@localhost php-5.3.29]$ sudo cp php.ini-development /usr/local/lib/php.ini
[vagrant@localhost php-5.3.29]$ sudo vim /usr/local/lib/php.ini
MySQL5.5
CentOSにMySQL 5.5をバージョン指定してインストール | 俺日記を参考に進めていく。
1. yumを使ったパッケージ操作
[vagrant@localhost ~]$ sudo yum remove mysql*
[vagrant@localhost ~]$ sudo yum -y install http://dev.mysql.com/get/mysql-community-release-el6-5.noarch.rpm
[vagrant@localhost ~]$ sudo vim /etc/yum.repos.d/mysql-community.repo
何も操作しないと、MySQL5.6がインストールされるため、MySQL5.5がインストールされるように、/etc/yum.repos.d/mysql-community.repoを編集する。
# Enable to use MySQL 5.5
[mysql55-community]
name=MySQL 5.5 Community Server
baseurl=http://repo.mysql.com/yum/mysql-5.5-community/el/6/$basearch/
enabled=1
gpgcheck=1
gpgkey=file:/etc/pki/rpm-gpg/RPM-GPG-KEY-mysql

# Enable to use MySQL 5.6
[mysql56-community]
name=MySQL 5.6 Community Server
baseurl=http://repo.mysql.com/yum/mysql-5.6-community/el/6/$basearch/
enabled=0
gpgcheck=1
gpgkey=file:/etc/pki/rpm-gpg/RPM-GPG-KEY-mysql
[vagrant@localhost ~]$ sudo yum -y install mysql mysql-devel mysql-server mysql-utilities
2. MySQLの起動と確認
[vagrant@localhost ~]$ sudo service mysqld start
[vagrant@localhost ~]$ sudo chkconfig mysqld on
[vagrant@localhost ~]$ sudo service mysqld status
mysqld (pid  3173) を実行中...
[vagrant@localhost ~]$ mysql --version
mysql  Ver 14.14 Distrib 5.5.62, for Linux (x86_64) using readline 5.1
3. MySQLの設定
MySQLにとって重要なmysql.sockの場所を確認する。
[vagrant@localhost ~]$ sudo /usr/bin/mysqladmin -u root password "{好きなパスワードを設定}"
[vagrant@localhost ~]$ sudo mysql -u root -p
Enter password:
mysql> show variables like "%sock%";
+---------------+---------------------------+
| Variable_name | Value                     |
+---------------+---------------------------+
| socket        | /var/lib/mysql/mysql.sock |
+---------------+---------------------------+
1 row in set (0.00 sec)
MySQLの文字コードを確認する。
mysql> show variables like "%chara%";
+--------------------------+----------------------------+
| Variable_name            | Value                      |
+--------------------------+----------------------------+
| character_set_client     | utf8                       |
| character_set_connection | utf8                       |
| character_set_database   | latin1                     |
| character_set_filesystem | binary                     |
| character_set_results    | utf8                       |
| character_set_server     | latin1                     |
| character_set_system     | utf8                       |
| character_sets_dir       | /usr/share/mysql/charsets/ |
+--------------------------+----------------------------+
8 rows in set (0.00 sec)

mysql> exit
Bye

[vagrant@localhost ~]$
character_set_databaseとcharacter_set_serverをUTF-8に変更する。
mysqlで文字コードをutf8にセットする - Qiitaを参考に作業する。
[vagrant@localhost ~]$ sudo vim /etc/my.cnf
[mysqld]
character-set-server=utf8

[client]
default-character-set=utf8
[vagrant@localhost ~]$ sudo service mysqld restart
mysqld を停止中:                                           [  OK  ]
mysqld を起動中:                                           [  OK  ]
[vagrant@localhost ~]$ sudo mysql -u root -p
Enter password:
Welcome to the MySQL monitor.  Commands end with ; or \g.
Your MySQL connection id is 2
Server version: 5.5.62 MySQL Community Server (GPL)

Copyright (c) 2000, 2018, Oracle and/or its affiliates. All rights reserved.

Oracle is a registered trademark of Oracle Corporation and/or its
affiliates. Other names may be trademarks of their respective
owners.

Type 'help;' or '\h' for help. Type '\c' to clear the current input statement.

mysql> show variables like "%chara%";
+--------------------------+----------------------------+
| Variable_name            | Value                      |
+--------------------------+----------------------------+
| character_set_client     | utf8                       |
| character_set_connection | utf8                       |
| character_set_database   | utf8                       |
| character_set_filesystem | binary                     |
| character_set_results    | utf8                       |
| character_set_server     | utf8                       |
| character_set_system     | utf8                       |
| character_sets_dir       | /usr/share/mysql/charsets/ |
+--------------------------+----------------------------+
8 rows in set (0.00 sec)
参考資料
Windowsの設定
VirtualBox + Vagrant + CentOS
Apache2.4
- Apache2.4 ソースインストール | Skyarch Broadcasting
- atton.blog: php 5.x + apache httpd 2.4.x を make する
- 自明かもしれない: Apache 2.4 系をソースからインストールします
- Apache 2.2.4 configureでエラー:おぼえがき:So-net blog
PHP5.3
MySQL5.5