0. はじめに
- FastAPI + uvicorn + nginxをdocker-composeで構築
- FastAPI + uvicorn + NginxでWebページを表示(Jinja2によるTemplates機能 )
の続編として、更にNginxの設定を編集・追加してSSL化(HTTPS)とBASIC認証をつけるところまでやってみる
※前提:「FastAPI + uvicorn + NginxでWebページを表示(Jinja2によるTemplates機能 )」の状態からスタートする
1. SSL
ディレクトリ構造(抜粋)
$ tree
.
├── app
├── docker-compose.yml
└── web
    ├── conf.d
    │   └── app.conf
    └── ssl
        ├── server.crt
        └── server.key
-
docker-compose.ymlの修正 -
webディレクトリ内のファイルを修正・追加-
conf.d/app.confの修正 - 証明書・鍵の用意(
ssl/ディレクトリ)
-
がそれぞれ必要
詳細は以下の通り:
docker-compose.yml
以下のように修正:
version: '3'

services:
  web:
    container_name: web
    image: nginx:alpine
    depends_on:
      - app
    ports:
      # - "80:80"
      - "${PORT:-8443:443}"
    volumes:
      - ./web/conf.d:/etc/nginx/conf.d
      - ./web/ssl:/etc/nginx/ssl
    networks:
      - nginx_network

  app:
    container_name: app
    image: test_fastapi_app
    build:
      context: ./app
      dockerfile: Dockerfile
    expose:
      - 8000
    networks:
      - nginx_network
    # volumes:
    #   - ./app/app:/app/app
    # command: "uvicorn app.main:app --host 0.0.0.0 --proxy-headers --forwarded-allow-ips * --reload"

networks:
  nginx_network:
    driver: bridge
差分のあるところだけ抜き出すと、
services:
  web:
    ports:
      # - "80:80"
      - "${PORT:-8443:443}"
    volumes:
      - ./web/conf.d:/etc/nginx/conf.d
      - ./web/ssl:/etc/nginx/ssl
- SSL用にポートマッピングを変更している
- ホストOSの8443ポート(デフォルト、環境変数で設定)とコンテナ(Nginx)の443ポート
- なお、環境変数を使って8443にしているのは個人的な都合で深い意味は無いので、必要に応じて変更する
- 証明書・鍵の入った
web/sslディレクトリはNginxコンテナの/etc/nginx/sslにマウントしている- ここのパス・ファイル名も後でNginxの設定内で使用する
web/ssl(鍵・証明書)
web
└── ssl
    ├── server.crt
    └── server.key
↑のserver.crtとserver.keyに対応するものを予め用意しておいてweb/sslディレクトリにそれぞれ配置しておく
今回の例ではスクリプト(ワンライナー)でオレオレ証明書を自動生成したものをそのまま配置している:
# !/usr/bin/env sh

openssl req -batch -new -x509 -newkey rsa:4096 -nodes -sha256 \
  -subj /CN=example.com/O=example -days 3650 \
  -keyout ./server.key \
  -out ./server.crt
web/conf.d/app.conf
Nginxの設定ファイルを書き換える。
upstream backend {
    server app:8000;
}

server {
    listen 443 ssl;
    ssl_certificate     /etc/nginx/ssl/server.crt;
    ssl_certificate_key /etc/nginx/ssl/server.key;
    ssl_protocols        TLSv1.2 TLSv1.3;

    # server_name  _;
    index index.html index.htm;

    location / {
        proxy_set_header    Host    $http_host;
        proxy_set_header    X-Real-IP    $remote_addr;
        proxy_set_header    X-Forwarded-Host      $http_host;
        proxy_set_header    X-Forwarded-Server    $http_host;
        proxy_set_header    X-Forwarded-Server    $host;
        proxy_set_header    X-Forwarded-For    $proxy_add_x_forwarded_for;
        proxy_set_header    X-Forwarded-Proto  $scheme;
        proxy_redirect      http:// https://;

        proxy_pass http://backend;
    }

    # log
    # access_log /var/log/nginx/access.log;
    # error_log /var/log/nginx/error.log;
}

server_tokens off;
クリティカルな変更点:
-
listen 80だった部分を以下のように書き換えることで、コンテナ内にvolumeマウントして配置した鍵・証明書を指定してHTTPSにしている - ついでにTLSのバージョンも制限している
    listen 443 ssl;
    ssl_certificate     /etc/nginx/ssl/server.crt;
    ssl_certificate_key /etc/nginx/ssl/server.key;
    ssl_protocols        TLSv1.2 TLSv1.3;
-
location /内のproxy_***を修正・追加などしている- やったのがそこそこ前なのと、かなり試行錯誤した関係で詳細はあまり覚えていない。。。
- なので不要な設定などが混じっているかもしれない。。。
        proxy_set_header    Host    $http_host;
        proxy_set_header    X-Real-IP    $remote_addr;
        proxy_set_header    X-Forwarded-Host      $http_host;
        proxy_set_header    X-Forwarded-Server    $http_host;
        proxy_set_header    X-Forwarded-Server    $host;
        proxy_set_header    X-Forwarded-For    $proxy_add_x_forwarded_for;
        proxy_set_header    X-Forwarded-Proto  $scheme;
        proxy_redirect      http:// https://;
とりあえずこれで
docker-compose up -d
を実行して、 https://localhost:8443 (ポートは自分で設定したもの)などにアクセスするとhttps通信化されていることが確認出来る
2. (おまけ)NginxでBASIC認証
ついでにBASIC認証くらいまでかけておく
- 予め
.htpasswdを生成しておく- 例えば
echo "user:"$(openssl passwd password) >> /path/to/.htpasswdのような感じ - なお、
.htpasswdの内容自体はApache httpdなどと同様
- 例えば
- 置き場所はある程度任意だが、今回は
web/conf.d内に置いた:
.
├── app
├── docker-compose.yml
└── web
    ├── conf.d
    |   ├── .htpasswd
    │   └── app.conf
    └── ssl
-
web/conf.d/app.confに追記:
upstream backend {
    server app:8000;
}

server {
    listen 443 ssl;
    ssl_certificate     /etc/nginx/ssl/server.crt;
    ssl_certificate_key /etc/nginx/ssl/server.key;
    ssl_protocols        TLSv1.2 TLSv1.3;

    # basic-auth
    auth_basic "BASIC AUTH";
    auth_basic_user_file /etc/nginx/conf.d/.htpasswd;

    # server_name  _;
    index index.html index.htm;

    location / {
        proxy_set_header    Host    $http_host;
        proxy_set_header    X-Real-IP    $remote_addr;
        proxy_set_header    X-Forwarded-Host      $http_host;
        proxy_set_header    X-Forwarded-Server    $http_host;
        proxy_set_header    X-Forwarded-Server    $host;
        proxy_set_header    X-Forwarded-For    $proxy_add_x_forwarded_for;
        proxy_set_header    X-Forwarded-Proto  $scheme;
        proxy_redirect      http:// https://;

        proxy_pass http://backend;
    }

    # log
    # access_log /var/log/nginx/access.log;
    # error_log /var/log/nginx/error.log;
}

server_tokens off;
↑追記したのは以下:
    # basic-auth
    auth_basic "BASIC AUTH";
    auth_basic_user_file /etc/nginx/conf.d/.htpasswd;
-
auth_basicの内容は認証を求められるときの文字列として出てくることがある(多分ブラウザに依る)ので、適宜書き換えておく -
auth_basic_user_fileでコンテナ内にvolumeマウントしてある.htpasswdのパスを指定して読み込んでいる
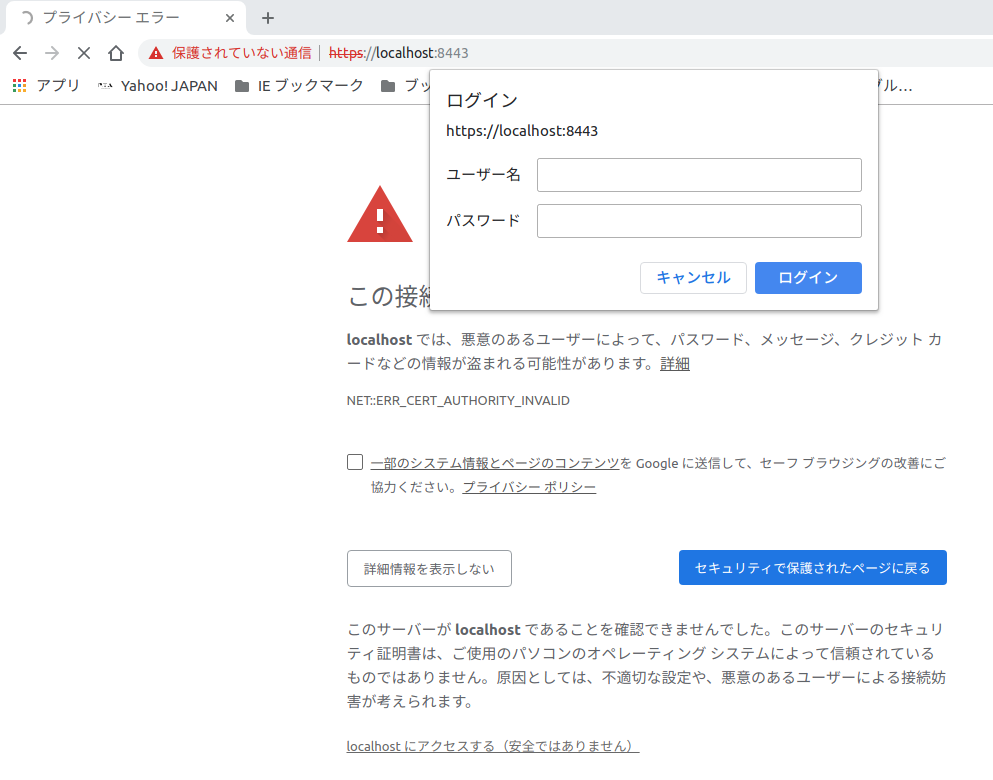
これで、例えば以下のような感じで認証がつく:
(※今回はオレオレ証明書なので警告が出ている)
参考
-
Nginx リバースプロキシ設定
- https://qiita.com/uezo/items/847e1911ac486f5a89c4
- https://qiita.com/imoimo2009/items/515ceaeea5aeb1bade3a
- https://qiita.com/tnoce/items/ded6d3d298da5972ab63
- https://ja.nuxtjs.org/faq/nginx-proxy/
- https://blog.akagi.jp/archives/3883.html
- https://www.busterworks.co.jp/archives/64
- https://threetreeslight.com/posts/2014/03/14/nginx%E3%81%A7ssl-reverse-proxy%E8%A8%AD%E5%AE%9A/
- https://tech-lab.sios.jp/archives/9922
-
Nginxでhttpからhttpsへリダイレクト
-
NginxにおけるBASIC認証
-
.htpasswd生成 -
オレオレ証明書のワンライナー
