まずはじめに
LGTM 乞食なのでよろしくお願いします¥
この記事の目的
Nginxを使ったリバースプロキシをLet's Encryptの無料証明書付きで構築していきます。
独自ドメインの /(root) ディレクトリにアクセスしたとき、Qiitaのトップページにアクセスする設定をしていきます。
Overview
- NGINXとLet's Encryptの紹介
- インフラの準備(AlibabaCloud)
- NGINXリポジトリの追加〜NGINXのインストール
- NGINXの設定(リバースプロキシ)
- SSL証明書(Let's Encrypt)の準備
- SSL証明書の設定
- 最後に
NGINXとLet's Encryptの紹介
NGINX

Wikipediaより
nginx(「エンジンエックス」のように発音[3])は、フリーかつオープンソースなWebサーバである。処理性能・高い並行性・メモリ使用量の小ささに焦点を当てて開発されており、HTTP, HTTPS, SMTP, POP3, IMAPのリバースプロキシの機能や、ロードバランサ、HTTPキャッシュなどの機能も持つ。
nginxは、BSDライクライセンスでリリースされており、Linux、BSD系OS、macOS、Solaris、AIX、HP-UX、Microsoft Windowsで動作する。2004年にIgor Sysoevによって公開された。現在はNGINX Plusとしてnginxのエンタープライズ版の販売やサポートを行っているNginx, Inc.が管理している。
nginxは静的コンテンツ(つまりサーバ上のファイル)を高速に配信するように設計されている。また、リバースプロキシの機能を持つため、背後にWebアプリケーションサーバを配置して動的なコンテンツを配信したり、ソフトウェアロードバランサ[4]やHTTPキャッシュとしても使うこともできる。各種のウェブアプリケーション用インターフェース(FastCGI, uWSGI(英語版), Phusion Passengerなど)も標準でサポートしている。
Apache HTTP Serverがリクエストの処理にデフォルトでスレッドやプロセス指向のアプローチを用いている一方で、nginxは非同期(英語版)のイベント駆動アプローチを用いている。イベント駆動によるアプローチは、高負荷下において、より予測可能なパフォーマンスを提供すると考えられている[5]。
Let's Encrypt
Wikipediaより
Let's Encrypt(レッツ・エンクリプト)は、2016年4月に正式に開始された認証局である[1]。自動化された発行プロセスにより、TLSのX.509証明書の発行を無料で行っている[2][3]。
Let's Encryptは、すべてのWebサーバへの接続を暗号化することを目指したプロジェクトである[4]。支払い、サーバ設定、メールによる確認、証明書の更新といった作業を省略することで、TLS暗号化における設定や保守の複雑さを大幅に削減することを意図している[5]。LinuxのWebサーバーでは、HTTPSの暗号化の設定および証明書の入手・更新がわずか2つのコマンドによって可能である[6][7]。
このため、Let's EncryptのソフトウェアパッケージはDebianやUbuntuの公式リポジトリに含まれている[8][9]。MozillaやGoogleなどの主要なブラウザベンダーが現在主導しているHTTPS重視の方針は、Let's Encryptの利用可能性を見込んだものである[10][11]。このプロジェクトは、ウェブ全体の暗号化接続を達成する可能性のあるものであると認められている[12]。
完全自動化のため、ドメイン認証 (Domain Validation: DV) 型証明書のみ発行しており、企業認証 (Organization Validation: OV) 型やEV (Extended Validation) 型は提供していない[13]。日本語ドメインなどの国際化ドメイン名には対応する[14]。
Let's Encryptは、できる限り透明化することで信頼性を維持し、攻撃から保護するねらいがある。このため定期的に報告書を発行し[15]、全てのACMEトランザクションを公開し(たとえば Certificate Transparency などにより)、できる限りオープン標準とフリーソフトウェアを使用している[6]。
ACME v2とワイルドカード証明書(英語版)のサポートが2018年3月から開始された[16]。
Let's Encryptの中間証明書はIdenTrust(英語版)のルート証明書によってクロス署名されており、幅広いプラットフォームに対応している。ただし、フィーチャーフォンやニンテンドー3DSなど一部の端末は対応していない[17]。
インフラの準備(AlibabaCloud)
- GUIでECSを購入している前提です。
※サーバーさえ用意できれば何のプラットフォームでもOKです。
[root@nginx-redo /]# cat /etc/redhat-release
CentOS Linux release 7.7.1908 (Core)
NGINXの設定(リバースプロキシ)
- NGINXをインストールするためのyumリポジトリを追加していきます。
[root@nginx-redo]# vim /etc/yum.repos.d/nginx.repo
[nginx]
name=nginx repo
baseurl=http://nginx.org/packages/centos/7/$basearch/
gpgcheck=0
enabled=1
- NGINXをyum installします。
[root@nginx-redo]# yum -y install nginx
NGINXの設定(リバースプロキシ)
- Nginxの設定ファイルが存在する/etc/nginx/conf.dに移動
- ファイル確認
- default.confをcpしてserver.confとして新しく設定
[root@nginx-redo ~]# cd /etc/nginx/conf.d
[root@nginx-redo conf.d]# ls
default.conf
[root@nginx-redo conf.d]# cp default.conf server.conf
[root@nginx-redo conf.d]# ls
default.conf  server.conf
- vimで
server.confを編集していきます。
デフォルトの状態
server {
    listen       80;
    server_name  localhost;

    #charset koi8-r;
    #access_log  /var/log/nginx/host.access.log  main;

    location / {
        root   /usr/share/nginx/html;
        index  index.html index.htm;
    }

    #error_page  404              /404.html;

    # redirect server error pages to the static page /50x.html
    #
    error_page   500 502 503 504  /50x.html;
    location = /50x.html {
        root   /usr/share/nginx/html;
    }

    # proxy the PHP scripts to Apache listening on 127.0.0.1:80
    #
    #location ~ \.php$ {
    #    proxy_pass   http://127.0.0.1;
    #}

    # pass the PHP scripts to FastCGI server listening on 127.0.0.1:9000
    #
    #location ~ \.php$ {
    #    root           html;
    #    fastcgi_pass   127.0.0.1:9000;
    #    fastcgi_index  index.php;
    #    fastcgi_param  SCRIPT_FILENAME  /scripts$fastcgi_script_name;
    #    include        fastcgi_params;
    #}

    # deny access to .htaccess files, if Apache's document root
    # concurs with nginx's one
    #
    #location ~ /\.ht {
    #    deny  all;
    #}
}
テスト用に編集した状態
- コメントアウトは分かりづらいのですべて削除
- listenポートを
443に変更 - ssl を有効化(後ほどLet's Encrypteで設定しますが、先行してここでpathを入れてしまいます。)
-
location /でQiitaのトップページを指定 - location /.well-known
- ここではcertbotがアクセスした際の参照するディレクトリを指定しています
server {
    listen  443;
    ssl on;
    ssl_certificate /etc/letsencrypt/live/[YOUR DOMAIN]/fullchain.pem;
    ssl_certificate_key /etc/letsencrypt/live/[YOUR DOMAIN]/privkey.pem;
    server_name  localhost;

    location /.well-known {
        root  /var/www/tnoce/;
     }

    location / {
        proxy_pass https://qiita.com:443/;
     }

    error_page   500 502 503 504  /50x.html;
    location = /50x.html {
        root   /usr/share/nginx/html;
    }
}
SSL証明書(Let's Encrypt)の準備
注意点
進まれる前に以下を対応する必要があります。
- ドメイン取得済み
- DNSレコードの設定で対応するAレコードを登録済み
- certbotのyum installを実行
[root@nginx-redo ~]# yum -y install certbot
- 仮想webrootとなるディレクトリを作成(certbotが参照するディレクトリ)
mkdir -p /var/www/tnoce
- 証明書の発行
- Congratulations!となれば成功です。
[root@nginx-redo ~]# certbot certonly --webroot -w /var/www/tnoce -d [YOUR DOMAIN]
Saving debug log to /var/log/letsencrypt/letsencrypt.log
Plugins selected: Authenticator webroot, Installer None
Obtaining a new certificate
Performing the following challenges:
http-01 challenge for [YOUR DOMAIN]
Using the webroot path /var/www/tnoce for all unmatched domains.
Waiting for verification...
Cleaning up challenges

IMPORTANT NOTES:
 - Congratulations! Your certificate and chain have been saved at:
   /etc/letsencrypt/live/[YOUR DOMAIN]/fullchain.pem
   Your key file has been saved at:
   /etc/letsencrypt/live/[YOUR DOMAIN]/privkey.pem
   Your cert will expire on 2020-09-15. To obtain a new or tweaked
   version of this certificate in the future, simply run certbot
   again. To non-interactively renew *all* of your certificates, run
   "certbot renew"
 - If you like Certbot, please consider supporting our work by:

   Donating to ISRG / Let's Encrypt:   https://letsencrypt.org/donate
   Donating to EFF:                    https://eff.org/donate-le
- Nginxの再起動
[root@nginx-redo ~]# systemctl restart nginx
SSL証明書の更新
以下コマンドで対応できます。
今回はやりませんがcronにコマンドをセットすれば、周期的に実行して勝手に更新してくれるようになります。
certbot renew --webroot-path /var/www/tnoce/ --post-hook "systemctl reload nginx"
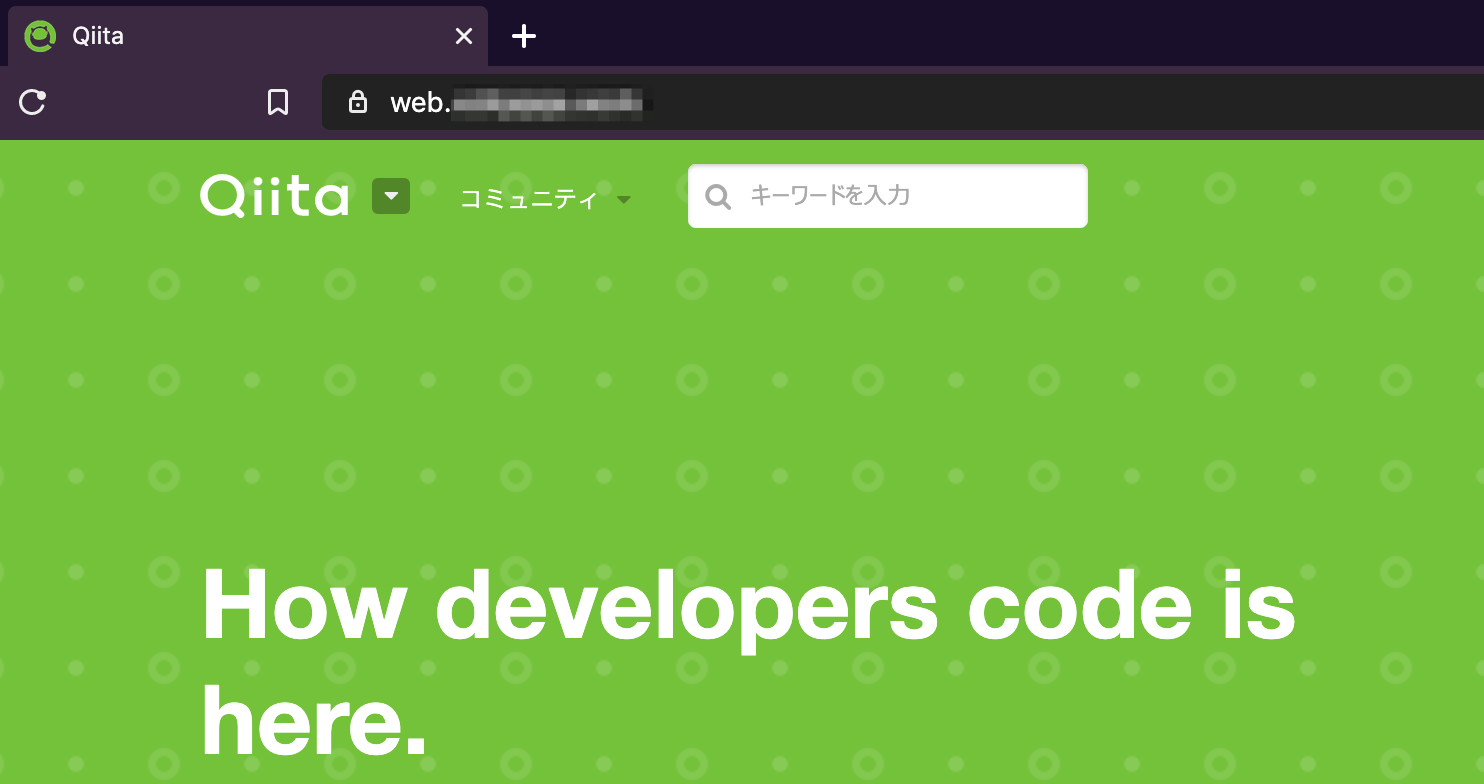
実際の画面へのアクセス
-
取得したドメインでqiitaのトップページが表示されました。
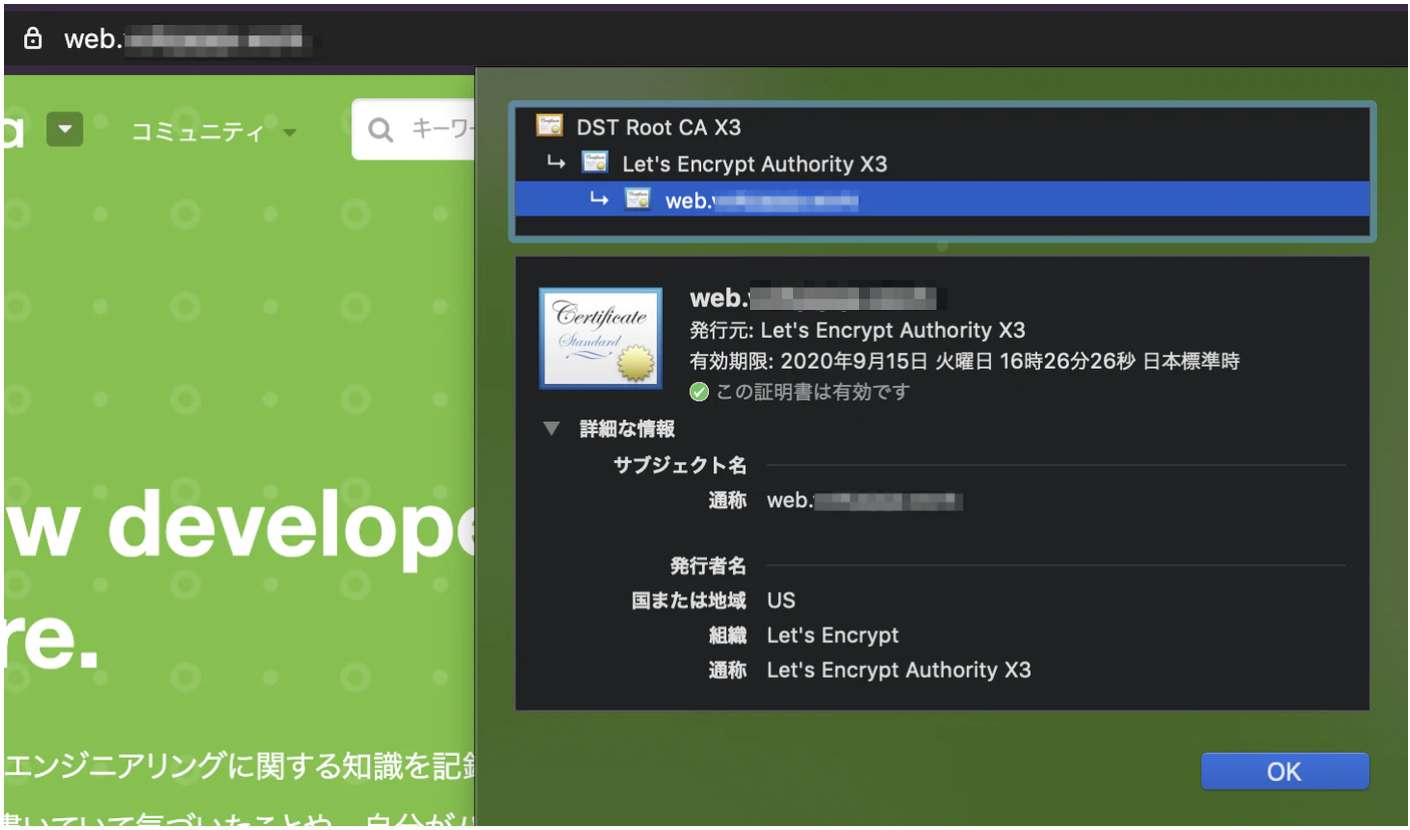
-
証明書も有効化されていますね。

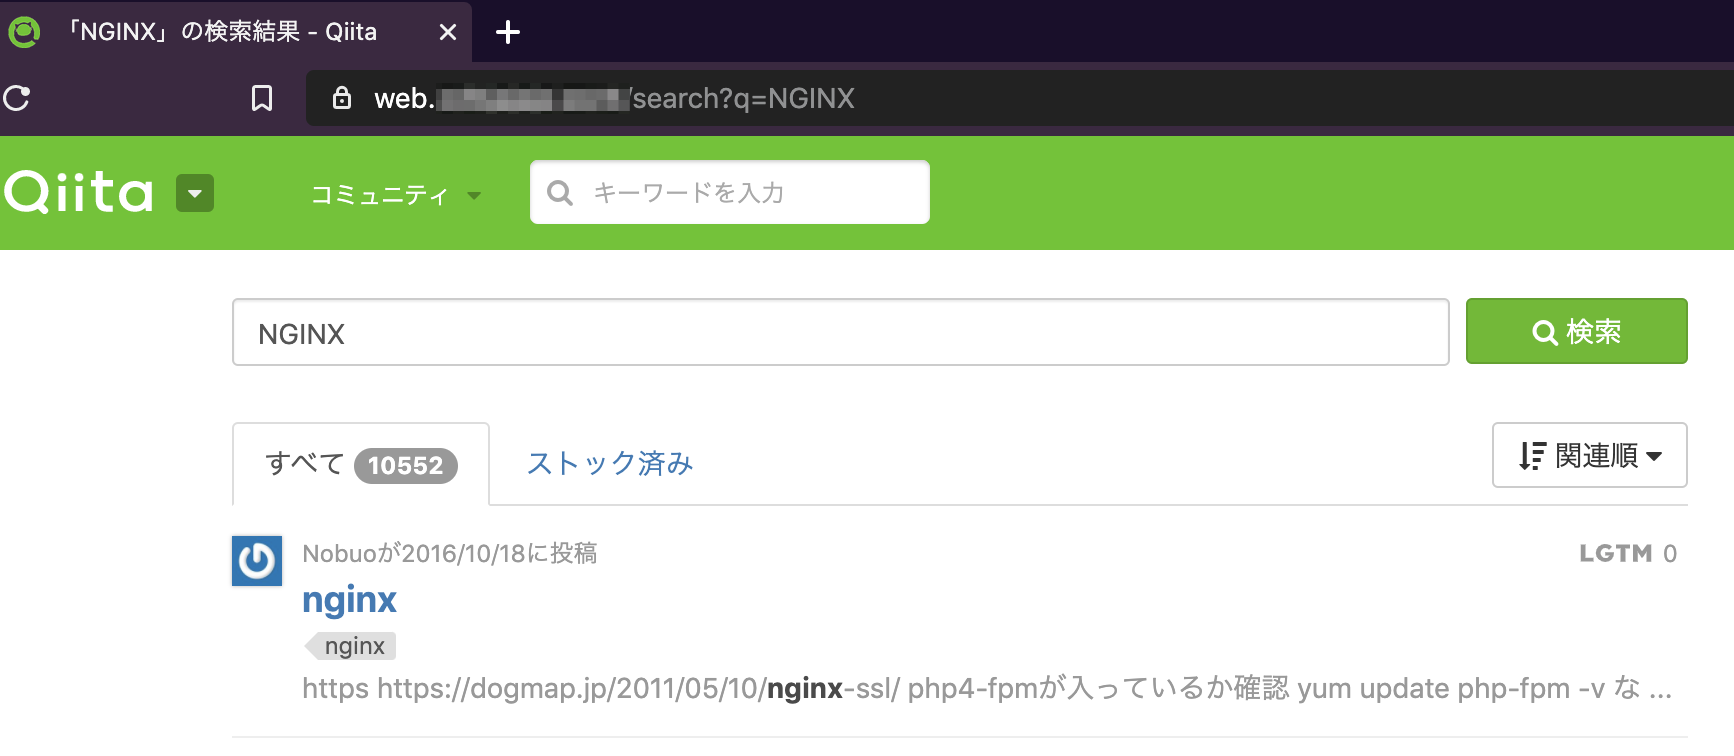
ページ遷移を試してみた所、リバースプロキシドメイン経由でアクセスができています。(ここもしっかりSSL化されている)
最後に
自身の備忘録として書いたものですが、どなたかの役に立てれば幸いです。
サーバー側のFWで80,443は開けておいてくださいね。