
以下のことについて知りたい人向けの記事。
①TensorFlowのチュートリアル(Deep MNIST for Experts)を自分の書いた数字で試す方法
②Windows7だけどLinux(Ubuntu)でTensorFlowの開発をする方法
ーTensorFlowはUbuntuで開発したほうがいろいろ良い点があるなーと思った
・GUI周りがしっかりと作りこまれている
ーTensorBoard(グラフの可視化機能)が簡単に使える
ーGUIアプリ開発が簡単
・apt-getで便利なライブラリやツールを簡単にインストールできる
ー元々Ubuntuの機能であるだけあってつまづくことが少ない
・Pythonで音を出せる
ーこれで音声処理がはかどる
ーPyAudioを使う
ーWindowのDocker環境で音出すのはあきらめました
ーこの機会にWindows7とUbuntuのデュアルブート環境を構築する
③LinuxでGUI開発をする方法
ーコマンドで結果見せられても深層学習の凄さが伝わりづらい
ーわかりやすいGUIアプリを作ってしまおう
開発環境(Ubuntu):
OS:Ubuntu 16.04 LTS 64bit
CPU:Core i7-5500U @ 2.40GHz × 4
GPU:標準Intel HD Graphics 5500
メモリ:8GB
言語:Python 2.7.12
以下の構成で記述する。
1.開発環境の構築
2.成果物
3.方法の解説
4.実験
5.考察
6.まとめ
1.開発環境を構築する
1-1.Windows7とUbuntuのデュアルブート環境を構築
Windows7にUbuntuをデュアルブートで入れるにはWubiというインストーラを使うのが簡単だ。WubiはWindowsユーザのためのUbuntuインストーラである。これを使えば他のWindowsアプリケーションと同じようにUbuntuをインストールしたり、アンインストールすることができる。おまけにWindowsとの共有フォルダもあって便利。
参考サイト:https://wiki.ubuntulinux.jp/UbuntuTips/Install/WubiGuide
1-2.TensorFlowのインストール
Pythonは標準で入っているので、以下のサイトを参考にTensorFlowをインストールする。今回GPUは使わずにCPUのみの方をインストールする。
参考サイト:http://qiita.com/yudsuzuk/items/092c38fee18e4484ece9
会社のPCなどの場合、毎度のことだが、この辺からプロキシ設定でつまづくことになる。以下のページを参考に設定する。exportするとか、sudoのあとに-Eつけるとか。
参考サイト:http://qiita.com/showsuzu/items/9ee031208d38ff8ac889
UbuntuのSystem Settings画面でのプロキシの設定もする。
1-3.その他のライブラリのインストール
以下のコマンドを実行し、必要なライブラリをapt-getでインストールする。加えて、後で使いそうなので入れておくものや、最初から入ってるが一応確かめておくものも示す。(これで全部だといいけど...)
sudo apt-get install libopencv-dev
sudo apt-get install python-opencv
sudo apt-get install python-scipy
sudo apt-get install python-matplotlib
sudo apt-get install python-numpy
1-4.GUIアプリケーション作成のためのライブラリとツール
PyQt4とGUIを簡単に作成するためのツールQt Designerをインストールするために、以下のコマンドを実行し、GUIアプリケーションの開発環境を整える。
sudo apt-get install python-qt4
sudo apt-get install qt4-designer
2.成果物
作成したアプリケーションはGitHubにアップロードしている。gitを使える人は以下のコマンドでダウンロードできる。
sudo git clone https://github.com/jintaka1989/DeepMnistGuiApp.git
UbuntuとOSXで動作確認をした。ただし、OSXは上記の必要なライブラリをインストールするのに少々手間取った。apt-getがないのでbrewとかpipなどを使った。動作確認するだけならqt4-designerは必要ない。気が向いたらOSX用に別に説明をする。
作成したアプリケーションの実行結果を図1に示す。
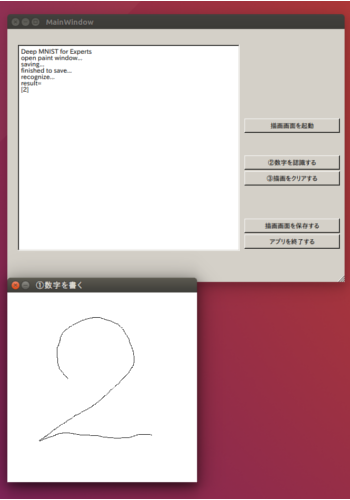
図1 DeepMnistGuiAppの実行結果
2-1.動作の説明
ターミナルで以下のコマンドによりプログラムを実行する。
sudo python main.py
a.「描画画面を起動」ボタンを押す
・「①数字を書く」画面が表示される
b.「①数字を書く」画面にマウスで数字を書く
c.「②数字を認識する」ボタンを押す
・描画画面と認識のためをの前処理の結果の画像が保存される
・左側テキストボックスに手書き数字を認識した結果(0~9)が表示される
d.「③描画をクリアする」ボタンを押す
・画像データがクリアされる
・「①数字を書く」画面が再表示される
・(b.から始めることができる)
e.「描画画面を保存する」ボタンを押す
・描画画面と認識のための前処理の結果の画像が保存される
f.「アプリを終了する」ボタンを押す
・TensorFlowのセッションが閉じられる
・アプリケーションが終了する
2-2.注意事項
2-2-1.学習済みのモデルを使用している
ボタンを押すたびに機械学習しているわけではなく、あらかじめ10000stepほど学習したモデルを使っている。これは学習しながらだと処理が重いためである。学習したモデルを生成するプログラムは「double_layer_model_creator.py」である。20000stepの学習などをしてもっと精度を高めたい場合はこれを実行してckptファイルを生成する。
10000stepほど学習したモデルの認識率はMNISTのテストデータで99.11%だが、自分の書いた文字でやってみると、やはり認識率が低くなるようだ。
2-2-2.枠をはみ出るとダメ
枠をはみ出て数字を書くとエラーなので「③描画をクリアする」ボタンを押して書き直す。
3.方法の解説
3-1.モデルを生成する
TensorFlowのチュートリアル(Deep MNIST for Experts)を参考にdouble_layer_model_creator.pyを作成した。これを実行することで、学習したモデルを保存するckptファイルが生成される。コードを以下に示す。
# from __future__ import absolute_import, unicode_literals

from tensorflow.examples.tutorials.mnist import input_data
mnist = input_data.read_data_sets("MNIST_data/", one_hot=True)

import tensorflow as tf

sess = tf.InteractiveSession()

x = tf.placeholder(tf.float32,[None,784])
W = tf.Variable(tf.zeros([784,10]), name = "W")
# b = tf.Variable(tf.zeros([10]), name = "b")
y_ = tf.placeholder(tf.float32,[None,10])
# sess.run(tf.initialize_all_variables())
# y = tf.nn.softmax(tf.matmul(x,W)+b)
# cross_entropy = -tf.reduce_sum(y_*tf.log(y))
#
# train_step = tf.train.GradientDescentOptimizer(0.01).minimize(cross_entropy)

# for i in range(1000):
   #batch = mnist.train.next_batch(50)
   #train_step.run(feed_dict={x: batch[0], y_: batch[1]})
   ##print tf.argmax(y, 1)

# correct_prediction = tf.equal(tf.argmax(y,1),tf.argmax(y_,1))
# accuracy = tf.reduce_mean(tf.cast(correct_prediction, "float"))

# print accuracy.eval(feed_dict={x: mnist.test.images, y_: mnist.test.labels})

def weight_variable(shape):
	initial = tf.truncated_normal(shape, stddev=0.1)
	return tf.Variable(initial)

def bias_variable(shape):
	initial = tf.constant(0.1, shape=shape)
	return tf.Variable(initial)

def conv2d(x, W):
	return tf.nn.conv2d(x, W, strides=[1,1,1,1], padding='SAME')

def max_pool_2x2(x):
	return tf.nn.max_pool(x, ksize=[1,2,2,1],strides=[1,2,2,1], padding='SAME')

# first layer
W_conv1 = weight_variable([5, 5, 1, 32])
b_conv1 = bias_variable([32])

x_image = tf.reshape(x, [-1,28,28,1])

h_conv1 = tf.nn.relu(conv2d(x_image, W_conv1) + b_conv1)
h_pool1 = max_pool_2x2(h_conv1)

# second layer
W_conv2 = weight_variable([5, 5, 32, 64])
b_conv2 = bias_variable([64])

h_conv2 = tf.nn.relu(conv2d(h_pool1, W_conv2) + b_conv2)
h_pool2 = max_pool_2x2(h_conv2)

#
W_fc1 = weight_variable([7 * 7 * 64, 1024])
b_fc1 = bias_variable([1024])

h_pool2_flat = tf.reshape(h_pool2, [-1, 7*7*64])
h_fc1 = tf.nn.relu(tf.matmul(h_pool2_flat, W_fc1) + b_fc1)

# Drop out
keep_prob = tf.placeholder("float")
h_fc1_drop = tf.nn.dropout(h_fc1, keep_prob)

W_fc2 = weight_variable([1024,10])
b_fc2 = bias_variable([10])
y_conv=tf.nn.softmax(tf.matmul(h_fc1_drop, W_fc2) + b_fc2)


cross_entropy = -tf.reduce_sum(y_*tf.log(y_conv))
train_step = tf.train.AdamOptimizer(1e-4).minimize(cross_entropy)
correct_prediction = tf.equal(tf.argmax(y_conv,1),tf.argmax(y_,1))
accuracy = tf.reduce_mean(tf.cast(correct_prediction, "float"))

saver = tf.train.Saver()

sess.run(tf.initialize_all_variables())
# original = 20000
for i in range(20000):
	batch = mnist.train.next_batch(50)
	if i%100 == 0:
		train_accuracy = accuracy.eval(feed_dict={
			x:batch[0], y_: batch[1], keep_prob: 1.0})
		print "step %d, training accuracy %g"%(i, train_accuracy)
	train_step.run(feed_dict={x: batch[0], y_: batch[1], keep_prob: 0.5})

print "test accuracy %g"%accuracy.eval(feed_dict={
	x: mnist.test.images, y_: mnist.test.labels, keep_prob: 1.0})

saver.save(sess, "double_layer_model.ckpt")

sess.close()
3-2.画面を作る
PyQt4とQt Desingnerを使って画面を作る。以下のサイトを参考にした。
python + PyQt4 + Qt DesignerでGUIアプリ:http://domnikki.hateblo.jp/entry/2016/04/07/005006
画面deep_minist.uiを作ったあと、convert_qt.pyを実行して、deep_mnist.pyを生成し、Pythonで使えるようにする。それぞれのコードを以下に示す。
# -*- coding: utf-8 -*-
from PyQt4 import uic

fin = open('deep_mnist.ui', 'r')
fout = open('deep_mnist.py', 'w')
uic.compileUi(fin,fout,execute=False)
fin.close()
fout.close()
# -*- coding: utf-8 -*-

# Form implementation generated from reading ui file 'deep_mnist.ui'
#
# Created by: PyQt4 UI code generator 4.11.4
#
# WARNING! All changes made in this file will be lost!

from PyQt4 import QtCore, QtGui

try:
    _fromUtf8 = QtCore.QString.fromUtf8
except AttributeError:
    def _fromUtf8(s):
        return s

try:
    _encoding = QtGui.QApplication.UnicodeUTF8
    def _translate(context, text, disambig):
        return QtGui.QApplication.translate(context, text, disambig, _encoding)
except AttributeError:
    def _translate(context, text, disambig):
        return QtGui.QApplication.translate(context, text, disambig)

class Ui_MainWindow(object):
    def setupUi(self, MainWindow):
        MainWindow.setObjectName(_fromUtf8("MainWindow"))
        MainWindow.resize(640, 480)
        self.centralwidget = QtGui.QWidget(MainWindow)
        self.centralwidget.setObjectName(_fromUtf8("centralwidget"))
        self.button_exit = QtGui.QPushButton(self.centralwidget)
        self.button_exit.setGeometry(QtCore.QRect(450, 390, 181, 27))
        self.button_exit.setObjectName(_fromUtf8("button_exit"))
        self.pushButtonPaintImage = QtGui.QPushButton(self.centralwidget)
        self.pushButtonPaintImage.setGeometry(QtCore.QRect(450, 170, 181, 27))
        self.pushButtonPaintImage.setObjectName(_fromUtf8("pushButtonPaintImage"))
        self.pushButtonSaveImage = QtGui.QPushButton(self.centralwidget)
        self.pushButtonSaveImage.setGeometry(QtCore.QRect(450, 360, 181, 27))
        self.pushButtonSaveImage.setObjectName(_fromUtf8("pushButtonSaveImage"))
        self.textEdit = QtGui.QTextEdit(self.centralwidget)
        self.textEdit.setGeometry(QtCore.QRect(20, 30, 421, 391))
        self.textEdit.setObjectName(_fromUtf8("textEdit"))
        self.widget = QtGui.QWidget(self.centralwidget)
        self.widget.setGeometry(QtCore.QRect(520, 30, 81, 131))
        self.widget.setObjectName(_fromUtf8("widget"))
        self.pushButtonClear = QtGui.QPushButton(self.centralwidget)
        self.pushButtonClear.setGeometry(QtCore.QRect(450, 270, 181, 27))
        self.pushButtonClear.setObjectName(_fromUtf8("pushButtonClear"))
        self.pushButtonRecognizeNumber = QtGui.QPushButton(self.centralwidget)
        self.pushButtonRecognizeNumber.setGeometry(QtCore.QRect(450, 240, 181, 27))
        self.pushButtonRecognizeNumber.setObjectName(_fromUtf8("pushButtonRecognizeNumber"))
        MainWindow.setCentralWidget(self.centralwidget)
        self.menubar = QtGui.QMenuBar(MainWindow)
        self.menubar.setGeometry(QtCore.QRect(0, 0, 640, 25))
        self.menubar.setObjectName(_fromUtf8("menubar"))
        MainWindow.setMenuBar(self.menubar)
        self.statusbar = QtGui.QStatusBar(MainWindow)
        self.statusbar.setObjectName(_fromUtf8("statusbar"))
        MainWindow.setStatusBar(self.statusbar)

        self.retranslateUi(MainWindow)
        QtCore.QMetaObject.connectSlotsByName(MainWindow)

    def retranslateUi(self, MainWindow):
        MainWindow.setWindowTitle(_translate("MainWindow", "MainWindow", None))
        self.button_exit.setText(_translate("MainWindow", "アプリを終了する", None))
        self.pushButtonPaintImage.setText(_translate("MainWindow", "描画画面を起動", None))
        self.pushButtonSaveImage.setText(_translate("MainWindow", "描画画面を保存する", None))
        self.pushButtonClear.setText(_translate("MainWindow", "③描画をクリアする", None))
        self.pushButtonRecognizeNumber.setText(_translate("MainWindow", "②数字を認識する", None))
3-3.マウスカーソルで直接描画できる画面を作る
以下のサイトを参考にQWidgetクラスを拡張した描画画面を作る。
PyQtでのグラフィックス その1 (QWidgetに直接描画する):http://bravo.hatenablog.jp/entry/2016/02/07/084048
作成したモジュールファイルwidget_painted.pyを以下に示す。
   # Copyright 2016 Satoshi TAKAGI <jintaka198912@gmail.com>
   #
   # Licensed under the Apache License, Version 2.0 (the "License");
   # you may not use this file except in compliance with the License.
   # You may obtain a copy of the License at
   #
   #     http://www.apache.org/licenses/LICENSE-2.0
   #
   # Unless required by applicable law or agreed to in writing, software
   # distributed under the License is distributed on an "AS IS" BASIS,
   # WITHOUT WARRANTIES OR CONDITIONS OF ANY KIND, either express or implied.
   # See the License for the specific language governing permissions and
   # limitations under the License.

import sys
from PyQt4.QtCore import *
from PyQt4.QtGui import *
import cv2
import numpy
import pdb
import scipy

class PaintedWidget(QWidget):
    def __init__(self, parent=None):
        QWidget.__init__(self, parent)
        self.px = None
        self.py = None
        self.points = []
        self.psets = []
        self.points_saved = []

    def mousePressEvent(self, event):
        self.points.append(event.pos())
        self.update()

    def mouseMoveEvent(self, event):
        self.points.append(event.pos())
        self.update()

    def mouseReleaseEvent(self, event):
        self.pressed = False
        self.psets.append(self.points)
        self.points_saved.extend(self.points)
        self.points = []
        self.update()

    def paintEvent(self, event):
        painter = QPainter(self)
        painter.setPen(Qt.NoPen)
        painter.setBrush(Qt.white)
        painter.drawRect(self.rect())

        painter.setPen(Qt.black)

        # draw historical points
        for points in self.psets:
            painter.drawPolyline(*points)

        # draw current points
        if self.points:
            painter.drawPolyline(*self.points)
3-4.TensorFlowを用いて手書き数字の認識処理を行う関数を作る
double_layer_model_creator.pyを参考に手書き数字の認識処理を行う関数を作る。作成したmnist_recognizer.pyモジュールはimportされた時点で、あらかじめ作られたモデル(ckptファイル)を読み込む。そして、28*28画像を引数にmnist_recognizer()関数を使うことにより、認識した数字を返すことができる。
以下にmnist_recognizer.pyのコードを示す。
   # Copyright 2016 Satoshi TAKAGI <jintaka198912@gmail.com>
   #
   # Licensed under the Apache License, Version 2.0 (the "License");
   # you may not use this file except in compliance with the License.
   # You may obtain a copy of the License at
   #
   #     http://www.apache.org/licenses/LICENSE-2.0
   #
   # Unless required by applicable law or agreed to in writing, software
   # distributed under the License is distributed on an "AS IS" BASIS,
   # WITHOUT WARRANTIES OR CONDITIONS OF ANY KIND, either express or implied.
   # See the License for the specific language governing permissions and
   # limitations under the License.

from tensorflow.examples.tutorials.mnist import input_data
mnist = input_data.read_data_sets("MNIST_data/", one_hot=True)

import tensorflow as tf
from PIL import Image
import numpy as np
import cv2

import pdb

sess = tf.InteractiveSession()

x = tf.placeholder(tf.float32,[None,784])
W = tf.Variable(tf.zeros([784,10]), name = "W")
# b = tf.Variable(tf.zeros([10]), name = "b")
y_ = tf.placeholder(tf.float32,[None,10])

def weight_variable(shape):
	initial = tf.truncated_normal(shape, stddev=0.1)
	return tf.Variable(initial)

def bias_variable(shape):
	initial = tf.constant(0.1, shape=shape)
	return tf.Variable(initial)

def conv2d(x, W):
	return tf.nn.conv2d(x, W, strides=[1,1,1,1], padding='SAME')

def max_pool_2x2(x):
	return tf.nn.max_pool(x, ksize=[1,2,2,1],strides=[1,2,2,1], padding='SAME')

# first layer
W_conv1 = weight_variable([5, 5, 1, 32])
b_conv1 = bias_variable([32])

x_image = tf.reshape(x, [-1,28,28,1])

h_conv1 = tf.nn.relu(conv2d(x_image, W_conv1) + b_conv1)
h_pool1 = max_pool_2x2(h_conv1)

# second layer
W_conv2 = weight_variable([5, 5, 32, 64])
b_conv2 = bias_variable([64])

h_conv2 = tf.nn.relu(conv2d(h_pool1, W_conv2) + b_conv2)
h_pool2 = max_pool_2x2(h_conv2)

#
W_fc1 = weight_variable([7 * 7 * 64, 1024])
b_fc1 = bias_variable([1024])

h_pool2_flat = tf.reshape(h_pool2, [-1, 7*7*64])
h_fc1 = tf.nn.relu(tf.matmul(h_pool2_flat, W_fc1) + b_fc1)

# Drop out
keep_prob = tf.placeholder("float")
h_fc1_drop = tf.nn.dropout(h_fc1, keep_prob)

W_fc2 = weight_variable([1024,10])
b_fc2 = bias_variable([10])
y_conv=tf.nn.softmax(tf.matmul(h_fc1_drop, W_fc2) + b_fc2)

cross_entropy = -tf.reduce_sum(y_*tf.log(y_conv))
train_step = tf.train.AdamOptimizer(1e-4).minimize(cross_entropy)
correct_prediction = tf.equal(tf.argmax(y_conv,1),tf.argmax(y_,1))
accuracy = tf.reduce_mean(tf.cast(correct_prediction, "float"))

sess.run(tf.initialize_all_variables())

saver = tf.train.Saver()

saver.restore(sess, "double_layer_model.ckpt")

def mnist_recognizer(image):
	image = 1.0 - np.asarray(image, dtype="float32") / 255
	image = image.reshape((1,784))

	answer = tf.argmax(y_conv,1)
	result = sess.run(answer, feed_dict={x: image, keep_prob: 1.0})

	return result

def close():
	sess.close()
3-5.これまで作成したモジュールを呼び出すメインのプログラムを作る
メインのプログラムを作成する。「②数字を認識する」ボタンが押されるとMainWindowクラスのrecognize_number()関数の処理が行われる。まず、ペイントした画像をMNISTの画像のように、縮小する前処理を行っている。この処理ではモデルが認識しやすいように画像を加工することが求められる。今回は、膨張処理、縮小処理、2値化による強調処理を行っている。
以下にmain.pyのコードを示す。
# -*- coding: utf-8 -*-

   # Copyright 2016 Satoshi TAKAGI <jintaka198912@gmail.com>
   #
   # Licensed under the Apache License, Version 2.0 (the "License");
   # you may not use this file except in compliance with the License.
   # You may obtain a copy of the License at
   #
   #     http://www.apache.org/licenses/LICENSE-2.0
   #
   # Unless required by applicable law or agreed to in writing, software
   # distributed under the License is distributed on an "AS IS" BASIS,
   # WITHOUT WARRANTIES OR CONDITIONS OF ANY KIND, either express or implied.
   # See the License for the specific language governing permissions and
   # limitations under the License.

import sys
import cv2
import numpy as np
from PIL import Image
import scipy
import deep_mnist
import mnist_recognizer

from widget_painted import *
from PyQt4 import QtCore, QtGui
from PyQt4.QtCore import *
from PyQt4.QtGui import *
from scipy import ndimage

try:
    _fromUtf8 = QtCore.QString.fromUtf8
except AttributeError:
    def _fromUtf8(s):
        return s

try:
    _encoding = QtGui.QApplication.UnicodeUTF8
    def _translate(context, text, disambig):
        return QtGui.QApplication.translate(context, text, disambig, _encoding)
except AttributeError:
    def _translate(context, text, disambig):
        return QtGui.QApplication.translate(context, text, disambig)

width = 1200
height = 200
paint_width = 360
paint_height = 360
mnist_width = 28
mnist_height = 28
mnist_size = (mnist_width, mnist_height)

# 16*16近傍の定義
kernel = np.ones((16, 16), np.uint8)

class MainWindow(QtGui.QMainWindow, deep_mnist.Ui_MainWindow):
    def __init__(self):
        super(self. __class__, self).__init__()
        self.setupUi(self)
        self.move(width,height)
        self.textEdit.setText("Deep MNIST for Experts")
        self.image = np.zeros((paint_width, paint_height,3), np.uint8)
        self.image = cv2.cvtColor(self.image, cv2.COLOR_RGB2GRAY)
        self.mnist_image = np.zeros((mnist_width, mnist_height,3), np.uint8)
        self.mnist_image = cv2.cvtColor(self.mnist_image, cv2.COLOR_RGB2GRAY)

    def paint_image(self):
        self.textEdit.append("open paint window...")
        view_paint.show()

        # TODO:Input画像(28*28)を表示
        # view_result.show()

    def saved(self):
        self.textEdit.append("saving...")

        for point in view_paint.points_saved:
            self.image[point.x(), point.y()] = 255

        # 上下反転
        self.image = cv2.flip(self.image, 0)
        # 時計回り回転
        self.image = ndimage.rotate(self.image, 270)
        # cv2.imwrite("out_put.bmp", self.image)
        # 膨張処理
        image_dilation = cv2.dilate(self.image, kernel, iterations = 1)
        cv2.imwrite("dilation.bmp", image_dilation)
        # 縮小処理
        self.mnist_image = cv2.resize(image_dilation, mnist_size)
        cv2.imwrite("mnist.bmp", self.mnist_image)
        # 2値化で強調、BINARY_INVで反転し、白背景で黒文字にする
        ret,thre_image = cv2.threshold(self.mnist_image, 5, 255, cv2.THRESH_BINARY_INV)
        cv2.imwrite("thre_image.bmp",thre_image)

        self.textEdit.append("finished to save...")

    def recognize_number(self):
        self.textEdit.append("saving...")

        for point in view_paint.points_saved:
            self.image[point.x(), point.y()] = 255

        # 上下反転
        self.image = cv2.flip(self.image, 0)
        # 時計回り回転
        self.image = ndimage.rotate(self.image, 270)
        # cv2.imwrite("out_put.bmp", self.image)
        # 膨張処理
        image_dilation = cv2.dilate(self.image, kernel, iterations = 1)
        cv2.imwrite("dilation.bmp", image_dilation)
        # 縮小処理
        self.mnist_image = cv2.resize(image_dilation, mnist_size)
        cv2.imwrite("mnist.bmp", self.mnist_image)
        # 2値化で強調、BINARY_INVで反転し、白背景で黒文字にする
        ret,thre_image = cv2.threshold(self.mnist_image, 5, 255, cv2.THRESH_BINARY_INV)
        cv2.imwrite("thre_image.bmp",thre_image)

        self.textEdit.append("finished to save...")

        self.textEdit.append("recognize...")
        self.textEdit.append("result=")

        result = mnist_recognizer.mnist_recognizer(thre_image)
        self.textEdit.append(str(result))

        # スクロールを下に移動
        self.textEdit.verticalScrollBar().triggerAction(QtGui.QAbstractSlider.SliderToMaximum)

        self.image = np.zeros((paint_width, paint_height,3), np.uint8)
        self.image = cv2.cvtColor(self.image, cv2.COLOR_RGB2GRAY)
        self.mnist_image = np.zeros((mnist_width, mnist_height,3), np.uint8)
        self.mnist_image = cv2.cvtColor(self.mnist_image, cv2.COLOR_RGB2GRAY)

    def clear_points(self):
        self.textEdit.append("clear image...")
        view_paint.close()
        view_paint.__init__()
        view_paint.move(width,height+500)
        view_paint.setWindowTitle(_translate("", "①数字を書く", None))
        view_paint.setFixedSize(QSize(360,360))
        view_paint.show()

        self.image = np.zeros((paint_width, paint_height,3), np.uint8)
        self.image = cv2.cvtColor(self.image, cv2.COLOR_RGB2GRAY)
        self.mnist_image = np.zeros((mnist_width, mnist_height,3), np.uint8)
        self.mnist_image = cv2.cvtColor(self.mnist_image, cv2.COLOR_RGB2GRAY)

        self.textEdit.verticalScrollBar().triggerAction(QtGui.QAbstractSlider.SliderToMaximum)

    def  quit(self):
        print "close..."
        mnist_recognizer.close()

if __name__ == "__main__":
    app = QtGui.QApplication(sys.argv)
    form = MainWindow()
    form.show()
    view_paint = PaintedWidget()
    view_paint.move(width,height+500)
    view_paint.setWindowTitle(_translate("", "①数字を書く", None))
    view_paint.setFixedSize(QSize(360,360))
    view_result = QWidget()
    view_result.move(width+360,height+500)
    view_result.setWindowTitle(_translate("", "MNIST用画像に変換", None))
    view_result.setFixedSize(QSize(mnist_width,mnist_height))

    form.pushButtonPaintImage.clicked.connect(lambda: form.paint_image())
    form.pushButtonSaveImage.clicked.connect(lambda: form.saved())
    form.pushButtonRecognizeNumber.clicked.connect(lambda: form.recognize_number())
    form.pushButtonClear.clicked.connect(lambda: form.clear_points())
    form.button_exit.clicked.connect(app.quit)
    form.button_exit.clicked.connect(lambda: form.quit())

    app.exec_()
3-3.実行して動作を確認する
ターミナルで以下のコマンドを実行し、動作を確認する。
sudo python main.py
4.実験
実際に1から5までの数字を入れて認識させる。

図2 実験結果
概ね正解というところ。
失敗があるものも例として残しておく。8、9、0あたりの認識率が他の数字よりも低い気がする。

図3 失敗例
5.考察
以上の結果を踏まえて、気になったところや改善したい点などを考察する。
5-1.利点と欠点
まずはこのアプリケーションを作る利点と欠点を以下に示す。
利点:
■見た目にわかりやすい
■作るのが楽しかった、GUI最高。
■学習済みモデルを使用するのでレスポンスが早い
■OSXでも動いた
ーただし、それなりに環境を整えないといけない
欠点:
■開発環境整えるのは面倒
ーでもUbuntuじゃなかったらもっと面倒だったと思う。Ubuntu最高。
■適宜学習はしない
ー間違えた時に学習させるとかするといいかも
■Windowsで動くのか?
ー知りません
ーみんなに試してもらうならWebアプリの方がいいかも
5-2.気になった点
このアプリを動かしてみて気になった点を以下に示す。
■認識しにくい数字
ー0を認識しにくい
・意外にも0の認識率が低いように感じた
ー単純すぎて特徴が少ないから?
ー9は書き順で認識率が違うように感じた
・図3の成功例のような感じで書くと認識しやすい
・図3の失敗例のような感じで書くと認識しづらい
ーMNISTの9の書き順が前者のほうが多いからだろうか
・元データを眺めてみなきゃかぁ...
ー8,6など
・予想通り認識しづらい
ー8は複雑
ー6は丸があるという点で0にも8にも似ている、みようによっては5にも似ている
■認識しやすい数字
ー2、3
・正答率高い印象
6.まとめ
TensorFlowのチュートリアル(Deep MNIST for Experts)を自分の書いた数字で試すGUIアプリケーションを作成した。
やっぱり自分で書いた数字だと認識率が下がる。でも、こんなに簡単に作れる識別器でこのレベルのものはなかなかないのかなーとも思ったり。
ライセンスのなんちゃらを少し勉強したかったのでコードになんとなくTensorFlowと同じApache 2.0のライセンスの記述をしてみた。ライセンス記述方法の勉強になった。
このアプリを作って、TensorFlowというより、Linux開発環境周りに強くなったと感じている。今後、Pythonプログラムを試してもらいたいときはGUIに実装していきたい。
次は自分でTensorFlowモデルを作成してGUIに実装したい。顔認識などの画像処理とか、音響処理がやりたい。
以上